Saturday, September 24, 2022
Wedding Scrapbook Page
Welcome back and Nancy, here. Hundreds (if not thousands) are taken of the lovely bride & groom, the amazing venue, the beautiful flowers, & more! So of course, you end up with enough photos to fill an entire album. This requires a lot of wedding scrapbook pages, which means you need a lot of ideas! If you're stuck & need some inspiration, check out the gorgeous Stamperia-You and Me, and Mintay-Yes I Do collection available at The Rubber Buggy. This together-forever wedding scrapbook page will have you swooning over their special day with these gorgeous collections that have die cuts and pages of romantic, elegant and heartfelt details — see for yourself!
So I show up and take hundred of photos and go back to my laptop to edit through Adobe Lightroom and Photoshop. I even will add a decorative overlay of sparkles, etc. for that added touch of artistic and modern photo.
The easiest choice is to use the bride and groom's chosen wedding colors. Not only will this make your paper choices simple, but it's a great way to remember the wedding. These two beautiful paper collections are dedicated to weddings and ceremonies and are the perfect sets for adding elegant embellishments bridal dresses, wedding cake, flowers, tags and labels to your wedding scrapbook page that also had most of the wedding colors.


Overall, a scrapbook page is fairly simple to put together with the die cuts and gorgeous paper that are already designed for the theme of weddings. Istarted with a 12 x 12 piece of Mintay, Yes I Do cardstock. I cut out a doily from an ole die and cut out a circle of the photo and adhered together and glued to the center of the cardstock. Once I layed down the Stamperia and Mintay die cut pieces and chipboard around the doily without covering some of the images I wanted to show, I glued these down. I handmade some flowers and bow and adhered to the scrapbook page for the final touches.

Stamperia You and Me Paper Pad 12" x 12"
handmade flowers
Ribbon
feathers, doily
So get crafting and have a fabulous day and thanks for visiting.
The Rubber Buggy has the crafting supplies for your next project. So have fun crafting this weekend with these products. My cards and projects are always posted on Saturday. Keep watching and thank you so much for those wonderful comments as well as suggestions.
Enjoy and Happy Crafting!
 |
Saturday, September 17, 2022
Sizzix Colorlit Dies Halloween Cards
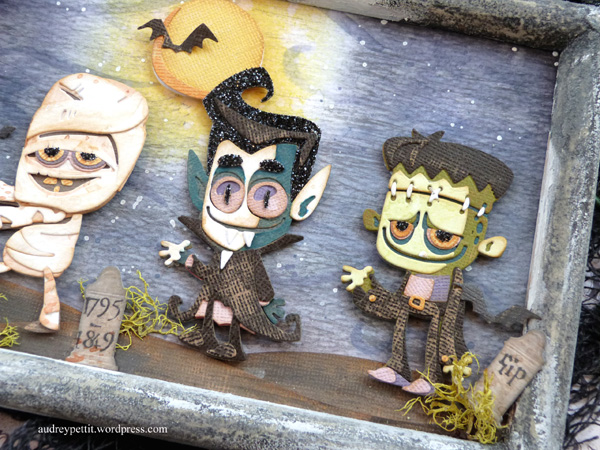
Happy Saturday, crafty friends, and thanks so much for stopping by! It’s now September and this is the time of year when my crafty ideas think of fall and Halloween. Today I wanted to share some of my Halloween cards made with Sizzix Tim Holtz Costume and Sizzix Tim Holtz Mischievous die sets along with the Simple Stories Elements October 31st patterned paper and Simple Stories Vintage October 31st stickers.


Can you even resist these cute little adorable little monsters? If you’re not familiar with Colorize, it’s basically layers of dies that you build up following the color code stamped on the back of each die. I used a combination of cardstock to build my monsters, and I love how the mix of surfaces adds contrasting visual texture to the finished design. And for even more fun, I added the Sizzix Tim Holtz Mischeaveous featuring eight curious cats that are perfect for adding spooky kitties to your Halloween cards. The set comes with 16 dies of eight cats and eight coordinating heads to make those kitties pop!
Sizzix has tutorials on putting these monsters together which I watched and followed. Just google it and the tutorial for each monster will show up on your computer. My first attempted for each monster assembly was a learning experience and had to do it twice to get it right. I would highly recommend to NOT do all of the cutting at once in the beginning since those little pieces get easily lost. Therefore, cut one die and glue to base before continuing to the next die that will be cut with a different colored cardstock. At first, you will refer to the tutorials and the color guideline to get you through the first assembly as well as the picture on the front of the die packet of the monsters.


Additional Supplies for these cards:
metallic gold cardstock
Sizzix Big Shot with Sizzix Chrome Precision Base Plate for Intricate Thinlits.

So get crafting and have a fabulous day and thanks for visiting.
The Rubber Buggy has the crafting supplies for your next project. So have fun crafting this weekend with these products. My cards and projects are always posted on Saturday. Keep watching and thank you so much for those wonderful comments as well as suggestions.
Enjoy and Happy Crafting!
The Rubber Buggy has the crafting supplies for your next project. So have fun crafting this weekend with these products. My cards and projects are always posted on Saturday. Keep watching and thank you so much for those wonderful comments as well as suggestions.
Enjoy and Happy Crafting!
|
Saturday, September 10, 2022
Graphic 45 Warm Wishes Christmas Cards
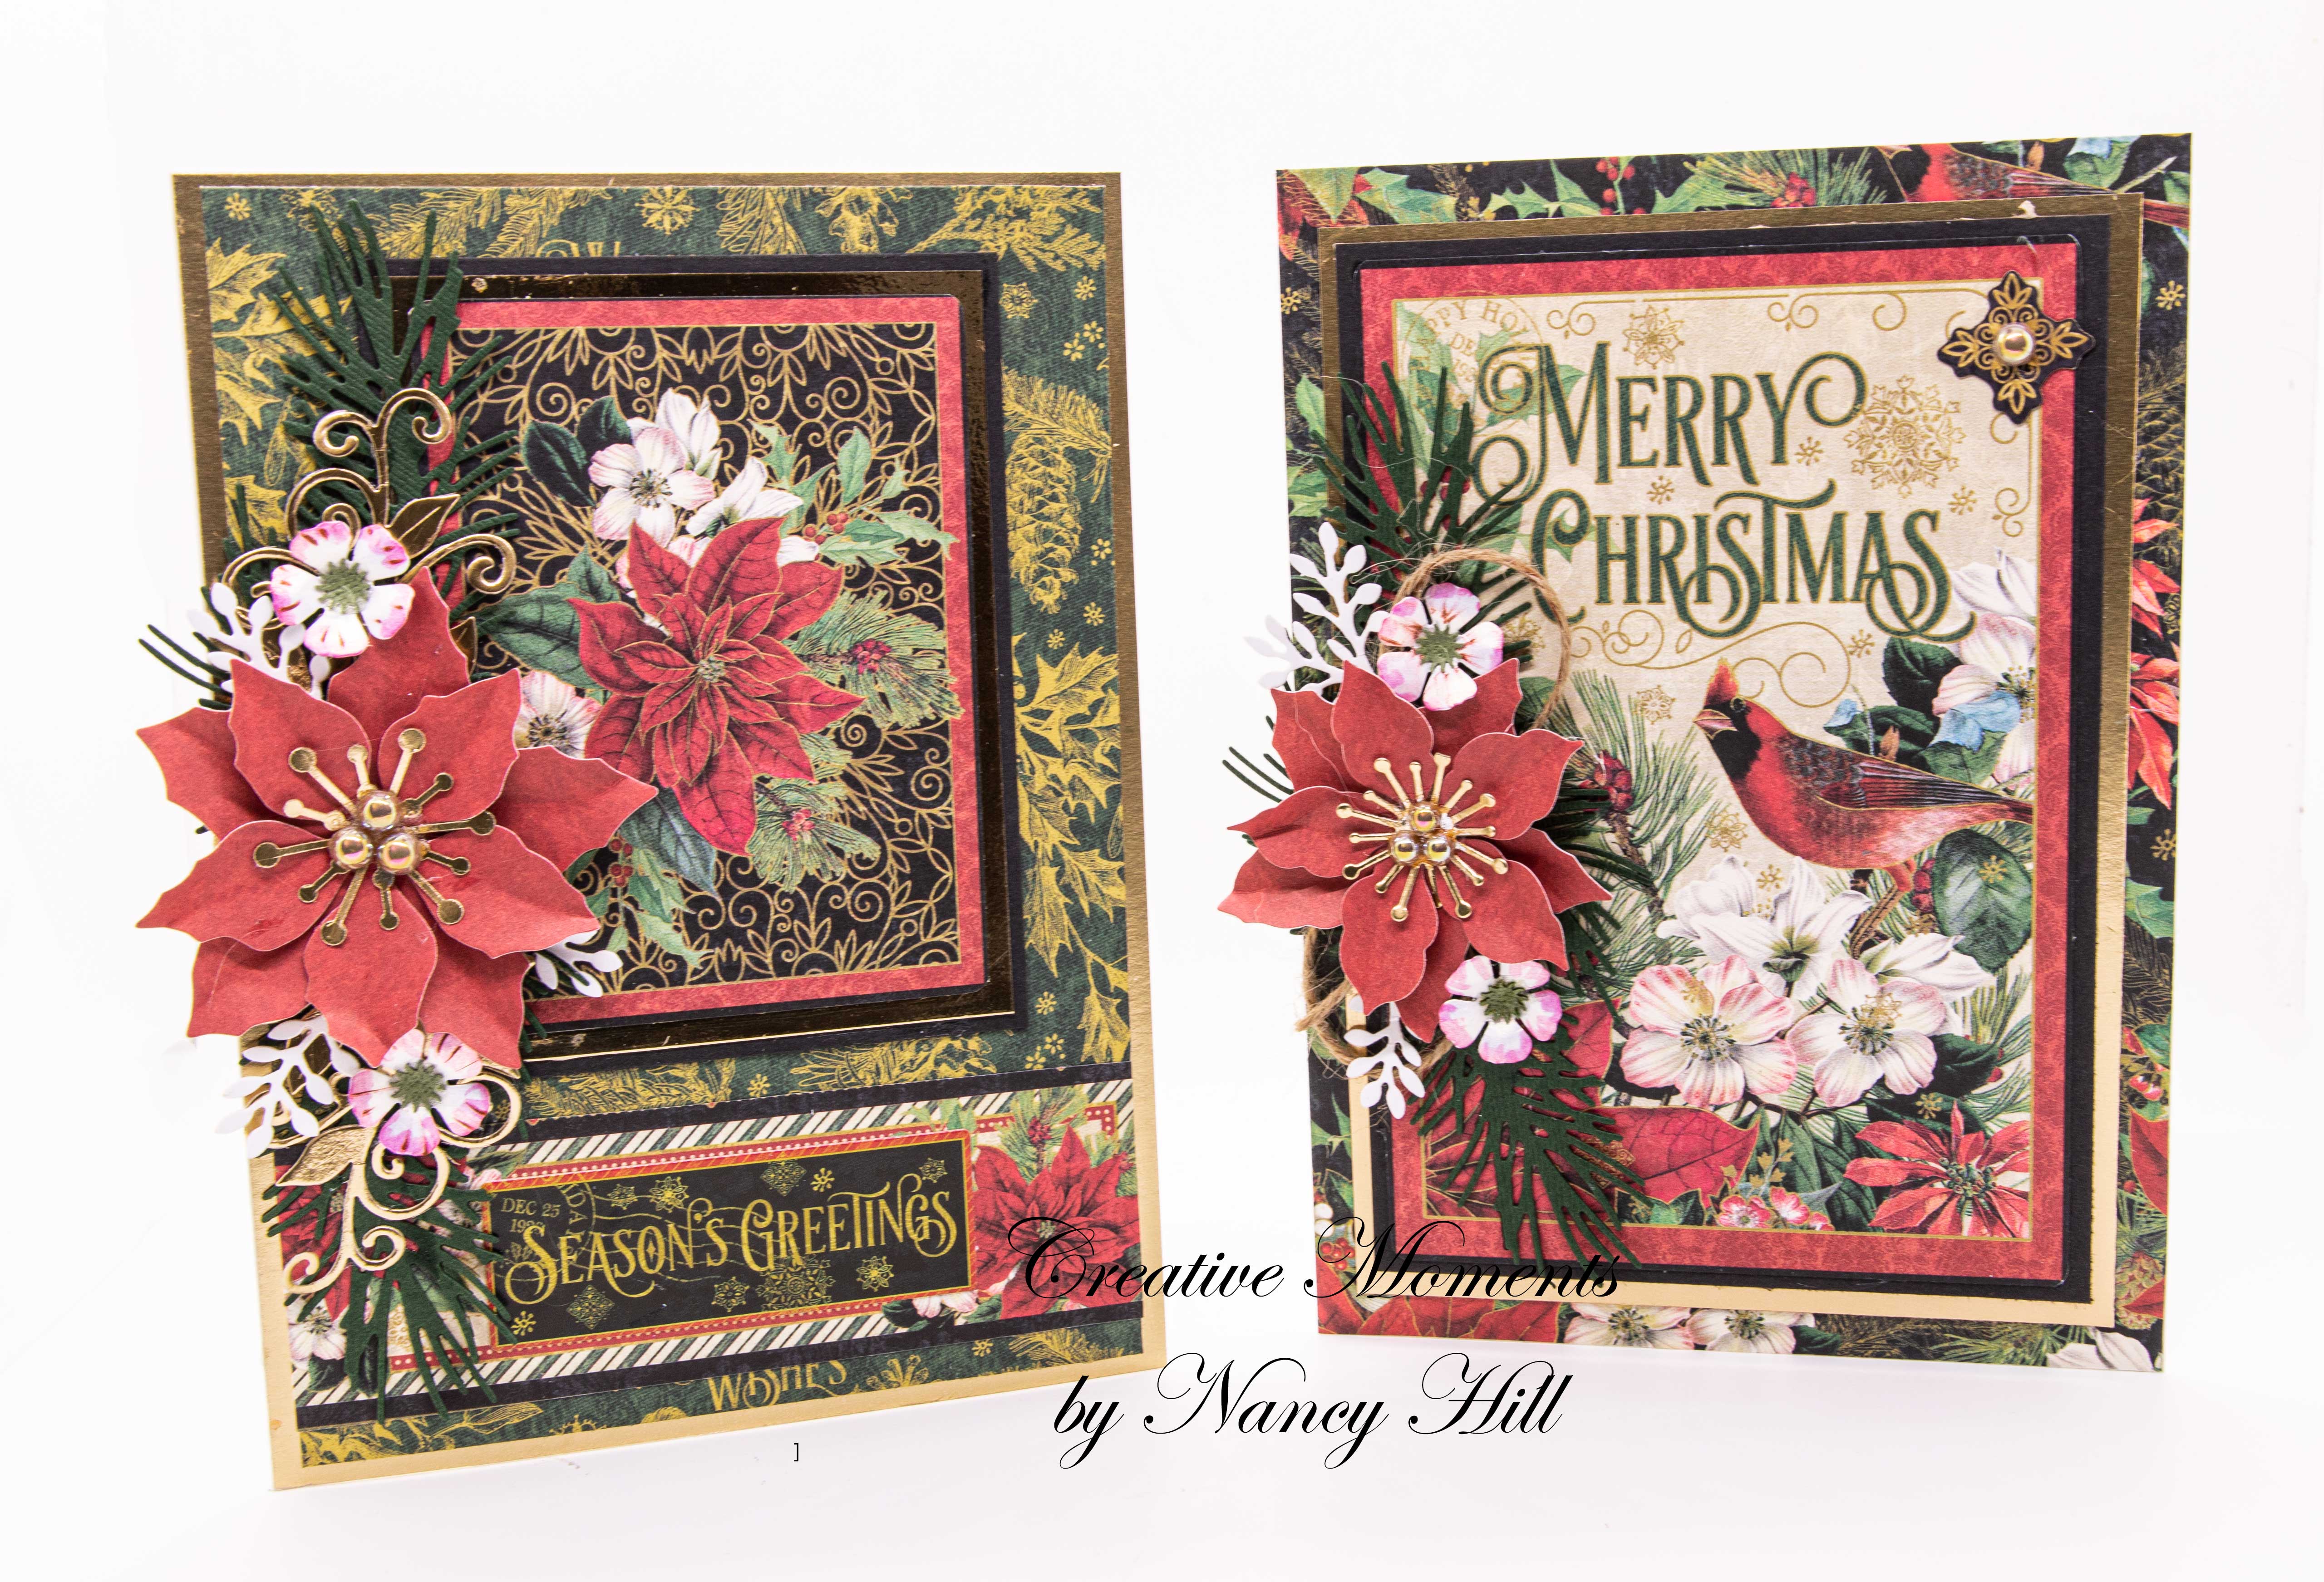
Welcome back and Nancy, here, to share two Christmas cards for this year created with the gorgeous Graphic 45 Warm Wishes available while supplies last at The Rubber Buggy. This collection is filled with gorgeous florals, snowflakes, birds, and stamps and is perfect for Christmas cards, home decor, albums, and crafty handmade Christmas gifts. 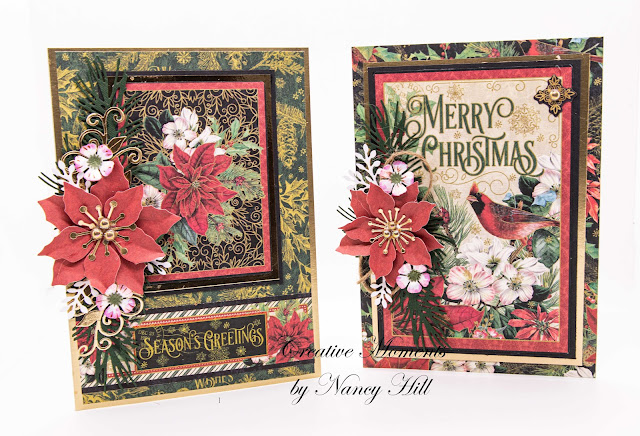


 Since the Graphic 45 Warm Wishes Journaling cards had most of the gorgeous images as well as the Christmas sentiments for each card, there wasn't too much to add to complete these Christmas cards.
For each card, I started with a Graphic 45 Journaling cards, Graphic 45 Warm Wishes paper pad or Graphic 45 Warm Wishes Pattern/Solid Paper pad. I cut my frame to create a 5" x 7" card and glued the patterned paper on the front and then cut it out rather than cut the patterned paper at 5 x 7 and glued it onto the frame. I have found this so much easier. I die cut leafy pine needles, poinsettias and flowers. I glued in the center of each poinsettia the Pink Fresh Studio Metallic Champagne pearls. I added a jute bow on one card.
That’s pretty much all it took to complete the card front. I liked using the metallic cardstock to frame the journaling card for that added shimmer to each card.

Graphic 45 Warm Wishes Collection sets available at the Rubber Buggy:
8 double-sided papers each sold separately
12×12 collection pack (includes 16 sheets, 2 of each 8 designs & decorative sticker sheets), 8×8 paper pack
12×12 Patterns & Solids pack
Coordinating Chipboard
Journaling Cards
Ephemera Assortment
Decorative Cardstock Stickers
Warm Wishes Stamp Set
Additional Supplies for these cards:
Pink Fresh Studio Metallic Champagne pearls
My Colors 100 lb. Heavy White Cardstock
My Colors Black Cardstock
metallic gold cardstock
May Art Jute
Sizzix Glue Gun
EK Success Scoring Board
EK Success Cutter See Scissors
Welcome back and Nancy, here, to share two Christmas cards for this year created with the gorgeous Graphic 45 Warm Wishes available while supplies last at The Rubber Buggy. This collection is filled with gorgeous florals, snowflakes, birds, and stamps and is perfect for Christmas cards, home decor, albums, and crafty handmade Christmas gifts.


Since the Graphic 45 Warm Wishes Journaling cards had most of the gorgeous images as well as the Christmas sentiments for each card, there wasn't too much to add to complete these Christmas cards.
For each card, I started with a Graphic 45 Journaling cards, Graphic 45 Warm Wishes paper pad or Graphic 45 Warm Wishes Pattern/Solid Paper pad. I cut my frame to create a 5" x 7" card and glued the patterned paper on the front and then cut it out rather than cut the patterned paper at 5 x 7 and glued it onto the frame. I have found this so much easier. I die cut leafy pine needles, poinsettias and flowers. I glued in the center of each poinsettia the Pink Fresh Studio Metallic Champagne pearls. I added a jute bow on one card.
That’s pretty much all it took to complete the card front. I liked using the metallic cardstock to frame the journaling card for that added shimmer to each card.

Graphic 45 Warm Wishes Collection sets available at the Rubber Buggy:
8 double-sided papers each sold separately
12×12 collection pack (includes 16 sheets, 2 of each 8 designs & decorative sticker sheets), 8×8 paper pack
12×12 Patterns & Solids pack
Coordinating Chipboard
Journaling Cards
Ephemera Assortment
Decorative Cardstock Stickers
Warm Wishes Stamp Set
Additional Supplies for these cards:
Pink Fresh Studio Metallic Champagne pearls
My Colors 100 lb. Heavy White Cardstock
My Colors Black Cardstock
metallic gold cardstock
May Art Jute
Sizzix Glue Gun
EK Success Scoring Board
EK Success Cutter See Scissors
So get crafting and have a fabulous day and thanks for visiting.
The Rubber Buggy has the crafting supplies for your next project. So have fun crafting this weekend with these products. My cards and projects are always posted on Saturday. Keep watching and thank you so much for those wonderful comments as well as suggestions.
Enjoy and Happy Crafting!
|
Saturday, September 3, 2022
Graphic 45 Fashion Forward Birthday Card
Welcome back and Nancy, here, to wish you a good morning to our Rubber Buggy crafters and bloggers. Make sure to check out the new arrivals everyday coming to The Rubber Buggy since these gorgeous Fall and Winter items will sell out soon.
Today, I am sharing a birthday card made with the Graphic 45 Fashion Forward November cardstock. This collection is so well suited for crafters to make planners, daily journals, mini albums, gorgeous cards with papers reflecting flowers and colors for that month and for all of your scrapbook needs. What I like about this the Graphic 45 Fashion Times collection is the monthly pages in this collection to create projects and cards for each month of imagery of vintage ladies, wonderful sentiments and florals for each season of vibrant colors of sapphire blue, amethyst purples, emerald greens, ruby reds and citrine yellows.

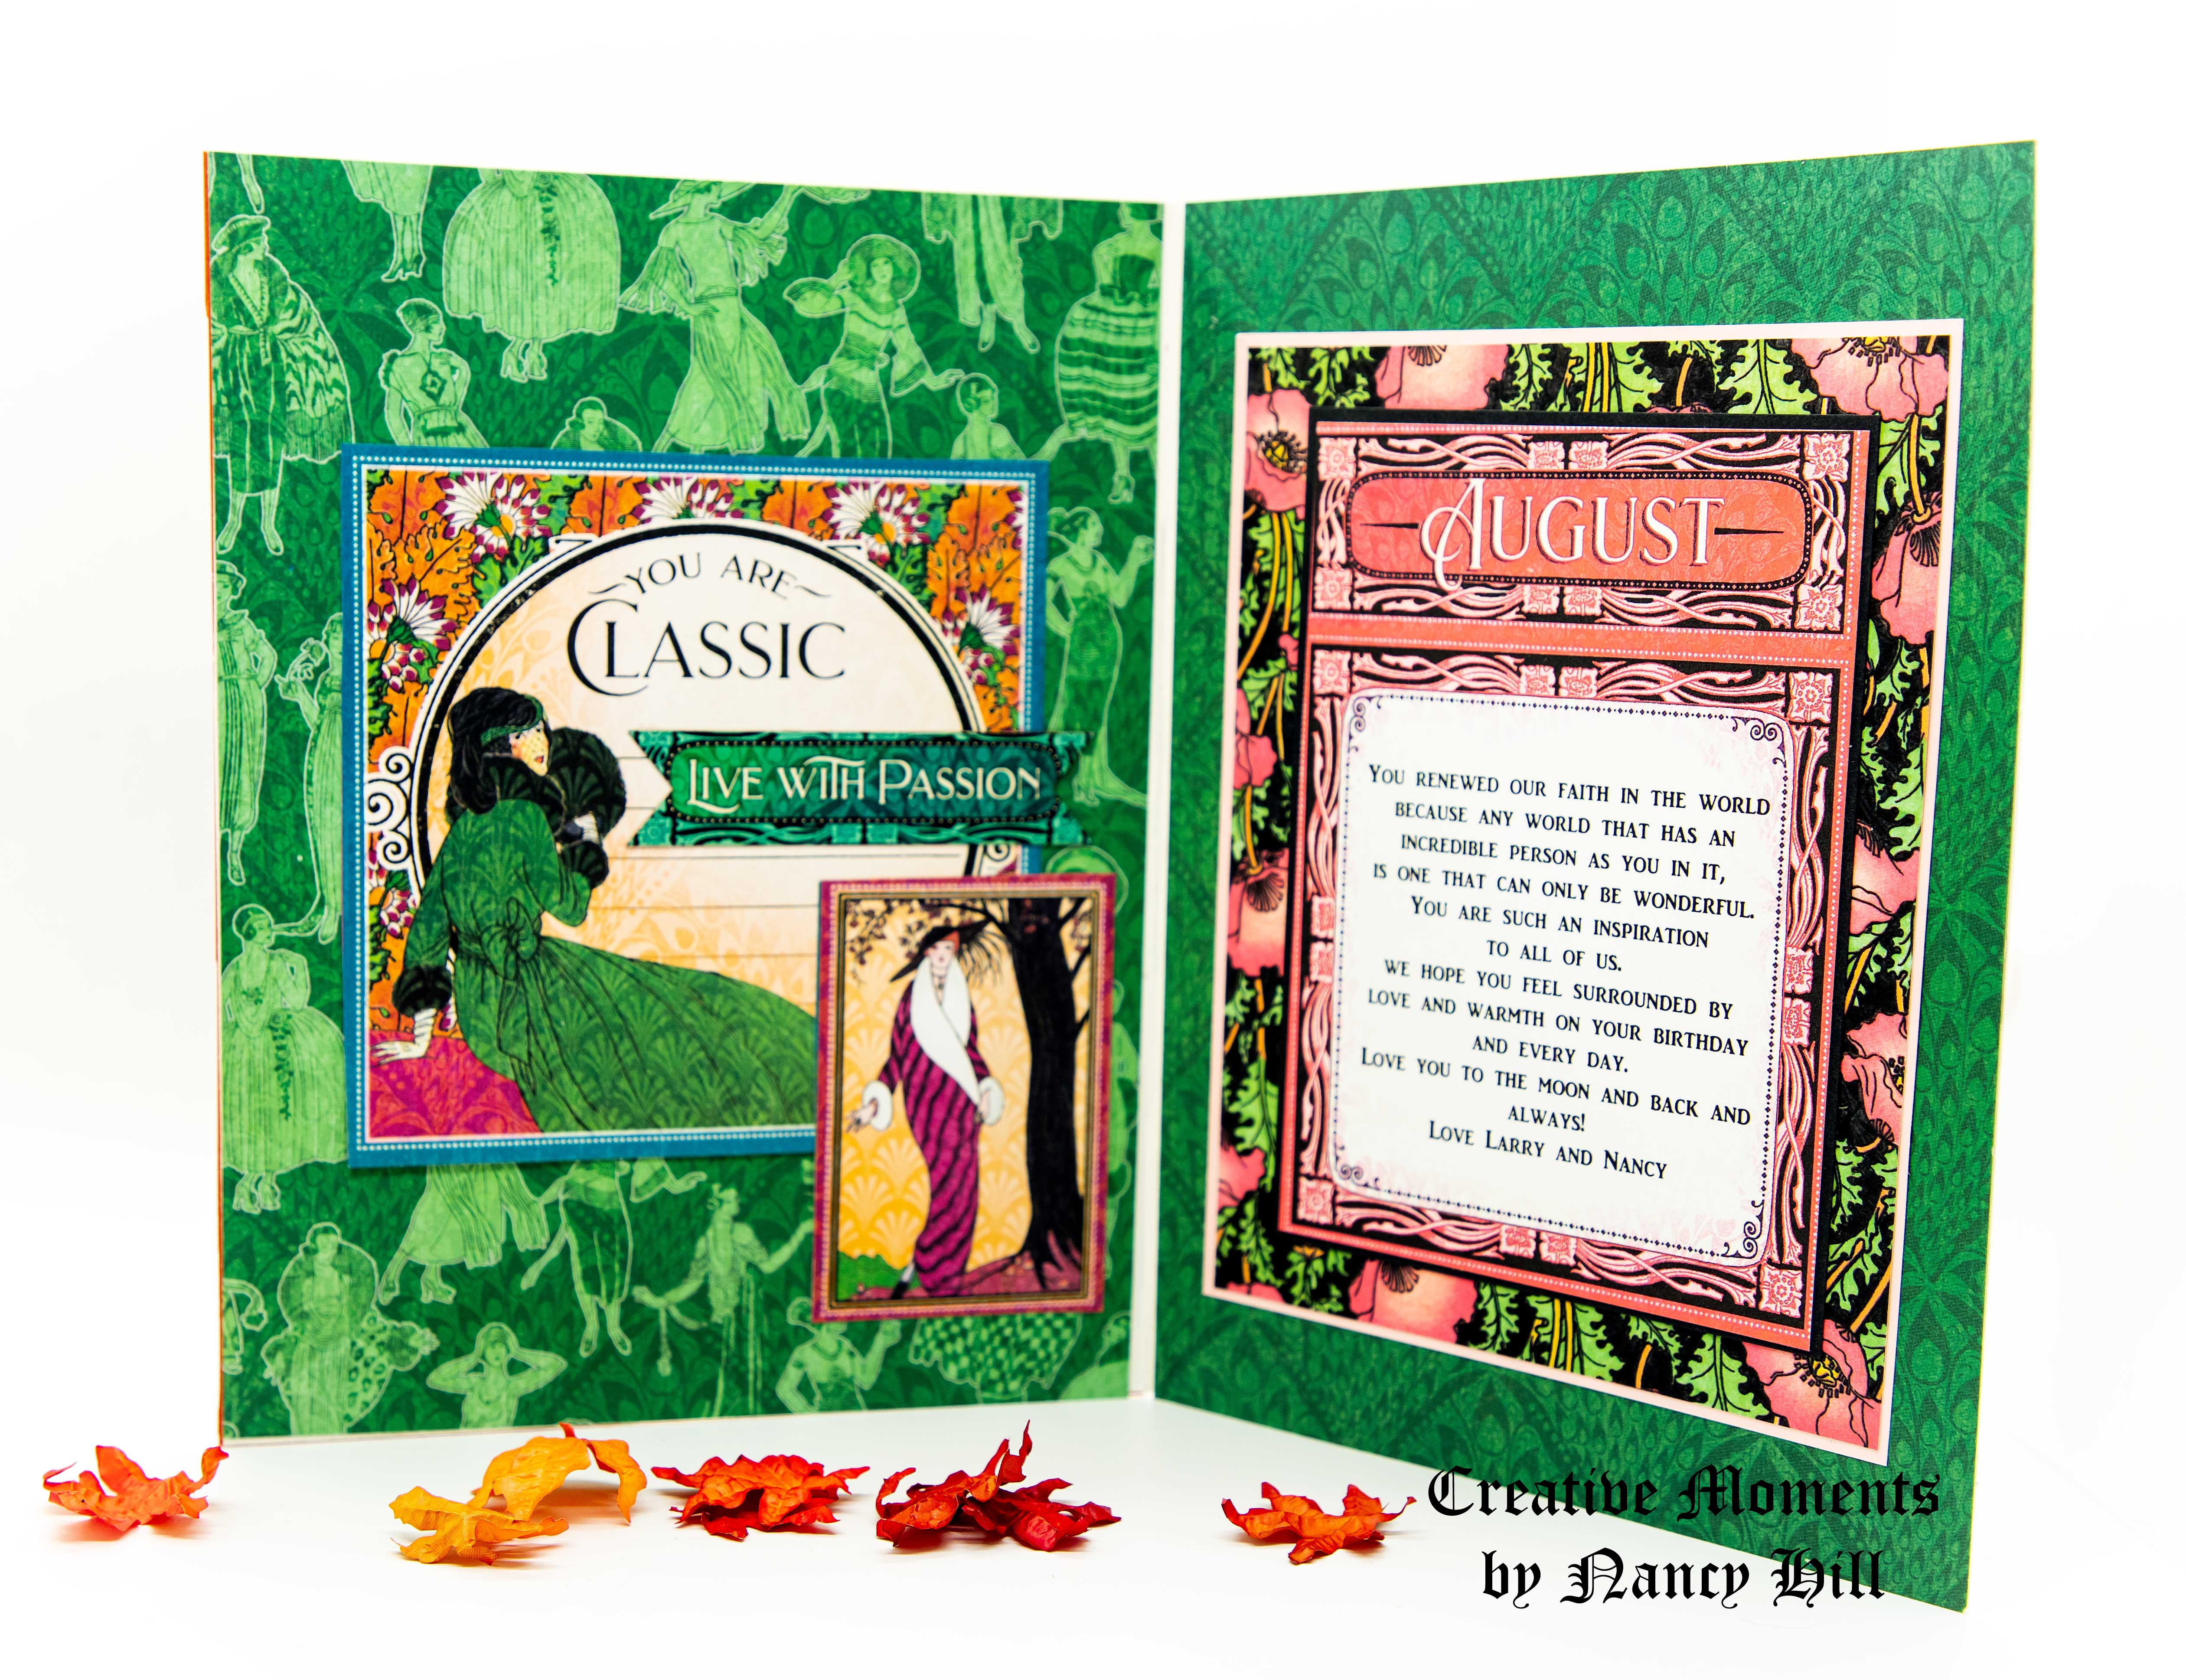
I cut out the classy women and adhered it to the inside of the card with Graphic 45 Fashion Forward Solid Patterned Paper pad. I scan the Graphic 45 Fashion Forward August and added a sentiment using Photoshop and printed it out to personalize the birthday card.
Supplies:
Graphic 45 Fashion Forward August
Graphic 45 Fashion Forward Solid and Patterned Paper Pad
The Rubber Buggy has the crafting supplies for your next project. So have fun crafting this weekend with these products. My cards and projects are always posted on Saturday. Keep watching and thank you so much for those wonderful comments as well as suggestions. Enjoy and Happy Crafting!

The Rubber Buggy has the crafting supplies for your next project. So have fun crafting this weekend with these products. My cards and projects are always posted on Saturday. Keep watching and thank you so much for those wonderful comments as well as suggestions.
Enjoy and Happy Crafting!
|
Subscribe to:
Posts
(Atom)


