Friday, July 31, 2015
You are my sunshine!
Hi everyone!!
Noe here with another inspirational post... Lately, I can´t stop creating cards!! What is happening to me?? Hahaha... Well... this is my newest card:

I made the background of my card with Broken China Distress Reinker sprayed with water and applied with a brush. Then I cut the clouds with a die.

To make the rainbow I used a Lawn Fawn die and papers of the same brand mixed with other of Prima Marketing designed by Julie Nutting. Banner is painted with Squeezed Lemonade Distress Paint and black embossed sentiment.

Products used in this card:
- Rainbow Lawn Cut.
- Let´s Polka mon amie 6x6 Collection Pack.
- Dress me Up Paper Pad 6x6
- Broken China Distress Ink Reinker.
- Squeezed Lemonade Distress Paint.
- Ranger Embossing Powder Black.
- Stamping Supplies.

Thank you for visiting
Thursday, July 30, 2015
Teacup Stack
Hi everyone, Steph Ackerman here on this lovely Thursday.
Today's card uses the lovely Teacup Stack dies from Poppy Stamps. This intricate die cuts beautifully no matter what papers you use.


A torn strip of paper from the same Lawn Fawn pack was added to the left side and a large die cut oval was added on top. The tea cups were perched on top.
Thank you for visiting.
Steph
Today's card uses the lovely Teacup Stack dies from Poppy Stamps. This intricate die cuts beautifully no matter what papers you use.

I created the card using Bazzill cardstock and added some striped paper from the Lawn Fawn Snow Day 6x6 paper pack.

A torn strip of paper from the same Lawn Fawn pack was added to the left side and a large die cut oval was added on top. The tea cups were perched on top.
Thank you for visiting.
Steph
Tuesday, July 28, 2015
Dare to dream card
Hi everyone!
Pi here and I'm trying something out of my comfort zone. Playing with pink tones...

I have to admit, I'm not good at it. So I had to balance it with a lot of white and dark blue.
I've cut the polaroids myself, eyeballing the size. The backgrounds of the photos are just distress paint, which is very opaque and make perfect fake cardstock - LOL!
I colored the stamped images with my copics and fuzzy cut them before I stuck them in the frames. Great tip if you are like me and love colouring hair, but not so much the clothes. I can get away with my misplaced shadows in hair, but on clothes it just looks plain dumb :)
The sentiment "Dare to dream" is part of a Kaisercraft clear stamp. I just masked off the rest "BIG".
Products used from the store:
Saturated canary rubber stamp yoga mamas
Saturated canary rubber stamp Rebecca
Lawn Fawn cuts puffy clouds border
Copic markers
Kaiserkraft clear stamp dream big
Bakers twine
WOC tulips
Lawn Fawn fundamentals ink Freshly cut grass
Stamping supplies (doublesided tape, neenah white cardstock, memento tuxedo black)
Thank you for visiting!
Monday, July 27, 2015
Card with 3D Flower video Tutorial

Hi Bev here today. Today I am using The Rubber Buggy products to create this cute card and will share the video tutorial on how to make what I call the 3D Flower. When making your own flowers you can use the papers that match the rest of your project.. and even good to use those scrap pieces too.
Supply List:
The Rubber Buggy Products: Paper Maja Design Vintage Summer Basics
Other: button, frame
Cardstock: misc
Stickers; SRM

Hope you'll take time to view the video so you too can make these cute flowers.

Close up view of the 2 different size of bud size parts of the flower.

Close up view to see the finished flower after mounted on scrap piece and trimmed ready for applying to the card.


Friday, July 24, 2015
Happy Summer Card
Hi everyone!!
Noe here as every Friday... I hope you all are doing well...
For this week, with the summer heat, I made a summery and refreshing card... To make it, I couldn´t use other stamp that they were not of Lawn Fawn, one of my favorite brands of stamps and dies.

I love watermelon for afternoon snack in summer so these stamps are perfect for me !! :)
Products used in this card:
- Happy Summer Stamps Lawn Fawn.
- Happy Summer Dies Lawn Fawn.
- Ultra Smooth Premium White Cardstock for alcohol markers.
- Spectrum Noir.
- Stamping Supplies.
- Lemon zest Dylusion Spray Ink.


Here is a video with step by step:
I hope you like this card!! Have a great Friday!!
Thank you for visiting
Thursday, July 23, 2015
Love to help weather the storm
Hi everyone, Steph Ackerman on this lovely Thursday.
Using a premade card, I cut Bazzill cardstock to fit. Graphic 45 pattern paper was then cut to slightly smaller. May Arts ribbon was wrapped around the panel and LOVE was stamped on the ribbon.

Using a premade card, I cut Bazzill cardstock to fit. Graphic 45 pattern paper was then cut to slightly smaller. May Arts ribbon was wrapped around the panel and LOVE was stamped on the ribbon.
I used the Layers Label 2 die to die cut a white panel. Then I used the Love Showers Rubber Stamp set. I stamped the umbrella in the center of the panel then repeatedly stamped hearts all around the umbrella.
A die cut circle was added to the card and the die cut panel was placed slightly off center. The sentiment was stamped and edges with black cardstock, then added to the card with foam adhesives for dimension.
Thank you for visiting.
Steph
Wednesday, July 22, 2015
Mixed Media Canvas with Netra
Hi everyone. This week has been going by so fast.
With school approaching I need to get in as much crafting time as possible ;)
So, this week I decided to pull a canvas and practice my painting. I used Distress Paints and Dylusions paints lots of flowers and things fro The Rubber Buggy Store.
I hope you like this one. Its for my Grandma's. She turns 75 today !!!

White Gesso
Distress Paint in "Peacock Feathers"
Dylusions in "Melted Chocolate" Paint
Blue Fern Studios chip board
WOC Daisy's in white
WOC 1 inch Rose in white
Thank you for visiting
Tuesday, July 21, 2015
Magnolia o'hoy
Hi everyone!
Pi here :)
Out of pure luck, I stumbled across this super cute stamp in my stash. I love, love this stamp, but I had forgotten I had it. I've been fortunate engough to have been on Kellie's design team for so long things are now getting lost in my DT stash - LOL!

I've used Maja Design paper pad skärgårdsliv, a paper pad inspired by coastal scenes outside of Gothenburg. To match the paper I used copic markers (B93, B95, B97 and W3 & W5) to color my image. I was out of matching cardstock, but I have a distress paint in chipped saphire that I colored some white cardstock and voila! I used that cardstock to mat both of my design paper and I also die cut some flourishes. I used a spellbinders label from my stash to die cut my image in an oval, but there are lots of oval dies in the shop
Products used from the store:
Magnolia rubber stamp Dangling Tilda
Copic markers
Distress paint chipped saphire
Maja Design paper pad Skärgårdsliv
MFT die-namic fancy flourish
WOC carnation
Ice stickles orange peel
WOC hip rosebuds
Petaloo textured blossom moccha
Stamping supplies (doublesided tape, memento tuxedo ink, neenah white cardstock)
Thank you for visiting!
Monday, July 20, 2015
"Good Times" at The Rubber Buggy

Hi.. Bev here today. My post for The Rubber Buggy uses my sketch from the Turtle Soup Birthday Bash. I love multitasking to create.
My "Good Times" page boasts some of my newest products from The Rubber Buggy. With these great prom photos I wanted something soft and elegant to base the photos. Accents also needed that vintage but elegant touch also. Flowers with leaves, a doily, some stamping and the addition of bling was a great finishing touch.

Supply List:
The Rubber Buggy Products: Maja Design Vintage Summer Basics
Blue Fern Studios Deja Vu Dangles and Layering Stems chipboard,
Leaves: 30mm Green Mulberry paper leaves
Other: StazOn, Tim Holtz Ranger Adirondack Ink

In the close ups you can view the details easier. This shows the great chippie accents with all the amazing detailed cuts. They are so easy to use. Leave plan, paint, mist, copic colour and even distress ink them. Also note the 2 layers of paper matting with inked edges... and the small paper clustered section on top of the chippie with added bling.

On this section just faintly in the background you can see the 2 tone ink stamped dangles. The top corner also has a paper and bling section to coordinate with the other section.

This section highlights more amazing chipping and a stamped title.
Thanks for visiting today.. be sure to visit every Monday as I get to share even more fabulous Rubber Buggy products.


Friday, July 17, 2015
You Color my world!!
Hi everyone!!


I'm editing a video with step by step to make this card ... Coming soon in "The Rubber Buggy" Youtube channel. Don´t miss it!!
Thank you for visiting
Noe here as every Friday to show you my newest card!! I love Lawn Fawn Stamps, are soooo cute and funny!! Look!

Inks are my other passion so that I´ve put together both of them on this card!!


Supplies used in this card:
- Color My World Lawn Cuts
- Color My World Lawn Stamps
- Lemon Zest Dylusion Spray Ink
- Tangerine Dream Dylusion Spray Ink
- Festive Berries Distress Ink
- Ultra Smooth Premium White Cardstock


Thank you for visiting
Thursday, July 16, 2015
Bella with Dahlia
Hi everyone, Steph Ackerman on this lovely Thursday.
Today I've used Bella with Dahlia from Wild Rose Studio.


Bazzill cardstock was adhered to the card and a layer of Graphic 45 was adhered. Next I die cut an oval, then layered the fussy cut stamped image.

Thank you for visiting.
Steph
Today I've used Bella with Dahlia from Wild Rose Studio.
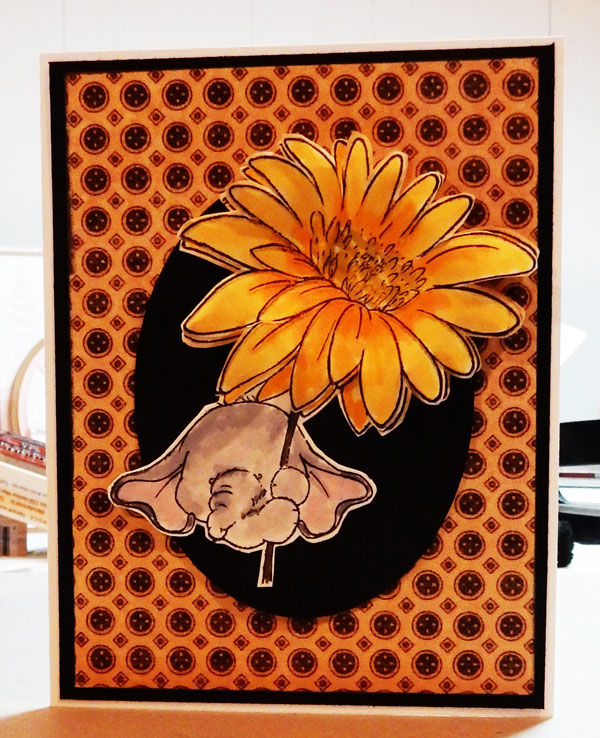
I stamped and colored two images with Copic Markers, then fussy cut one complete image. I fussy cut a second dahlia and layered it on top for dimension.

Bazzill cardstock was adhered to the card and a layer of Graphic 45 was adhered. Next I die cut an oval, then layered the fussy cut stamped image.

Thank you for visiting.
Steph
Wednesday, July 15, 2015
MIxed Media Card with Netra
Hey everyone !!
I hope you all are doing well. Its been HOT out
and drinking iced green tea all day has helped.
But in between tea's Ive been deep in my paints.
Another mixed media card for you today to continue
my week in Mixed Media !!!
I hope you like it !
Thank you for visiting

I used:
White Gesso
Distress Paint in "Peacock Feathers"
Dylusions in "Melted Chocolate" Paint
Blue Fern Studios chip board
WOC Daisy's in white
WOC 1 inch Rose in white
***and other items from my stash
Tuesday, July 14, 2015
Graphic 45 scraps made into tags
Hi everyone!
Pi here with some easy made tags.

These are the #5 tags by Ranger and then I've cut the paper a sliver smaller to layer on top of the tags. I've used paper from Graphic 45, these tags are perfect to make with your scraps. As I covered the ready made hole reinforcer I just used a brad from my stash, as I don't have a hole punch to match and I couldn't be bothered to fetch my crop-o-dile and put in an eyelet. If you want a little more fiddling, you could also try this layering technique with G45's staple tags, they are gorgeous and already comes with the eyelet.

 Products used from the store:
Manilla kraft tags #5
Distress ink vintage photo
G45 paper
Petaloo textured elements blossom mocha
WOC rose 25mm
WOC open rose 15mm
W9plus Handlettered thanks stamp set
Wild rose studio circle greetings
Stamping supplies (doublesided tape, archival ink coffee, scissors, acrylic block, distress ink tool)
Thank you for visiting!
Monday, July 13, 2015
Enjoy every Moment of your Life with Blue Fern Studios Sanctuary

Hi Bev here again today. I am excited to share "Enjoy every Moment of your Life" which was created using Blue Fern Studios "Sanctuary" paper, Circle Links and Berry Stems chipboard accents along with some cream lace and stamps to finish off this page.
Supply List:
The Rubber Buggy Products: Paper: Blue Fern Studios Sanctuary Collection
Chipboard: Blue Fern Studios circle links and berry stems
Lace: cream
Ink: Tim Holtz ranger ink
Other: beads and misc stamps

In the close ups you'll be able to see some of the details better. In this section ... the centre core of the page it is highlighted with a massive circle which is stitched on the outside. The inner edge is a chippie left plain and a stem chippie which is copic coloured. Inked edges are on the journal card title. The main circle was placed under a few fussy cut sections of the bird and flower as an insert.

This section shows a stamped image.

Here is a view of another stamped image and also the chippie and title section.


Thanks for stopping by.. loved having you visit today... look forward to your return.

Subscribe to:
Posts
(Atom)


