Saturday, November 30, 2019
Stamperia Blue Land Gift Box
Welcome back and Nancy, here, to share my gift box for my granddaughter with the gorgeous Stamperia Blue Land paper collection. I am showcasing Stamperia Blue Land paper collection for the next couple weeks which should be in everyone's supplies for cards and projects this winter season as well as for Christmas! These products are available at The Rubber Buggy on-line store. The Rubber Buggy carries all of the name-brand products and supplies you will need to create those amazing keepsake cards, scrapbook pages and beautiful craft projects!


I handmade the flowers with the Heartfelt Creations Classic Rose die. I added flat back pearls and colored one with a blue Copic Marker.
I cut out the butterfly found in the Stamperia Blue Land paper and glue it to a silver wire that was twisted. I glued the end of the wire to make it look like the butterfly was flying.
I typed my grand daughter's name and printed it out and glued behind the Tim Holtz Decorative Plate/Frame.


Supplies:
box or decorate box to alter
Venice Lace
Beacon 3 n 1 Advance Glue
Tim Holtz-Ideology-Ornate Corner Plates
flatback pearls (center of flowers)
Heartfelt Creations Flower Stamens Bridal Bouquet
Heartfelt Creations Classic Rose Die
NUVO White Blizzard Glitter Drops
Prima Marketing Finnabiar Art - White Gesso
 | |
Stamperia Blue Land Paper Collection
I hope I have inspired you try out these products available at The Rubber Buggy on-line store. My cards and projects are always posted on Saturday. Keep watching and thank you so much for those wonderful comments as well as suggestions.
Enjoy and Happy Crafting!
|
Thursday, November 28, 2019
Christmas Gift Bag Ensemble
Happy Thanksgiving everyone. Steph Ackerman here today with lots of fun products from the store. Please visit the store for all the fun products I've used today.
The Maja Designs Holiday in the Alps paper pad at 6" x 6" contains 2 sheets each of 18 double sided papers.


Thank you for visiting
The Maja Designs Holiday in the Alps paper pad at 6" x 6" contains 2 sheets each of 18 double sided papers.

Placing one of the papers on Bazzill Wax Lips cardstock really emphasized the pretty papers. This was then adhered directly on the gift bag.

Using Lawn Fawn Stitched Circle dies, I die cut Bazzill cardstock and a panel from the Alps collection, adding it to the center of the gift bag.

For the card, I cut Lawn Fawn Kraft Cardstock 4 1/4" x 11 and scored it with a Scor-Pal Scoring Board to create a top folding card.

Cutting papers to fit the card, I matted each with cardstock. The larger panel was wrapped with ribbon and placed on the card. The smaller panel was added to the card with Scrapbook Adhesives 3D Foam Adhesives for dimension.

Lawn Fawn Christmas stamps were stamped with Memento Tuxedo Black Ink, then matted with cardstock. The words were then added to the card with Scrapbook Adhesives 3D Foam Adhesives for dimension.

Such a pretty combination.

Thank you for visiting
Wednesday, November 27, 2019
Christmas in the Country Folio
Hello friends! Today I'm sharing a Christmas folio featuring Prima Marketing Christmas In The Country Collection. This newer release is just so gorgeous and has so many beautiful embellishments to coordinate with it.
On this folio I used the Christmas In The Country - Tidings flowers and Nutcracker Flowers and the A4 Paper Pad. Perfect for layouts and card making!
On this folio I used the Christmas In The Country - Tidings flowers and Nutcracker Flowers and the A4 Paper Pad. Perfect for layouts and card making!

I die cut a large poinsettia from red foil card stock and one from red glitter card stock. I pieced the glitter paper into the die cut foiled poinsettia I used a Tutti Designs die from my stash.

I made a small envelope and added some journal tags to the inside.

I added a couple more die cuts to the corners of the pockets on the bottom. You can add more photo mats or journal tags to the pockets.


Thanks for stopping by the Rubber Buggy blog today!
Debbie
Debbie
Tuesday, November 26, 2019
Merry Christmas From All Of Us

Hi Everyone it's Jennifer here and I have used the
Oddball Snowman and the Lawn Fawn Peekaboo Backdrop
to Create this Shaker Card Christmas Card.
Oddball Snowman and the Lawn Fawn Peekaboo Backdrop
to Create this Shaker Card Christmas Card.
I have used 3 of my favorite Oxide Inks for backgrounds
Chipped Sapphire, Blue Print Sketch and Broken China.
I have then sprayed it using perfect pearls in a spray bottle of
water that gives it an Awesome Sparkle. I then did a white splatter
with watered down Copic Opaque White and a brush.
I glued the Mountains onto the bottom of it.
I glued the Mountains onto the bottom of it.

I coloured my Snowman up using
Copics
Copics
Snowman - C00, C0, C01, C3
Reds - R39, R37, R35, R32
Greens - G12, G16, G19
Orange - YR12, YR15, YR68
Black - C05, C07, C09
Reds - R39, R37, R35, R32
Greens - G12, G16, G19
Orange - YR12, YR15, YR68
Black - C05, C07, C09
I covered the back of the Die with a piece of Acetate and then
used 3D foam around all the edges to create a Shaker.
I then filled one section with white beads ar little foam balls.
3D Taped the Snowman on the front and a sentiment to finish it off.


Bazzill

I hope you all have a Great Crafting Week
Jennifer
Jennifer
Monday, November 25, 2019
Stamperia Winter Star Collection with many projects for inspiration

For this layout I used many layers, lots of accent trims, fussy cut accents, doodled and also finished it off with inked edges.

This page was many layers, lots of ripped elements, accents and more inked edges... and some doodling again.

For this card I went for some layers... some popped up and a cute banner with bling accents

This card used lots of layer, matting, pop ups and some die cut letters for the sentiment.

Lots of layers and mix and match on this card.. and using scrap pieces from the stash on this origami xmas tree accent. Finished up with some bling and it's perfect.
The Rubber Buggy Supplies:
- Paper: Stamperia Winter Star Collection
- Dies: Sizzix Tim Holtz Thinlets Vacation
- Ink: Tim Holtz Distress Vintage Photo
- Glue: Beacon 3-in-1 Glue,
- Accents: Scrapbook 3D foam
- Machine/ tools: Tim Holtz 5" mini Snips, Fiskar Paper Trummer, Tim Holtz mini tool kit
- Other: bling, chipboard, black pen, cardstock


Thanks for stopping by... hope to see you again soon ... but in the mean time be sure to stop by the STORE where these items and so many others are available. Also take note of all the products that aren't carried in our regular local stores. ... AND the service is A1.

Sunday, November 24, 2019
Tutorial for Scallop Easel Card with Traditional Card
Nancy, here. Back to today's inspiration for a scallop circle easel tutorial that I created for you as well as I am showcasing Stamperia Blue Land paper collection for the next couple weeks which should be in everyone's stash for cards this winter season as well as for Christmas!


Step 7: I glued on a snowflake and then glued the label with the "Merry Christmas" that was embossed with NUVO Embossing Silver powder. Note: Adhere some 3D foam pads or foam dots to act as a stopper for the front panel of the easel card to lock in behind the Merry Christmas Label when the card is being displayed.
 When closed, this cheery circle easel card will fit into 5" square envelope
 |
| Sample page found in the Stamperia Blue Land Paper Collection |


This is actually a scallop circle easel card but my easel card will also have a traditional part for a Christmas sentiment on another layer. This style of easel card is very simple to make with my step-by-step tutorial. I am a visual person and like to see step-by-step pictures plus I added a lot of photos to guide you through this since words in these instructions can't always describe well for everyone. There are other tutorials of a scallop circle easel card but I think my tutorial with a scallop doily may be easier for beginners to follow along. So let's get started!
Putting Together The Circle Easel Card


Step 1: Choose your card base 8" x 11" and and score it in half and fold. Do this again for the second card base. Use a Bone Folder to sharpen the score line. Any size circles will work and a couple sizes smaller so you can layer patterned paper on top and decorate.
Place the circle die which my circle was 4 1/4" diameter and lay the circle die slightly overlapping the folded cardstock and cut through your press (as below). Make sure the fold of the card base is not cut within the die, so as to leave a card "hinge". Cut two of these bases which one for the easel card and one that will be glued on the bottom of the easel card for the traditional inside of a card with your sentiment.

Step 2: Open your card base and fold one side of the circle in half, back into the center (as below on left side). Stamp your Christmas sentiment for the inside of the card (as below on right side). I used two stamps on the right photo below to give the sentiment a background.

Step 3: Cut two single circle (circle size 4 1/4") one from white cardstock and the other one from a glitter cardstock and two doily dies.

Step 4: I used a 3 3/4" circle die to cut the Stamperia Blue Land patterned paper out and adhered it to the glitter circle that was cut with the 4 1/4" circle die which will be glued together and then glued to a doily (See sample above photo of the circle on top right of photo of patterned paper glued to glitter circle. This will be on the easel section of the card. Add adhesive to the folded half of the circle you just scored down and glue this doily to it (see photo below).

Step 5: Adhere the other doily behind the bottom of the easel card. Align the other card and glue the two cards together.

Photo below is another sample of the other card.


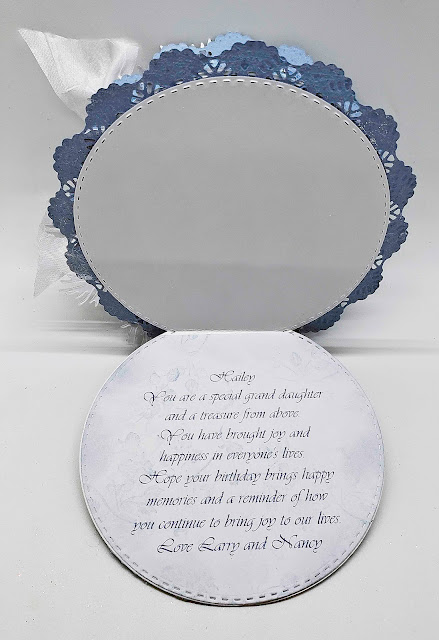
Sample of scoring and folding. Birthday sentiment was typed and printed and then die cut and adhered to the last layer of this easel card.

Step 6: Using the 4 1/4" circle die slightly over lapping on top (see section 1 as a sample), cut out a blue patterned paper from the Stamperia Blue Land paper collection and glue to the inside of the easel card.


Step 7: I glued on a snowflake and then glued the label with the "Merry Christmas" that was embossed with NUVO Embossing Silver powder. Note: Adhere some 3D foam pads or foam dots to act as a stopper for the front panel of the easel card to lock in behind the Merry Christmas Label when the card is being displayed. 

This is the easel card turned sideways so that you can see the layers as well as the 3D foam tape behind the label. I can mail this card this way but will continue to add more embellishments to finish this project which will cost more to mail. I figure that if I make a card for a special person, the extra cost of mailing is a no-brainer.

If you have any questions, don’t hesitate to leave me a comment below. I would love to hear from you. And do share with me your very own handmade Easel Card photos.
So get off your computers and start making one of these fun scalloped circle easel card like these! I hope I have inspired you try out these products available at The Rubber Buggy on-line store. My cards and projects are always posted on Saturday. Keep watching and thank you so much for those wonderful comments as well as suggestions.
Enjoy and Happy Crafting!
 |
Subscribe to:
Posts
(Atom)


