Showing posts with label stamping bella. Show all posts
Showing posts with label stamping bella. Show all posts
Thursday, September 2, 2021
Thanks with Stamping Bella
Hi everyone, Steph Ackerman here today with lots of fun products from the store.


Ciao Bella has some beautiful stencil and I've used Ciao Bella Blossom stencil to create the background of my card. I first inked the stencil with Ranger Distress Oxide Ink in Abandoned Coral.

Since I was using the stencil on dark cardstock, I then used Ranger Clear Embossing Powder on top to give the design dimension.

Since I usually get embossing powder everyway, the Sizzix Anti-Static Funnel Tray by Tim Holtz is the perfect tray to keep the powder confined and then it easily poured back into its original jar.

I matted the panel with white cardstock.

Wrapping the panel with ribbon, I then added the panel to a card created with Bazzill Pale Rose Cardstock using 3D Foam Adhesives for dimension.

I stamped Stampingbella's Daisy Squidgy and colored her with Copic Markers. Thanks, which was included with the stamp set, was stamped and tied to the ribbon with Baker's Twine.

Thank you for visiting.
Thursday, April 15, 2021
Swinging by....
Hi everyone, Steph Ackerman swinging by to say hi.


I stamped the image - Bundle Girl on a Swing from Stamping Bella - on white cardstock and colored her with Copic Markers. Next, I die cut her with Lawn Fawn Small Stitched Rectangle Dies. While still within the die, I added color with Distress Oxide Inks in Speckled Egg.

I then added some Distress Oxide Ink Stormy Sky.

Removing the die leaves a white edge around the image.

She was matted with Simple Stories Navy Cardstock, then Bazzill Gold Coins Cardstock that was die cut with Lawn Fawn Stitched Windy Backdrop Die.
The panel was placed on Bazzill Peppermint Cardstock, then added to the card.
The included sentiment was stamped, inked and matted with a scrap of the navy cardstock and added to the card with EK Success 3D Foam Dots.

Thank you for visiting.
Thursday, April 8, 2021
Stamping Bella Thanks Card
Hi everyone, Steph Ackerman here to share a sweet thank you card.
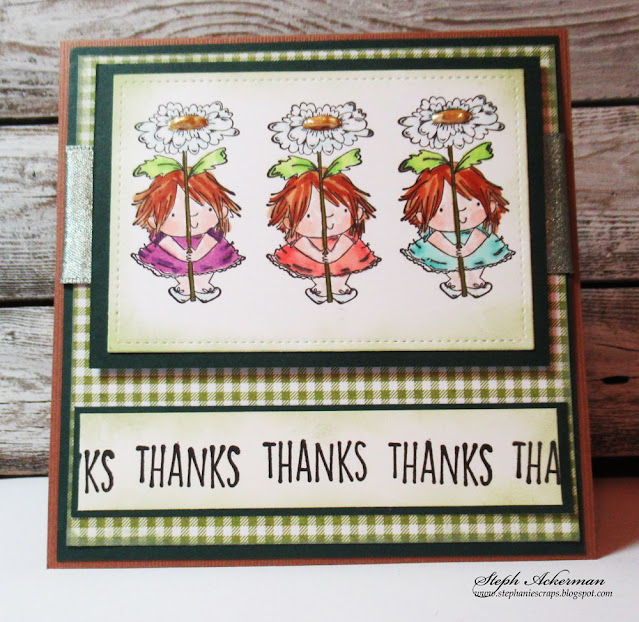


This Stamping Bella stamp set - Daisy Squidgy is so much fun to create with. The stamp set comes with 2 different sized images and a sentiment.

I stamped the smaller image three times on white cardstock, then die cut it with Lawn Fawn Small Stitched Rectangle Stackables. After coloring with Copic Markers, I added Liquid Pearls to the centers of the daisies. The panel was matted with Echo Park Dark Green Cardstock.

Creating a card from Echo Park Brown Cardstock, I wrapped a checked panel with ribbon and adhered the panel to the card.

Thanks was stamped repeatedly on a scrap of cardstock, then cut to fit the card.

Thank you for visiting
Thursday, December 10, 2020
Merry Christmas - Be Jolly
Hi everyone, Steph Ackerman here today with lots of fun products from the store. Please visit the store for all the fun products I've used today.

I created an easel card to showcase the Stamping Bella Woodsies Christmas Morning Chicks stamp set. The easel card was created from Bazzill cardstock and an older paper from a Graphic 45 Christmas collection was added to both layers. The image was stamped with Lawn Fawn Black Licorice Ink, then colored with Copic Markers. It was then die cut with Lawn Fawn Rectangle Die then edged with Heartfelt Creations Fleur Borders and Pockets Dies to give it a lacey edge. The panel was added to Bazzill Lollipop Cardstock.


Using a Lawn Fawn Line Border Die - Merry Christmas - I also die cut it from Lollipop cardstock.

The image was added to the card with Glue Dots for dimension. Merry Christmas was added across the front of the card using Art Institute Glue. Using Tutti Designs Oval Dies, I created the stopper for the card base adhering it with Glue Dots for dimension.

Folded up, the card slips into a square envelope for easy mailing.

Thank you for visiting
Thursday, April 23, 2020
Enjoy the Little Things
Hi everyone, Steph Ackerman here today with lots of fun products from the store. Please visit the store for all the fun products I've used today.

Heartfelt Creations has some wonderful dies and this Fleur Borders and Pocket Dies is no exception. This die set has 3 delicate dies and 3 background dies. Let me show you how I've used two of these dies today.

Starting with a sheet from Lawn Fawn's Knock on Wood paper pad, I selected the orange panel, cutting it to size. Next, I used Lawn Fawn's Vanilla Malt cardstock to die cut the filigree design, gluing it directly to the card with Tombow Mono Aqua Liquid Glue. I love the orange peeking out from behind the die.

The panel was added to a blue panel from the Lawn Fawn pack and brads were added to the die cut flowers. Several flowers from Prima Marketing's Capri Flowers were added to the corner. The stamp was inked with Memento Tuxedo Black Ink on Lawn Fawn's Vanilla Malt cardstock. I used Lawn Fawn Stitched Circle dies to die cut the phrase.


My next card uses the same die, plus the coordinating background die on another sheet of Lawn Fawn's Knock on Wood paper pad. Using a premade card, I cut a woodgrain panel from LemonCraft's House of Roses collection to fit, then used the die cut element as a pocket, adhering just the edges. Ranger Liquid Pearls were added to the die cut flower centers.

Thank you for visiting.
Thursday, April 16, 2020
Need a Hug? Card
Hi everyone, Steph Ackerman here today with lots of fun products from the store. Please visit the store for all the fun products I've used today.




Thank you for visiting

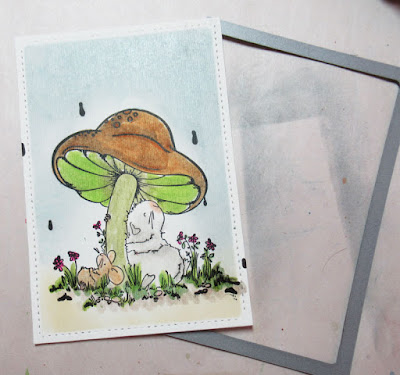
I stamped Stamping Bella's Gilbert and Maisy Under the Toadstool with Memento Tuxedo Black Ink, then colored the image with Copic Markers. Using Lawn Fawn Stitched Rectangle Dies, the image was die cut. Leaving the image in place, I added Ranger Distress Inks around the image using a Ranger Ink Blending Tool.

Removing the die, you can see a nice white edge around the image.

Creating a card from Bazzill Gumdrop cardstock, I added a panel from Lawn Fawn's Knock on Wood paper pad, then wrapped the card with Cotton Ribbon.

Matting the image with Bazzill Gumdrop cardstock, I added it to the card with Scrapbook Adhesives 3D Foam Squares for dimension. The sentiment was added to the corner.

To finish, Ranger Liquid Pearls in Merlot were added to the flower centers and the sentiment.
Thank you for visiting
Thursday, April 9, 2020
Happy Easter Cards
Hi everyone, Steph Ackerman here today with lots of fun products from the store. Please visit the store for all the fun products I've used today.

Have you seen the new Lindy's Stamp Gang products available in the store? They are absolutely stunning and such a wide variety of products.
I've used Shimmer Magicals - Drop Dead Diva pigment powders. I began by spritzing a sheet of Strathmore Watercolor Paper with water then dropped the powders on the paper.

Once the powders were dropped on the paper, I used a paint brush to move them about the paper. Then I spritzed additional water and moved the paper so the colors would run.

Once I liked the effect, I heat set the paper.

I created 2 cards from Bazzill Licorice cardstock then cut the spritzed panel to fit each card. Each card was then wrapped with May Arts Sheer Ribbon.

Stamping Bella's Bunny and Her Daffodil was stamped with Memento Tuxedo Black Ink and then colored with Copic Markers. Each image was then die cut with Lawn Fawn's Stitched Rectangle dies. While the die remained in place, I colored around the first image with Weathered Wood Distress Ink using the Ranger Ink Blending Tool.

The second image was inked as the first image, but this time I used Milled Lavender Distress Ink. I love the white edge of the cardstock that shows.


The sentiment, Just for You, is from the Wild Rose Studio Antique Roses stamp set, was stamped with Memento Tuxedo Black Ink, matted with Licorice cardstock and added to the card.

Thank you for visiting.
Thursday, January 2, 2020
Happy New Year with Friends
Hi everyone, Steph Ackerman here today with lots of fun products from the store. Please visit the store for all the fun products I've used today.


I stamped Stamping Bella's Felicity and Blair with Memento Tuxedo Black Ink on Bazzill Marshmallow cardstock, then colored them with Copic Markers.


Thank you for visiting

It's a New Year and time to celebrate what is to come. Using papers from Maja Design Holiday in the Park 6" x 6" pattern pack, I cut the papers as shown. Each layer was inked with Ranger Tea Dye Distress Ink then matted with Bazzill Wax Lips cardstock. The top panel was wrapped with ribbon.


The image was die cut with Lawn Fawn Stitched Rectangle dies, inked with Ranger Tea Dye Distress Ink then matted with a die cut larger panel.

Finally the phrase was stamped on Bazzill Marshmallow cardstock, inked with Ranger Tea Dye Distress Ink, matted with cardstock then added to the card with Scrapbook Adhesives for dimension.

Thank you for visiting
Tuesday, November 26, 2019
Merry Christmas From All Of Us

Hi Everyone it's Jennifer here and I have used the
Oddball Snowman and the Lawn Fawn Peekaboo Backdrop
to Create this Shaker Card Christmas Card.
Oddball Snowman and the Lawn Fawn Peekaboo Backdrop
to Create this Shaker Card Christmas Card.
I have used 3 of my favorite Oxide Inks for backgrounds
Chipped Sapphire, Blue Print Sketch and Broken China.
I have then sprayed it using perfect pearls in a spray bottle of
water that gives it an Awesome Sparkle. I then did a white splatter
with watered down Copic Opaque White and a brush.
I glued the Mountains onto the bottom of it.
I glued the Mountains onto the bottom of it.

I coloured my Snowman up using
Copics
Copics
Snowman - C00, C0, C01, C3
Reds - R39, R37, R35, R32
Greens - G12, G16, G19
Orange - YR12, YR15, YR68
Black - C05, C07, C09
Reds - R39, R37, R35, R32
Greens - G12, G16, G19
Orange - YR12, YR15, YR68
Black - C05, C07, C09
I covered the back of the Die with a piece of Acetate and then
used 3D foam around all the edges to create a Shaker.
I then filled one section with white beads ar little foam balls.
3D Taped the Snowman on the front and a sentiment to finish it off.


Bazzill

I hope you all have a Great Crafting Week
Jennifer
Jennifer
Subscribe to:
Posts
(Atom)


