Saturday, August 28, 2021

Barn Shaped Card


Howdy! Nancy, here.  Lately, I have been spending too much time in our barn bottle feeding a calf and during that time, dreaming up of a barn shape template.  I created a barn shaped card with fun stuff inside each card.  


Supplies:  
Popsicle Sticks
Cream Cardstock
White ruffled ribbon

Instructions:


1.  Cut out 2 front barn doors 2" x 1 3/4" .  Cut out 1/4" strips of cream cardstock and glue the strips around the barn doors and in the center.
2.  Paint two popsicle sticks with brown paint and then sponged on a little Prima Marketing Brass wax. I used a wire cutter knife and cut each stick through the center lengthwise.  Then cut again with scissors or the wire cutter a 6" strip, 4 strips measuring 1/2" long and 1/4" wide.  Don't stress about getting the exact measurements and a perfect straight lines for the popsicle sticks since this is a rustic barn. 
3.  Score in the center a 12" cream cardstock.  Lay out the template and put the bottom left side of the barn on the score line and cut out the barn.    Adhere glue to the bottom half of the barn and lay the flowery paper on the glue and then cut out the sides.  It is easier to do this than measuring and trying to get a good fit.
4.  Take the Graphic 45 Farm House sticker border and adhere across the barn.
5.  Cut out strips of 1/4" wide strips and glue around the top of the barn with a little bit sticking out from each side.  
6.  Take the Graphic 45 Farm House sticker and stick to the center of the bottom of the barn.
7.  Use glue to adhere the 6" x 1/4" painted popsicle strip across the barn.
8.  Adhere the 4 hinges made from the 1/2" long and 1/4" wide popsicle sticks to the tops of the barn door.  Adhere the other 2 hinges to the center of each door.
9.  Since the hinges glued to the border hinge added too much space for behind the door, I added 3D Foam Circle  3D Foam double side adhesive strips to the back of each door and adhered to the card.
10.  Add NUVO Ebony Black dots to the hinges and wooden popsicle border.

Inside:
1.  Adhere glue to the top half of the barn and lay the poke-a- dot black paper on the glue and then cut out the sides.
2.  Cut out a 3" x 5" of Graphic 45 Farm House wheat pattern paper and the black wired pattern paper.  Score each in half down the width, fold and use your bone tool to get a strong center score.  I have a rectangle die that cuts out a  2 1/4" x 5" window.  Otherwise, you can just draw and cut out on the score line a 2 1/4" x 2 1/2" length rectangle with scissors.  Take the wheat pattern paper and glue to the center of the bottom of the barn.  Take the wired black pattern paper and glue on the sides to the end of the wheat pattern paper for the tunnel.  I made a tutorial on how to do insert tunnel cards by clicking HERE.
3.  Cut out 3" x 3" Graphic 45 Farm House flowery red paper and glue on each end.  
4.  Cut out a 4" white ribbon and I used 1/8" Scor-Pal double sided adhesive tape to tape the top of the ribbon behind the window.  I adhered the Simple Stories Vintage die cuts to the inside and outside of the tunnel.  

5.  I cut out 4" x 2" cream cardstock and folded it in half.  I adhered with glue behind a Simple Stories Vintage Stories Garden die cut and glued to the right side of the card for my sentiment.
6.  I added the Lawn Fawn Hay There stamp "Happy Birthday" "From the Whole Herd" to the Graphic 45 Sticker and stuck it to the top of the barn on the inside.


7.  I cut out a 1 1/4" x 1 3/4" Graphic 45 wheat pattern paper, added the 1/4" wide cream strips and a Graphic 45 baby chicken sticker to this window.  I glued the moss on the bottom of the window to look like hay.  
8.  I added the wind mill and cow die cut from the Simple Stories Vintage Farm house package.  If you don't like how white the wind mill is against the background, just lightly sponge on Distress Vintage Photo ink or a cream color ink on it.  

So have fun making these barn shape cards for a good ole country loving person.

So get crafting and have a fabulous day and thanks for visiting.

 The Rubber Buggy has the crafting supplies for your next project. So have fun crafting this weekend with these products.   My cards and projects are always posted on Saturday.  Keep watching and thank you so much for those wonderful comments as well as suggestions. 

Enjoy and Happy Crafting!


Thursday, August 26, 2021

Thinking of You with Lawn Fawn

Hi everyone, Steph Ackerman here today with lots of fun products from the store.


This sweet card uses the Lawn Fawn Tropical Laves Backdrop.


I die cut the backdrop from white cardstock, then used assorted colors of Ranger Distress Oxide Inks in Marigold, Mowed Lawn and Tea Dye to add color to the backdrop.  I matted it on white cardstock then added the panel to a card.


The die set came with some small elements which you can easily clip apart.  I chose to keep them intact as I tend to misplace little pieces.  I die cut them from Ranger Kraft-Stock - Cool.


I stamped the bird from Memory Box Bird Sanctuary Stamp set, colored with Copic Markers and then fussy cut.  Thinking of You was stamped with Lawn Fawn Black Licorice Ink directly on the white panel.


Thank you for visiting
Saturday, August 21, 2021

Christmas Card with Zuri Designs Flower Festival mould

Welcome back and Nancy, here.  I have a fun Christmas card to share with you that was fun to make as well as a lot of "thinking outside the box" creation with using molds, embossing 3D dies, acrylic paints and of course, I always need to add a handmade bow to a shabby chic card like this one.


Supplies:

Zuri Designs Mould - Flower Festival mould with A1 Creative White Stone Resin or epoxy resin 

Frame mould and floral leaves in my collection  

Cardstock:  Stamperia Pink Christmas Paper Collection for frame, Stamperia Ceremony Paper journal card behind image, Gold Metallique cardstock and Pink Cardstock

Tim Holtz/Sizzix 3D Impresslits Large Scallop Embossing Die Set

Handmade seam binding bow

Beacon 3-n-1 Advanced Glue

Prima Marketing Acrylic Paints:  Prima Marketing Metallique Vintage Rose, Prima Marketing Sparks Magical PondRedesign Decor Wax BrassPrima Marketing Rose Gold Wax.

Instructions:

The card measures 5" x 7 1/2".  The pink frame measures 5" x 7 1/2" of pink cardstock.  The second layer is metallique gold cardstock measuring 5 1/4" x 6 1/4".  The Stamperia Pink Christmas paper on the third layer measuring 5" x 7".  I cut out the Stamperia Ceremony Paper journal card and centered it to the card with the Tim Holtz/Scallop Embossing die border that was cut out with gold metallique paper and sponged on with Prima Marketing Rose Gold wax which was glued behind the journal card.  I cut out the Stamperia Pink Christmas images and adhered it behind the resin oval frame that was previously sponged with Prima Marketing Redesign Brass wax.

I created my moulds with epoxy resin since I will be mailing it and the epoxy resin is almost like plastic and won't break in the mailing.  I let dry over night and sprayed a primer on the mould.  I painted the flowers with the gorgeous Prima Marketing Vintage Rose pink paint for the roses and Prima Marketing Magical Pond for the leaves.  The blue leaves coordinate well with the background of the image.

I used Beacon 3-n-1 Advanced glue to adhere the moulds to the cardstock.  I had some green floral leaves from cardstock and a handmade seam binding bow and adhere behind the mould. 

Actually with the two moulds made out of epoxy resin, the card is light weight but still will probably be mailed as a package due to the thickness.  Overally, a very unique and beautiful Christmas card for a very special person which is worth the extra cost of mailing.

So have fun with these moulds and would love to see what you created today.  Join the fun and post your projects and cards on The Rubber Brigade Facebook Group page.

So get crafting and have a fabulous day and thanks for visiting.

 The Rubber Buggy has the crafting supplies for your next project. So have fun crafting this weekend with these products.   My cards and projects are always posted on Saturday.  Keep watching and thank you so much for those wonderful comments as well as suggestions. 

Enjoy and Happy Crafting!


Thursday, August 19, 2021

Chipboard Christmas Tags

Hi everyone, Steph Ackerman here today with lots of fun products from the store.  

I'm using a fun set from Scrapiniec - Workshop Kit Cards - Old Fashioned Christmas.  This kit includes an assortment of chipboard elements that can be used together or separately to create an assortment of tags, cards, or even consider a mini album.


I've used papers from Maja Vintage Autumn Basics.  Since the papers are double sided, I chose to you both sides, then mixed and matched other papers from this collection to decorate 2 of the tags.


Ranger Distress Oxide Ink in Brushed Corduroy and Chipped Sapphire along with  Lawn Fawn Freshly Cut Grass were used to add color to the elements.


Using the tags as stencils, I cut the base papers to fit, then tore additional papers.  I distresssed the edges to get an "old world" effect.


Merry Christmas was die cut using papers from the same collection with a Lawn Fawn Border Die.  Finally, I used twine to complete the tags.


Thank you for visiting
Saturday, August 14, 2021

Zuri Designs Owl Tales Shadow Box

Welcome back and Nancy, here.  The Rubber Buggy has a new line of Zuri Design moulds and I want to share an altered shadow box made with the Zuri Designs Owl Tales mould along with another mould that I thought coordinated well with this owl.  I was inspired to do work with this owl since we have Great Horn owls screeching next to our bedroom window all night long.  Their screeching means that they have a little family nearby probably in our barns.  This winter, they will be hooting rather than that screeching which is more of a pleasant sound from these owls. 

There is so many possibilities of what to do with this owl.  You can put this owl on a cake using a special icing but I was torn between gluing this owl on a vase, on an Apache Tear hanging or in a shadow box.  Since I had this pine cone and branch mould, I decided to glue this owl inside a shadow box with the pine cones and branches on the outside.  

The owl was created first with the A1Creative White Stone resin.  I sprayed the owl with a primer spray and then colored with Prima Marketing waxes and acrylic paints.  

I covered the shadow box with Stamperia Forest paper using Beacon 3-n-1 Advanced glue and sandpapered the edges and sponged on Ranger Distress Vintage Photo and Ranger Distress Ground Espresso ink to blend with the side of the frame which wasn't covered with paper.
 
All of you know I love my Prima Marketing waxes besides the Prima Marketing acrylic paints.  Of course, my favorite is the Prima Marketing Decor Brass wax and Prima Marketing Firebird wax.   I used a paint brush for the waxes and paints.  I used some Prima Marketing Green Goblin,  Prima Marketing Blue Lagoon and Prima Marketing Golden Moss acrylic paints for the pine branches and details in the owl.  I just love the golden sheen in the Golden Moss green paint.  I adhered with a hot glue gun the Prima Marketing Finnabair Vintage Art Pebbles in the center of the owl as well as gluing the owl inside the shadow box.   I used glue to add some moss around the owl to blend into the shadow box.
Zuri Designs Owl Tales mould

So have fun with these moulds and would love to see what you created today.  Join the fun and post your projects and cards on The Rubber Brigade Facebook Group page.

So get crafting and have a fabulous  day and thanks for visiting.

 The Rubber Buggy has the crafting supplies for your next project. So have fun crafting this weekend with these products.   My cards and projects are always posted on Saturday.  Keep watching and thank you so much for those wonderful comments as well as suggestions. 

Enjoy and Happy Crafting!


Thursday, August 12, 2021

Mixed Media Tags with Simple Stories

Hi everyone, Steph Ackerman here today with lots of fun products from the store.  


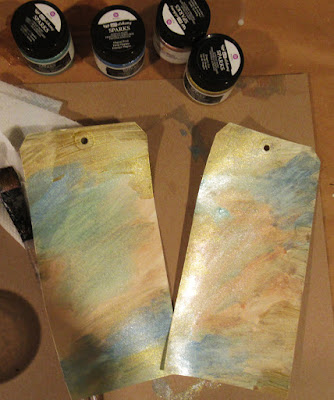
Wanting something a little different, I used Prima Marketing Art Alchemy Acrylic Paints on large tags from Dylusions Journal Tags #10.  The colors are gorgeous so I mixed up an assortment of colors including Ice Queen, Gold Amber, Frozen Berries and Soft Satin and painted them randomly on the tags.


Next I used one of the Ciao Bella Stencils with Lawn Fawn's Freshly Cut Grass Ink, randomly adding a pattern around the tag.


Net I cut apart Simple Stories Simple Vintage Farmhouse papers to decorate the tags.


I also fussy cut the words to fit the tags.  This is a little time consuming as the words are delicate, but the results were worth it.


Next, I used a script stamp (similar to this Ciao Bella Stamp) and randomly stamped it about the tags.  Then I added May Arts Celery Green Sheer Ribbon to finish off the tags.


Thank you for visiting
Saturday, August 7, 2021

Shabby Chic Flower Vase


Welcome back and Nancy, here.  I am fairly new with castings and moulds and with The Rubber Buggy expanding their mould products and supplies, I decided to add to my crafting adventures and experiment using their new line of Zuri Design mould along with one older Prima Marketing mould along with their new line of A1 Creative Resin.  I have used the Stamperia soft moulds in the past posted on my blog on gift boxes which are wonderful to use.

I bought this used flower vase that had no finish to it.  If you haven't done any casting in a mould with resin, check out my U-Tube Video by clicking HERE.

1.  I used 1Creative White Stone Resin to the Zuri Design Flower Festival mould and let dry 24 hours.  A few weeks ago, I used Art Resin epoxy resin to the Zuri Design Wings in Wind and Prima Marketing Vintage Art - Louise mould and let dry 24 hours.

2.  I glued  the castings from the moulds to the flower vase with a hot glue gun.  Overall, I would have not had to break the flowers to adhere to the mould if I casted them with epoxy resin.  I used a hot glue gun to the broken parts of the flower to the vase.

3.  Sprayed the vase with the castings with Rust-Oleum Bonding Primer and let dry.


5.  I glued to the side of the flowers the Stamperia Glamour Sparkles Green to add to the shine.

6.  Added some rhinestone bling to the dragonfly.

7.  I sponged on the Prima Marketing Royal Robes wax to the vase. 

8.  I adhered the Prima Marketing Pumpkin and Spice SIIC crystal to the center of the casting on top of the vase with a hot glue gun.  

9.  I sprayed on the Rust-Oleum Lacquer to cover the castings and vase for that glossy finished appearance and so that the colors will not rub off if water come into contact with the vase.  

So have some new adventures and try out these moulds and gorgeous colors to paint them.


So get crafting and have a fabulous  day and thanks for visiting.

 The Rubber Buggy has the crafting supplies for your next project. So have fun crafting this weekend with these products.   My cards and projects are always posted on Saturday.  Keep watching and thank you so much for those wonderful comments as well as suggestions. 

Enjoy and Happy Crafting!


Thursday, August 5, 2021

Simply Sweet Daisy Cards

Hi everyone, Steph Ackerman here today with lots of fun products from the store. 


Start by die cutting the Daisy base from green and yellow cardstock and the top layer from white cardstock.


Assemble the layers.  You can either use the yellow base for the daisy topper or inlay the yellow petals once the white  layer has been placed.


Cut Memory Box Woodgrain White Cardstock 4" x 5 1/4".  Die cut thanks from Lawn Fawn Thanks Line Border Die and place across each panel.  Add the daisies placing the top one with 3D Foam Adhesives for dimension.


 Using Lawn Fawn Gemstone Cardstock, create the cards, then adhere the  panels.


Thank you for visiting

Total Pageviews

Related Posts Plugin for WordPress, Blogger...

Powered by Blogger.