Tuesday, April 30, 2013
Divine washi & fabric tape
Hi everyone!
I'm playing with washi, I got the Prima divine washi & fabric tape and it's gorgeous!!

I'm a bit new on the washi and banner trend (I know I'm slow, but I'm doing my best to catch up), please help me and tell me what I could have done to make it perfect:)
I'm liking how the colours pop layered on black, but now I'm thinking I should have gone for a tag instead of a card - help me and I'll make that my next project crediting you!
Products used from the rubber buggy:
Prima Divine washi and fabric tape
WOC hip rosebuds
WOC open rose 25mm
MFT die-namics flourish
Thank you for visiting!
Hugs Pi
I'm playing with washi, I got the Prima divine washi & fabric tape and it's gorgeous!!
I'm a bit new on the washi and banner trend (I know I'm slow, but I'm doing my best to catch up), please help me and tell me what I could have done to make it perfect:)
I'm liking how the colours pop layered on black, but now I'm thinking I should have gone for a tag instead of a card - help me and I'll make that my next project crediting you!
Products used from the rubber buggy:
Prima Divine washi and fabric tape
WOC hip rosebuds
WOC open rose 25mm
MFT die-namics flourish
Thank you for visiting!
Hugs Pi
Saturday, April 27, 2013
Shaped Magnolia Card 'Tilda sitting with butterlfy' by Deb.x
Hi all it's Deb here and it's my day to post here at The Rubber Buggy. I have made a shaped Magnolia card using one of the new Tilda's & I just love her...how adorable?!! She is 'Sitting Tilda with Butterfly' from the new 'Once Upon a Time `13' collection as of course all you avid Magnolia fans will allready know - how loyal & enthusiastic are Magniolia fans?!! ;)

My card is sporting beautifully my new and long awaited purchase in the form of one brand spanking new Martha Stewart clay kit...& WOW...I LOVE THIS KIT!!! How soft & pliable is the clay? I just can't get over how soft it is - it's really feels more like sponge! 10 out of 10 for ease of use & same again for results (see white clay corners & frame), Iookin' good!

The card blank is die cut with Go Kreate Frilly Frame #5. Papers are by Prima and have been inked and sewn around the edges. I've also used Doo Hickey Lovely Fence & So Wrapped Lovely dies and Tim Holtz Butterflight Movers & Shapers die to make the 2 larger butterflies.

DISTRESS INKS:
Skin: Tattered Rose, Vintage Photo
Hair: Antique Linen, Walnut Stain
Cheeks: Aged Mahogony
Dress & butterfly body: Pumice Stone, Frayed Burlap
Tights & butterfly wings Victorian Velvet, Aged Mahogony
Shading: Pumice Stone, Walnute Stain, Black Soot
I added Crystal Glamour Dust to the tights & butterfly body and Crakle Accents to the butterfly wings.

Above shows Tim Holtz Butterflight on the edge die, bottom layer cut from coreogated card taken from an old box & top layer cut from Core'dinations Whitewash cardstock - as is Floral Oval Spellbinders die. have been inked with Walnut Stain using a blending tool.

Above shows the Martha Stewart clay frame with LOTV sentiment.
Rubber Buggy Products Linked Below:
Thank you for visiting
Friday, April 26, 2013
Tilda with Hanging Rabbit
Hi Everyone!!! Dawn here on this fabulous Friday with my post for The Rubber Buggy, to show you some more inspiration using some wonderful stamps and products from the Store.
Today I used a few stamps called "Tilda with hanging rabbit" from The Butterfly Dream Collection 2011 Magnolia Tilda Collection.

See you all back next Friday with some more inspiration. Check out the challenge blog for an awesome challenge, we'd love to see you participate.
Happy Stamping!!!!!


See you all back next Friday with some more inspiration. Check out the challenge blog for an awesome challenge, we'd love to see you participate.
Happy Stamping!!!!!
Wednesday, April 24, 2013
DT Project Saturated Canary Balloon Wishes by Kelly
Hi everyone it's Kelly and I have my weekly design team project to show you for The Rubber Buggy.
I used the image Saturated Canary Balloon wishes which you can get, as well as many other amazing Saturated Canary stamps in many styles. I made a giftbox for my daughters little friend for her
birthday. It's all about the bright colors, which led me to do some
purple hair. I just love it! I have the copic colors listed below. I hope you can see which ones are shown. So
check it out and leave me a comment to tell me what you think of purple
hair? Should it stay or should it go? Hee hee! ~Kelly Walkelmol


Thank you for visiting


Thank you for visiting
Just Because
Good morning, Steph here again with some fun Bild Malarna Stamps. It's so much fun to build your image when combining stamps!

I used So Sweet and perched her on Stone. I colored each image with the following Copic Markers:
Perfect Primaries
Pale Pastels
Floral Favorites
I selected paper from Prima's Londonerry paper pad. To focus on the image, I used Spellbinders circle dies and perched her on top.

Thank you for visiting.

I used So Sweet and perched her on Stone. I colored each image with the following Copic Markers:
Perfect Primaries
Pale Pastels
Floral Favorites

Thank you for visiting.
Tuesday, April 23, 2013
Prima paper meets G45 stamps
Hi everyone!
Have you checked out Kellie's store lately? It is packed with new goodies. If you haven't been there for a while check out the new Magnolia & Magnolia mini stamps, the MFT dies and paper flowers from Wild Orchids craft!!!! Yay! What are you waiting for:)
For this week I have mixed some G45 cling stamps, French country with some Prima Almanac collection papers.


Products used from the store:
Prima Alamanac paper pad 6x6 with a hint of Prima engraver
Cling stamp by Graphic 45, french country
Spellbinders dies postage
Distress ink vintage photo, peeled paint, victorian velvet, black soot
MFT decorative doily die-namics
Thank you for visiting
Hugs Pi
Have you checked out Kellie's store lately? It is packed with new goodies. If you haven't been there for a while check out the new Magnolia & Magnolia mini stamps, the MFT dies and paper flowers from Wild Orchids craft!!!! Yay! What are you waiting for:)
For this week I have mixed some G45 cling stamps, French country with some Prima Almanac collection papers.
 |
| Archival ink in jet black & olive green |
 | |||
| The fishtail banners are cut from the paper pad, the butterfly is a punch from Mc Gill with some pink flatback pearls |
 |
| All decorations is elements cut from the paper 6x6 |
Prima Alamanac paper pad 6x6 with a hint of Prima engraver
Cling stamp by Graphic 45, french country
Spellbinders dies postage
Distress ink vintage photo, peeled paint, victorian velvet, black soot
MFT decorative doily die-namics
Thank you for visiting
Hugs Pi
Monday, April 22, 2013
Violets and Lily Valley
Happy Monday everyone! Indah here with an elegant card I made using one of my favorite Graphic 45 collection.

I used Graphic 45 SECRET GARDEN 12 X 12 Paper Pad. I die cut a doily shape using their gorgeous violet colored patterned paper then embellished it using some flowers and rhinestones. The stamps are cut out from one of the patterned paper.
Hope you enjoy my card :)

I used Graphic 45 SECRET GARDEN 12 X 12 Paper Pad. I die cut a doily shape using their gorgeous violet colored patterned paper then embellished it using some flowers and rhinestones. The stamps are cut out from one of the patterned paper.
Hope you enjoy my card :)
Magnolia 'Ice Tilda' tag by Deb.x
Morning Crafters I am posting today for a post I scheduled for my Saturday slot & for some reason didn't get published - my appologies, I'll get it right third time around (I hope!).
Today I have simple a tag card with coloured Magnolia image.The 'tag card' is folded at the top so it opens tent stlye, basically it looks like a tag & opens like a card. To make I create a 6x4" tent fold card blank and with the card in portrait orientation trim one of the top corners (either with scissors if your free hand cutting is ok or with a trimmer if prefered), then turn the cut off corner piece over back to front & position over the other top corner to use as a guide - this way the conrers will be of equal size and angles (just ensure you get it the correct orientation when cutting).

Image is 'Ice Tilda' from the 2011 Christmas collection, I colour with Tim Holtz Distress Inks onto watercolour paper. The glitter is Crystal Glamour Dust and is applied to the skirt, ice boots, collar and ear-muffs.

Distress Inks:
Skin - Tattered Rose, Pumice Stone
Hair - Antique Linen, Pumice Stone
Ear Muffs, Collar, skirt & boots - Milled Lavendar, Pumice Stone
Hand muff & socks - Pumice Stone

Dies Used:
Spellbinders Ovals
Spellbinders Fancy Ovals
Spellbinders Fancy Tags 3
Doo hickey Foliage

Rubber Buggy Materials:
Thank you for visiting
Friday, April 19, 2013
Princess Pea Tilda
Hi Everyone!!! Dawn here on this fabulous Friday with my post for The Rubber Buggy, to show you some more inspiration using some wonderful stamps and products from the Store.
Today I used a few stamps called "Princess Pea Tilda" from The Once Upon a Time Collection 2013 Magnolia Tilda Collection.

I also used some WOC flowers, which are now available in the store.
See you all back next Friday with some more inspiration. Check out the challenge blog for an awesome challenge, we'd love to see you participate.
Happy Stamping!!!!!

I also used some WOC flowers, which are now available in the store.
See you all back next Friday with some more inspiration. Check out the challenge blog for an awesome challenge, we'd love to see you participate.
Happy Stamping!!!!!
Thursday, April 18, 2013
In My Garden
Hi everyone, Steph here today.
These Bildmalarna stamps are perfect to use together. I stamped the Mimosa I Forgot on Copic Xpress- It cardstock, then stamped the Mimosa Fence. Using a mask on the main image helped create the illusion that she is standing in front of the fence.

I colored the image with the following Copic Markers:
Skin Tones
Floral Favorites
Bold Primaries
I created a large circle for the image to sit on and surrounded her with beautiful floral paper from Prima's Londonerry paper pad. Then I wrapped some beautiful May Arts Grossgrain Ribbon around the card before adhering the circle.
Thank you for visiting today.
Wednesday, April 17, 2013
Prima Hello Pastel 12 x 12 layout "Family"
Hello everyone it's Kelly. You may have noticed that I have been doing quite a bit with the Hello Pastel collection, well there is so much you can do with this paper and embellishments that I am addicted and cannot stop. I wanted to share with you a layout I made to enter over at the Prima BAP challenge but almost everything you see you can purchase over at The Rubber Buggy.
This was a very simple layout and didn't require a lot of time so it's one that would be easy for anyone to do and not feel intimidated about as I do sometimes with the more detailed projects.

I used:
Hello Pastel 6x6 paper line
Hello Pastel flower embellishments
Thank you for visiting ~Kelly Walkelmol for The Rubber Buggy
Tuesday, April 16, 2013
Magnolia Pop-up card with Masking Tutorial
Hello Rubber Buggy fans I'm Deb from Manchester, England and this is my very first post for The Rubber Buggy! Firstly my upmost appologies as this should have been posted on Saturday, which will be my day to post.

I have made a Pop-up card with a scene background I created by using a masking technique. Please see the tutorial below on the masking technique.

Above the sentiment is by LOTV on a Spellbinders oval die, layered over a Spellbinders ornate oval die cut from Bazzil cardstock. Flowers are a mixture, small white ones are by Kort & Godt and berries are by Magnolia.

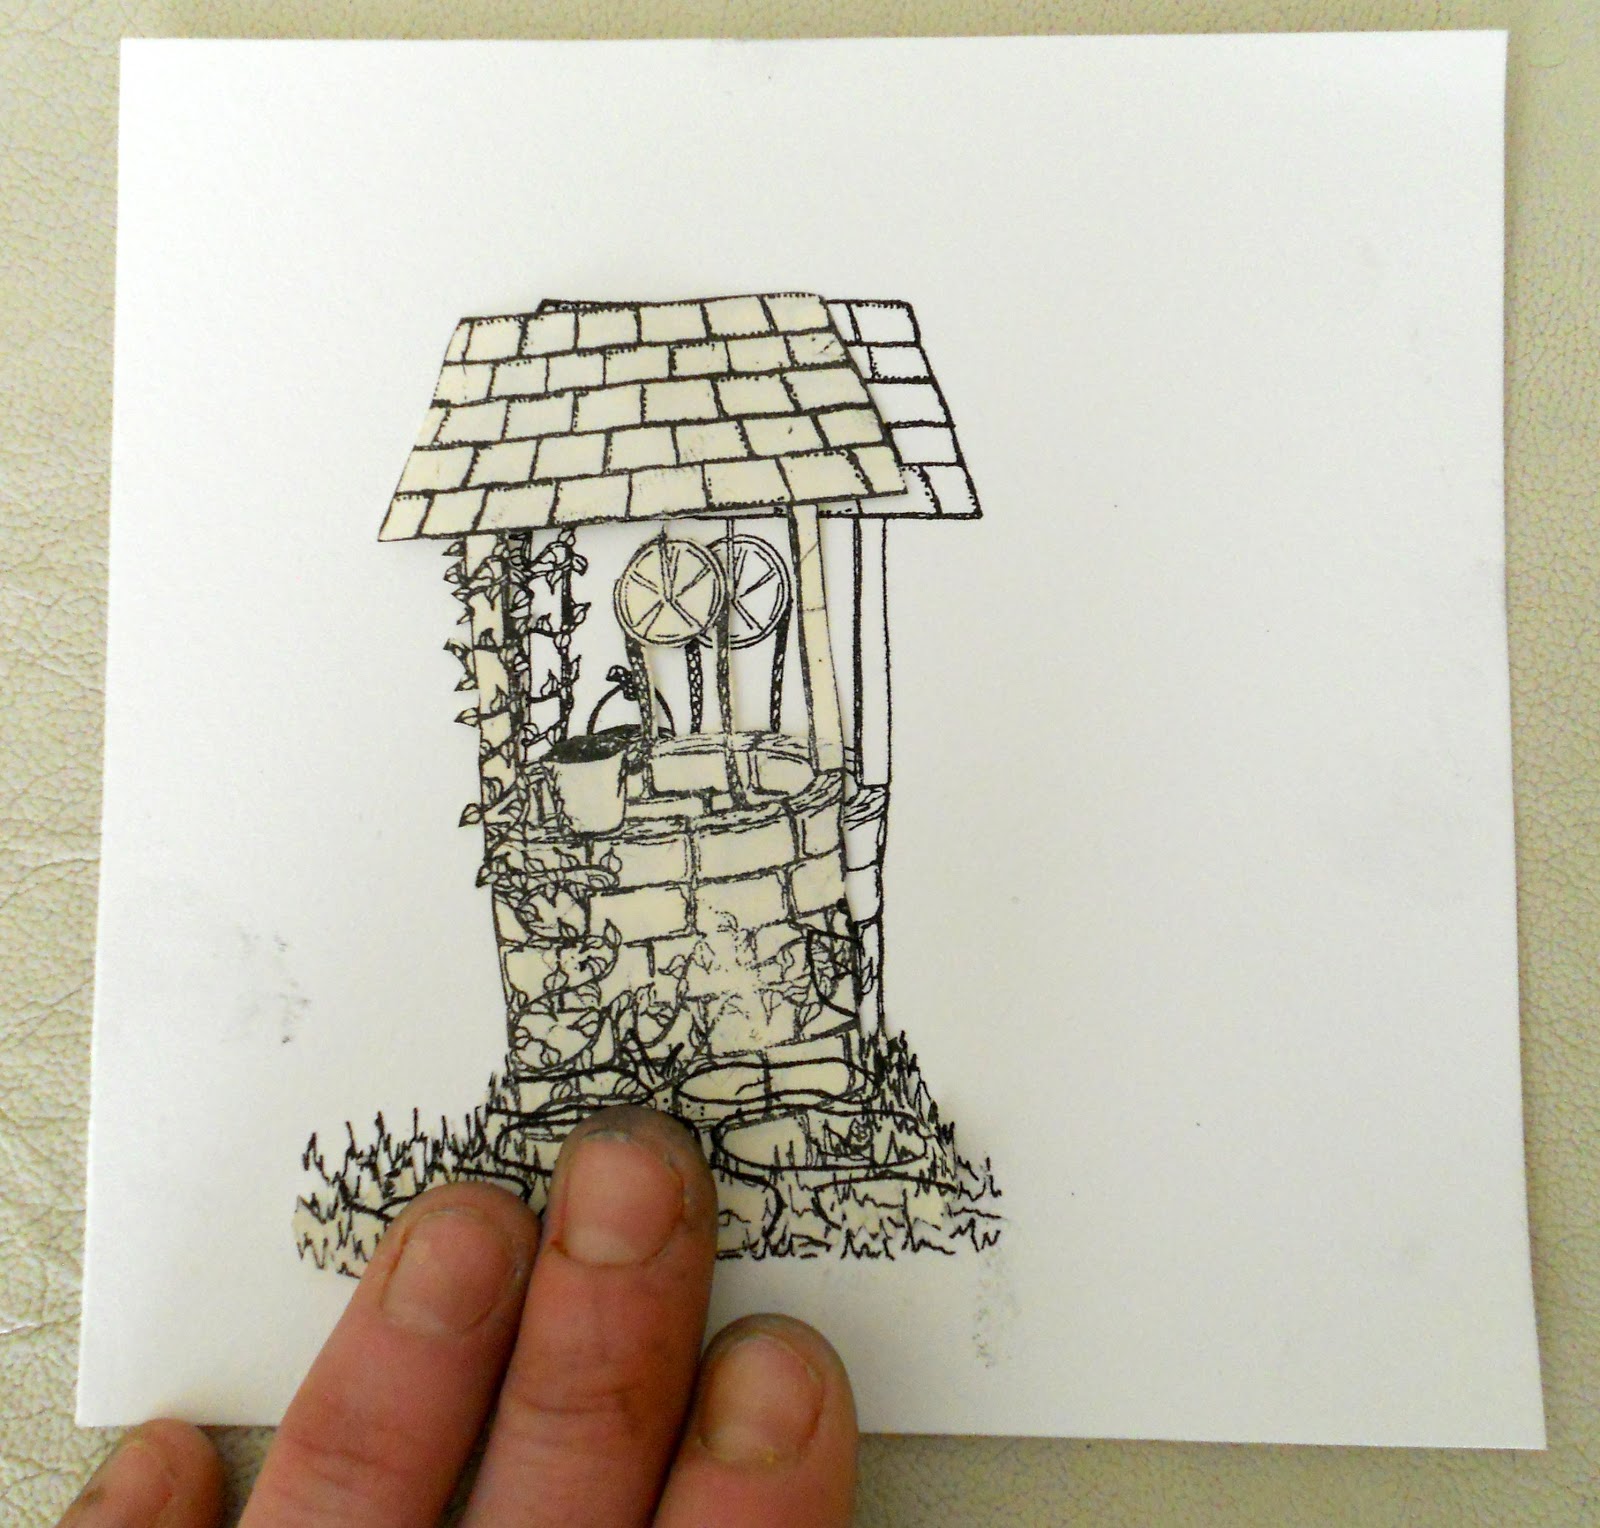
The Tildas are 'Hello Little Butterfly' and 'Kneeling Tilda' from the Butterfly Dreams 2011 collection. The stone path is from the same collection, the cloud is from the With Love 2013 collection, and the wishing well is actually a Pixie Cottage stamp.

All the images have been coloured with Distress Inks & highlighted with Crystal Glamour Dust.

The Pop-up elements have been added by creating a 3D box (shown below). Begin by cutting a cm strip of card then score 4 lines - here the left pop-up is scored at approx 2", 1", 2", 1" intervals to give an idea of size. When folded into a box with the end secured they need to be adhered on the back side and bottom right up to the crease when the card is at a right angle, then position your pop-up element (in this case the Tilda's) and adhere to the front side. The card and pop-up elements should fold away flat when the card is closed, then 'pop-up' when opened.

MASKING TUTORIAL:
Make the scene above in 11 easy steps!
The general principle of masking technique is to stamp the object that is nearest to the point of view and gradually work backwards, in this case the wishing well is nearest to the front so we'll begin with that...

Step 1) Begin by cutting a square of watercolour card approx 5" (I use Langton extra smooth Hot Pressed). Stamp the Pixie Cottage wishing well image slightly to the left hand side.

Step 2) Stamp the same image again onto scrap paper and carefully cut out.
Step 3) Position the cut out wishing well directly over the origional image.

Step 4) With the 'mask' in place now stamp the stone path image, positioning so the wishing well is in the middle of the flowers that are on either side of the stone path stamp. (pic shown with mask removed)

Step 5) Re-position the mask then stamp the Magnolia cloud (from the 2013 With Love collection) so it overlaps the laft hand side of the wishing well.

Step 6) (Note: the rest of the card is created without need for the mask) Stamp another cloud to the top right.

Step 7) Position the Stone Path here (to the right of the origional stone path) and stamp.

Step 8) Repeat the previous step with the Stone Path here (now to the left) and stamp again.
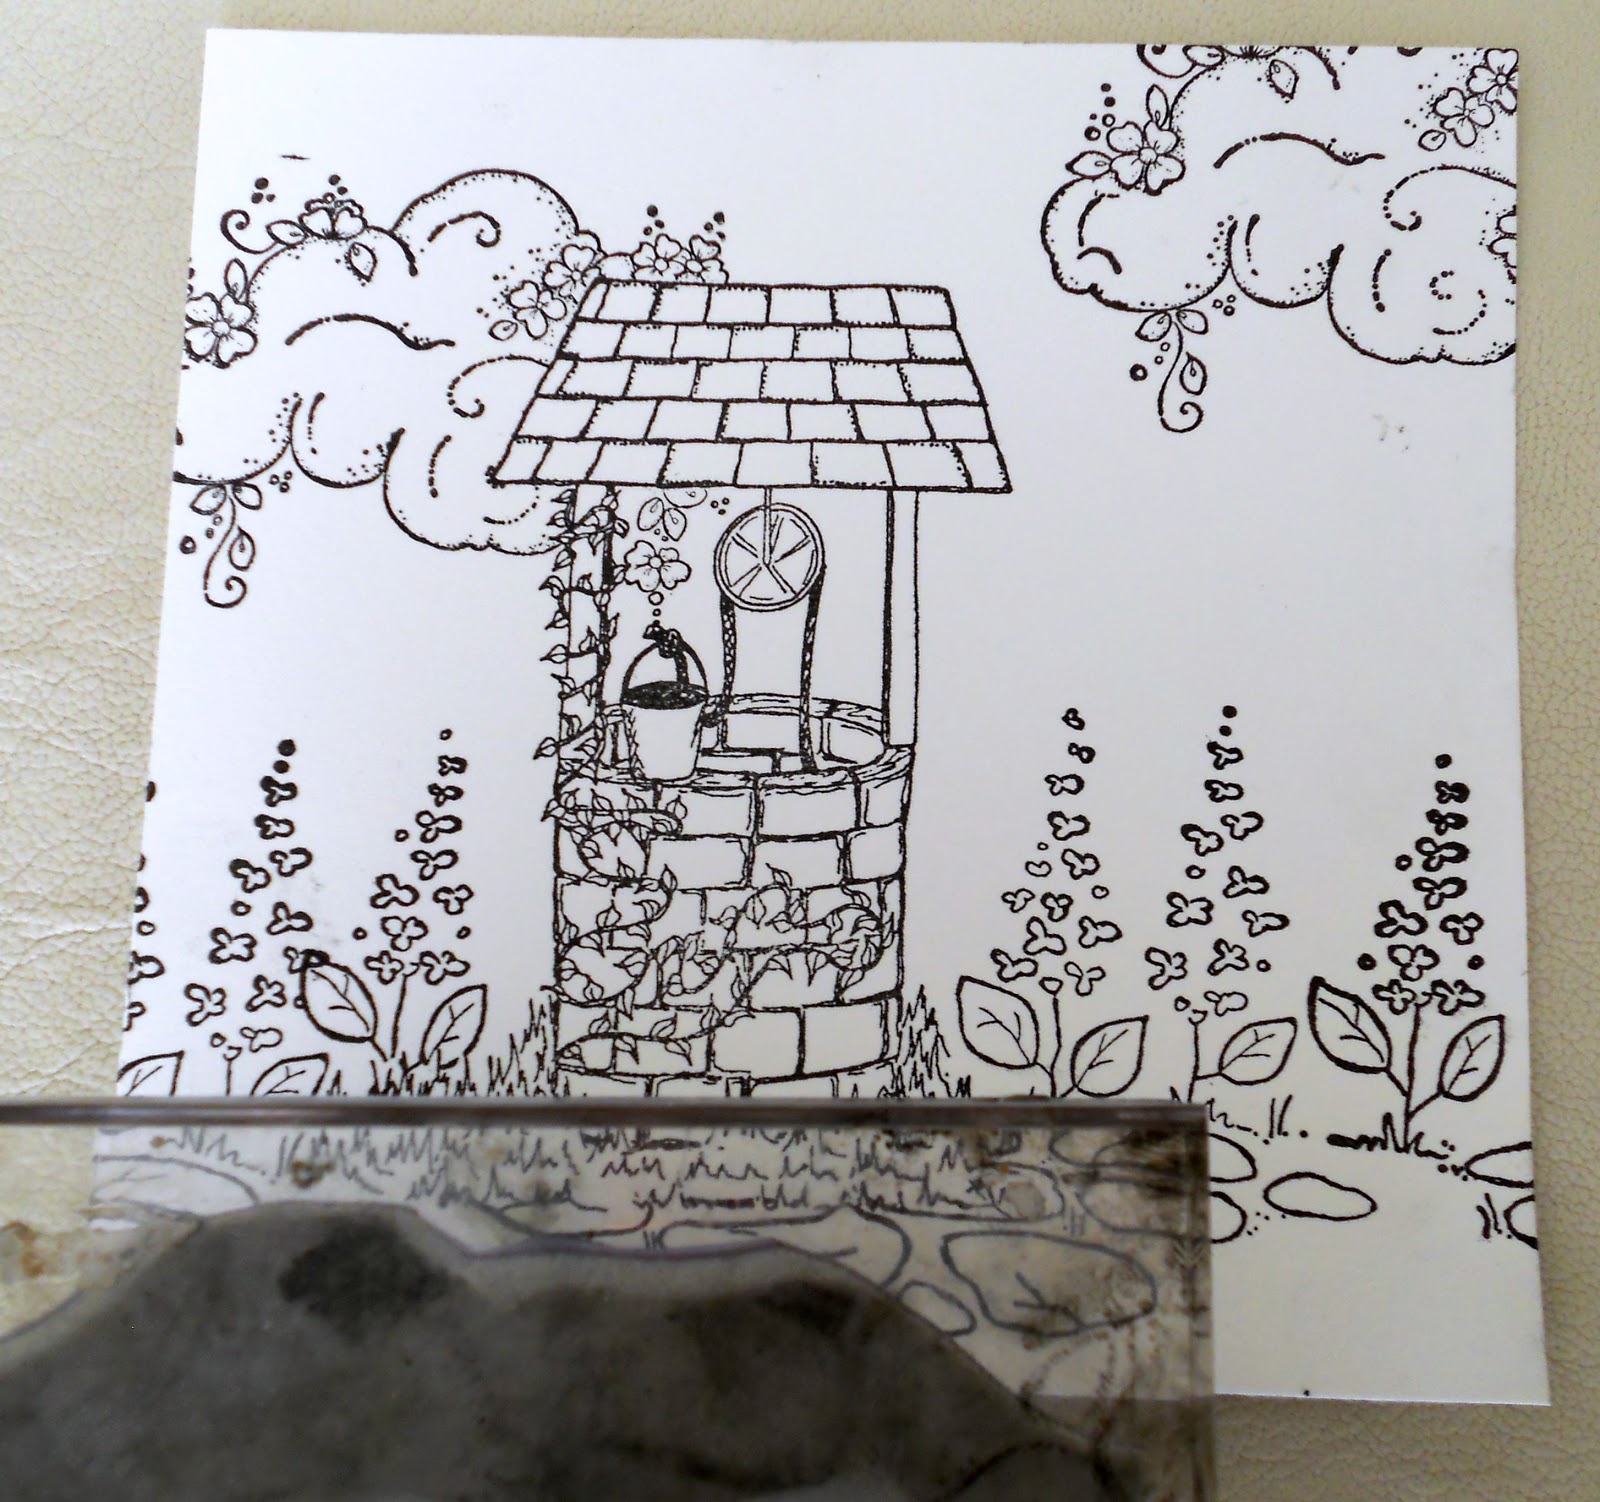
Step 9) Now turn the stone path stamp upside down so that the stones are at the top. Position as shown above and stamp.

Step 10) Stamp again slightly to the right (try to fill in the gaps with stones).

Step 11) Lastly I finished by adding some tiny butterfly stamps from a Hero Arts sentiment stamp set.
Thank you for visiting
Magnolia love
Hi all!
It's been a while since I had the chance to play with this awesome and super adorable sweetie, Bubbling Tilda. I had the best time putting this card together and had several inspiration sources.

I coloured her with my copics (a growing collection) and some other alcohol pens.
Skin: E50, ivory, satin, R01
Dress: C0, C1, C3
Hair: E50, E53, E55, E57
Wings: R000, C0
To create some structure and interesting elements I used glossy accent crackle medium on her wings and some diamond stickles. Spring is trying to come through here in Gothenburg, so I was inspired by the colours and the light - which I hope shows in my card.

For a oval die cuts check out the store. Here I used spellbinders label 10, but Kellie stock gorgeous decorative ovals on the website both from Spellbinders as well as MFT. I created a little cluster of flowers and sprays using the Magnolia chandilier garland in green and wild orchid flowers.

To soften the card I layered pearl centered lace from the store on top of grossgrain ribbon. I created a banner using MFT banner dies to hold the sentiment SMILE from TGF's newest release.

I finished the inside as well, I stamped the image again in distress ink tattered rose, to make it seem like a watermark.
Products from the store:
Bubbling Tilda
Copic markers
Magnolia chandilier garland, green
WOC cherry blossoms, coloured with LSG salt water taffy starburst spray
WOC open rose 10mm, coloured with LSG salt water taffy magical
WOC open rose 15mm, coloured with LSG salt water taffy magical
Spellbinder & MFT dies
distress ink, tattered rose
Pearl centered lace
Grossgrain ribbon
Stamping supplies (Memento ink, copic paper, scor tape)
I hope you like it!
Our current challenge is all about lace, we would love for you to join.
Thank you for visiting:)
It's been a while since I had the chance to play with this awesome and super adorable sweetie, Bubbling Tilda. I had the best time putting this card together and had several inspiration sources.
I coloured her with my copics (a growing collection) and some other alcohol pens.
Skin: E50, ivory, satin, R01
Dress: C0, C1, C3
Hair: E50, E53, E55, E57
Wings: R000, C0
To create some structure and interesting elements I used glossy accent crackle medium on her wings and some diamond stickles. Spring is trying to come through here in Gothenburg, so I was inspired by the colours and the light - which I hope shows in my card.
For a oval die cuts check out the store. Here I used spellbinders label 10, but Kellie stock gorgeous decorative ovals on the website both from Spellbinders as well as MFT. I created a little cluster of flowers and sprays using the Magnolia chandilier garland in green and wild orchid flowers.
To soften the card I layered pearl centered lace from the store on top of grossgrain ribbon. I created a banner using MFT banner dies to hold the sentiment SMILE from TGF's newest release.
I finished the inside as well, I stamped the image again in distress ink tattered rose, to make it seem like a watermark.
Products from the store:
Bubbling Tilda
Copic markers
Magnolia chandilier garland, green
WOC cherry blossoms, coloured with LSG salt water taffy starburst spray
WOC open rose 10mm, coloured with LSG salt water taffy magical
WOC open rose 15mm, coloured with LSG salt water taffy magical
Spellbinder & MFT dies
distress ink, tattered rose
Pearl centered lace
Grossgrain ribbon
Stamping supplies (Memento ink, copic paper, scor tape)
I hope you like it!
Our current challenge is all about lace, we would love for you to join.
Thank you for visiting:)
Monday, April 15, 2013
Elegant Yet Simple Card
Helllo all! Indah here. If you're in need of a simple and easy to make yet looks elegant, you can cut out some elements to your paper and then adhere it to a background and just add a piece of die cut piece. Et voila! Elegant card in no time!

This time I am using ONE paper from the Graphic 45 Secret Garden 12x12 paper pad. I think it has such pretty patterns on it :)

This time I am using ONE paper from the Graphic 45 Secret Garden 12x12 paper pad. I think it has such pretty patterns on it :)
Friday, April 12, 2013
Tilda With Big Tulip Pot
Hi Everyone!!! Dawn here on this fabulous Friday with my post for The Rubber Buggy, to show you some more inspiration using some wonderful stamps and products from the Store.
Today I used a few stamps called "Tilda with Big Tulip Pot" from The Little Easter 2013 Magnolia Tilda Collection.
 I also used some WOC flowers, which are now available in the store.
A closer peek at my colored image:

See you all back next Friday with some more inspiration. Check out the challenge blog for an awesome challenge, we'd love to see you participate.
Happy Stamping!!!!!

A closer peek at my colored image:

See you all back next Friday with some more inspiration. Check out the challenge blog for an awesome challenge, we'd love to see you participate.
Happy Stamping!!!!!
Subscribe to:
Posts
(Atom)


