Wednesday, August 31, 2016
Baby Album Pages with Netra
Hi everyone !
Today I am sharing a continuation of the Baby Album from last week.
I left lots of space for pictures of any size.
Its better to do it that way because
I am not sure what size the recipient of this album will want their photos.
On the shorter pages I added boarders on the side. I love doing this.
I kept my flowers smaller and flatter so that the pages wont be too bulky.


Messa Leaf Background Die http://www.therubberbuggy.com/poppystamps-craft-die-massa-leaf-background/
Drifting Feathers Die http://www.therubberbuggy.com/poppystamps-craft-die-drifting-feathers/
Flourish Blooms Die Set http://www.therubberbuggy.com/poppystamps-craft-die-flourish-blooms-die-set/
Prima Marketing "Heaven Sent" A4 Collection Kit http://www.therubberbuggy.com/prima-marketing-a4-collection-kit-heaven-sent/
Thank you for visiting
Tuesday, August 30, 2016
Fiona Loves Flowers

Hi it's Jennifer here with a new card I created using
the Adorable Stamp Stamping Bella - Fiona Loves Flowers
and these Gorgeous new papers are from Maja Summertime Collection
Flowers are from Wild Orchid Flowers
I have coloured her up using Copics
Colours used are
E0000, E000, E00, E01, E11, E30, E31, E33, E43
Y21
YR23
R32, R35, R37, R59
G20, G21, G23
The yellow flowers were not the right colour so I coloured roughly over
them with copics and then dropped a few drops of colourless blender on
them which spread the colour evenly and I now have the right colour.

All these products and more are avaliable at the
down the side too, Instragram and the Rubber Buggy Design Team Blog
where there's a post nearly everyday from one of the team.
Enjoy your Crafting Week Everyone!
Jennifer
Monday, August 29, 2016
Adore by Bev using Blue Fern Studio Tranquility Collection

hi Bev here today ... so I am still creating wedding pages... doing black and white and colour photos. I am using products from The Rubber Buggy. The Blue Fern Studio Collections have been amazing and have the perfect touch of softness and elegance for wedding pages.
The Rubber Buggy Products
Paper: Blue Fern Studio Tranquility Stillness
Stencils: TCW 455s, 605s, 507s
Ink: Tim Hotlz mini pads
Accent: ART C doily
Other: flowers, fern stickers, chipboard

In the close ups I'll share some of my techniques. I use both Color Box and Tim Holtz inks... shading to the outer edges of where the photo will be.

Now using some shades of green I add more defined straight lines through out the yellow.

Now I used green paint splatter applied by flicking the paint brush.

Now it's stencil time. I am using a few of them and mix up the yellow and green to them.

Here is my finished stenciling all placed to the outer edges of the photo spot.

At this point I play all the proposed accents on the page in estimated placement. I take a photo so when I take them all off to start gluing from the back going forward I have a photo to view.

In these close ups you can see the page come together. In the one above you can see I chose to move everything up higher from my sample photo to leave the 3 hearts showing in full size.

I loved the natural chipboard colouring with the paper and inking.

The stenciling and colouring is perfect for this page. I love the hearts and the word Love... just perfect.

I decided on single flowers but originally had tried larger clusters. They became too strong and went back to one each. The fern leaves are stickers and the other accent is the doily.
At this point less is better so I chose to stop at this point.


Thanks for stopping by.. see you again soon.

Saturday, August 27, 2016
Christmas Frame for Photo
Welcome back to the Rubber Buggy blog. Each day, one of our talented and creative designers from The Rubber Buggy blog and The Rubber Buggy Facebook will share with you what they have created using wonderful and exciting supplies, dies and flowers from The Rubber Buggy Store. The Rubber Buggy sales a huge variety of the latest quality rubber stamping and scrapbooking supplies for you at reasonable prices. Check out the new releases and latest wonder scrapbook and card making supplies today!!
I am excited to share with you my Christmas frame that I made for a special person and have a photo that I took of some of my grand kiddos after a summer dance recital with their their dance outfits and makeup on for this special day.

First, I cut out a 6" x 7" rectangle using card board. I cut the center 4 1/4" x 5 1/4". I covered this with white cardstock paper that was embossed before gluing it on this card board. I cut another 6" x 7" rectangle using card board and glued my photo on it. I used the 3L CORP-Scrapbook Adhesives - Crafty Foam Tape on the back of the front frame to the back frame.
I cut out the red mirror or foil card stock measuring 6 3/4" x 7 3/4" and glued the frame on it. I cut out a 4" x 5" card board and folded it in half. I glued it on the back of the entire frame to make this frame stand up.
I cut out the Tutti Design Poinsettia Corner die with gold cardstock and added a banner with the sentiment from Heartfelt Creations-Gift Wrap Present Stamp set. I am loving this stamp set.
I added the Prima Marketing Rose Gold Kiss roses to both corners and gold satin string ribbon around the inside frame.
I am excited to share with you my Christmas frame that I made for a special person and have a photo that I took of some of my grand kiddos after a summer dance recital with their their dance outfits and makeup on for this special day.

First, I cut out a 6" x 7" rectangle using card board. I cut the center 4 1/4" x 5 1/4". I covered this with white cardstock paper that was embossed before gluing it on this card board. I cut another 6" x 7" rectangle using card board and glued my photo on it. I used the 3L CORP-Scrapbook Adhesives - Crafty Foam Tape on the back of the front frame to the back frame.
I cut out the red mirror or foil card stock measuring 6 3/4" x 7 3/4" and glued the frame on it. I cut out a 4" x 5" card board and folded it in half. I glued it on the back of the entire frame to make this frame stand up.
I cut out the Tutti Design Poinsettia Corner die with gold cardstock and added a banner with the sentiment from Heartfelt Creations-Gift Wrap Present Stamp set. I am loving this stamp set.
 |
| Tutti Designs Poinsettia Corner Heartfelt Creations-Gift Wrap Present Stamp Set |
 |
| Prima Marketing - Box Flowers - Rose Gold Kiss Satin string ribbon 1/16 wide
I plan on making for Christmas frames soon so stop by every Saturday and take a peek at what I am doing with the wonder supplies at The Rubber Buggy on-line store Thank you for stopping by and would appreciate a comment.
Nancy Hill
Design Team
|
Friday, August 26, 2016
Starting with Christmas Cards
Hi everyone!!
It´s Noe here, and yes, have you read good... I'm starting to make my Christmas cards... Is there something nicer to open a mailbox and find a Christmas card full of good wishes??
Well, this is my first Christmas Card for this year!


Products used from the Store:

Thank you for visiting
It´s Noe here, and yes, have you read good... I'm starting to make my Christmas cards... Is there something nicer to open a mailbox and find a Christmas card full of good wishes??
Well, this is my first Christmas Card for this year!

I made my background using "Bayou Flora" Prima Stamps with Gold and Cooper Metallics inks.

Then, I embossed in a vellum paper my sentiment and framed it with my Banner Die and finally, add some metallics sequins.

- Holidays Greetings Blue Fern Studios Stamps.
- Deck the Halls - Lawn Fawn Stamps.
- Bayou Flora Ink N´Layer Prima Stamps.
- Stitched Party Banners Lawn Fawn.
- Gold Embossing Powder... Something like THIS.
- Craft Medley Cup Sequins

Thank you for visiting
Thursday, August 25, 2016
Maja Designs Altered Notebook
Hi everyone, Steph Ackerman here today with an altered notebook.
Since school supplies are readily available, I thought it would be fun to alter a notebook. I used some amazing papers from Maja Designs - Summer Crush collection.


The stamp was inked with Memento Tuxedo Black Ink and stamped on the Off to Meet Him paper. Then it was die cut with Spellbinders dies and added to the notebook with foam adhesives by Scrapbook Adhesives by 3L.
Thank you for visiting.
Steph
Since school supplies are readily available, I thought it would be fun to alter a notebook. I used some amazing papers from Maja Designs - Summer Crush collection.

The base layer is He Gives Her Flowers. On top of that I've added strips of papers titled Flirty and Off to Meet Him. The edging is the cut off strip from one of the papers. May Arts Lace/Pearl ribbon was then placed along the edging to finish.

The stamp was inked with Memento Tuxedo Black Ink and stamped on the Off to Meet Him paper. Then it was die cut with Spellbinders dies and added to the notebook with foam adhesives by Scrapbook Adhesives by 3L.
Thank you for visiting.
Steph
Wednesday, August 24, 2016
"Sweet Memories" Baby Photo Book with Netra
Oh I am so happy to see Wednesday !
I have a fun easy project to share with you.
I am IN LOVE with the Heaven Sent collection by Prima, so
I had to make a baby photo book with it.
Here is the cover.


For the pages, I took 3 regular white sheets of paper and 3 sheets of the patterned paper.
Folded them together.
I punched a hole at the top and bottom of the pages.
Just put twine though one end and then the other and tie a bow on the outside spine.
Easy book.


I cut the A4 Heaven Sent papers to fit the height of the white paper.

Be sure to tune in for the decoration of the inside pages.
I have some wonderful tips and tricks for easy photo book assembly!
Thank you for visiting
Xo, Netra
Drifting Feathers Die http://www.therubberbuggy.com/poppystamps-craft-die-drifting-feathers/
Flourish Blooms Die Set http://www.therubberbuggy.com/poppystamps-craft-die-flourish-blooms-die-set/
Prima Marketing "Heaven Sent" A4 Collection Kit http://www.therubberbuggy.com/prima-marketing-a4-collection-kit-heaven-sent/
Tuesday, August 23, 2016
Christmas Gift Cards

Hi Everyone it's Jennifer here with my Tuesday Make for
you. This week as it is getting closer to Christmas it was time
to start the Gift Cards.
I have used the Sweet New Bunny Wishes Stamp Set and
matching Bunny Wishes Die Set combined with some
Lawn Fawn to Create these 3 Cards.
This First one is a Shaker Card I have stamped the sky with snowflakes
from Lawn Fawn Critters in the Snow . I have then used the
Snowflake Die from Lawn Fawn Mini Snowflakes and the
Mountain is Lawn Fawn Stitched Hillside Border Dies and then created
the Window using Lawn Fawn Large Circle Stitched Dies.

I used Basicly the same as above but added some
Lawn Fawn Sweet Heart Twine and layered it all with some dimentions.

I added a tree in this background with the cute Bunny.
It is such a fun set to play with and so many more stamps in it
to create with.

Copics used
E50, E51, E53, E55
R20, R27, R29, R59
BG10, BG11, BG13
YG11
G21, G63
Some Quick Links
All these Products and more are avalible at
down the side too, Instragram and the Rubber Buggy Design Team Blog
where there's a post nearly everyday from one of the team.
Enjoy your Crafting Week Everyone!
Enjoy your Crafting Week Everyone!
Jennifer
Monday, August 22, 2016
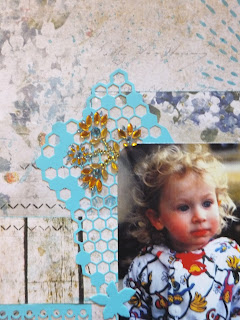
Sweet by Bev using Blue Fern Studio Tranquility and so many amazing accents

Hi everyone.. Bev here today. Sure hope your having a great day. This page I share today has one of my favourite photos of my eldest Grand Daughter. She is now 20? OMG where did the time go? This is The Rubber Buggy post for today. Be sure to visit the store to view all the amazing products I used from there.
Supply List:
The Rubber Buggy Products
Paper: Blue Fern Studio Tranquility Collection, Calm, Calling Cards
Die: Memory Box Honeycomb Collage 91443, Lenora Bloom
Stencil: TCW #287s mini burst
Other: cricut title, Martha Stewart punch, twine, bling, buttons, sew easy ink roller stitch
Instructions:
#1. I started with some soft coloured turquoise blue paint splatter

#2. Next I chose the 2 papers to base the photo. The back one I first wrapped with twine 3 times for texture and depth. The front one I inked the edges in blue. Do not glue down yet.


#4. Things were still too plain so I die cut the floral flourish and punched a border accent. These are all done in the same cardstock.


Here is one last close up for your viewing... it is a sweet page. I loved sharing with you today... and hope to see you again soon.


#3. With the above placement organized I removed them and added starburst stencil inking with Tim Holtz mini pad. Layering things down again I die cut the Honeycomb accent for behind the photo. Also on the bottom right corner under the photo I found a piece of paper that I ripped, inked the edge and added for colour and depth by popping it up.


#5. I cricut cut the title using the same cardstock. You can also view from this photo the Sew Easy ink roller stitching accents.

#6. For a total change up I added the yellow flower cluster with the blue in it. It was perfect.

#7. It doesn't show except in the finished page... I added 3 buttons in the upper left corner. (this is a fun challenge over at the Turtle Soup to add buttons so I will be submitting there too.)


I loved sharing with you today... and hope to see you again soon.

Subscribe to:
Posts
(Atom)


