Saturday, September 26, 2020
Teepee Card VIDEO and instructions with Bev
Here is a sample of teepee card and also the printable version so you can make one too.


Thanks for stopping by... hope to see you again soon ... but in the mean time be sure to stop by the STORE where these items and so many others are available. Also take note of all the products that aren't carried in our regular local stores. ... AND the service is A1.

Maja Designs Vintage Baby girl card
Welcome back and hope you are having a wonderful crafty day. Nancy, here, and excited to share my great-granddaughter's card with you using the beautiful Maja Designs-Vintage Baby-Ephemera Cards cardstock. The Rubber Buggy carries the name-brand products and supplies for your craft and card.

I always start in the middle and work my way out so I found some old oval dies and cut the Maja Design girl with a oval die and adhered with glue. I used the 5mm flat back pearls around this frame. I made my own little angel with clay from a mold and added it on the card next to the
Wild Orchid flowers and pink/white Baker twine with glue. I found in my stash some lacy butterflies and hearts and added it to the card. I had an old "Baby" die and cut it out with pink cardstock. I used a scallop die cut around the outside of the card. If you don't have a scallop die, just use regular scallop lace.

I like to personalize every card that I make. I type the sentiment on Word, print on a laser printer and use my laminator to gold foil the sentiment. After I glued the final sheet, I noticed a really big ink spot so I added my great granddaughter's collage pictures to the bottom to cover up the ink spots. I found these adorable critters in my baby die cut folder and added them to the inside of the card by the sentiment.
 | |
|
Thanks for your visit today! The Rubber Buggy has the crafting supplies for your next project. So have fun crafting this weekend with these products. My cards and projects are always posted on Saturday. Keep watching and thank you so much for those wonderful comments as well as suggestions.
Enjoy and Happy Crafting!
|
Thursday, September 24, 2020
Bird Cage Slimline Cards
Hi everyone, Steph Ackerman here today with lots of fun products from the store. Please visit the store for all the fun products I've used today.


I started by adhering Lawn Fawn Knock on Wood papers to Sizzix Mat Board, then running it through my Big Shot with Tim Holtz Alterations Cage Bird Die by Sizzix.

Since I die cut 3 sets, I moved the birds around till I liked how they looked on the cages. I then glued them to the cages using Art Institute Glue.

I inked the cages with Tim Holtz Distress Oxide Ink in Ground Espresso using a Ranger Ink Blending Tool. Add some twine to the bird cages.

I used Lawn Fawn Large Slimline Dies and Lawn Fawn Small Slimline Dies to create my layers from Maja Design papers - Vintage Summer Basics 1936, Vintage Summer Basics 1943 and Vintage Summer Basics 1903.


Using Penny Black Stamps - Special Thoughts - I chose the phrases I wanted to use, inked them with Lawn Fawn Black Licorice ink and stamped them on scraps of the same papers.

Creating cards from Bazzill cardstock, I used a Scor-Pal Scoring Board to create the creases in the cardstock, so the cards folded easily. Then I assembled the cards, mixing the layers. Using Mat Board elevates the bird cages to a 3 dimensional look on your cards.

This card could be sent to someone who is not feeling quite well.

This card could be sent to someone you are missing.

This card could be sent to someone to cheer them up.

There are lots of possibilities when you mix and match your stamps, dies and papers.
Thank you for visiting
Saturday, September 19, 2020
Ciao Bella Microcosmos Birthday Card
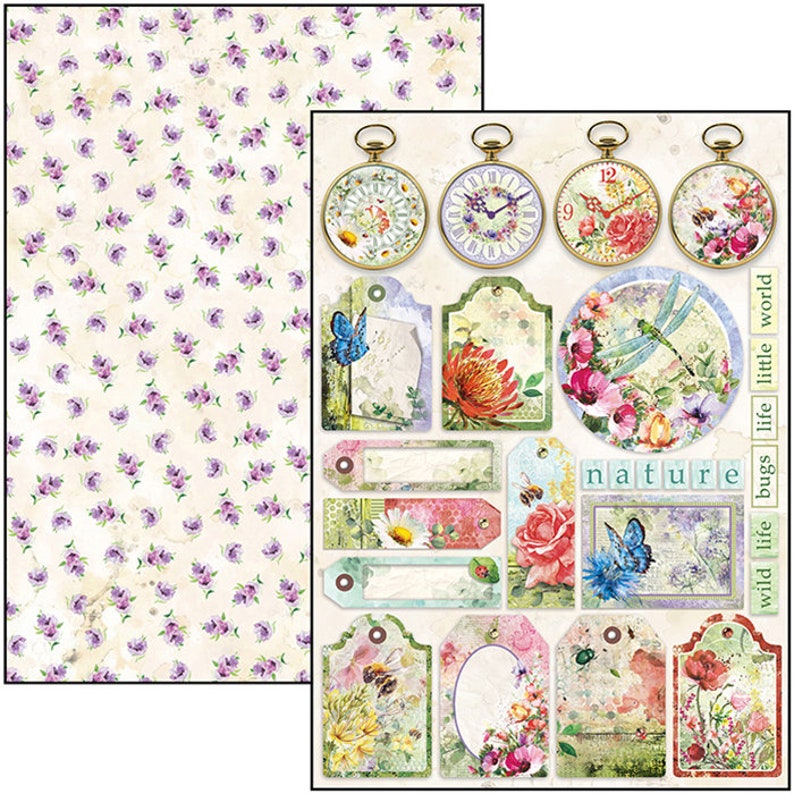
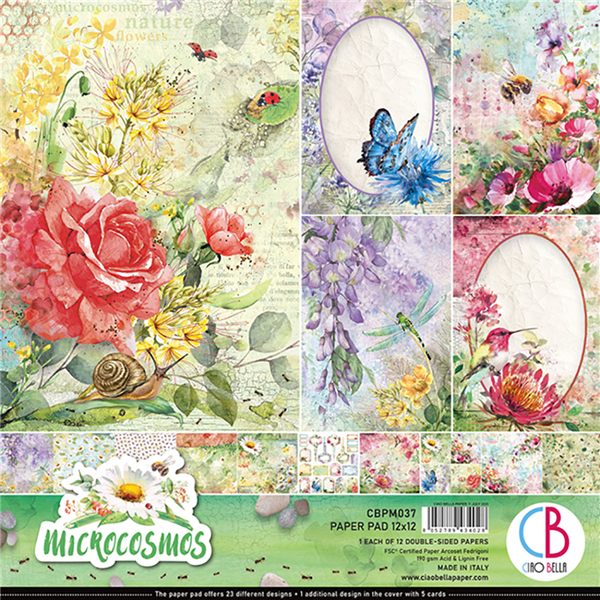
Welcome back and Nancy, here. Everyone loves flowers. The Ciao Bella Microcosmos paper collection has beautiful and colorful details of the flowers and the magnificent world of butterflies and dragon flies in this gorgeous paper collection. This paper collection contains 12 textured sheets of double sided 12" x12" paper, 24 different designs. Also inside this paper pad is a wonderful 2021 monthly calendar.
Please review Bev Code's video on the Ciao Bella Microcosmos paper. She had a very well detail of this collection that is also available in rice paper and background paper that coordinates with this paper pad. Check these available supplies at The Rubber Buggy that coordinates with Ciao Bella Microcosmos paper pad by clicking HERE.

 I cut out the strip of butterflies from the pad to make the pocket. Cut a 7 1/2" x 2 1/4" strip of butterfly paper and score each side at 1/2" and 1/4" and fold. The 1/2" fold will be glued to the card. Before you do this, cut another strip of 6" x 3/4" and score at 1/4" on each sides and glue to bottom of the pocket strip before gluing to the card.
I added the gorgeous label in the Graphic 45 Policy and Decorative Die for the pocket as well as the back of my card for my name. I typed the sentiment and printed it out and used spray glue to the intricate Graphic 45 cut out die to adhere to the card. I cut out the beautiful butterfly from the Graphic 45 Staples Tag, Pocket and Butterfly die set.

I added a pink/coral 1/2" wide seam binding ribbon to the center and outside of the card and adhered it with the 3/8" wide Scor-Tape.


Please review Bev Code's video on the Ciao Bella Microcosmos paper. She had a very well detail of this collection that is also available in rice paper and background paper that coordinates with this paper pad. Check these available supplies at The Rubber Buggy that coordinates with Ciao Bella Microcosmos paper pad by clicking HERE.

All of the cardstock shown below in the photos are from the Ciao Bella Microcosmos paper pad including the gorgeous monthly 2021 monthly calendar.
The card measures 6" x 7 1/2" with a 1/2" center for the inside pocket. I cut the base with a heavy white poster paper of 7 1/2 x 12 1/2" and scored at 6" and 6 1/2" lengthwise and fold. I use my scoring bone on heavy weight paper for the best fold after scoring. I added some Prima Marketing labels and clock. I handmade the flowers using the foamiran foam and flower dies. I cut the clock from the paper pad and added a doily behind it. I added the clock parts and flower to the center. I typed my sister's name and cut it out and adhered it to the back of the Tim Holtz-Idea-ology Ornate Plate that was colored with Prima Marketing Finnabair Art Alchemy Vintage Silk and Vintage Gold wax.
The card measures 6" x 7 1/2" with a 1/2" center for the inside pocket. I cut the base with a heavy white poster paper of 7 1/2 x 12 1/2" and scored at 6" and 6 1/2" lengthwise and fold. I use my scoring bone on heavy weight paper for the best fold after scoring. I added some Prima Marketing labels and clock. I handmade the flowers using the foamiran foam and flower dies. I cut the clock from the paper pad and added a doily behind it. I added the clock parts and flower to the center. I typed my sister's name and cut it out and adhered it to the back of the Tim Holtz-Idea-ology Ornate Plate that was colored with Prima Marketing Finnabair Art Alchemy Vintage Silk and Vintage Gold wax.

I added the gorgeous label in the Graphic 45 Policy and Decorative Die for the pocket as well as the back of my card for my name. I typed the sentiment and printed it out and used spray glue to the intricate Graphic 45 cut out die to adhere to the card. I cut out the beautiful butterfly from the Graphic 45 Staples Tag, Pocket and Butterfly die set.

I added a pink/coral 1/2" wide seam binding ribbon to the center and outside of the card and adhered it with the 3/8" wide Scor-Tape.

I cut out some of these tags and monthly calendar from the paper pad. I added a frame around the tags and calendar using my Brother's Scan and Cut machine since I didn't have dies to fit these tags. I used the Graphic 45 Clock and Square tag die set for the calendar and used my Brother's Scan and Cut machine to enlarge another tag to fit behind the Graphic 45 tag.


 | |
| Ciao Bella Microcosmos
Thanks for your visit today! I hope this card inspired you to get your order into The Rubber Buggy and have a bit of fun in your next crafty adventure!. The Rubber Buggy has the crafting supplies for your next project. My cards and projects are always posted on Saturday and would love to hear from you in the comment section below.
Enjoy and Happy Crafting!
|
Thursday, September 17, 2020
Happy Fall with Penny Black's Gathering Stamp
Hi everyone, Steph Ackerman here today with lots of fun products from the store. Please visit the store for all the fun products I've used today.
As we head into our next season, I want to wish everyone Happy Fall.

I stamped the Gathering Stamp from Penny Black with Lawn Fawn Licorice Black Ink. Next, I colored her with Copic Markers. In order to die cut the image, I first cut around the basket, fitting the Lawn Fawn Small Stitched Rectangle Die so the basket would remain intact.


I stamped the Gathering Stamp from Penny Black with Lawn Fawn Licorice Black Ink. Next, I colored her with Copic Markers. In order to die cut the image, I first cut around the basket, fitting the Lawn Fawn Small Stitched Rectangle Die so the basket would remain intact.

While still in the die, I lightly inked around the image with Tim Holtz Distress Oxide Ink in Faded Jeans using a Ranger Ink Blending Tool.

The card was created using Bazzill cardstock and the new Photo Play Gnome for Thanksgiving 6x6 paper pad. This double sided paper pad has 24 papers with 2 of each design. This leaves you lots of options to work with. The wordy paper was matted with cardstock then wrapped with May Arts Sheer Ribbon before being added to the card on a slight angle.

The image was edged with Tim Holtz Distress Oxide Ink in Bundled Sage, matted with a Lawn Fawn Large Stitched Rectangle Die, then placed on the card with Scrapbook Adhesives.

Finally, I used the reverse side of the wordy paper to die cut Lawn Fawn's Happy Fall Line Border Die, placing it above the image with Tattered Lace Detail Glue, which is perfect for these smaller die cuts.

Thank you for visiting
Saturday, September 12, 2020
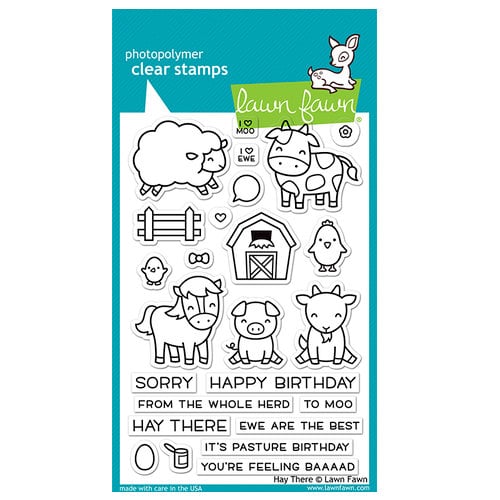
Lawn Fawn Hay There
Welcome back and Nancy, here. I am showcasing another adorable Lawn Fawn Stamp and Die set called Hay There. These farmyard critters can’t wait to send you happy greetings from the whole herd! The Lawn Fawn Hay There is available at The Rubber Buggy on-line and retail stores and makes great birthdays, get well cards (sorry you’re feeling baaaad), and cute just because cards.

The background paper is the Lawn Fawn 6x6 or 12x12 Single-side Hello Sunshine paper that comes in a 36 page pad with 12 coordinating designs. Also I cut out the Lawn Fawn Grassy Hillside Border die set and Lawn Fawn Stitched Hillside Border for the card. I always love using the Lawn Fawn Simple Puffy clouds die with the adorable smiley face for part of the background of my cards.


Thanks for your visit today! I hope this card inspired you to get your order into The Rubber Buggy and have a bit of fun in your next crafty adventure!. The Rubber Buggy has the crafting supplies for your next project. My cards and projects are always posted on Saturday and would love to hear from you in the comment section below.
Enjoy and Happy Crafting!
 |
Thursday, September 10, 2020
Stamperia Designed Cards
Hi everyone, Steph Ackerman here today with lots of fun products from the store. Please visit the store for all the fun products I've used today.


Thank you for visiting
Stamperia has a line of decorative chips that can be used for assorted projects. I've used the Rose and Butterfly chips to create my cards today.

Start by inking the leaves and flowers with Copic Markers. Then lightly ink the lattice panel with Tim Holtz Squeezed Lemonade Ink. Use Tattered Lace Detail Glue to adhere the panel to the card base.

Using Liquid Pearls in Dazzle and Garnet, fill in the roses. Use Liquid Pearls in Electric to fill in the leaves. Place aside to dry. Once dry, I added some more liquid pearls to fill in the cavities.

Along the right side of the card, add a strip of Bazzill Gumdrop Cardstock. Ink the Stamperia Butterflies with Tim Holtz Tattered Rose Ink and adhere just the bodies to the cards, leaving the wings free. Hello Friend, from the Memory Box Bird Sanctuary Clear Stamp set was stamped on Marshmallow Cardstock with Lawn Fawn Black Licorice Ink, die cut and matted with Gumdrop Cardstock. It was added to the card with Scrapbook Adhesives for dimension.

For my second card, I chose to ink the roses with Tim Holtz Tattered Rose and Fired Brick Inks. The leaves were inked with Bundled Sage Ink.

Using Maja Designs Shades of Sweet Coral, Tear the panel and ink with Fired Brick before adhering to the card. Stamp the dots in Black Licorice Ink using a stamp from the Bird Sanctuary collection. Also stamp Hello friend on a scrap of the Coral paper. Assemble the card and adhere the roses and leaves. Place the sentiment across the bottom edge and place one of the left over leaves on the strip.

Saturday, September 5, 2020
Graphic 45 Farmhouse Birthday Card
Welcome back and Nancy, here to share a fun card made with the Graphic 45 Farmhouse collection. Take time to remember life’s simple pleasures of watching the sunrise from the front porch, walking down a country road, having a chat with a good friend, or enjoying our animal friends. All these simple, good things about life are celebrated in this Graphic 45 Farmhouse collection. Cards and projects covered with this country and fall colored paper are gorgeous enough to set out as home décor with the fresh country vibe. 

The 6 1/2" x 6 1/2" birthday card is filled with farm/ranch goodness with a fun pocket for tags and a gift card made with the Graphic 45 die set that holds a gift card or gift certificate or chocolates. etc.. I just love the colors and country theme in this collection especially since we live on the farm and most of our relatives were raised in the farm/ranch country on our prairie.
I made this card especially for my sister-in-law whose favorite time of the day is to sit on her porch in the afternoons and visit with with friends and family that stopped by for a friendly chat.
The Graphic 45 Farmhouse collection has a Farmhouse Cardboard stickers with this clock but I used the Graphic 45 Staples Dies-Square Tag and Clock die set and cut out the clock with black cardstock, added the patterned paper cut out with a circle die and then the Farmhouse sticker in the center. I used the Scraphbook Adhesives 3D black foam squares on the back of the clock.
 |
| Graphic 45 Paper Collection with Graphic 45 Stickers Included |
 |
| Graphic 45 Farmhouse Stickers |


This is the back of my card with my name. I cut out the Graphic 45 Policy and Decorative Die with the lace die in black cardstock. I fussy cut the chicken to cow and stamped my stame on the pig.
This card base measures 6 1/2" x 6 1/2" when closed, Here’s how to create the card base.
- I use heavy poster board paper for my base frames to prevent warping for larger cards. Measure and cut a 6 1/2" x 12". Score at 6 1/2". I cut out 6 1/2 square black cardstock and used Beacon 3-n-1 Advanced glue to adhere to the poster board paper.
- My pocket on the inside measures 2" x 6 1/2". I cut 2" x 7" strip of paper and scored 1/4" on each side and folded at the score lines. Take glue and glue a little strip on the bottom and on the edge for the pocket to open up. Then fill with another ephemera card and a little chocolate treat. I filled this pocket with tags and
- Embellish the tags with ribbon and Wild Craft Chrysanthemums flowers along with using the Graphic 45 Farmhouse stickers for the tags on black cardstock. I just stuck the stickers on black cardstock and cut a 1/4" frame around it. I used yellow brads for the label on one Graphic 45 Farmhouse cardstock sticker to be adhered to the pocket. Additionally, you can fill this pocket with Graphic 45 Farmhouse ephemera cards and a little chocolate treat.
Thanks for your visit today! I hope this card inspired you to get your order into The Rubber Buggy and have a bit of fun in your next crafty adventure!. The Rubber Buggy has the crafting supplies for your next project. My cards and projects are always posted on Saturday and would love to hear from you in the comment section below.
Enjoy and Happy Crafting!
|
Subscribe to:
Posts
(Atom)


