Thursday, March 30, 2017
Birthday Love with Graphic 45
Hi everyone, Steph Ackerman here today wishing you a happy birthday.


Thank you for visiting

Using the Scor-Pal Mini, I created a card from Bazzill Marshmallow cardstock. Then I used Graphic 45 papers from the Time to Celebrate paper pad.

I created several layers on the card, then added a die cut oval using Spellbinders dies.

Using a Julie Nutting doll from Prima, I colored her with assorted Copic Markers. A sentiment from Kaisercraft finished the card.
Thank you for visiting
Wednesday, March 29, 2017
Tim Holtz Folio with Netra
Hello everyone!
As always I hope that this week has been
wonderful for you so far.
My week has been going well....and my creative mojo too.
I recently got the Tim Holtz Small Folio and
and Die Cuts pack and I had to start on it.
I only decorated the cover and added paper to the inside.
I really want to take my time, fear of messing it up. LOL
Is a neat little way to add pictures and the design is
so vintage and different.
I used a mixture of products. They will be linked below.
I hope you like it.
Stay tuned.


 |
| The inside |
Products Used
Similar Tim Holtz Die Cuts Pack
Thank you for visiting
Tuesday, March 28, 2017
Edwin with Teo the Dragon

Hi it's Jennifer here with a card I created using an older
but really adorable stamp
I have stamped the Image in Memento and coloured them up in
Copics. The background I did using the new AWESOME
Tim Holtz Oxide Inks the colours I used are
Fossilized Amber, Vintage Photo, Peeled Paint and Faded Jeans.
I have raised the white frame that I diecut using two of
3D Crafty Foam. I finished it of with a few scattered sequins
Lawn Fawn Ready Set Snow Die Set for the Sentiment.

Copics
Face - E0000, E000, E00, E01, E11, E13, R20
Overalls - E42, E43, E44, E47
Heart - RV00, R81, R83
Shirt - B24, B26, B28
Dragon - YG17, YG21, YG25, G24, G94, G99
All these products and more are avaliable at the
The Rubber Buggy Shop and don't forget to visit us on Facebook
look for the Videos down the side too, Instragram and the
Rubber Buggy Design Team Blog where there's a post nearly
everyday from one of the team.
look for the Videos down the side too, Instragram and the
Rubber Buggy Design Team Blog where there's a post nearly
everyday from one of the team.
Happy Crafting
Jennifer
Monday, March 27, 2017
Simple Stories Carpe Diem collection at The Rubber Buggy

Hi.... it's Bev here today I am sharing a layout for The Rubber Buggy using Simple Stories Carpe Diem Collection and the matching die cut accents. This fun bright collection is perfect for some of my great family photos. This is us with our youngest son's family and what a fun photo of our son and his lovely wife. These pages will be presented to them for memories of our times celebrating together.
Supply List:
The Rubber Buggy Products
Accents: Simple Stories Carpe Diem snap pack, Petaloo flowers/butterflies
Mediums: Glossy Accents
Other: Creative Embellishment chipboards, cardstock, ScraPerfect non stick fine tip writing tool

To start this collection I used a floral background. I took some background papers and cut different sizes and shapes to form the layers with a change of colour and prints. The small circular photo I matted with coordinating colours.

From there I pulled the larger photo and cut it to fit the chipboard frame. I pulled lots of accents and words from the collection.

With the background all ready I pulled things off and started to layer and glue from the bottom up to the top layer.

The photo is glued and placed onto the background.

Using the non clogging fine tip writing tool on the bottle of glossy accents I applies the great glossy finish to the word Happy and Love below.


Using Petaloo flowers and leaves I made a cute clustered accent.

These next 2 close ups give a better view of the corner clustered accents with snap accents, paper and chipboards.


These 2 photo close ups show some fun Petaloo butterfly accents. Also note how the photos still pop front and centre for a fabulous family page.


Thanks for stopping by today... hope to see you again soon,

Saturday, March 25, 2017
"About a Little Boy" Photoplay Mini Album
Hi everyone!!
It´s Noe here in a rare day for posting but I´ve making a Baby Boy Mini Album that I needed end today and I can´t wait to show you the final result!!

I love Photoplay's "Collection Pack" ... they bring everything that you need to be able to make a complete project ... Double-sided decorated paper, stickers sheet, label sheet to decorate ... HERE, you can see another Mini Album that I maded using in that time a 6x6 stack with its coordinated die cuts!

Supply List:

Thank you for visiting
It´s Noe here in a rare day for posting but I´ve making a Baby Boy Mini Album that I needed end today and I can´t wait to show you the final result!!

I love Photoplay's "Collection Pack" ... they bring everything that you need to be able to make a complete project ... Double-sided decorated paper, stickers sheet, label sheet to decorate ... HERE, you can see another Mini Album that I maded using in that time a 6x6 stack with its coordinated die cuts!

Supply List:
- About a Little Boy Photoplay Collection Pack.
- Square Dies ... Like THIS or THIS.

Thank you for visiting
Friday, March 24, 2017
Warmest Wishes Birthday Card


I love making different shapes of cards and this one is very different from my other cards using the Heartfelt Creations Fleur Border Basics die set.
The Rubber Buggy Supplies
Instructions:
Card measures 6” x 6”. Cut two 6” x 12” pink card stock for the main frame and score in the center of each frame. Adhere two sections together to form three pages.
Use the pink paper to cut two Heartfelt Creations Fleur Border Basic dies or you can cut it from the pink card stock as well.
First Page: Cut the patterned paper 4” x 6”. Use the 7” x 1.75” plain border die to cut the patterned papers for the front of the first page and pink main frame for this page. Place the plain border die on the left side at 4 ½” and ends on the left at ¼”. Use the other plain border die to cut the patterned paper for the back of this page. Adhere the front page to the pink main frame. Adhere one pink HC Fleur Border die as shown on the photo of the card. Adhere the back of the patterned paper to the pink main frame of this first page.
Second Page: Repeat the same instructions for the first page except place the plain border on the right side at 4 ½” and ends on the left side at 3 ¼”.
Inside of Card: Cut out a 6" x 6" found in the Heartfelt Creations Flowering Dogwood and adhere to main frame of card. Stamp the sentiment and use Copic Markers or colored pencils to color the flowers and humming birds.
Now it is your turn to try these products out from
The Rubber Buggy and see what you create!
Remember to visit The Rubber Buggy store to shop for those gorgeous dies, stamp supplies and other supplies for all of your projects, scrap booking and card making. The Rubber Buggy Design Team has something new to share here. Pop in often and see for yourself what is being shared by this talented group of inspiring designers!!
Have a fabulous crafting day! I'll be back again next Saturday with a new card or project. In the meantime, here are all The Rubber Buggy quick links you will need:
Thank you again for stopping by
Nancy Hill
Designer for The Rubber Buggy

Thursday, March 23, 2017
Beautiful Rose Cards
Hi everyone, Steph Ackerman here today with cards created from some beautiful new Prima pattern papers - Rose Quartz.

This 6" x 6" paper pad has 30 double sided sheets in 6 patterns. Included is a set of phrases that can be used for any occasion. Simply use them as is or die cut them to fit your project.


Prima has again provided a great pattern paper pack that creates some amazing cards.
Thank you for visiting

This 6" x 6" paper pad has 30 double sided sheets in 6 patterns. Included is a set of phrases that can be used for any occasion. Simply use them as is or die cut them to fit your project.

I love the rose paper and wanted it to be front and center on both cards. I placed it on top of the black print to create my card. A bit of dimension was created by inking the edges of each piece with Walnut Stain Ink with a Ranger Ink Blending Tool. I used one of the included sentiments, placing it on the card with foam adhesives.

I love the wood grain paper so I paired it with the rose paper for my next card. This time, I die cut the sentiment and adhered it to the card with foam adhesives for dimension.

Prima has again provided a great pattern paper pack that creates some amazing cards.
Thank you for visiting
Wednesday, March 22, 2017
Rose Quartz Planner Page with Netra
Hey everyone ! This week has been wonderful so far.
Today I am sharing my planner page with you.
I received the Rose Quartz collection and I love it!
Its perfect for planners and journals.

I also used the Planner Die Set by My Prima Planner to
make a divider out of the darker pattern paper, and a smaller one that I put my note sheet on.
I used
Thank you for visiting
Tuesday, March 21, 2017
Lawn Fawn Shaker Box Card

Hi It's Jennifer to show you how to put together this
Awesome and I mean Awesome and a must have for any
cardmaker die the LF Scalloped Box Card.
So all the dies are in the packet and lots of embellishing
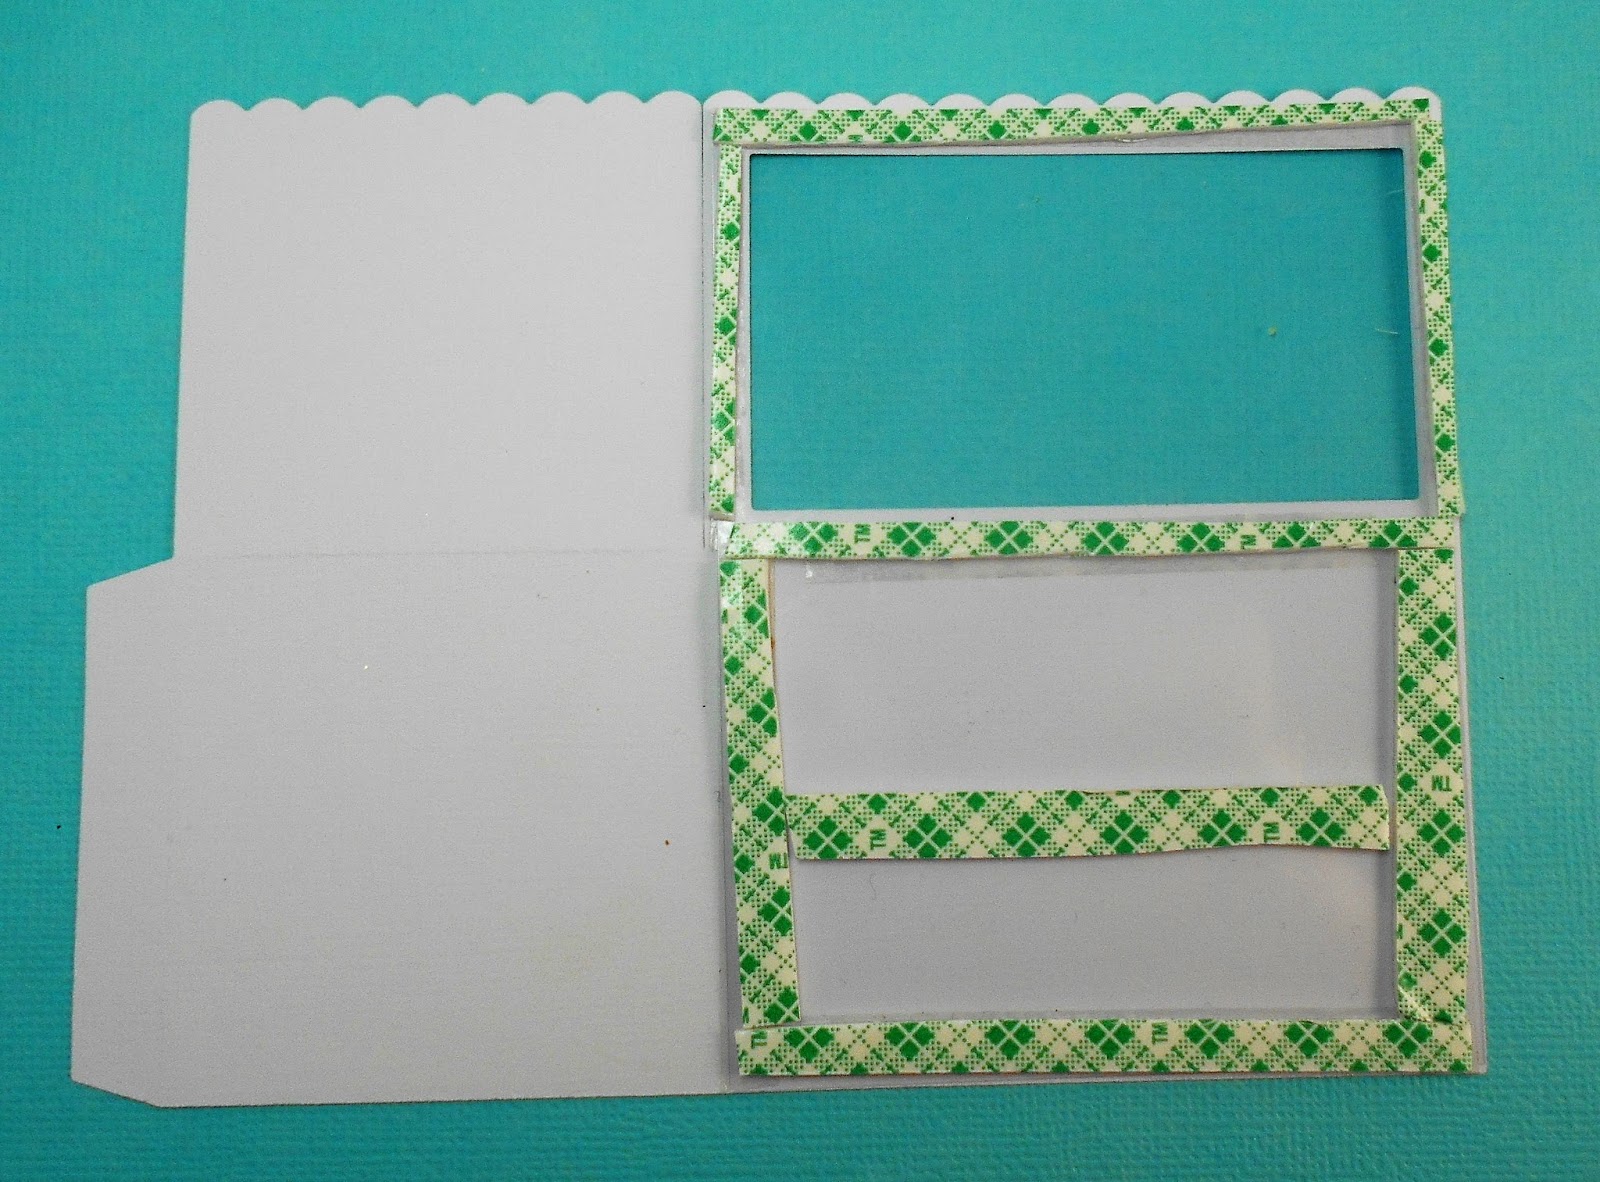
ones too that I didn't use. First I cut out two of the Box.
I also used the small layer die to cut out one of the larger
scalloped tops to make a window.

I cut 3 of the inserts.

Then I put accetate over it and my 3M tape
popped a few sequins in it.
I then created the background using 8.5cm x 10 cm

Then placing it over the sequins.
I then added a layer cutting two 5.3cmx 5.3cm and one
5.3cm x 7.9 cm

cutting two 5.3cm x 4.5cm and one 4.5cm x 7.9cm

I then used the layers from the kit this is the bottom of the box
and missed the pic for the top layer. I used
LF Winter Perfectly Plaid.
LF Winter Perfectly Plaid.

So you can see the shaker here and see where I have joined
the two pieces together.

I then taped each end of the inserts I placed them on the smaller
section equally apart.

I taped the joining piece on the end and if you lay them all flat
you fold the bigger section down and they all fit perfectly in the
right spots.

this how it folds for a standard envelope too!

With all its layers on and you can see the shaker.

Then to decorate! I used Christmas as I like to do Christmas
Cards 2 a month so by the time I get to Christmas I have done
most of them. I used the Fabulous LF Cheery Christmas Set.

Love the way it come out. The sentiment is from
LF Big Scripty Words Winter.
LF Big Scripty Words Winter.

All these products and more are avaliable at the
The Rubber Buggy Shop and don't forget to visit us on Facebook look for the Videos
down the side too, Instragram and the Rubber Buggy Design Team Blog
where there's a post nearly everyday from one of the team.
Happy Crafting
Happy Crafting
Jennifer
Subscribe to:
Posts
(Atom)


