Showing posts with label lawn fawn Inks. Show all posts
Showing posts with label lawn fawn Inks. Show all posts
Thursday, September 16, 2021
Happy Moments
Hi everyone, Steph Ackerman here today with lots of fun products from the store.


I've used the Folk Flowers - SizzixThinlits Dies by Tim Holtz to create this card. I die cut it from white cardstock and used assorted Distress Oxide Inks - Weathered Wood, Dried Marigold, to add color to the panel.

I matted the panel with Simple Stories Cardstock, then wrapped it with sheer ribbon.

The panel was added to a yellow card with 3D Foam Adhesives for dimension. The sentiment was stamped with Lawn Fawn Black Licorice Ink, die cut with Lawn Fawn Small Stitched Circle Die, then matted with Lawn Fawn Large Stitched Circle Die.
Finally, baker's twine was tie to the ribbon.
Thank you for visiting
Thursday, August 26, 2021
Thinking of You with Lawn Fawn
Hi everyone, Steph Ackerman here today with lots of fun products from the store.


This sweet card uses the Lawn Fawn Tropical Laves Backdrop.

I die cut the backdrop from white cardstock, then used assorted colors of Ranger Distress Oxide Inks in Marigold, Mowed Lawn and Tea Dye to add color to the backdrop. I matted it on white cardstock then added the panel to a card.

The die set came with some small elements which you can easily clip apart. I chose to keep them intact as I tend to misplace little pieces. I die cut them from Ranger Kraft-Stock - Cool.

I stamped the bird from Memory Box Bird Sanctuary Stamp set, colored with Copic Markers and then fussy cut. Thinking of You was stamped with Lawn Fawn Black Licorice Ink directly on the white panel.

Thank you for visiting
Thursday, August 12, 2021
Mixed Media Tags with Simple Stories
Hi everyone, Steph Ackerman here today with lots of fun products from the store.

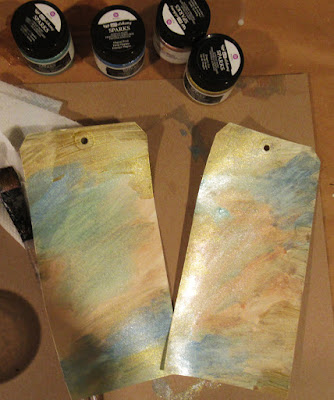


Wanting something a little different, I used Prima Marketing Art Alchemy Acrylic Paints on large tags from Dylusions Journal Tags #10. The colors are gorgeous so I mixed up an assortment of colors including Ice Queen, Gold Amber, Frozen Berries and Soft Satin and painted them randomly on the tags.

Next I used one of the Ciao Bella Stencils with Lawn Fawn's Freshly Cut Grass Ink, randomly adding a pattern around the tag.

Net I cut apart Simple Stories Simple Vintage Farmhouse papers to decorate the tags.

I also fussy cut the words to fit the tags. This is a little time consuming as the words are delicate, but the results were worth it.

Next, I used a script stamp (similar to this Ciao Bella Stamp) and randomly stamped it about the tags. Then I added May Arts Celery Green Sheer Ribbon to finish off the tags.

Thank you for visiting
Thursday, July 8, 2021
Mixed Media Card
Hi everyone, Steph Ackerman here today with lots of fun products from the store.


If you like mixed media, the Lindy's Stamp Gang collection of products is perfect for you. I started by cutting Stathmore Watercolor paper into 5"x 6" panels. Using Lindy's Stamp Gang sprays from Beauty School Dropout and Drink Me Silly, I sprayed both panels.

Once dry, I used Lawn Fawn Small Stitched Rectangle Dies to cut each panel to size. Save the extra die cut layer as you will need it later on.

On the top layer I stamped 49 and Market - Gabi's Hibiscus with Lawn Fawn Black Licorice Ink. Each die cut panel was matted with Pion Designs Pion Black cardstock.

The card was created from Bazzill Jawbreaker cardstock. The remaining piece of the die cut panel was added to the card, then the die cut panels were added on top.

The sentiment was die cut with the smallest Lawn Fawn die, matted with black cardstock and added to the card with 3D Foam Dots for dimension.
Thank you for visiting
Thursday, March 11, 2021
Lawn Fawn Birdhouse Card
Hi everyone, Steph Ackerman here with a sweet birdhouse card today.

Lawn Fawn's Magic Iris Birdhouse add on is part of their Iris series but it can be used alone, which is the beauty of the Lawn Fawn dies. You aren't forced to purchase something you might not want to use.


Since many of the dies are small, I tend to keep them linked together so I don't lose them. I die cut all the pieces from a variety of colors so I would be ready to assemble the card. I wanted a wood grain effect to the birdhouse so I used Lawn Fawn's Dark Brown Woodgrain Cardstock.

Once I had all the pieces die cut, I created the card from brown cardstock and Authentique's Romance pattern paper. I created a stake for the birdhouse, placed it on the card, then placed the birdhouse on top. The phrase was stamped with Lawn Fawn Black Licorice Ink on the left over circle which was die cut from the center of another birdhouse.

Leaves and flowers were added to the flower box along with the blue bird. Then I added several small pearls for dimension.

To finish I added two leafy vines below the birdhouse as well as 2 more leafy vines and a small pink heart to the top of the birdhouse.
Thank you for visiting
Thursday, September 17, 2020
Happy Fall with Penny Black's Gathering Stamp
Hi everyone, Steph Ackerman here today with lots of fun products from the store. Please visit the store for all the fun products I've used today.
As we head into our next season, I want to wish everyone Happy Fall.

I stamped the Gathering Stamp from Penny Black with Lawn Fawn Licorice Black Ink. Next, I colored her with Copic Markers. In order to die cut the image, I first cut around the basket, fitting the Lawn Fawn Small Stitched Rectangle Die so the basket would remain intact.


I stamped the Gathering Stamp from Penny Black with Lawn Fawn Licorice Black Ink. Next, I colored her with Copic Markers. In order to die cut the image, I first cut around the basket, fitting the Lawn Fawn Small Stitched Rectangle Die so the basket would remain intact.

While still in the die, I lightly inked around the image with Tim Holtz Distress Oxide Ink in Faded Jeans using a Ranger Ink Blending Tool.

The card was created using Bazzill cardstock and the new Photo Play Gnome for Thanksgiving 6x6 paper pad. This double sided paper pad has 24 papers with 2 of each design. This leaves you lots of options to work with. The wordy paper was matted with cardstock then wrapped with May Arts Sheer Ribbon before being added to the card on a slight angle.

The image was edged with Tim Holtz Distress Oxide Ink in Bundled Sage, matted with a Lawn Fawn Large Stitched Rectangle Die, then placed on the card with Scrapbook Adhesives.

Finally, I used the reverse side of the wordy paper to die cut Lawn Fawn's Happy Fall Line Border Die, placing it above the image with Tattered Lace Detail Glue, which is perfect for these smaller die cuts.

Thank you for visiting
Thursday, September 3, 2020
Hello Friend - Thinking of You
Hi everyone, Steph Ackerman here today with lots of fun products from the store. Please visit the store for all the fun products I've used today.

I used the Memory Box Bird Sanctuary Clear Stamp set for my card, stamping one of the birds with Lawn Fawn Black Licorice Ink on Bazzill Marshmallow Cardstock. Use an art dauber to add a touch of Ranger Tea Dye Ink to the bird's wings.

Because I wanted the bird to sit along the bottom edge of the card, I first die cut it with Lawn Fawn Stitched Circle Die then matted with a larger scalloped die. I cut off the bottom edge so it would sit along the bottom edge of the card, then stamped the phrase, also from this stamp set, in red ink. I also stamped a second phrase in Black Licorice Ink on a strip of white cardstock.

The card was created from Bazzill Candy Bar Cardstock and a sheet of wood grain paper was added as the base layer. The die cut bird was added to the bottom edge. After matting Hello Friend with brown cardstock, I wrapped twine around the panel then added it to the card with Scrapbook Adhesives 3D Foam Adhesives.

Finally, I used Ranger Liquid Pearls in Oyster around the card.
Thank you for visiting
Thursday, August 27, 2020
Window Cards with Art Impressions
Hi everyone, Steph Ackerman here today with lots of fun products from the store. Please visit the store for all the fun products I've used today.


I love window cards, don't you? They can be used in a number of different ways.
Using the stamps included in the Art Impressions Window Deco Die, I stamped the curtains and valance with Lawn Fawn Soot Dye Ink on Bazzill Marshmallow Cardstock and another set on Mintay papers then die cut them. I also die cut the shutters from Marshmallow cardstock, then inked with Ranger Distress Tea Dye Ink using a Ranger Ink Blending Tool.

I cut a piece of Maja Design - Summer Crush Flirty pattern paper to fit my card, then using the Art Impressions Window Die, I cut through both layers.

I used the white curtains and valance, placing them on the card around the window with Scrapbook Adhesives 3D Foam Adhesives for dimension.

Using Lawn Fawn Soot Ink, I inked a Penny Black stamp and stamped the phrase directly on the card front.

My 2nd card uses the shutters which had been die cut from a square of Marshmallow cardstock. It was then matted on a scrap of Flirty pattern paper so it peeks out of the shutters. It was then matted on Bazzill Lollipop Cardstock. Another Penny Black stamp was stamped directly on the card.

Thank you for visiting
Thursday, June 11, 2020
Pretty in Purple Cards
Hi everyone, Steph Ackerman here today with lots of fun products from the store. Please visit the store for all the fun products I've used today.

Starting with the Prima Marketing Open Flower die, I decided to build 2 cards around it. Since it is an open flower, there is no backing, so to achieve the look I wanted, I die cut the flower from 3 layers of Pion Design's Purple cardstock in one pass and 3 layers of Pion Design's Lavender cardstock in one pass. Pulling off the top 2 layers, the third layer shows the impression of the die and remains intact.

Using the intact layer for the flower bases, I reassembled the flowers using Tattered Lace Detail Glue, adding the purple insets to the lavender layer and the lavender insets to the purple layer. Then I adhered the top layer, gluing just the center of the flower, leaving the edges free.


Thank you for visiting

Starting with the Prima Marketing Open Flower die, I decided to build 2 cards around it. Since it is an open flower, there is no backing, so to achieve the look I wanted, I die cut the flower from 3 layers of Pion Design's Purple cardstock in one pass and 3 layers of Pion Design's Lavender cardstock in one pass. Pulling off the top 2 layers, the third layer shows the impression of the die and remains intact.

Using the intact layer for the flower bases, I reassembled the flowers using Tattered Lace Detail Glue, adding the purple insets to the lavender layer and the lavender insets to the purple layer. Then I adhered the top layer, gluing just the center of the flower, leaving the edges free.

Create a card from purple cardstock. Using Lawn Fawn Stitched Rectangle dies, die cut Bazzill Marshmallow Cardstock. Assemble the card by adding a lavender layer behind the rectangle.

Using Heartfelt Creations Classic Rose dies and coordinating stamps, create 4 sets of leaves on Bazzill Gumdrop Cardstock using Lawn Fawn Walnut Ink. Place 2 sets of leaves along the bottom of the card.

Add a brad to the flower center and place the flower on top of the leaves.

Finish the card by stamping a stamp from Stamperia's Enjoy stamp set, stamp it on Marshallow Cardstock and die cut with a Tutti Designs Nesting Oval die. Die cut a larger purple oval and slip it behind the leaves. Add to the card with Scrapbook Adhesives.

Alternate the colors for the 2nd card and adhere 2 sets of leaves in the upper corner. Again, add a brad to the flower center and place it on top of the leaves.

Stamp and die cut the same sentiment, adding it to the card with Scrapbook Adhesives.
Thank you for visiting
Thursday, May 21, 2020
Anniversary Cards with Tutti Designs
Hi everyone, Steph Ackerman here today with lots of fun products from the store. Please visit the store for all the fun products I've used today.

I had small amounts of Prima Marketing Art Alchemy paints in Flame and Gold remaining so I decided to create some backgrounds by painting the left over paints on Strathmore Watercolor Paper. It doesn't look very pretty, but the resulting card definitely is!


I adhered Bazzill Marshmallow Cardstock behind the die cut panel giving emphasis to the die cut areas. The die cut panel was matted with pink cardstock.


Thank you for visiting

I had small amounts of Prima Marketing Art Alchemy paints in Flame and Gold remaining so I decided to create some backgrounds by painting the left over paints on Strathmore Watercolor Paper. It doesn't look very pretty, but the resulting card definitely is!

I created the card using Maja Designs Vintage Summer Basics 1910 with the Tutti Designs Bird Tapestry die. For definition, I cut the painted panel to fit behind the die.

I added brads to the flowers, then inked the edges of the panel with Lawn Fawn Sunflower Ink and then matted it with Bazzill Gold Coins Cardstock.

The panel was then added to Maja Design Vintage Summer Basics 1912 and Bazzill Gold Coins Cardstock. It was then added to a pink card with Scrapbook Adhesives 3D Foam Squares.

Nuvo Crystal Drops in Party Pink were added to the corner designs. The phrase, from Art Impressions Watercolor Cling stamps, was stamped with Memento Tuxedo Black Ink on a scrap of Vintage Summer Basics 1912 and pink cardstock.

My 2nd card was created using Maja Designs Vintage Summer Basics 1933 and the same Tutti Designs die. A totally different effect was created.


Vintage Summer Basics 1910 was added to a pink card and the phrase, from Art Impressions Watercolor Cling stamps was stamped with Memento Tuxedo Black Ink on Bazzil Marshmallow Cardstock.

I used a Tutti Designs Oval Die to die cut the phrase and a larger mat. It was added to the card with Scrapbook Adhesives 3D Foam Squares. Raspberry Liquid Pearls were added to the corners of the card.
Thank you for visiting
Subscribe to:
Posts
(Atom)


