Saturday, February 29, 2020
Lawn Fawn Pivot PopUp Birthday Card
Welcome back and Nancy, here, to share with you some exciting Lawn Fawn dies that I know you will want in your crafting supplies for your next cards. I will be showcasing in this site the Lawn Fawn Pivot Popup Die Set and Lawn Fawn Just Stitching Hearts besides other wonderful supplies that are available at The Rubber Buggy on-line and retail store. 

I cut out a the Lawn Fawn Outside Inside Stitched Scalloped Rectangle die for the frame and die cut the hearts using Lawn Fawn Just Stitching Hearts die set. These double stitched hearts are only stitched and does not cut out a heart die, making these stitching hearts great for adding a decorative touch to your background! I used my die cutting machine to add different size hearts to the background and sponged on pastel colored inks in the center of the hearts.
The Stamping Bella UpTown Girls- Bianca Loves Her Big Cake was stamped and colored with Copic Markers. I used the NUVO Simply White Gloss for the cake and polka dots on her dress. I let the drops dry for a few hours. I cut out the stamp and used Beacon 3-n-1 Advanced glue to adhere Bianca and the cake to the card. The gorgeous pink patterned paper is from the Lemon Craft Sweet Secret collection. The banner was made using the Lawn Fawn Wavy Banner Set with the Lawn Fawn Wavy Saying Stamp Set. You will want to cut out the banner first and then stamp the sentiment on the banner.
I added a handmade bow with a Wild Orchid Craft flower in the center.
 |
| Lawn Fawn Just Stitching Hearts |
 |
| Lawn Fawn Pivot Popup Die Set
I added the Lawn Fawn Pivot Popup Die Set for the inside of the card. This set includes everything you need to create a four-panel pop-up scene that twists open inside your card! Use the included hills, trees, and clouds to decorate your scene, or use the panels as a starting point to create your own pop-up masterpiece! This panel can be used on a portrait or landscape side of the card. You will need to watch the video on assembling the pivot before you begin. Lawn Fawn made a video that goes through the steps. Click on Here to take you to this video.
|


I had so much fun making this card and hope you will too. So have fun crafting this weekend with these products. My cards and projects are always posted on Saturday. Keep watching and thank you so much for those wonderful comments as well as suggestions.
Enjoy and Happy Crafting!
 |
Thursday, February 27, 2020
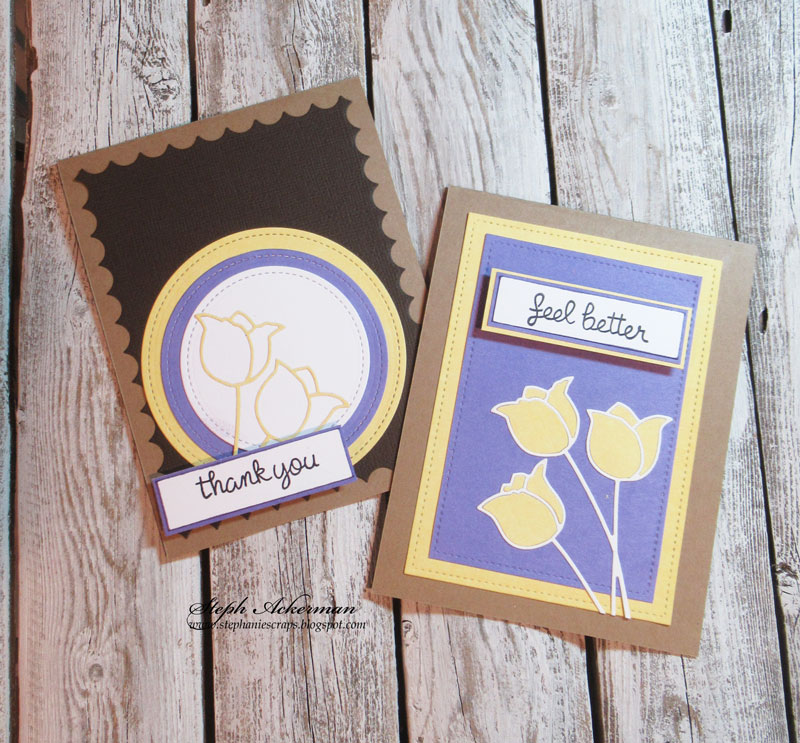
Beautiful Tulips
Hi everyone, Steph Ackerman here today with lots of fun products from the store. Please visit the store for all the fun products I've used today.

Using the Memory Box Tulip die, I die cut it with Bazzill Marshmallow and Sour Lemon Cardstocks. This is a great die to create cards with both the positive and negative pieces.

Die cut Bazzill Sour Lemon and Jelly Bean Cardstocks with Lawn Fawn Stitched Rectangle dies.


For my second card, I used the die cut sour lemon tulips, opting not to fill them in. I placed the tulips on 3 layers of cardstock die cut with Lawn Fawn Circle Stackable dies, creating a silhouette effect. Thank you was placed in the lower corner.

The card was created from brown cardstock and the Lawn Fawn Bayou Backdrop die

Thank you for visiting

Using the Memory Box Tulip die, I die cut it with Bazzill Marshmallow and Sour Lemon Cardstocks. This is a great die to create cards with both the positive and negative pieces.


Place the white tulip in the corner and add the lemon die cut pieces to complete the tulips. Use Lawn Fawn stamps to stamp a phrase using Memento Tuxedo Black Ink. Double mat and add to the card with Scrapbook Adhesives 3D Foam Squares.


Wednesday, February 26, 2020
Easel Hat Card
Hello friends! Today I'm sharing a easel hat card featuring
This paper collection is just so gorgeous and has so many beautiful embellishments to coordinate with it. I love the bright colors, it can be used for Birthday's, Mothers Day, Easter, Weddings or any occasion! It's perfect for layouts and card making!
I used


Be sure to stop by the Rubber Buggy Store and pick up this beautiful collection!
Stamperia House of Roses
I used
Velvet ribbon for the bow and beaded lace for the hatband and from my stash. The flowers are also from my stash.
The hat is created using Tutti Designs Nesting Stitched Circles and are available at the Rubber Buggy Store.
The hat is created using Tutti Designs Nesting Stitched Circles and are available at the Rubber Buggy Store.


The sentiment is also from my stash and is a Penny Black Stamp called Heartfelt Thanks.
Thanks for stopping by the Rubber Buggy blog today.
Debbie
Debbie
Saturday, February 22, 2020
Ciao Bella Easter and Spring Cards
Hello friends! Today I'm sharing a card set featuring
This paper collection is just so gorgeous and has so many beautiful embellishments to coordinate with it. I love the bright colors, it gives me Spring fever! It's Perfect for bright Spring/Easter layouts and card making!


The sentiment, flowers and ribbon are from my stash.
Be sure to stop by the Rubber Buggy Store and pick up this beautiful collection!
Ciao Bella - Sicilia- 12 x 12 Prints Paper Collection.


Be sure to stop by the Rubber Buggy Store and pick up this beautiful collection!
Thanks for stopping by the Rubber Buggy blog today.
Debbie
Debbie
Sympathy Cards
Welcome back and Nancy, here. Sympathy cards are some of the toughest occasions to create cards for but no doubt these cards are meaningful to the recipient with personalized messages in the card of sympathy, support, and wonderful memories of the person who passed away.
Today, I'm sharing a handmade sympathy card that is actually versatile enough to use for many other occasions with the Laserowe Love Chipboard - Crosses With Flowers. Laserowe Love Chipboard - Crosses With Flowers set has beautiful crosses and gorgeous lilies that are commonly used to make Easter cards, Sympathy cards, Confirmation or Baptism cards.

 |
Laserowe Love Chipboard - Crosses With Flowers |

I tried to not to go overboard with embellishments and let the main focus of the card be the message on the front and inside of the card. These gorgeous lillies on the card is like sending a bouquet of flowers to them as well.
It was so much meaningful for me to make these sympathy cards for them. My cards and projects are always posted on Saturday. Keep watching and thank you so much for those wonderful comments as well as suggestions.
Enjoy and Happy Crafting!
|
Thursday, February 20, 2020
Wander and Explore Panel
Hi everyone, Steph Ackerman here today with lots of fun products from the store. Please visit the store for all the fun products I've used today.

I found some left over wood panels in a local craft store after the holidays and knew they would work for a mixed media project.

I began by adding gesso to the panel. Once dry, I sprayed Tim Holtz Distress Oxide Spray Inks in Cracked Pistachio, Mermaid Lagoon and Iced Spruce across the panel. Heat set each color, then use Tim Holtz Dotted Layering Stencil with modeling paste as well as Tim Holtz Slate Layering Stencil with modeling paste to add dimension. Allow to dry thoroughly.


Then go to town with assorted embellishment, adding them around the panel. Once all the elements are down, add Prima Art Stones randomly about the panel.

Finish the panel by adding die cut words from Sizzix Thinlits, Shadow #3. Die cut each from Bazzill Marshmallow and Licorice Twist cardstocks. Place them randomly around the panel.
Thank you for visiting

I found some left over wood panels in a local craft store after the holidays and knew they would work for a mixed media project.

I began by adding gesso to the panel. Once dry, I sprayed Tim Holtz Distress Oxide Spray Inks in Cracked Pistachio, Mermaid Lagoon and Iced Spruce across the panel. Heat set each color, then use Tim Holtz Dotted Layering Stencil with modeling paste as well as Tim Holtz Slate Layering Stencil with modeling paste to add dimension. Allow to dry thoroughly.

Using a script stamp with Memento Tuxedo Black Ink, stamp around the panel.


Finish the panel by adding die cut words from Sizzix Thinlits, Shadow #3. Die cut each from Bazzill Marshmallow and Licorice Twist cardstocks. Place them randomly around the panel.
Thank you for visiting
Saturday, February 15, 2020
Birthday Steampuck Card
Welcome back and hope you are having a wonderful start for the new year. I have a few male birthday cards to make right now and a nice change from making Christmas cards for the past few months. If you are looking for vintage parts for your vintage steam puck projects, The Rubber Buggy on-line store carries the supplies you will need from Prima Marketing, Tim Holtz, etc. The Rubber Buggy carries these major name-brand craft supplies with fast delivery and wonderful customer services.

 |
Inside of card using ole Sizzix Thinlit Gear Head die very similar to Memory Box Dies Gear Assembly. I die cut and then used my scissors to cut out the die part that I want on the inside of the card. I typed out the sentiments and sponged on the Ranger Distress Antique Linen and Ranger Walnut Stain ink around the edges for the antique look.
|
 |
| Sizzix 3D Tim Holtz Mechanic Embossing Folder |

I had a sheet in my piling stash of old paper of gold mirror foil and embossed it with the Sizzix 3D Tim Holtz Mechanic Embossing Folder. I used a brush to apply the Prima Marketing Finnabair Black Gesso over the entire sheet. If you use a brush and tap it on, you will get more of a rustic appearance rather than brushing it smoothly. I applied the Prima Marketing Metallique Aged Brass, Rich Copper, Ginger Sparks and Red Amber with some Ranger Dauber Black Soot. Occasionally, I used a dry wipe to spread or remove any excess colors.
I cut out the edges of the embossed section before gluing and adding the gears that were also covered with black gesso and various colors of the same Prima Marketing Metallique waxes. I love using the Prima Marketing waxes since it provides a nice metallic sheen on this paper along with the Prima Marketing Art Alchemy Ginger Sparks. I just use my fingers to smear these waxes and Sparks on the paper and gears. I first applied the black gesso in the Prima Marketing Finnabair Art Basic Mixed Media Essentials Gesso Sets on the gears and screws and let dry before applying the waxes and Sparks.
I added the brown baker twine and then used a hot glue gun for the Tim Holtz Idea-ology Metal Word Bands. I smeared some Prima Marketing waxes on the metal word bands.
I cut out some patterned brown paper and distress the one edge with my fingers and used a pencil to draw the stitches. I applied the Ranger Antique Linen to the edges for a distress look.
I sponged on the Ranger Distress Antique Linen ink to the stamped sentiment and number 41st.

I had so much fun making these cards and hope you will too. So have fun crafting this weekend with these products. My cards and projects are always posted on Saturday. Keep watching and thank you so much for those wonderful comments as well as suggestions.
Enjoy and Happy Crafting!
|
Thursday, February 13, 2020
3D Floral Card
Hi everyone, Steph Ackerman here today with lots of fun products from the store. Please visit the store for all the fun products I've used today.


Fold on the 3" score, folding inwards to create a stand up card.

Using 2 sheets of pattern paper from the Love Letters paper pack from the Mintay pattern paper collection, I adhered one to the scored section to create the base layer. Next, I fussy cut the flowers from the second sheet as I wanted to create a 3D effect with the flowers. Use Heartfelt Creations Flower Shaping Essentials to form the flowers.

Lightly ink the flowers with Tea Dye Distress Ink using an Ink Blending Tool.

Place the fussy cut flowers on the base layer with Scrapbook Adhesives 3D Foam Squares. For more dimension, I doubled the squares.

Die cut the 2 sets of circles using Lawn Fawn Small Circle Dies and Lawn Fawn Large Circle Dies. On the smaller circles stamp phrases from Art Impressions and 49th and Market using Memento Tuxedo Black Ink.

Wednesday, February 12, 2020
Romantic Tango Valentine's Day Card
Hello friends! Today I'm sharing a card set featuring
This paper collection is just so gorgeous and has so many beautiful embellishments to coordinate with it. This collection comes with tags and embellishments to help you create romantic layouts and cards! It's Perfect for beautiful romantic Valentine's Day Card.


The sentiment, flowers and ribbon are from my stash.
Be sure to stop by the Rubber Buggy Store and pick up this beautiful collection!
Ciao Bella Tango - A4 Creative Collection


Be sure to stop by the Rubber Buggy Store and pick up this beautiful collection!
Thanks for stopping by the Rubber Buggy blog today.
Debbie
Debbie
Saturday, February 8, 2020
Pregnancy Card
Welcome back and Nancy, here, to share a birthday card made with the new arrival of the January paper in this gorgeous Graphic 45 Fashion Forward 12 x 12 Paper Pad and Fashion Forward collection. What a beauty and gorgeous collection. This collection is so well suited for crafters to make planners, daily journals, mini albums, gorgeous cards with papers reflecting flowers and colors for that month and for all of your scrapbook needs. What I like about this the Graphic 45 Fashion Times collection is the monthly pages in this collection to create projects and cards for each month of imagery of vintage ladies, wonderful sentiments and florals for each season of vibrant colors of sapphire blue, amethyst purples, emerald greens, ruby reds and citrine yellows.
All of these wonderful products are available at The Rubber Buggy on-line and retail store. Get your order in while supplies last since this collection is way too gorgeous

 |
| Individual papers can also be purchased separately - double-sided paper Graphic 45 Fashion Forward - May |
My granddaughter who got married in August just announced that she is now pregnant and may be having their baby around my birthday in September. We will now be great grandparents-WOW!


I added a frame around the image using the Graphic 45 Fashion Forward Pattern and Solid Paper and die cut out the Congratulations in gold and black cardstock. I adhered the gold on top of the black die cut to add dimension.
I typed out the sentiment and used the Graphic 45 Fashion Forward left over pieces around the sentiment. I stamped the little angel from an ole Penny Black stamp from The Rubber Buggy and colored the baby with Copic Markers. I cut the angel using my new Brothers Scan and Cut 125 machine which does a great job in cutting many of my stamp images like this one.
Supplies:
Graphic 45 Fashion Forward Pattern and Solid Paper
Graphic 45 Fashion Forward 12 x 12 Paper Pad
Beacon 3-n-1 Advanced Glue
Wild Orchid Craft rose
Seam Binding Ribbon - Rose
Tim Holtz Gum Drops (Colored with Pink Copic Marker)
Beacon 3 in 1 Advanced Glue
I had so much fun making these cards and hope you will too. So have fun crafting this weekend with these products. My cards and projects are always posted on Saturday. Keep watching and thank you so much for those wonderful comments as well as suggestions.
Enjoy and Happy Crafting!
|
Subscribe to:
Posts
(Atom)


