Saturday, August 31, 2019
Tim Holtz Mechanic Embossing Folder cards
Hope you are having a good harvest whether it is in your garden or farm or just crafting! The Rubber Buggy has the wonderful products that you will want for all of your crafting projects like the Sizzix 3D Tim Holtz Mechanic Embossing Folder and this gorgeous Stamperia Voyages Fantastique paper with fun Prima Marketing waxes.

I have two cards made with these products that I would like to share with you this crafty weekend.


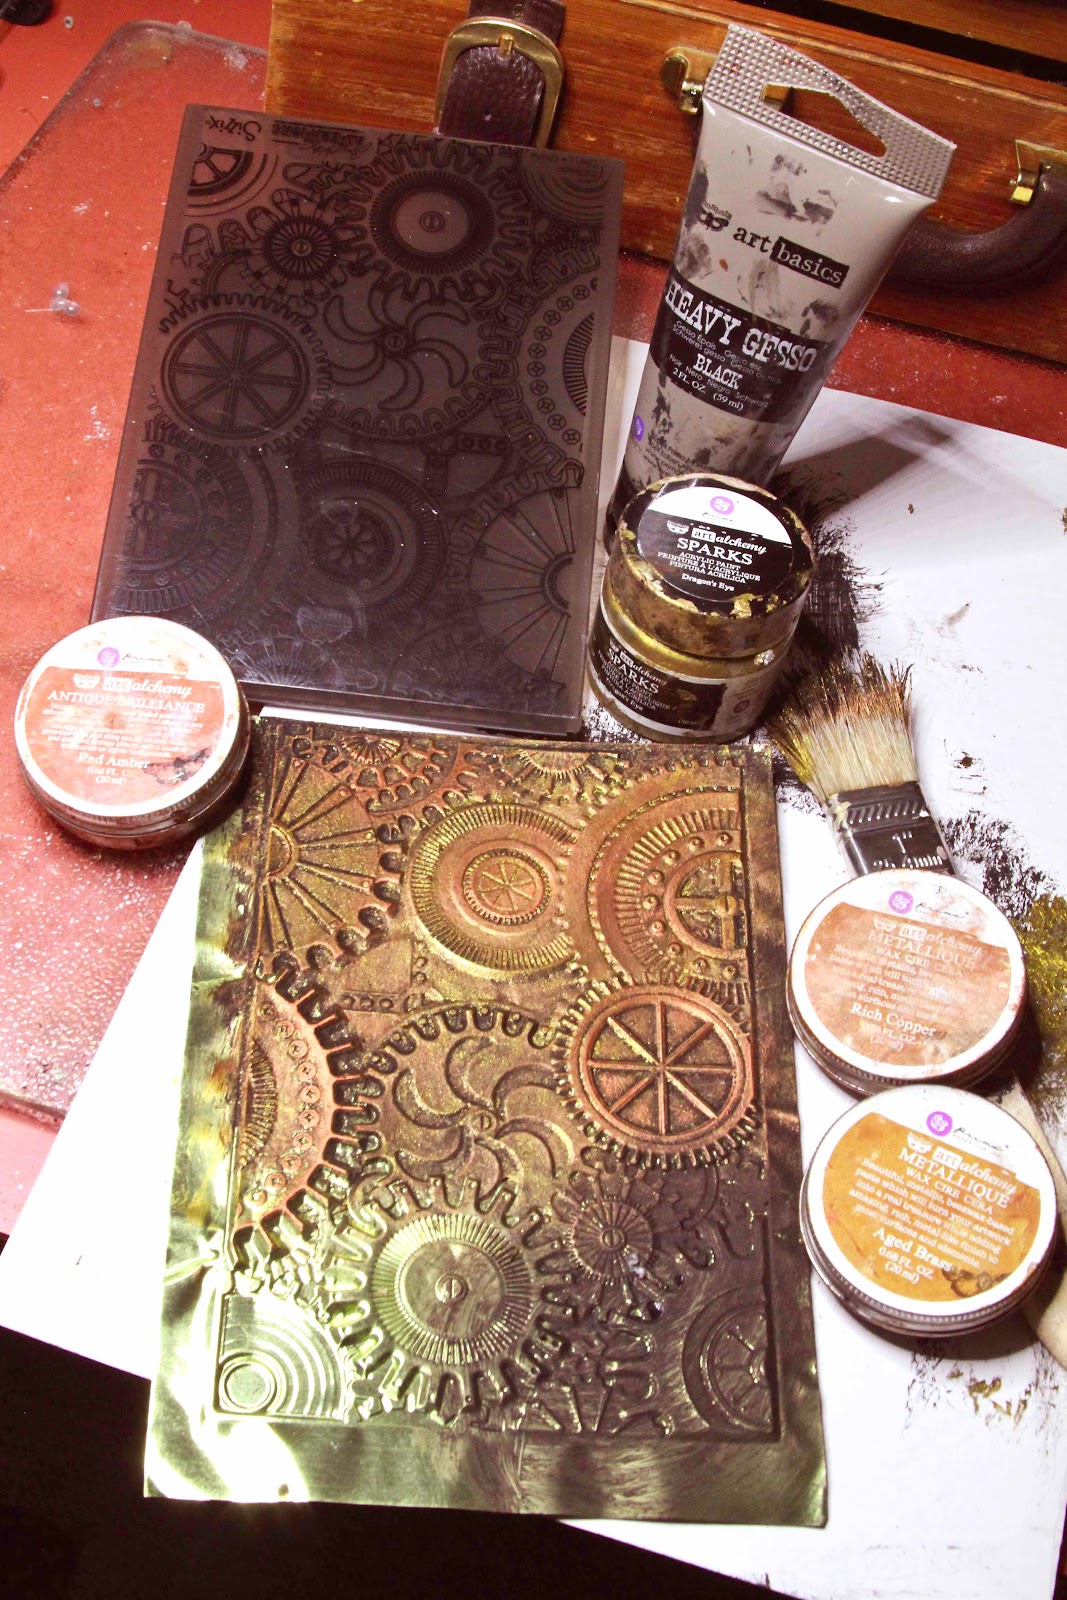
I cut out the edges of the embossed section before gluing and adding the gears that were also covered with black gesso and various colors if these Prima Marketing Metallique waxes. I used a hot glue gun to adhere the gears to the card and used the Beacon 3-in-1 Advanced Glue for the rest of the card especially the cut out tag from the Stamperia Voyages Fantastique paper pad.
For the female card, I added a chipboard with these Prima Marketing Metallique waxes to frame the tag. I found an ole metal flower and wings from a necklace and applied white gesso on the flower and let dry before applying the Prima Marketing Metallique waxes. I cut out another frame from the paper pad behind the embossed paper.
For the male card, I found a small flash light bulb and added it to the card. I added the Prima Marketing Melange Vintage Art Pebble to this card with a Tim Holtz Idea-ology Muse Token and Prima Marketing Art Alchemy Finnabair Mechanical set on the corner.
I sponged on the Ranger Distress Antique Linen ink to the tags and chipboard of Tim Holtz Quotes Chipboards to blend theses into the embossed card.
I had so much fun making these cards and hope you will too. So have fun crafting this weekend with these products. I hope I have inspired you try out these products available at The Rubber Buggy on-line store. My cards and projects are always posted on Saturday. Keep watching and thank you so much for those wonderful comments as well as suggestions.
Enjoy and Happy Crafting!
 |
Thursday, August 29, 2019
Candy Cane Cards
Hi everyone, Steph Ackerman here today with lots of fun products from the store. Please visit the store for all the fun products I've used today.


It's never to early to start creating Christmas cards is it?
Thank you for visiting

Using my Scor-Pal, I created 5 1/2" square cards using Bazzill Wax Lips cardstock which I scored in half. I've used the new Graphic 45 Joy to the World collection, using the Angel's Sing paper for the card base. Then I wrapped it with sheer ribbon before adding a torn panel on top.

I repeated the process for my second card using the Radiant Beams paper.

This sweet White Rose Studio stamp - Mia with Candy, was stamped with Memento Tuxedo Black Ink, then colored with Copic Markers. She was die cut with Lawn Fawn Small Stitched Circle die and then matted with a Lawn Fawn Large Stitched Circle die.

Happy Holidays is part of this stamp set. It was also stamped with Memento Tuxedo Black Ink, matted with green and red cardstock, then added to the card wtih Scrapbook Adhesives 3D foam squares for dimension.
It's never to early to start creating Christmas cards is it?
Thank you for visiting
Tuesday, August 27, 2019
Trimming The Tree

Hi it's Jennifer here with another Christmas Card.
This time I used Woodsies Trimmimg The Tree I
just love these little Chicks they are just all over it.
I picked a couple of colours out of the Baubles for my
background papers and layered them in 3D Tape.
Copics used are
Chicks - Y00, Y06, Y15, Y17, YR23
Tree - YG01, YG03, YG17, YG23
Bauble Blue - B21, B24, B26, B28
Bauble Red - R22, R24, R27, R29
Bauble Aqua - BG10, BG11, BG45, BG49
Bauble Purple - BV02, BV04, V04, V06
I have created my highlights using a White Pen and
then finished it of with some Sequins.


I hope you all have a Great Crafting Week
Jennifer
Monday, August 26, 2019
Brag Book with 3 Waterfalls with Bev

Hi... Bev here today at The Rubber Buggy. I am sharing this super fun brag book. I experimented with this style for days before ending up with my preferred 3 waterfalls with both horizontal and vertifcal waterfalls to be able to share lots of photos. It will be great for memories of all kinds... special occasions.... use them as photo gifts or even xmas gifts. The personal touch makes it an amazing creative brag gift... perfect for any coffee table for viewing often.
This collection ... Prima Apricot Honey – is soft, elegant and has amazing mix and match prints and subtle accents sheets and images to decorate your projects.
- Paper: Prima Marketing Apricot Honey Collection
- Flowers: Prima Marketing Apricot Honey - Honey Sweet, Prima Fruit Paridise Raspberry Kisses
- Glue: Beacon 3-in-1 Glue,
- Accents: Scrapbook 3D foam
- Machine/ tools: EK success cutter bee scissors, Fiskar Paper Trummer.
- Other: cardstock, accents, ribbon, glass floral

For this brag book as I mentioned I was after something that would be perfect for vertical and horizontal photos ... and also wanted a good size photo space.... and the many photos of both sizes.
(Instructions to follow when ready)

Side view of brag book.

So the outside and accents are mostly Prima Marketing Apricot Honey Collecton.

Super fun to decorate by theme.

This one is soft, elegant and displays amazing prints both light and dark and the touch of foil is a great touch in this collection.


Thanks for stopping by... hope to see you again soon

Saturday, August 24, 2019
Stamperia Ceremony Wedding Card
Welcome back and Nancy, here, to share with you a wedding card for my granddaughter's wedding this month. I just love working with Stamperia paper collection and this is the Stamperia Ceremony Paper Collection that I used for this card. All of these wonderful name-brand products are available at The Rubber Buggy on-line store.


Took more time to think about how to make this card and take a picture of it than to actually make it. I started out with cutting out the hat boxes and sentiment from the Stamperia Ceremony Paper Collection. After I cut out the sentiment, I sponged on the Distress Oxide Walnut Stain ink around the edges before adhere it on the hat box with Beacon 3-in-1 Advanced glue. I took the chipboard swans and colored the leaves with Copic Markers before adding the NUVO Aqua Shimmer Glitter Gloss pen on the swans and flowers. I added a 10mm Wild Orchid Craft rose in the center of the flowers on the swans. I cut out the butterfly in this collection and added the NUVO Aqua Shimmer Glitter Gloss pen and folded the butterfly and only glued the center of the butterfly on the card along with additional 10mm Wild Orchid Craft roses. I used the 5/8" wide Scor Tape to adhere coral seam binding ribbon to the card before adding the bow and flowers. I buy a lot of cheap pearl necklaces and other embellishments from thrift stores to add to my card. I cut the string of the pearl necklace and pull the gold or silver wire thread through the pearls and twist it to make a pearl flower spray with about 1 1/2" wire left over and will fold that wire and use a hot glue gun to add the pearls sprays behind my bouquet. I added a handmade seam binding coral ribbon to the bow tied with a heart-shape rhinestone in the center. I used a hot glue gun to add this together with the beautiful Venice Lace on the card. I used a hot glue gun to add the 4mm pearl strings around the frame of the card.

 |
| Stamperia Ceremony Paper Collection |
So get off your computers and start making a tag like this one! I hope I have inspired you try out these products available at The Rubber Buggy on-line store. My cards and projects are always posted on Saturday. Keep watching and thank you so much for those wonderful comments as well as suggestions.
Enjoy and Happy Crafting!
|
Thursday, August 22, 2019
Cards with Mintay Marina Collection
Hi everyone, Steph Ackerman here today with lots of fun products from the store. Please visit the store for all the fun products I've used today.

Have you seen the Mintay papers yet? These papers are heavy stock and come in a wide variety of colors and styles. This is the Mintay Marina Collection.


Thank you for visiting

Have you seen the Mintay papers yet? These papers are heavy stock and come in a wide variety of colors and styles. This is the Mintay Marina Collection.

Using Bazzill Licorice Twist, I cut to 5 1/2" x 11, then used the Scor-Pal to create 5 1/2" square card. Then I aded a layer of Bazzill Wax Lips. Next, I added a panel from the Mintay collection. Selecting another sheet from the collection, I die cut it with Lawn Fawn Small Stitched Circle die and matted with a Lawn Fawn Large Stitched Circle die. For a fun effect, I cut off the right edges of each.

My next card uses more papers from this collection. I've added a strip of black cardstock between the layers. Then I fussy cut another panel and added it to the card with Scrapbook Adhesives 3d foam adhesives.

And my third card uses mini tags cut from the collection, a circle panel using Lawn Fawn Small Stitched Circle die and matted with a Lawn Fawn Large Stitched Circle die. Again, I cut the edges for a fun effect.
Thank you for visiting
Wednesday, August 21, 2019
Mixed Media Heart Hanger
Hello friends! Debbie with you today sharing a new project featuring Prima Marketing


Tuesday, August 20, 2019
Merry Christmas

Hi Everyone it's Jennifer here getting ready for Christmas
with 129 sleeps to go. So it was time to get serious with
these Christmas Cards. So my first one I have used these
very Adorable Penguins that I coloured them up using Copics.
I glued Glitter down for snow.
I glued a scattering of Sequins to finished it off.
I coloured my Girl up using Copics.
Penguins - B97, B99
Feet - YR23, Y15, Y38
Feet - YR23, Y15, Y38
Scarf - BV000, BV02, BV04
Trees -YG01, YG03, YR23, YG17
Stamping Bella - Woodsies Warm And Fuzzy Penguins


I hope you all have a Great Crafting Week
Jennifer
Subscribe to:
Posts
(Atom)


