Showing posts with label may arts. Show all posts
Showing posts with label may arts. Show all posts
Thursday, August 12, 2021
Mixed Media Tags with Simple Stories
Hi everyone, Steph Ackerman here today with lots of fun products from the store.

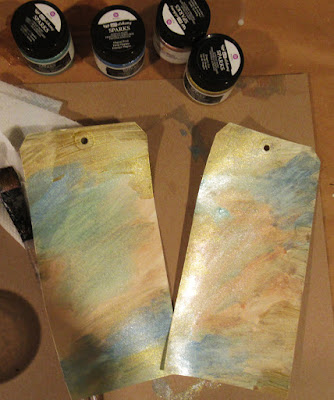


Wanting something a little different, I used Prima Marketing Art Alchemy Acrylic Paints on large tags from Dylusions Journal Tags #10. The colors are gorgeous so I mixed up an assortment of colors including Ice Queen, Gold Amber, Frozen Berries and Soft Satin and painted them randomly on the tags.

Next I used one of the Ciao Bella Stencils with Lawn Fawn's Freshly Cut Grass Ink, randomly adding a pattern around the tag.

Net I cut apart Simple Stories Simple Vintage Farmhouse papers to decorate the tags.

I also fussy cut the words to fit the tags. This is a little time consuming as the words are delicate, but the results were worth it.

Next, I used a script stamp (similar to this Ciao Bella Stamp) and randomly stamped it about the tags. Then I added May Arts Celery Green Sheer Ribbon to finish off the tags.

Thank you for visiting
Thursday, January 7, 2021
Mini Album with Ciao Bella Frozen Roses Collection
Hi everyone, Steph Ackerman here today with lots of fun products from the store. Please visit the store for all the fun products I've used today.


The Ciao Bella Frozen Roses 6x6 paper collection is a fun collection of 24 double sided papers perfectly suited for winter. I had a mini album in my stash and decided to decorate it with these wonderful papers. Bazzill Lollipop Cardstock was used as a mat for each page. I used large circle dies, but you could also use a plate and free hand cut each page.

Selecting one of the papers for the cover, I used Nuvo Jewel Drops to add color to the flowers by the gazebo. I used a Lawn Fawn line die to add happy holidays across the top of the album.

Additional Nuvu Jewel Drops were added throughout the album.

The interior pages are comprised of images from this collection which I fussy cut.

I created a pocket on one of the pages and inserted a tag from the collection tied with May Arts Sheer Ribbon. A perfect place to add a sentiment or a photo.

There are lots of berries on these papers so I added Ranger Liquid Pearls in Garnet to the berries to give them dimension throughout the album.

Aren't the papers gorgeous? They are so detailed and really put you in a winter mood.

Creating a mini album can be a continuous feat, always finding something else to add, so at some point I needed to stop!!!

Thank you for visiting
Thursday, September 17, 2020
Happy Fall with Penny Black's Gathering Stamp
Hi everyone, Steph Ackerman here today with lots of fun products from the store. Please visit the store for all the fun products I've used today.
As we head into our next season, I want to wish everyone Happy Fall.

I stamped the Gathering Stamp from Penny Black with Lawn Fawn Licorice Black Ink. Next, I colored her with Copic Markers. In order to die cut the image, I first cut around the basket, fitting the Lawn Fawn Small Stitched Rectangle Die so the basket would remain intact.


I stamped the Gathering Stamp from Penny Black with Lawn Fawn Licorice Black Ink. Next, I colored her with Copic Markers. In order to die cut the image, I first cut around the basket, fitting the Lawn Fawn Small Stitched Rectangle Die so the basket would remain intact.

While still in the die, I lightly inked around the image with Tim Holtz Distress Oxide Ink in Faded Jeans using a Ranger Ink Blending Tool.

The card was created using Bazzill cardstock and the new Photo Play Gnome for Thanksgiving 6x6 paper pad. This double sided paper pad has 24 papers with 2 of each design. This leaves you lots of options to work with. The wordy paper was matted with cardstock then wrapped with May Arts Sheer Ribbon before being added to the card on a slight angle.

The image was edged with Tim Holtz Distress Oxide Ink in Bundled Sage, matted with a Lawn Fawn Large Stitched Rectangle Die, then placed on the card with Scrapbook Adhesives.

Finally, I used the reverse side of the wordy paper to die cut Lawn Fawn's Happy Fall Line Border Die, placing it above the image with Tattered Lace Detail Glue, which is perfect for these smaller die cuts.

Thank you for visiting
Thursday, August 6, 2020
Stamping Bella Cards
Hi everyone, Steph Ackerman here today with lots of fun products from the store. Please visit the store for all the fun products I've used today.


.

I love the 7 Gypsies Boots & Brollas on Ivory cardstock. This is a sturdy cardstock with assorted boots and umbrellas. Creating 5 1/2" square cards from Bazzill Licorice Twist Cardstock, the pattern paper was cut 5" square and inked with Tim Holtz Gathered Twigs Ink.
Using the reverse side, I cut it 5 1/4" square and adhered the papers together.
After wrapping the panels with May Arts Sheer Black Ribbon, the panels were added to the cards.

I love the Stamping Bella stamps and used both Sunny is Stylish and Lolly with her Brollie. Both were colored with Copic Markers. Sunny was fussy cut and added atop a Tutti Designs oval die, with Scrapbook 3D Foam Adhesives for dimension, while Lolly was stamped on a Tutti Designs oval die. The ovals were then adhered to larger black ovals.

The right side of Lollie's oval was cut off to align with the edge of the card.
The ovals were then added to each of the cards with foam adhesives for dimension.
Thank you for visiting
Thursday, July 30, 2020
Let It Snow Snowflake Cards
Hi everyone, Steph Ackerman here today with lots of fun products from the store. Please visit the store for all the fun products I've used today.
It may still be the middle of summer, but there is no better way to cool off than by creating winter themed cards.
It may still be the middle of summer, but there is no better way to cool off than by creating winter themed cards.

I used Maja Designs Vintage Summer Basics 1916 to create both cards, die cutting the papers with PoppyStamps Craft Die - Snowflake Lattice Frame. As this paper is double sided, I created two cards using both sides of the paper.

Use the Spellbinders Tool 'n One to remove the left over die cut pieces that remained in the die.

Mat the die cut panels with the same paper, then wrap each panel with May Arts Sheer Light Blue Stitched ribbon. This gives the cards a wintry feel.

The Maja paper gives each card a wintry feel.

Add the die cut panels to 4 1/4" x 5 1/2" cards created from Bazzill Marshmallow cardstock and Bazzill Icy Mint cardstock. Use Nuvo Crystal Drops to create pearls in each of the snowflakes. Allow to dry completely.

Die cut Tutti Designs Oval Dies from the same paper and place atop the cards with Scrapbook Adhesives 3D Foam for dimension. Stamp and die cut the bench and lamp post using Lawn Fawn Winter in the Park stamps and dies and Lawn Fawn Soot Dye Ink. Place them atop the oval and add to the card with foam adhesives.

Die cut Bazzill Marshmallow cardstock with the Lawn Fawn Let It Snow Line Border Die. As the die cut phrase is flexible, you can customize the die cut for your projects. I wanted to shape them in the form of an arch on my cards.

Finally add Yellow Ice Stickles to the lanterns.
Thank you for visiting.
Thursday, July 16, 2020
Thanks Shaker Card
Hi everyone, Steph Ackerman here today with lots of fun products from the store. Please visit the store for all the fun products I've used today.


Thank you for visiting

Using Tutti Designs Butterfly Dance die, I die cut it from white and pink cardstock from the Lawn Fawn Schoolyard paper pack. I then die cut larger ovals from acetate, yellow cardstock and a newsprint panel from Dress My Craft'sWhispering Love collection.
Adhere the white die cut butterfly panel to the acetate using Tattered Lace Detail Glue, then place the yellow oval on top. Adhere foam adhesives along the edge of the pattern panel creating the shaker. Fill the channel with Dress My Crafts Shaker Elements - Dessert, then place the acetate butterfly panel on top, creating the shaker.

Fussy cut the butterflies from the pink die cut oval and place them atop the white panel, letting the wings free. The butterflies appear to be in flight.

Create a card from white cardstock. Mat pattern paper (from the Whispering Love collection) with pink cardstock and wrap with May Arts Sheer Black ribbon. Adhere the panel to the card.
Adhere the butterfly shaker to the card. Using the Lawn Fawn Thanks Line die to die cut Thanks from black cardstock. Adhere it across the bottom of the oval., cutting off the excess portion as necessary.
Thank you for visiting
Thursday, May 14, 2020
Stamperia Enjoy Cards
Hi everyone, Steph Ackerman here today with lots of fun products from the store. Please visit the store for all the fun products I've used today.

Sprinkle Stamperia Glamour Pigments in Gold and Ancient Pink on Strathmore Watercolor Paper then spritz with water and let the colors mix. Rotate the papers so the colors run. Spritz more water as needed then heat set.

Mat each panel with Bazzill Gold Coins Cardstock then wrap with assorted ribbons and twine.

Create a pink card for card #1 and adhere the ribbon wrapped panel. Stamp the rose and pot using Stamperia Rubber Stamps using Memento Tuxedo Black Ink on Bazzill Marshmallow Cardstock. Color with Copic Markers. Die cut using Lawn Fawn Stitched Circle Dies. Mat with Lawn Fawn Zig Zag Circle Dies. Add the image on the card with Scrapbook Adhesives 3D Foam Adhesives for dimension.

Mask the word Enjoy from the same stamp set and ink with Memento Tuxedo Black Ink. Mat and add to the edge of the card.

Create a 2nd pink card and adhere the 2nd panel. Use the same rose and pot, stamp on Bazzill Marshmallow Cardstock, color with Copic Markers, then cut the edge of the stamped image. Mat with a Zig Zag die and cut off the edge. Add to the card with Scrapbook Adhesives 3D foam adhesives for dimension. Stamp Enjoy as above and add to the corner of the card.

Tie twine to the ribbon and add Enjoy to the corner. Add a little bit of glimmer to the rose using Ranger Ice Stickles.
Thank you for visiting
Thursday, April 16, 2020
Need a Hug? Card
Hi everyone, Steph Ackerman here today with lots of fun products from the store. Please visit the store for all the fun products I've used today.


Thank you for visiting

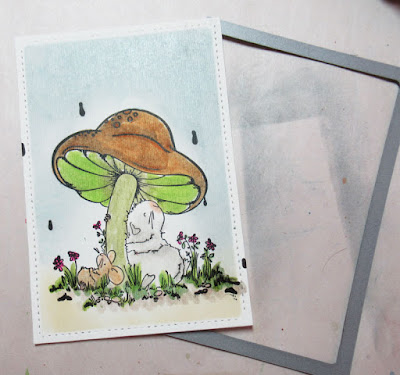
I stamped Stamping Bella's Gilbert and Maisy Under the Toadstool with Memento Tuxedo Black Ink, then colored the image with Copic Markers. Using Lawn Fawn Stitched Rectangle Dies, the image was die cut. Leaving the image in place, I added Ranger Distress Inks around the image using a Ranger Ink Blending Tool.

Removing the die, you can see a nice white edge around the image.

Creating a card from Bazzill Gumdrop cardstock, I added a panel from Lawn Fawn's Knock on Wood paper pad, then wrapped the card with Cotton Ribbon.

Matting the image with Bazzill Gumdrop cardstock, I added it to the card with Scrapbook Adhesives 3D Foam Squares for dimension. The sentiment was added to the corner.

To finish, Ranger Liquid Pearls in Merlot were added to the flower centers and the sentiment.
Thank you for visiting
Thursday, April 9, 2020
Happy Easter Cards
Hi everyone, Steph Ackerman here today with lots of fun products from the store. Please visit the store for all the fun products I've used today.

Have you seen the new Lindy's Stamp Gang products available in the store? They are absolutely stunning and such a wide variety of products.
I've used Shimmer Magicals - Drop Dead Diva pigment powders. I began by spritzing a sheet of Strathmore Watercolor Paper with water then dropped the powders on the paper.

Once the powders were dropped on the paper, I used a paint brush to move them about the paper. Then I spritzed additional water and moved the paper so the colors would run.

Once I liked the effect, I heat set the paper.

I created 2 cards from Bazzill Licorice cardstock then cut the spritzed panel to fit each card. Each card was then wrapped with May Arts Sheer Ribbon.

Stamping Bella's Bunny and Her Daffodil was stamped with Memento Tuxedo Black Ink and then colored with Copic Markers. Each image was then die cut with Lawn Fawn's Stitched Rectangle dies. While the die remained in place, I colored around the first image with Weathered Wood Distress Ink using the Ranger Ink Blending Tool.

The second image was inked as the first image, but this time I used Milled Lavender Distress Ink. I love the white edge of the cardstock that shows.


The sentiment, Just for You, is from the Wild Rose Studio Antique Roses stamp set, was stamped with Memento Tuxedo Black Ink, matted with Licorice cardstock and added to the card.

Thank you for visiting.
Subscribe to:
Posts
(Atom)