Friday, April 29, 2016
Little Birdie told me...
Hi everyone!!
Here Noe!! Today I come with a card made with one of my favourite stamp set: Crazy Birds from Tim Holtz... Love these stamps (and Crazy Cats too)... So, here is my B-dy Card with them!

Products used:
Thanks for stopping by!

Here Noe!! Today I come with a card made with one of my favourite stamp set: Crazy Birds from Tim Holtz... Love these stamps (and Crazy Cats too)... So, here is my B-dy Card with them!

Products used:
- Crazy Bird Stamp set
- Crazy Talk Stamp set
- Ranger Embossing Powder White
- Ranger Archival Jet Black
- Spectrum Noir Markers
Thanks for stopping by!

Thursday, April 28, 2016
Miss You a Lot
Hi everyone, Steph Ackerman here on this lovely Spring Thursday. It's a little dreary today, but the flowers are beginning to bloom!
Today I'm working with Aidan, a Julie Nutting stamp from Prima. Masculine cards can be a challenge but working with Aidan, you can create a fun and potentially whimsy card.


Aidan was stamped with Memento Tuxedo Black Ink and then fussy cut. He was lightly colored with Copic Markers before adding clothes using Graphic 45 papers. The sentiment is from WPlus9.

Thank you for visiting.
Steph
Today I'm working with Aidan, a Julie Nutting stamp from Prima. Masculine cards can be a challenge but working with Aidan, you can create a fun and potentially whimsy card.

I began by using Wendy Vecchi embossing paste with Tim Holtz Splatter stencil to create some background texture on a panel of cardstock. I inked the edges with Vintage Photo Distress Ink then adhered the panel to the card.

Aidan was stamped with Memento Tuxedo Black Ink and then fussy cut. He was lightly colored with Copic Markers before adding clothes using Graphic 45 papers. The sentiment is from WPlus9.

Thank you for visiting.
Steph
Tuesday, April 26, 2016
Travel album: More process
Hi everyone!
Pi here and I'm continuing my mini serie, where I'm documenting my process in putting together a travel album using Simple stories snap collection You are here.
You can find the set up plan HERE,
#1 process video HERE.
#2 process video HERE.
This week I really feel that I have grown in my process. Usually I'm not a quick embellisher and it takes me litterly hours to make one filler card. But this time I'm super happy with what I made and it came together so easy. It must be that everything is already coordinating. This is bad new for my huge stash that will just continuing sitting there as I will start buying collections from now on - LOL!
Products from The Rubber Buggy:
Simple stories snap green 6x8 fuax leather album
Simple stories you are here snap pages
Simple stories you are here snap pack
Simple stories you are here bradz
Simple stories you are here enamel dots
Simple stories you are here expression cardstock stickers
Memory box stitched circle layers
Thank you for visiting!
Monday, April 25, 2016
Heartfelt Creations stamp and die set to create a beautiful swirl card with tutorial

I am using my newest Heartfelt Creations products from The Rubber Buggy. It prompted me to get out my copics again, use Delightful Daisy stamps and dies along with the Tim Holtz ranger mini ink pads to create some cards.
Instructions:
I started by stamping the images and the sentiment as per above. I then coloured this section using Tim Holtz ranger mini ink pads and a finger sponge.

These stamped and die cut flowers are coloured with some Tim Holtz ranger mini ink pads with finger sponge.. but then accented the shading with copic markers.

Using my Heartfelt Creations Deluxe Flower shaping tool kit I mold my flowers.

You start on the back side and work them until they curl to you liking.

You can see some signo white gel pen accents on these pieces also.. they were added before sculpting the flowers. Above are 3 different sizes.

Here is a double layer flower. When you turn them over you mold and shape just the centre piece to flatten the flower. If you want double or triple you glue the centres inside each other.

On my finished card you can see some background flat inked flowers, some single shaped flowers and some double layered sculpted flowers. It great to mix them up. Some flowers are placed on top of the background coloured flowers.. some left plain. On this back ground I used a tan ink to lightly colour the white background, I inked the outer edges and cut the slanted shape for dimension. A print pattern is in the background and lots of fun ribbon accents this card.

You can also see the liquid pearl dot trailer in this photo.

Here is the photo shot showing the fabulous 3D depth in this card.
I enjoyed sharing with you today.

Friday, April 22, 2016
Little Trumpety
Hi everyone!!
Here Noe... Something late, but finally here!! Today I show you a Welcome Baby Card:

To make it I used a paper from "Live in Color" Collection and over it, I made this Bokeh Background!!
This Cute Elephant was painted with my friend Cristina with Copics and I liked it so much that I wanted to make a card with it!
Supply list:

Thank you for visiting
Here Noe... Something late, but finally here!! Today I show you a Welcome Baby Card:

To make it I used a paper from "Live in Color" Collection and over it, I made this Bokeh Background!!
This Cute Elephant was painted with my friend Cristina with Copics and I liked it so much that I wanted to make a card with it!
Supply list:
- Little Trumpety with Bow (Magnolia stamps)
- Copics Markers
- Live in Color 6x6 Paper Pad
- Let´s Bokeh LF Stamps
- So happy Avery Elle Stamps (sentiment)
- Craft Medley Cup Sequins Baby
- A Fox Tale Poppystamps (little heart)
- Jet Black Archival Ink

Thank you for visiting
Thursday, April 21, 2016
Hockey Birthday
Hi everyone, Steph Ackerman here on this lovely Spring Thursday. And finally the sun is shining and there is a hint of the flowers that are yet to come.
I love this Hockey Boy from Stamping Bella. It would make a wonderful card for the hockey player in your life. After coloring him with Copic Markers, he was mounted on Bazzill brown cardstock.


Thank you for visiting.
Steph
I love this Hockey Boy from Stamping Bella. It would make a wonderful card for the hockey player in your life. After coloring him with Copic Markers, he was mounted on Bazzill brown cardstock.

The background paper is from Graphic 45 and the sentiment is from Art Impressions.

Thank you for visiting.
Steph
Wednesday, April 20, 2016
Snail Mail Decoration with Netra
Hey everyone !
I know you have seen the growing popularity with term "Snail Mail".
I mean, we've all heard of sending letters, but only recently have I seen it go into the
scrapbooky, crafty, realm. Well, Ive been bitten by the bug.
I created a card, so to speak, where a letter can be slipped, or slipped onto.
Not your plain on envelope. I love the way it came out and I used TONS of
products from the store.
I hope you like the project. I also hope that you decide to jazz up
your next "Snail Mail" letter.


Items Used
Thank you for visiting
Tuesday, April 19, 2016
Travel album: The process continues
Hi everyone!
Pi back again and continuing with my travel album.
You can find the set up plan HERE and the first process video HERE.
This week I found I was more true to my own style.
In short, I have learned that I don't have the time to overthink or put to much effort in finding the perfect balance or even a straight line. Thus I have been forced to embrace the imperfection.
I have learned that in the end I'm glad that I have the story told, rather than focus on everything that could have been better layout-wise.
My goal is to fill the pockets and I do that by starting with the largest photos and continuing with the smaller. Then I add my jounaling, then I add my filler cards and last I embellish.
However, I do only manage to print a couple of photos at the time, otherwise I will forget how I intended to put them together. Thus, pending back and fourth between the steps I just told you about.
Products from The Rubber Buggy:
Simple stories snap green 6x8 fuax leather album
Simple stories you are here snap pages
Simple stories you are here snap pack
Simple stories you are here bradz
Simple stories you are here enamel dots
Simple stories you are here expression cardstock stickers
Thank you for visiting!
Monday, April 18, 2016
Love and a special page using Wild Rose Studio Always and Forever Pack

Hi... it's Bev here today to share this page for The Rubber Buggy which is special. It has my eldest Grand Daughter with her other Gramma before she pasted away. It will be a page that will saved to share with her kids and grandkids to tell them about this fabulous lady.
Supply List:
The Rubber Buggy Products
Paper: Wild Rose Studio Always and Forever Pack
Chipboard: Blue Fern Studio Circle LInks
Markers: copics
Stamp: Blue Fern Studios Halftone
Ink: Tim Holtz ranger
Doily: Unique
Flowers: Wild Craft Open Roses
Leaf: Wild Craft mulberry paper leaves
Other: paint, stencil, corner round punch, Cricut cut titles, cardstock

This page started with lots of fun background work. Paint splatter, stamping and stencil work.

The close ups share in more details the paint splatter, the stamping and also the stenciling. after the base layers of paper are applied. Then the doily and the matted photo are added. along with copic coloured chipboard accents and cut file titles.

The small cluster of flowers is a perfect accent for the page.


Thanks for visiting.. looking forward to seeing you again soon.

Friday, April 15, 2016
Mixed Media Time!
Hi everyone!!
Noe here as every Friday but today I come with a different project... A Mixed Media Project... Mixed Media is one of my passions but I don´t have enough time to dedicate it... I really love play with inks, gesso, papers, canvas, paints... and let my mind flies!!
So, this is my weekly project:

Products used:

Hope you like!! Happy crafting weekend!!

Thank you for visiting
Noe here as every Friday but today I come with a different project... A Mixed Media Project... Mixed Media is one of my passions but I don´t have enough time to dedicate it... I really love play with inks, gesso, papers, canvas, paints... and let my mind flies!!
So, this is my weekly project:

Products used:
- Candie .- Julie Nutting Doll (or another Prima Doll).
- Dina Wakley White Gesso
- Open Roses 15 mm Vintage Colors
- Crushed Grape Dylusion Paint.
- London Blue Dylusion Paint.
- Mixed Media Border Stamp by Julie Nutting
- Honeycomb splatter Stencil
- Life in Color Simple Stories (for paper piercing tecnique in Prima Doll).
- Wink of Stella Brush Marker - Clear

Hope you like!! Happy crafting weekend!!

Thank you for visiting
Thursday, April 14, 2016
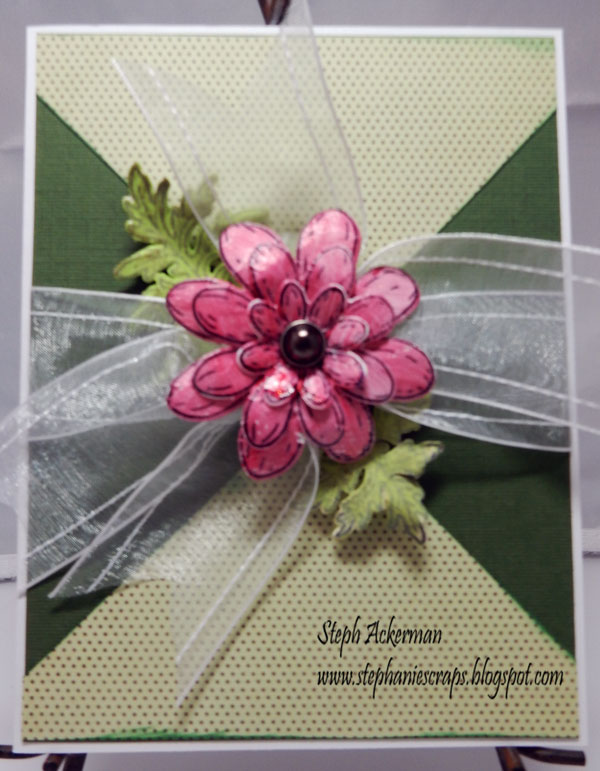
Spring Daisies
Hi everyone, Steph Ackerman here on this lovely Spring Thursday. And finally the sun is shining and there is a hint of the flowers that are yet to come.
Thinking about spring has lead me to creating cards using Heartfelt Creations Delightful Daisies Cling Stamp set and the coordinating Delightful Daisy Die.

The flowers and leaves were stamped and die cut using the coordinating dies - makes perfect cuts every time. The flowers and leaves were painted with Prima Marketing Acrylic Paints and allowed to dry. They easily formed into shape once dry using the Heartfelt Creations Deluxe Flower Shaping Kit.

The background of the card is a sheet of Bazzill Gumdrop cardstock. Pattern papers were cut into triangles and placed on the cardstock, then May Arts Sheer Ribbon was wrapped around the panel before adhering to the card. Using a brad I adhered the flower to the ribbon and placed the leaves underneath.
Thank you for visiting
Thinking about spring has lead me to creating cards using Heartfelt Creations Delightful Daisies Cling Stamp set and the coordinating Delightful Daisy Die.
The flowers and leaves were stamped and die cut using the coordinating dies - makes perfect cuts every time. The flowers and leaves were painted with Prima Marketing Acrylic Paints and allowed to dry. They easily formed into shape once dry using the Heartfelt Creations Deluxe Flower Shaping Kit.

The background of the card is a sheet of Bazzill Gumdrop cardstock. Pattern papers were cut into triangles and placed on the cardstock, then May Arts Sheer Ribbon was wrapped around the panel before adhering to the card. Using a brad I adhered the flower to the ribbon and placed the leaves underneath.
Thank you for visiting
Wednesday, April 13, 2016
"Lets Do This" Tag with Netra
Hey guys !!
I made a super stacked tag ! Using lots of layers. I thought I'd share it here.
I hope you like it !


Thank you for visiting
Tuesday, April 12, 2016
Travel album: The documenting begins
Hi everyone!
I'm here with a process video of the first pages of my travel album.
You can find the set up plan HERE.
For the first page you'll see me quickly pimp some of the snap cards.
Then the second page is mainly photos and I change the card I put there in the set up part.
I have some trouble placing the letters "CINQUE TERRE" and that takes me forever, I almost gave up. I have printed a map to the snap page which I want to highlight, so I added a geotag where we started. I also used some die cuts from the snap pack and enamel dots.
I hope you enjoyed the process and will come back for more next week.
I'm having a bit of stage fright, when the camera is recording, so I'll see how I proceed :)
Products from The Rubber Buggy:
Simple stories snap green 6x8 fuax leather album
Simple stories you are here snap pages
Simple stories you are here snap pack
Simple stories you are here bradz
Simple stories you are here enamel dots
Simple stories you are here expression cardstock stickers
Thank you for visiting!
Monday, April 11, 2016
Imagine using Pion Design, TCW Stencils and a sketch from Bev

Hi Bev here today with some multi tasking. I share my imagine Florida boat ride page from our visit with the eldest son and family. This is the eldest Grand Daughter of four. We had a great visit, did lots of swimming and some great exploring excursions. I used Pion Design Shoreline Treasures along with some great TCW stencils and Tim Holtz ranger mini pads and a sketch of mine from the Turtle Soup Forum.
Supply List:
The Rubber Buggy Products:
Paper: Pion Design Shoreline Treasures
Stencils: The Crafters Workshop
Sketch: Bev Code Turtle Soup
Other: Paper House Cork'd sticker, burlap ribbon


In the close ups you can view the many layers, the stenciling and extra strips and accents.

I love the touch of burlap ribbon for a rustic touch and depth to page.


Lots of stenciling and a great cork'd accents from Paper House.
Thanks for stopping by... see you again soon....have a great day.

Subscribe to:
Posts
(Atom)


