Friday, September 30, 2016
Happy planning!
Hi everyone!!
It´s Noe here as every Friday to show my newest project that starts today... Yes, after many attempts, today I start my weekly planner !! I need to organize my time !!
And this is the organization of my next week: mornings and afternoons for study and workshops, but on arrival the weekend ... Three Bithday Party !!

Supply list:


And you... ¿Do you have a planner? Hope you like it!!
See you next week!

Thank you for visiting
It´s Noe here as every Friday to show my newest project that starts today... Yes, after many attempts, today I start my weekly planner !! I need to organize my time !!
And this is the organization of my next week: mornings and afternoons for study and workshops, but on arrival the weekend ... Three Bithday Party !!

Supply list:
- Hedgehugs Lawn Fawn Stamps
- Hedgehugs Lawn Fawn Dies
- Love you a Latte Lawn Fawn Stamps
- Let´s Polka Mon Amie 6x6 Paper Pad
- Queen&Co Stick-Ems Birthday Sentiment
- Foil Sheets
- Grassy Border Die Lawn Fawn


And you... ¿Do you have a planner? Hope you like it!!
See you next week!

Thank you for visiting
Thursday, September 29, 2016
Your life is a Canvas
Hi everyone, Steph Ackerman here today working with an assortment of products from the store. Have you explored the store lately to see all the new (and perhaps older) products you might have missed?
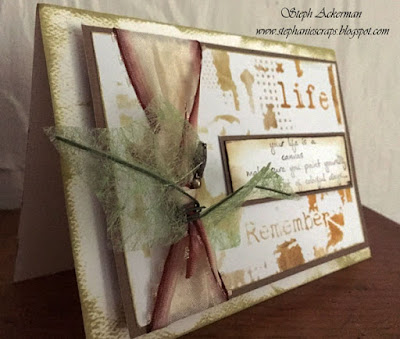


I lightly inked around the card and placed the panel on top with foam adhesives from Scrapbook Adhesives.
Thank you for visiting

I love stencils and this stencil from The Crafter's Workshop called Life Remembered is amazing. I used assorted inks Tim Holtz Distress Inks - Tea Dye, Walnut Stain, Frayed Burlap. Next, I matted the panel on brown cardstock. The sentiment from Stamping Bella - Abigail the Artist - was stamped with Walnut Stain and matted with brown cardstock.

I wrapped the panel with May Arts ribbon, then stuck a stick pin from Petaloo into the knot. Several leaves from Wild Orchard Crafts were tied around the knot.

I lightly inked around the card and placed the panel on top with foam adhesives from Scrapbook Adhesives.
Thank you for visiting
Wednesday, September 28, 2016
"Pen Pal Mail" with Netra
Did anyone else forget that today was Wednesday?
This week is going by fast and I don't mind.
I have some Pen Pal that I'll be sending out this weekend.
Its a new take on the "Flip Book" craze and I thought I share it with you all.
I used Prima's Rossibelle Collection...Its my new favorite.

On the cover I used a Creating in Faith Stamp "Mary"
and the Creating in Faith "Phrases".

Here is the inside cover. I add a pocket with
some cutouts from the paper pad for "little" notes.

On the far left page, I placed an envelope with die cuts inside.
In the middle there is a removable note book, with blank white paper inside.
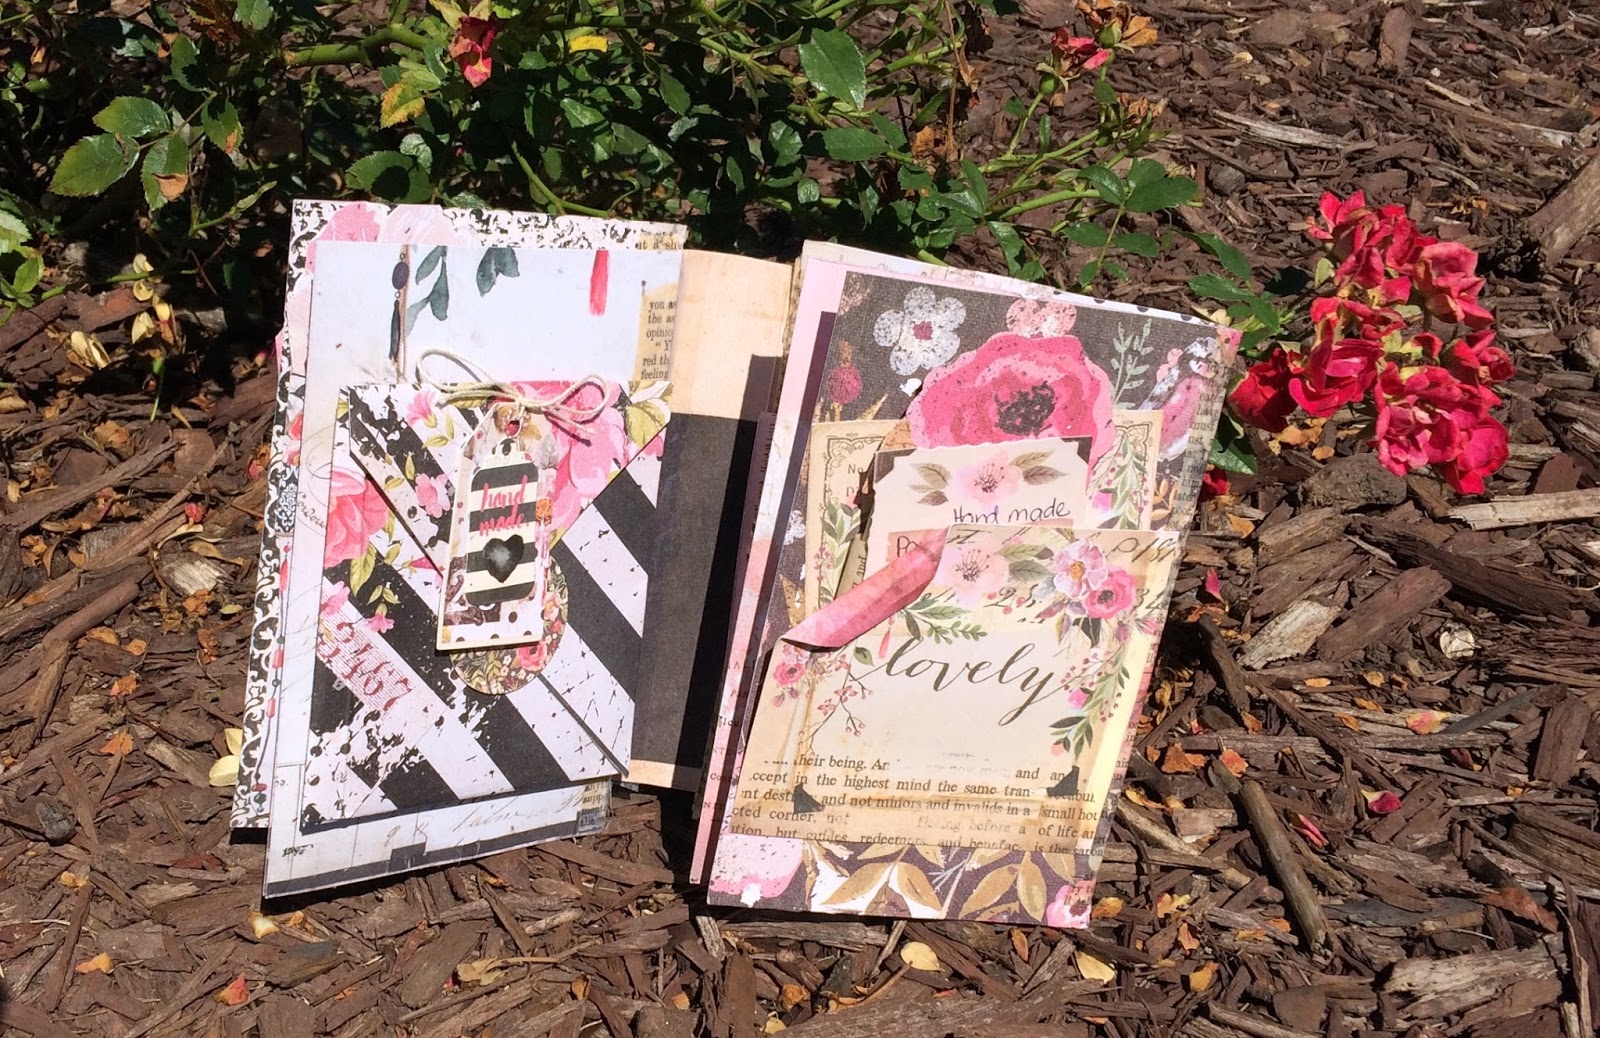

Here is my pen pal letter, with a handmade paper clip.
Its full of details. I hope my Pen Pal likes it.
Have a great rest of your week.
Xo, Netra
Thank you for visiting
Tuesday, September 27, 2016
Magical Christmas

Hi everyone its Jennifer here with a Gorgeous set of Stamps and Dies
from Lawn Fawn called Frosty Fairy Friends Dies and I have used
the new Stitched Hills Pop Up this is so easy to use and
looks so effective! I have coloured all these Sweet Fairies
with Copics the colours are
E000, E00, E01, E11
R20
BG10, BG11, BG13
V01, V12, V15

I have stamped the Merry in Lawn Fawn Juice Box
and have a magical Christmas in Peacock Ink.
The Die and stamp are from Lawn Fawn and called

You can see the Lawn Fawn Sugarplum Cardstock
under the layer of white. The background has been created
using Distress Ink Pads the colours are Lilac, Peacock and Dusty Concord
sprayed in Perfect Pearls for a nice shine I have also used
Wink Of Stella Clear for some extra sparkle on the trees and wand.
Hope you enjoyed this project and I will be back next Monday
Enjoy your Weekend.
All these products and more are avaliable at the
down the side too, Instragram and the Rubber Buggy Design Team Blog
where there's a post nearly everyday from one of the team.
Enjoy your Crafting Week Everyone!
Jennifer
Monday, September 26, 2016
Cozy Christmas using Riddersholm Our Country Christmas Collection

Supply List:
The Rubber Buggy Products
Paper: Riddersholm Design Our Country Christmas
Chipboards: Blue Fern Studios Christmas Ornaments, Cozy Christmas
Ribbon: Lemon Craft
Markers: Copics
Other: brads, doily, stickers, stickles, liquid pearls
In the close ups I am sharing you can see some of the details.

Here you get a great view of the fabulous coloured ornaments.. add some glitter to them too.

Here you see and fabulous Gina's Design Doily, Lemon Craft ribbon and some fun sticker accents.

Notice all the fun ripped papers... super cute little gold title and some more fun xmas accents.


Thanks for visiting..... see you again soon.

Saturday, September 24, 2016
Twas The Night Before Christmas

I have some instructions on my previous blogs on how I used the Tattered Lace-Shaped Shutter Card die set for my cards and there are some of these instructions of the back of the packet.


These wonderful supplies were purchased at The Rubber Buggy on-line store. Now it is your turn to try these products out from The Rubber Buggy and see what you create!
Remember to visit The Rubber Buggy store to shop for those gorgeous dies, stamp supplies and other supplies for all of your projects, scrap booking and card making. You will be excited to hop on over to The Rubber Buggy Blog and The Rubber Buggy Facebook each day to see what the talented and creative designers have made with products from The Rubber Buggy store.
Thank you again for visiting me today. I will be sharing with you next Saturday another exciting project or card made using the wonderful Rubber Buggy supplies.


Wouldn't this new released Poppy Stamp Merry Christmas banner die be gorgeous on a lot of projects and Christmas cards. I used the wonder Bazzill cardstock Peppermint for the red and gold metallic card stock for the banner.

I used the Ranger Ice Stickles - Diamond on the white parts of Santa's suite to give it glitter and dimension and Ranger Ice Stickles - Christmas Red on the berries and ornaments as well as the stockings (photo above)
Thank you again for visiting me today. I will be sharing with you next Saturday another exciting project or card made using the wonderful Rubber Buggy supplies.
Nancy Hill
Designer for The Rubber Buggy
Birthday Card using Tattered Lace Shutter Card die set

Hi, I am Nancy Hill and for those who haven't seen my last two posting for The Rubber Buggy, I am creating a variety of cards for this month using the wonderful Tattered Lace Shaped Shutter Card die from The Rubber Buggy.
If anyone has made a shutter card without using this die, there is a lot of time measuring and scoring which in the end, takes too much work for me to make a shutter card again. Tattered Lace has now created this die set with 50 dies that does the scoring and measuring for you. The large main die will die cut your card base and provides all the components to make and decorate your own shaped cards.
Now, I am having loads of fun making a variety of shutter cards for those special people in my life.
 |
Today, I am adding letters to the shutter card from this die set. I cut out twice, TARA, a friend of mine, using the Bazzill lavender paper and the Maja Designs-Vintage Autumn Basic pattern paper. By gluing the lavender paper behind the pattern paper, this will create a shadow effect behind the name to make it stand out.
|


I added this is the gorgeous Poppy Stamp die called Theo Butterfly on the top square and colored it with the Prima Marketing-Art Alchemy Opal Magic-Rose Gold Acrylic Paint. The opal acrylic paints come in a variety of two tone colors. I love how soft the colors are on the dies and chip boards. I just used my fingers this time to apply it on this butterfly and the drying time was so quick.


These wonderful supplies were purchased at The Rubber Buggy on-line store. Now it is your turn to try these products out from The Rubber Buggy and see what you create!
Thank you again for visiting me today. I will be sharing with you next Saturday another exciting project or card made using the wonderful Rubber Buggy supplies.
Nancy Hill
Designer for The Rubber Buggy
Friday, September 23, 2016
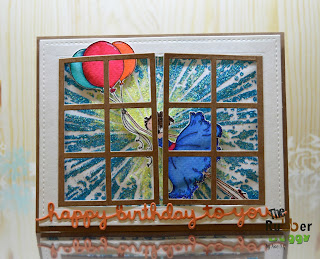
Bella´s Up
Hi everyone!!
What´s about your week? Hope everything went well!! Now, it´s time to enjoy the weekend! But first... one inspiration Birthday Card... These last days I have had a lot of birthdays, and this Card is for a special crafty friend for me!! Look!

I know my friend loves Stamping Bella stamps , and this that I used is one of my favorites... I stamped it on a piece of watercolor paper and I painted with my watercolor markers ...

Then, I created my background with a stencil and Sparkle medium, and created my window with a die. For the sentiment, I used Lawn Fawn die that I have placed under the window of my card.
Supply list:
Happy craftin!!

What´s about your week? Hope everything went well!! Now, it´s time to enjoy the weekend! But first... one inspiration Birthday Card... These last days I have had a lot of birthdays, and this Card is for a special crafty friend for me!! Look!

I know my friend loves Stamping Bella stamps , and this that I used is one of my favorites... I stamped it on a piece of watercolor paper and I painted with my watercolor markers ...

Then, I created my background with a stencil and Sparkle medium, and created my window with a die. For the sentiment, I used Lawn Fawn die that I have placed under the window of my card.

Supply list:
- Bentley gets Blown Away (Stamping Bella).
- Happy Birthday Border Die Lawn Fawn
- Window die... Something like THIS.
- Kraft Paper.
- Watercolor Paper.
Happy craftin!!

Thursday, September 22, 2016
Extraordinary Tag
Hi everyone, Steph Ackerman here today with a sweet tag.
Using an office supply tag, I cut black and green cardstock to fit. Ranger Walnut Ink was used to distress the green layer. Green Sheer ribbon from May Arts was tied to the tag.


The sentiment is from Stamping Bella - Callista Loves to Craft - and was added to the tag with foam adhesives from Scrapbook Adhesives by 3L.
Thank you for visiting
Using an office supply tag, I cut black and green cardstock to fit. Ranger Walnut Ink was used to distress the green layer. Green Sheer ribbon from May Arts was tied to the tag.

Prima pattern paper was die cut with the Label Layers 2 die cut from WPlus9 and also inked. Then, I used Heartfelt Creations Tropical Hibiscus stamp set and coordinating die set forming the flowers with the aid of the Heartfelt Creations Deluxe Flower Shaping Kit.

The sentiment is from Stamping Bella - Callista Loves to Craft - and was added to the tag with foam adhesives from Scrapbook Adhesives by 3L.
Thank you for visiting
Tuesday, September 20, 2016
Cheery Christmas

Hi Everyone I am here with my Tuesday Post. This week I was
so excited to get my new Lawn Fawn Cheery Christmas Stamp and Die Sets
so I couldn't wait to create . I used the Tim Holtz Distress Ink Pads
Festive Berries and Ever Green Bough mixed with water and
Perfect Pearls to create the background.
I have coloured the Presents, ornamants and deer using Copics.
I used the Sweet Sentiment from another Lawn Fawn Stamp Set
Snow Day. The White Card layer I die cut using Stitched Rectangles
and the white circles I used Stitched Circles.I have then scattered a few
Sequins to give it sparkle.Then for a bit of glitter I used

All these products and more are avaliable at the
down the side too, Instragram and the Rubber Buggy Design Team Blog
where there's a post nearly everyday from one of the team.
Enjoy your Crafting Week Everyone!
Jennifer
Monday, September 19, 2016
Aquarium double page using Blue Fern Studio products

Supply List:
The Rubber Buggy Products
Paper: Blue Fern Studio Timeless
Chipboard: Blue Fern Studio Arrow Words, Spring Iris small
Stamp: Blue Fern Studio Shabby Edges
Ink: Color Box, Memento, paint
Other: mesh, stickers, black pen

The chipboard is painted white and some mesh is used in the background of the photo.

Arrow words are painted for the title and a matted photo has more mesh accents in behind. The Florida is small stickers. Notice the shabby edges stamping under the photo!

Up next is the 2nd page of the double... it shares more Aquarium photos.
Supply List:
The Rubber Buggy Products
Paper; Blue Fern Studio Timeless
Chipboard: Blue Fern Studio spring iris small
Chipboard: Blue Fern Studio spring iris small
Other: mesh, black pen, paint
Added photos showcase the details on this page.

Going with the same accents as page 1 you see painted chipboards and mess accents.

More of the same accents on this close up.. but added the sticker title Aquarium in beige slightly fussy letters.


Thanks for visiting..... hope to see you again soon.
Subscribe to:
Posts
(Atom)


