Friday, June 30, 2017
Blue Fern Studios project 'Remember the Moment' using Garden Life Collection

Hi Bev here today at The Rubber Buggy. I am sharing 'Remember the Moment' using a photo of youngest Grand Daughter when they spent time at my house playing dress up. We always had so much fun when the kids come to visit us. They always put a smile on my face.
Supply List:
Paper: Blue Fern Studio Garden Life - MerrimentChipboard: Blue Fern Studios Collage Border
Flowers: 49 and Market Rustic Collection
Marker: copics
Accents: Firefly ephemera collage kit
Other: variegated cardboard, cardstock, beads, sew easy ink roller

I started with copic colouring the border.

I used variegated cardboard to accent this page. I ripped it to mat the photo with some other regular cardstock mats to add colour. Then using the super small but cute image in the Garden Life collection I matted it too. I used accents from the Firefly ephemera collage kit.

In this close up you get a better view of more accents like the clear title used from the Firefly ephemera collage kit, super cute burlap and other flowers, along with the finished chipboard border.

In this photo you get to see the great layers and the added bead accent.


Thanks for stopping by today.... enjoy your weekend and be safe on the holiday.

Thursday, June 29, 2017
Prima Rose Quartz Collection
Hi everyone, Steph Ackerman here today working with a bunch of products from the Rubber Buggy Store. Have you checked out the store lately? It has so many wonderful new products.
I used the Prima Marketing Rose Quartz paper pad to make some quick and easy cards. Do you ever feel like you just don't have the time to create elaborate cards? If so, this collection is for you.

This paper pad had everything you need to create any number of cards. Simply mix and match the patterns and the included phrases.


With a paper pad like this Prima Marketing Rose Quartz collection, the creativity is quick and easy and you'll have a number of cards on hand for when you need them.
hank you for visiting
I used the Prima Marketing Rose Quartz paper pad to make some quick and easy cards. Do you ever feel like you just don't have the time to create elaborate cards? If so, this collection is for you.

This paper pad had everything you need to create any number of cards. Simply mix and match the patterns and the included phrases.

I tore the rose layer on this card, placed it upon the black layer, then added one of the included phrases on foam adhesives for dimension. All you need is a little ink around the edges.

My next card using another sheet of rose paper paired with the wood grain paper. I love the layered look achieved by placing the rose paper over the wood grain paper. Then I die cut one of the included phrases, adding it to the card with foam adhesives for dimension.
With a paper pad like this Prima Marketing Rose Quartz collection, the creativity is quick and easy and you'll have a number of cards on hand for when you need them.
hank you for visiting
Wednesday, June 28, 2017
Vintage Layout with Netra
Hello everyone.
I hope today has been going wonderful for you all.
I am sharing a vintage style layout with you.
I am still working on my layouts, they are not my best work.
I do better with cards and things.
So, I hope you like it and can find some inspiration from it.
I used lots of Tim Holtz Ephemera. I just love them.


Thank you for visiting
Products from the Shop
Tuesday, June 27, 2017
Lawn Fawn Magic

Hi it's Jennifer here and I am using the new
LF Magic Color Slider kit and it is Awesome
and so easy to use ! I can see this being used an
Awful lot here!
So to start with I made a card base with white Card Stock
layered with blue I then used LF Peacock Card Stock and
Coloured it with a mix of Oxide Inks Faded Jeans and
Broken China splattered it with water and blotted to give a
water look. I dont have the new LF Ocean Wave Borders yet
so I improvised and used LF Puffy Cloud Borders which
I think worked well. The Stamp sets I have used are

I had some googley eyes in my stash that just added.
I coloured them all up in a mix of copic colours.
Don't you love how it reveals the colour picture.

Magic!

All these products and more are available at the
The Rubber Buggy Shop and don't forget to visit us on Facebook
look for the Videos down the side too, Instragram and the
Rubber Buggy Design Team Blog where there's a post nearly
everyday from one of the team.
look for the Videos down the side too, Instragram and the
Rubber Buggy Design Team Blog where there's a post nearly
everyday from one of the team.
Happy Crafting
Jennifer
Monday, June 26, 2017
'anthing is possible' using Simple Stories Carpe Diem collection

Hi ... Bev here today. I am using lots of layers, shapes, stickers and accents on this base for this photo of ....yes....myself. As crafters and the main taker of photos we don't get enough memories and photos of us alone or in groups. I have been trying to hand my camera over more often and get more photos with me in them.
Supply List:
The Rubber Buggy Products:
Paper: Simple Stories Carpe Diem collection
Accents: Simple Stories Carpe Diem Sn@p Pack
Sequins: 28 Lilac Lane Sunflower Sky
Ink: Tim Holtz ranger Vintage Photo
Blending Tool: Ranger Ink Blending tool
Glue: Beacon 3-in-1
Other: cardstock

I start most of my pages with a rough draft layout and take a photo for reference. I will change things up however as I go along.

Using a card section from the collection I hand cut it to make my title.


I start by gluing from the back to the front.

For this page I wanted lots of layers, lots of accents all from the collection. I then decided to use my newest purchase... the 28 Lilac Lane sequins which I scattered in areas of the page.

I inked the edges of some of the accents to give them dimension and depth.

My photo is still front and centre with all the trims and accents around it. This colouring in this collection is perfect with my photo.


Hope to see you again soon when I have another project sharing amazing products.

Saturday, June 24, 2017
A Wish For You


The Heartfelt Creations Sunrise Lily Wishes stamp set is a beautiful sentiment to send that special person in our lives that need our prayers for courage and inner peace. The Rubber Buggy On-Line store carries all of the quality supplies for you.
Supplies:
Tattered Lace Essential Book Die
Heartfelt Creations Eyelet Oval Die Set
Bazzill Card Stock
Copic Marker BV01
NUVO Shimmer Glitter Gloss clear pen
Ranger Pink Embossing Powder
Ink: Memento Tuxedo Black, Ranger Pink Gumball,
Heartfelt Creations Eyelet Oval Die Set
Bazzill Card Stock
Copic Marker BV01
NUVO Shimmer Glitter Gloss clear pen
Ranger Pink Embossing Powder
Ink: Memento Tuxedo Black, Ranger Pink Gumball,
Other: 4mm flat back pearl string, rose seam binding ribbon, self adhesive border stickers,
Instructions:
Card measures 7 ½” x 11 ½”. Also, if you need instructions for making the flowers, see below starting with step one.
First page measures 6 ½” x 10 ½”. Increase each book size by ½” on your printer. Use these templates and trace one of each using the paper listed except the white paper. Adhere each and add the border stickers. Stamp and die cut the Heartfelt Small C Small Classic Petunia Creations Sunrise Lily Wishes on white metallic paper and die cut using the oval die in the Heartfelt Creations Eyelet Oval die set. With the Heartfelt Creations Eyelet Oval die set, cut out the frame using the pink paper. Adhere to the card. Using both sizes of the petunia flowers in the Heartfelt Creations Small Classic Petunia, stamp with the pink embossing powder and sponge the edges with the pink ink. Die cut and shape/mold each flower using a shaping kit. Sponge pink ink around the edges of each flower. Adhere each flower to the leaves and poke a small hole in the center and poke the white flower spray in the hole and glue. Add Copic Marker BV01 in the center of each flower and along some of the stamp areas in the flower. Adhere the flowers to the card as shown on the photo. Die cut both of the large Heartfelt Creations Arianna Lace dies and cut each section and adhere behind the flowers. Adhere the 4mm pearl strips down the center of the card. Make a bow and adhere it in the top center of the card. Add NUVO Glitter Gloss clear pen to the wishing well, butterflies and hummingbirds. Fold the card stock and trace the large book template. Cut and adhere to the back of the card. Trace and cut the large book template on the Heartfelt Creations Classic Petunia Paper Collection and adhere to the inside of the card.
The Rubber Buggy Design Team has something new to share with you each day. Pop in and see for yourself what is being shared by this talented group of inspiring designers!!
In the meantime, here are all The Rubber Buggy quick links you will need:
Thank you again for stopping by
Nancy Hill
Designer for The Rubber Buggy

Friday, June 23, 2017
Lawn Fawn Mix Card
Hi everyone!!
It´s Noe here with a new Card made by combining two different Lawn Fawn stamps set.
Summer is here, so what about a summer card?

Supply list:

Thank you for visiting
It´s Noe here with a new Card made by combining two different Lawn Fawn stamps set.
Summer is here, so what about a summer card?

Supply list:
- Aloha Clear Stamp
- Aloha Craft Die.
- Color My World Stamps (for the sentiment).
- You are Here - Simply Stories 6x6 Paper pad.
- Stitched Annaleigh Tag Decoration
- Copics Markers.
- Stitched Rectangles Dies.
- Enamel Dots

Thank you for visiting
Thursday, June 22, 2017
Creating Backgrounds with Gel Press
Hi everyone, Steph Ackerman here today working with a bunch of products from the Rubber Buggy Store. Have you checked out the store lately? It has so many wonderful new products.


Next, I placed a Tim Holtz Stencil on top of the plate and placed a sheet of paper on top and pulled a print. This process is addicting so I continued pulling prints using a variety of stencils from Prima Marketing and The Crafter's Workshop until I had no paint left on the plate. You can continue adding stencil upon stencil to get some fun effects.

I hope I've inspired you to give this technique a try.
Thank you for visiting.

Have you tried monoprinting yet? If not, you are in for a surprise. It's so much fun to create your own backgrounds using the Gel Press and assorted acrylic paints from Prima Marketing. The Gel Press comes in assorted sizes so you have lots of possibilities.

Once I placed paint on the Gel Press, I used a Gel Press Brayer to smooth the paint on the plate.

Once I had the backgrounds ready, I created cards and added stamped images/sentiments from Heartfelt Creations Coffee Talk stamp set.

I hope I've inspired you to give this technique a try.
Thank you for visiting.
Tuesday, June 20, 2017
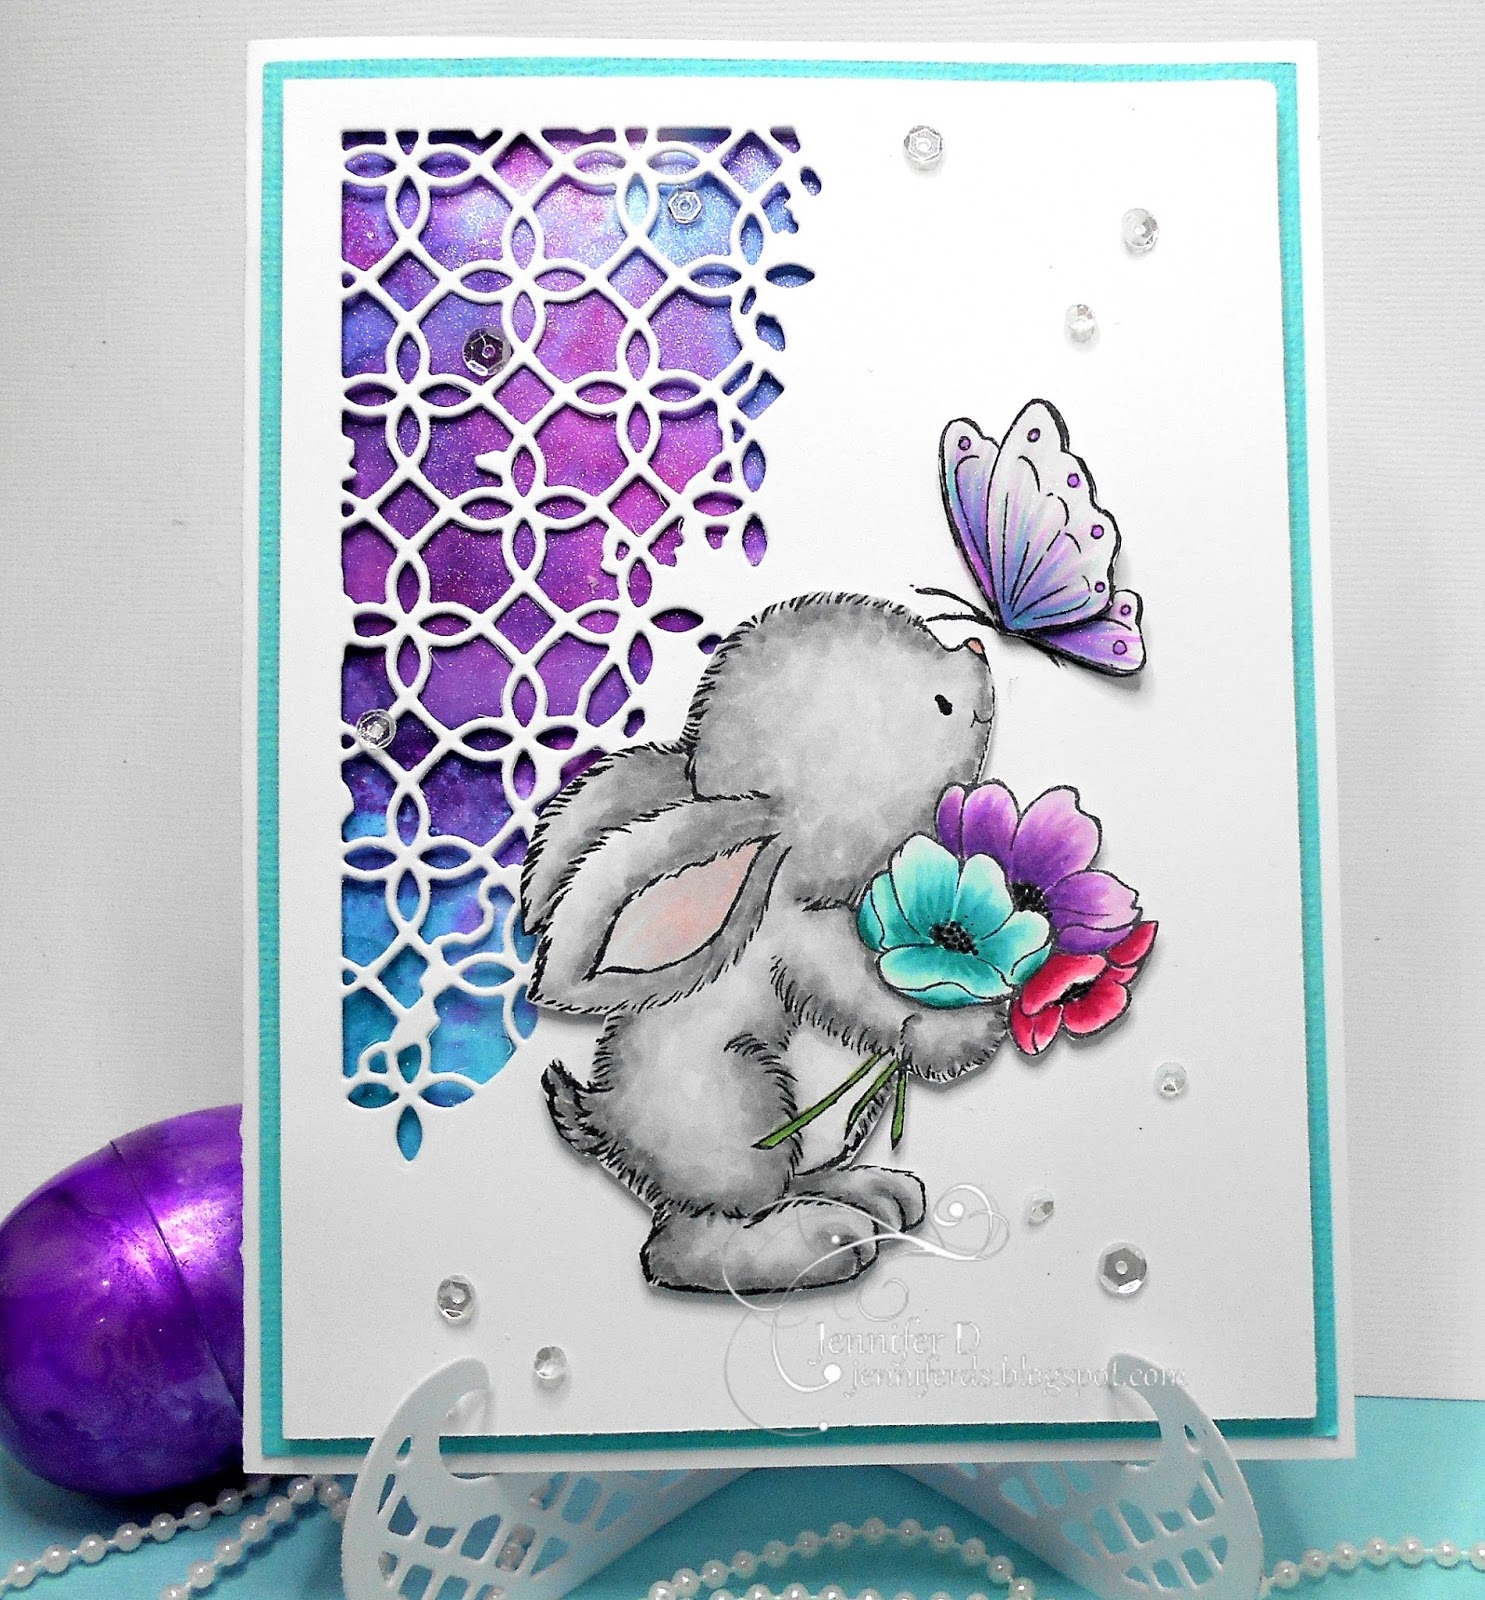
Bunny, Butterfly and Flowers

Hi it's Jennifer with Tuesday's post. I am still waiting
on the Postie with all my new goodies to create with I
will keep my fingers crossed and hopefully they will be
here before next week to share with you all.
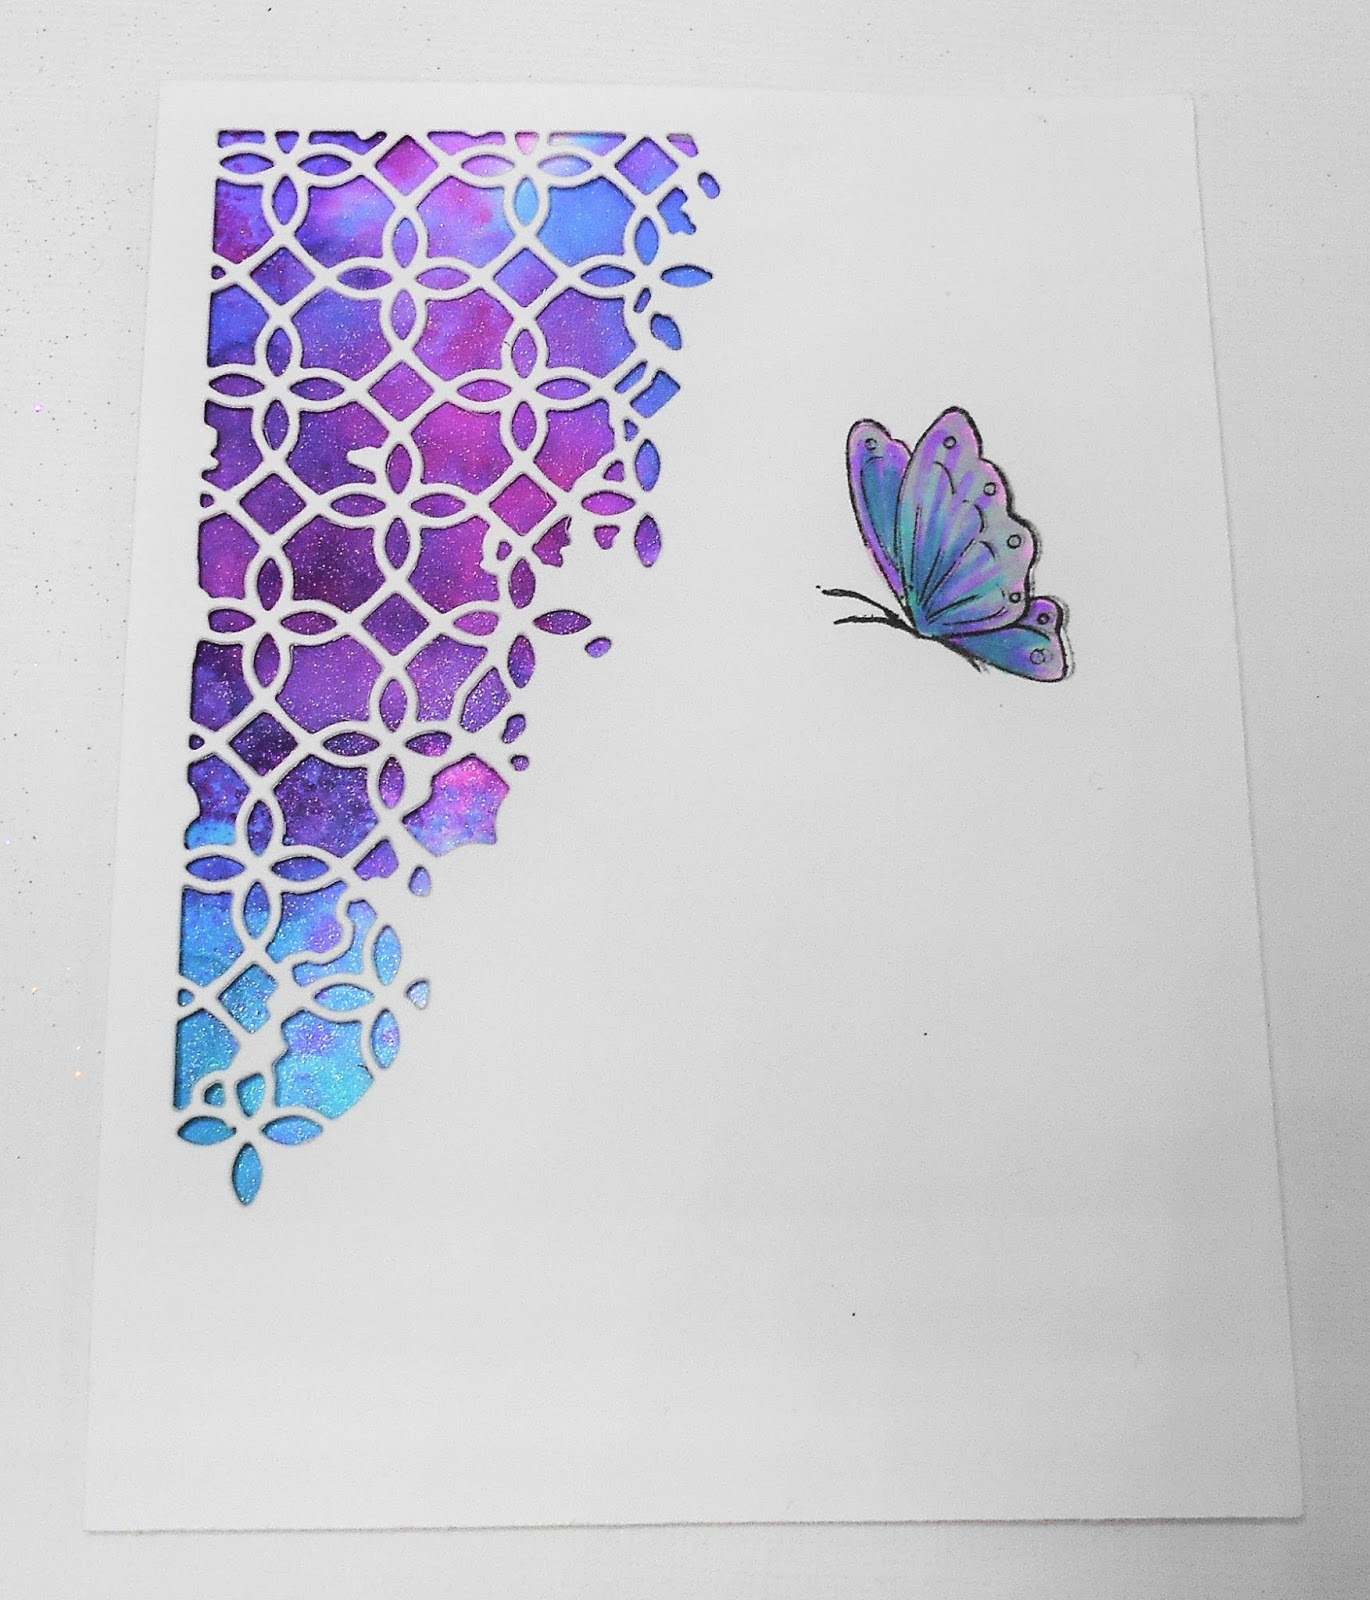
So this week I used this really Cute Stamp
created this background by wiping Distress Ink Pads on a
Tim Holtz Mat.I used Picked Raspberry, Dusty Concord and
Wilted Violet inks on a mat and spraying 2 squirts of water on
each colour. I then smoosh my papers in them drying inbetween
each layer and building up until its the right depth. I did it quiet
Tim Holtz Mat.I used Picked Raspberry, Dusty Concord and
Wilted Violet inks on a mat and spraying 2 squirts of water on
each colour. I then smoosh my papers in them drying inbetween
each layer and building up until its the right depth. I did it quiet
dark. I then sprayed it using Tim Holtz Perfect Pearls

As you can see by the Memory Box Distressed Addington Die
I only needed one corner with colour. I then diecut it from
White Card Stock and used 3D Foam Tape around the edges and a
couple of strips down the center for support and taped it too the
coloured piece. You could use any of the Memory Box Dies with
an open pattern to do this with.

I then stamped the Butterfly only making sure I didn't get ink on
the rabbit. I coloured it roughly. I then stamped another two
butterflies and fussy cut the butterfly wings one altogether and
the other with only the top wing. I coloured them and then covered
them in Wink of Stella Clear. I then layered each
one using 3D foam squares.
I then sprinkled a few clear sequin around. I then stamped
and fussycut the Rabbit and used 3D Tape to pop him on.

I also layered it on a white card base with an aqua layer.
All these products and more are available at the
The Rubber Buggy Shop and don't forget to visit us on Facebook
look for the Videos down the side too, Instragram and the
Rubber Buggy Design Team Blog where there's a post nearly
everyday from one of the team.
look for the Videos down the side too, Instragram and the
Rubber Buggy Design Team Blog where there's a post nearly
everyday from one of the team.
Happy Crafting
Jennifer
Subscribe to:
Posts
(Atom)


