Showing posts with label Design Team. Show all posts
Showing posts with label Design Team. Show all posts
Thursday, September 30, 2021
Happy Halloween with Magnolia WItch Tilda
Hi everyone, Steph Ackerman here today with lots of fun products from the store.


Happy Halloween with Magnolia Witch Tilda with Pumpkin. Isn't she a cutie? I colored her with Copic Markers.

The card is created from Simple Stories Vintage Farmhouse paper pack and Tim Holtz Kraft Cardstock. The contract of black and white against her red dress is amazing. She was fussy cut and added upon Lawn Fawn Stitched Circle dies, using the Small and Large dies. Cutting off the left side of the dies allowed Hello Friend from the Memory Box Bird Sanctuary stamp set to slip underneath.
Thank you for visiting
Thursday, September 23, 2021
Stained Glass Poinsettia
Hi everyone, Steph Ackerman here today with lots of fun products from the store.

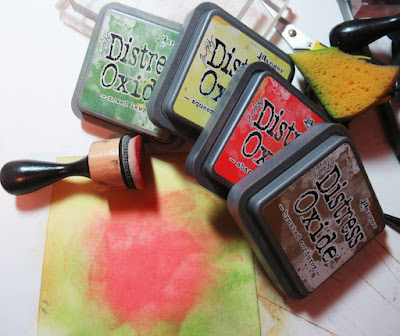


This Poppystamps Stained Glass Poinsettia die allows you many options to create.
Using assorted Distress Oxide Inks in Squeezed Lemonade, Brushed Corduroy, Abandoned Coral and Mowed Lawn - I created the first background.

Using Tim Holtz Idea-ology Kraft Cardstock, I die cut the poinsettia and placed it over the inked background.

The panel was then die cut using Lawn Fawn Stitched Rectangle dies, then added to another panel of Ranger Kraft Cardstock. The left over inked panel panel was added to a black card.

I used the die again with Ranger Kraft Cardstock and adhered it to green cardstock.

I die cut the poinsettia a second time and filled in the petals. The 5 prominent petals were added to the panel with Scrapbook Adhesives 3D Foam Adhesives for dimension.

The panel was matted on brown cardstock, then onto a torn panel from the Simple Stories Simple Vintage Farmhouse Garden paper pad, then finally onto Ranger Kraft Cardstock before being added to the card.

Finally I die cut Lawn Fawn Border Line Dies - Happy Holidays and Merry Christmas - and adhered them to each card.
Thank you for visiting
Thursday, September 2, 2021
Thanks with Stamping Bella
Hi everyone, Steph Ackerman here today with lots of fun products from the store.


Ciao Bella has some beautiful stencil and I've used Ciao Bella Blossom stencil to create the background of my card. I first inked the stencil with Ranger Distress Oxide Ink in Abandoned Coral.

Since I was using the stencil on dark cardstock, I then used Ranger Clear Embossing Powder on top to give the design dimension.

Since I usually get embossing powder everyway, the Sizzix Anti-Static Funnel Tray by Tim Holtz is the perfect tray to keep the powder confined and then it easily poured back into its original jar.

I matted the panel with white cardstock.

Wrapping the panel with ribbon, I then added the panel to a card created with Bazzill Pale Rose Cardstock using 3D Foam Adhesives for dimension.

I stamped Stampingbella's Daisy Squidgy and colored her with Copic Markers. Thanks, which was included with the stamp set, was stamped and tied to the ribbon with Baker's Twine.

Thank you for visiting.
Thursday, August 19, 2021
Chipboard Christmas Tags
Hi everyone, Steph Ackerman here today with lots of fun products from the store.


I'm using a fun set from Scrapiniec - Workshop Kit Cards - Old Fashioned Christmas. This kit includes an assortment of chipboard elements that can be used together or separately to create an assortment of tags, cards, or even consider a mini album.

I've used papers from Maja Vintage Autumn Basics. Since the papers are double sided, I chose to you both sides, then mixed and matched other papers from this collection to decorate 2 of the tags.

Ranger Distress Oxide Ink in Brushed Corduroy and Chipped Sapphire along with Lawn Fawn Freshly Cut Grass were used to add color to the elements.

Using the tags as stencils, I cut the base papers to fit, then tore additional papers. I distresssed the edges to get an "old world" effect.

Merry Christmas was die cut using papers from the same collection with a Lawn Fawn Border Die. Finally, I used twine to complete the tags.
Thank you for visiting
Thursday, August 12, 2021
Mixed Media Tags with Simple Stories
Hi everyone, Steph Ackerman here today with lots of fun products from the store.

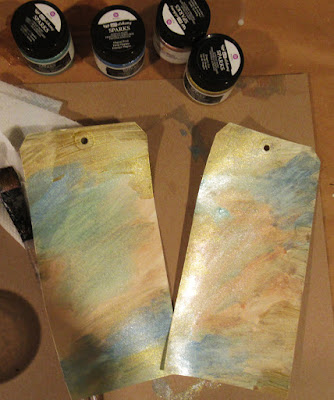


Wanting something a little different, I used Prima Marketing Art Alchemy Acrylic Paints on large tags from Dylusions Journal Tags #10. The colors are gorgeous so I mixed up an assortment of colors including Ice Queen, Gold Amber, Frozen Berries and Soft Satin and painted them randomly on the tags.

Next I used one of the Ciao Bella Stencils with Lawn Fawn's Freshly Cut Grass Ink, randomly adding a pattern around the tag.

Net I cut apart Simple Stories Simple Vintage Farmhouse papers to decorate the tags.

I also fussy cut the words to fit the tags. This is a little time consuming as the words are delicate, but the results were worth it.

Next, I used a script stamp (similar to this Ciao Bella Stamp) and randomly stamped it about the tags. Then I added May Arts Celery Green Sheer Ribbon to finish off the tags.

Thank you for visiting
Thursday, July 29, 2021
Travel Tags with Blue Fern Studios
Hi everyone, I've created a new set of tags today using papers from Blue Fern Studios Passages Collection.

Using Tim Holtzz Idea-ology cardstock in Cool, I cut the cardstock to fit the large office tags, then cut assorted Blue Fern papers to fit. One tag uses Junket, one uses Notes from Abroad and the other uses Intercontinental.

Each piece was inked with Distress Oxide Inks in either Speckled Egg or Ground Espresso.

The tags were assembled, holes punched in the tops and sheer ribbon added to each.

Each of the papers has small phrases, so I die cut those phrases for 2 of the tags and matted with the same cardstock used on the tag. The 3rd tags uses a phrase from Stamping Bella's Molly Makes a Detour.
Thank you for visiting
Thursday, July 22, 2021
Ciao Bella Stenciled Cards
Hi everyone, Steph Ackerman here today with lots of fun products from the store.


The Cia Bella Fern Stencil measures 5" x 8" and is perfect to use as a background for your projects.

Using the Ranger Ink Blending Tool, I inked the stencil with Distress Oxide Ink in Bundled Sage and Mowed Lawn.

Once the first panel was inked, I flipped over the stencil, and, using a baby wipe, inked up a 2nd panel. This process creates a negative, watercolor effect.

Next, I took several tags from the Scrapaholics - Chipboard - ExploreTag Set, and inked with Distress Oxide Ink.

Wrapping May Arts Sheer Celery Ribbon lengthwise around one panel, I tied the tag to the ribbon with Baker's Twine.

I wrapped the same ribbon horizontally around the second panel, also tying the tag to the ribbon with Baker's Twine.

The panels were added to cards created from Echo Park - Let's Go Camping cardstock. The panels were added to the cards with EK Success 3D Dots for dimension.
Thank you for visiting
Thursday, July 15, 2021
Graphic 45 Bird Watcher Tags
Hi everyone, Steph Ackerman here today with lots of fun products from the store.
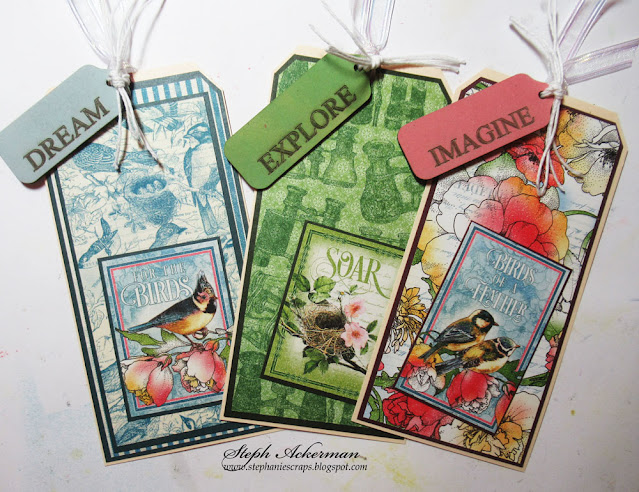


Using Distress Oxide Inks in Abandoned Coral, Mowed Grass, Speckled Egg, Dried Marigold and Squeezed Lemonade, I inked each Scrapaholics Chipboard Explore Tag a different color.

Selecting papers from the Tim Holtz Idea-ology Kraft cardstock - Cool, I cut them to fit the tags. Then, selecting papers from the Graphic 45 Bird Watcher Collection - Feather Your Nest, Flock Together, Beautiful Morning and Learn to Fly, I cut them to fit the cardstock. The panel were then added to the tags.

The bird panels were cut from the Learn to Fly paper also matted with cardstock then added to the tags. The chipboard tags were then tied to each tag with bakers twine.
Thank you for visiting
Thursday, April 29, 2021
Lawn Fawn Meadow Backdrop
Hi everyone, Steph Ackerman here with several fun stamp and die sets from Lawn Fawn.


Who wouldn't want to be in this Meadow? I've used the Lawn Fawn Meadow Backdrop Horizontal, but you could also use the Lawn Fawn Meadow Backdrop Landscape for a different effect.

Each set includes the outer panel with grass that creates the Meadow Backdrop. I die cut it from Bazzill Cardstock, then inked the grass with Distress Oxide Ink in Bundled Sage to give the grass some dimension. Creating a card from Bazzill Icy Mint Cardstock, I adhered the panel to the card.

To complete the scene, I added the clouds, flowers and bumbles bees that were included with the main die and finished with elements from Lawn Fawn Oh Gnome stamp set which were colored with Copic Markers.

Thank you for visiting
Thursday, April 22, 2021
Thinking About You....
Hi everyone, Steph Ackerman here just thinking about you.


Using the Heartfelt Creations Booklet Basics, I created the card by using the largest die. Be sure the die is placed slightly over the fold so it keeps the card in one piece.

Using the Heartfelt Creations Frame and Accents Dies Booklet, I die cut the largest frame from white cardstock and adhered it to the card base.

Die cutting the 2nd largest die, I stamped 2 different birds as well as the diamond elements from the Memory Box Bird Sanctuary stamp set using Lawn Fawn Black Licorice Ink. Next, I inked around the pages with Distress Oxide Ink in Faded Jeans.

Gentle folding along the score line to get a crease, I then "rolled" the pages so they looked like a book being read.

Adding a strip of Scor-Tape along the center line of the card, adhere the page. I then added Scrapbook Adhesives 3d Foam Squares along the outer edges to hold the pages in place.

Thank you for visiting
Subscribe to:
Posts
(Atom)


