Showing posts with label graphic 45. Show all posts
Showing posts with label graphic 45. Show all posts
Sunday, March 26, 2023
Album Box

Hi everyone today I am sharing an Album Box which is from Graphic 45 and I did things different by using Simple Stories “Life in Bloom” collection.

I covered the box using Life in Bloom which has soft
pastel colors

The album pages has a variety of ways to open and books and crannies for you to add fun photos

It has a magnetic latch for easy opening and closure

Here you can see the different page layouts inside the album
Thursday, February 23, 2023
Standing Mini Album
Hi welcome back to the Rubber Buggy’s blog 🥰
Today I am here sharing a standing mini album using Graphic 45 latest release “Little One”

I used some craft cardstock and folded them much like a toilet paper roll to use as the actual mini pages

I then covered each pages and did a lot of
Fussy cutting for each of the individual pages for a total of 6 ❤️

This page has a pull out mini with a total of 11 places for additional photos

Here you see how it looks folded standing upright

This page has a frame for you to slide your photo under

Here you have pull out tags within the pages


Thanks for visiting the Rubber Buggy blog ❤️❤️
Thursday, July 15, 2021
Graphic 45 Bird Watcher Tags
Hi everyone, Steph Ackerman here today with lots of fun products from the store.
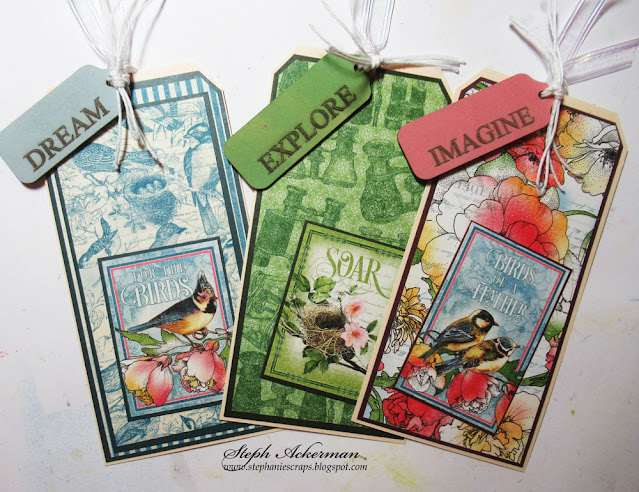


Using Distress Oxide Inks in Abandoned Coral, Mowed Grass, Speckled Egg, Dried Marigold and Squeezed Lemonade, I inked each Scrapaholics Chipboard Explore Tag a different color.

Selecting papers from the Tim Holtz Idea-ology Kraft cardstock - Cool, I cut them to fit the tags. Then, selecting papers from the Graphic 45 Bird Watcher Collection - Feather Your Nest, Flock Together, Beautiful Morning and Learn to Fly, I cut them to fit the cardstock. The panel were then added to the tags.

The bird panels were cut from the Learn to Fly paper also matted with cardstock then added to the tags. The chipboard tags were then tied to each tag with bakers twine.
Thank you for visiting
Thursday, June 17, 2021
Graphic 45 Bird Watcher Card
Hi everyone, Steph Ackerman here today with lots of fun products from the store.


Cutting cardstock 6" x 10", I scored it at 5" and 7 1/2" along the long edge using the Scor-Pal. Then I cut the card on an angle from the 5" score line to 3" from the bottom edge. Fold on the score lines to create the card.

I used assorted papers from the Graphic 45 Bird Watcher collection: Feather Your Nest, Flock Together and Beautiful Morning, cutting each to fit the card's shape.

Since the papers are double sided, I was able to use both sides of the papers.

The paper are beautiful and coordinate so well together. On the back panel, I matted the bird paper with a sheet of cardstock from Tim Holtz Idea-ology Kraft Cardstock - Cool.

To finish, I cut the tags from Graphic 45 - Bird Watcher Learn to Fly paper. Matting each with a sheet of cardstock from Tim Holtz Idea-ology Kraft Cardstock - Cool, I placed the tag inside, then aligned the exterior one so it covered the inside tag. You only see the inside tag once the card is opened.

Thank you for visiting
Wednesday, March 10, 2021
Graphic 45 Elegance Collection... reveal wth Bev Code
Create stunning French-inspired projects with the Paper Pack from the Elegance Collection by Graphic 45. This paper pack comes with 24 sheets of gorgeous, high quality papers. Designs include Victorian florals, patterns with dress forms, the Eiffel Tower, flowers, bottles of eau de toilette, and more. This pack is filled with black, pink, cream, and more.
Thanks for visiting


Thursday, December 24, 2020
Joy to the World Booklet Card
Hi everyone, Steph Ackerman here today with lots of fun products from the store. Please visit the store for all the fun products I've used today.


Using Heartfelt Creations Frame and Accents Dies, I cut 2 layers from Bazzill Marshmallow cardstock. I also die cut 1 layer from Bazzill Marshmallow cardstock and 1 layer from Graphic 45's Joy to the World pattern paper using Heartfelt Creations Frame and Accents Dies Booklet Basics.

The white layers were inked with Distress Oxide Ink in Bundled Sage. All 4 layers were gently folded at the center and a bead of Beacon 3 in1 Adhesive was added along the centers to hold the pages together.

Once dried, I gently formed the pages with my fingers giving them definition. Glue Dots were added along the edges of each page keep them defined.

A card was created from Bazzill Lollipop cardstock, then a pattern paper from Graphic 45's Joy to the World collection was added. The included bookmark was added to the pages which were then added to the card with Glue Dots.
Thank you for visiting
Thursday, December 3, 2020
How to use Slimline Dies
Hi everyone, Steph Ackerman here today with lots of fun products from the store. Please visit the store for all the fun products I've used today.


Thank you for visiting

I've created 2 cards today using Tutti Designs Slimline dies - Stitched Scalloped Rectangle and Stitched Rectangle in 2 different ways.
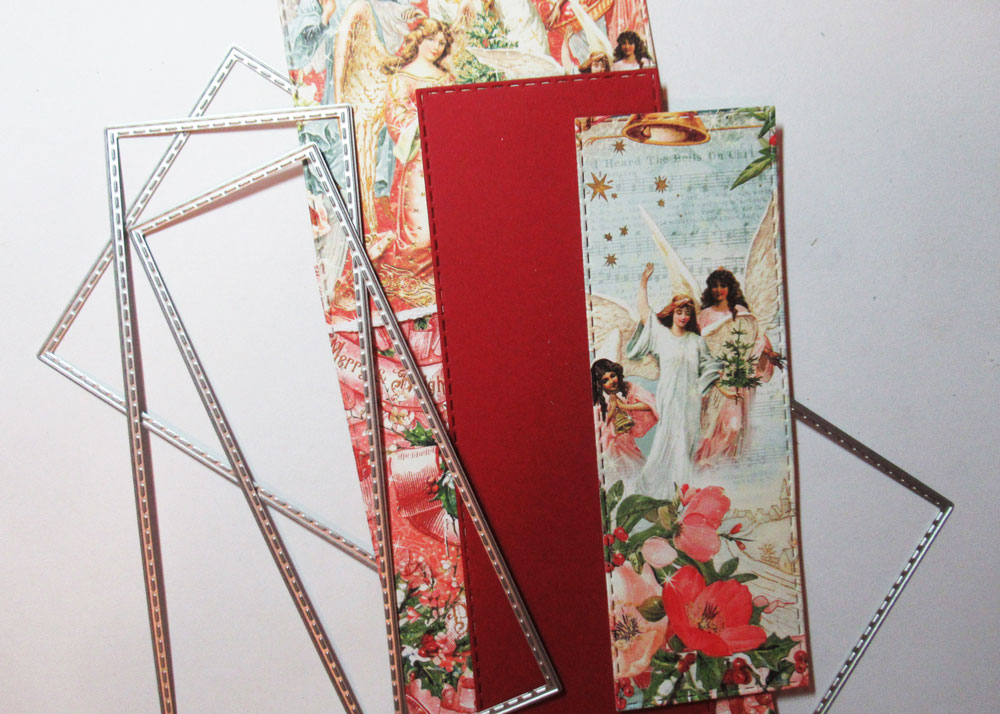
My first card was created from Bazzill Lollipop cardstock. Using papers from the Graphic 45 Joy to the World collection, along with Lollipop and green cardstock, I die cut the layers to create a true slimline card.

Prima poinsettias were added to to the layers with brads, along with a metal phrase from Tim Holtz Christmas Words collection. Glue Dots were used to provide dimension.

My next card is an A2 sized card and I used the same Tutti Designs Slimline dies to die cut the elements from Bazzill Lollipop cardstock and Graphic 45's Joy to the World papers.

I placed the scalloped layer on the card, cutting off the sections I did not need. Then I die cut the angel layer and cut off the sections I did not need. A poinsettia was added to the upper corner and a Tim Holtz Christmas Word was added along the edge. This is a great way to use slimline dies in another way with left over papers.

Thursday, April 2, 2020
Welcome Burlap Panel
Hi everyone, Steph Ackerman here today with lots of fun products from the store. Please visit the store for all the fun products I've used today.
What are you doing while you are waiting out the current pandemic? I've been going through my stash and organizing everything and pulling out products I want to use. This burlap panel is the result of just gathering supplies.

Using a burlap panel, I inked it with Ranger Distress Ink in Walnut Stain using a Ranger Ink Blending Tool. I cut Graphic 45 papers to fit, tearing the top layer and adding strips of Bazzill Licorice Twist Cardstock to help the panel pop. With so many different Graphic 45 papers available, any of them would be perfect for the center of this panel. I used US Art Quest Perfect Paper Adhesive to adhere the papers to the burlap panel.


Then I assembled the panel with burlap tags, paper tags (similar to the 7 Dots Studio tags), assorted flowers and clothes pins.


Thank you for visiting
What are you doing while you are waiting out the current pandemic? I've been going through my stash and organizing everything and pulling out products I want to use. This burlap panel is the result of just gathering supplies.

Using a burlap panel, I inked it with Ranger Distress Ink in Walnut Stain using a Ranger Ink Blending Tool. I cut Graphic 45 papers to fit, tearing the top layer and adding strips of Bazzill Licorice Twist Cardstock to help the panel pop. With so many different Graphic 45 papers available, any of them would be perfect for the center of this panel. I used US Art Quest Perfect Paper Adhesive to adhere the papers to the burlap panel.

I found some metal words at the Dollar Store, so I inked welcome with Ranger Embossing Ink and added color with Ranger Perfect Pearls in Forever Green and Perfect Copper. The embossing ink was a great foundation for adhering the perfect pearls. Allow to set for a few minutes, then brush away the excess.

Then I assembled the panel with burlap tags, paper tags (similar to the 7 Dots Studio tags), assorted flowers and clothes pins.
Welcome was added to the panel with US Art Quest Perfect Paper Adhesive as well as Scrapbook Adhesives 3D Foam Adhesives to pop it up in the center.

Think about using whatever you have handy and see what you can create.
Thank you for visiting
Thursday, November 14, 2019
Merry Christmas Cards with Memory Box
Hi everyone, Steph Ackerman here today with lots of fun products from the store. Please visit the store for all the fun products I've used today.
I've used the Memory Box - Open Studio - Distressed Baptisia Collage, which is a collection of 4 different dies, along with the Graphic 45 Joy to the World Collection to create Christmas cards.

My first card is horizontal and the dies were used in 2 opposite corners. Papers from the Joy to the World collection were added to both the inside and outside of the card.


This vertical card uses one of the other Memory Box dies in one corner. Assorted tags from the Graphic 45 paper collection were added to the front of the card.


Thank you for visiting
I've used the Memory Box - Open Studio - Distressed Baptisia Collage, which is a collection of 4 different dies, along with the Graphic 45 Joy to the World Collection to create Christmas cards.

My first card is horizontal and the dies were used in 2 opposite corners. Papers from the Joy to the World collection were added to both the inside and outside of the card.


Inside, pattern paper was added to both sides and you can see the design peeking out behind the die. Lawn Fawn's Outside In Stitched Rectangle dies were used on Bazzill Marshmallow and Lollipop cardstocks.

My final card uses yet another die. A torn paper panel and a post card from the Graphic 45 collection were added on top. Ranger Liquid Pearls were added around the card for dimension.

Inside I also used Lawn Fawn's Outside In Stitched Rectangle dies with Bazzill Marshmallow and Lollipop cardstocks.

Thursday, October 17, 2019
Happy Holidays with Wild Rose Studio
Hi everyone, Steph Ackerman here today with lots of fun products from the store. Please visit the store for all the fun products I've used today.

Christmas is only 11 weeks away so it's time to start creating Christmas cards. I've used the Mia with Candy from Wild Rose Studio - a sweet stamp, perfect for your Christmas cards or even general holiday cards. I stamped her twice on Lawn Fawn white cardstock with Memento Tuxedo Black Ink then colored the images with Copic Markers.

I die cut the images using Lawn Fawn Small Stitched Circle Dies, then added them to green cardstock which was die cut with Lawn Fawn Large Stitched Circle Dies.

The cards were created using Bazzill Wax Lips cardstock, cut to 5 1/2" x 11" and scored in half with Scor-Pal Scoring Board. The papers are from Graphic 45's Joy To The World collection which I mixed and matched to create my cards.
May Arts Sheer Ribbon was wrapped around the panels before adding the images with Scrapbook Adhesives 3D Foam Adhesives for dimension. Baker'sTwine was then tied around the ribbon to add some color.
The included phrase was stamped with Memento Tuxedo Black Ink on Lawn Fawn white cardstock, matted with green and red cardstock and then added to the card with Scrapbook Adhesives 3D Foam Adhesives for dimension.
Thank you for visiting

Christmas is only 11 weeks away so it's time to start creating Christmas cards. I've used the Mia with Candy from Wild Rose Studio - a sweet stamp, perfect for your Christmas cards or even general holiday cards. I stamped her twice on Lawn Fawn white cardstock with Memento Tuxedo Black Ink then colored the images with Copic Markers.

I die cut the images using Lawn Fawn Small Stitched Circle Dies, then added them to green cardstock which was die cut with Lawn Fawn Large Stitched Circle Dies.

The cards were created using Bazzill Wax Lips cardstock, cut to 5 1/2" x 11" and scored in half with Scor-Pal Scoring Board. The papers are from Graphic 45's Joy To The World collection which I mixed and matched to create my cards.
May Arts Sheer Ribbon was wrapped around the panels before adding the images with Scrapbook Adhesives 3D Foam Adhesives for dimension. Baker'sTwine was then tied around the ribbon to add some color.
The included phrase was stamped with Memento Tuxedo Black Ink on Lawn Fawn white cardstock, matted with green and red cardstock and then added to the card with Scrapbook Adhesives 3D Foam Adhesives for dimension.
Thank you for visiting
Thursday, October 3, 2019
Christmas Gift Card Holders
Hi everyone, Steph Ackerman here today with lots of fun products from the store. Please visit the store for all the fun products I've used today.
Do you realize that Christmas is only 10 weeks away? It's time to start getting your Christmas creations made so pop into the store for everything you need.

I love creating gift envelopes from family and friends. While I think gift cards are so impersonal, creating the perfect card/envelope in which to give it, makes all the difference, don't you think? The Graphic 45 Joy to the World 8" x 8" paper pad was perfect for my gift cards.

There are a lot of wonderful papers in this collection so I created 6 different gift card holders. I created pockets using Bazzill Candy Bar cardstock, then covered the pockets with a variety of papers from this collection. Each paper is as beautiful as the next.

Using Lawn Fawn Small Stitched Circle Dies and Large Stitched Circle Dies, I added elements to the front of several pockets. Other pockets had 2 layers of papers with a strip of Bazzill Wax Lips cardstock between them. Since the papers also included phrases, I used them as my sentiments.

Thank you for visiting.
Do you realize that Christmas is only 10 weeks away? It's time to start getting your Christmas creations made so pop into the store for everything you need.

I love creating gift envelopes from family and friends. While I think gift cards are so impersonal, creating the perfect card/envelope in which to give it, makes all the difference, don't you think? The Graphic 45 Joy to the World 8" x 8" paper pad was perfect for my gift cards.

There are a lot of wonderful papers in this collection so I created 6 different gift card holders. I created pockets using Bazzill Candy Bar cardstock, then covered the pockets with a variety of papers from this collection. Each paper is as beautiful as the next.

Using Lawn Fawn Small Stitched Circle Dies and Large Stitched Circle Dies, I added elements to the front of several pockets. Other pockets had 2 layers of papers with a strip of Bazzill Wax Lips cardstock between them. Since the papers also included phrases, I used them as my sentiments.

Using office tags, I cut pattern paper to fit, then lightly inked the edges before adhering. A belly band was created by adding a strip of paper across the center - only adhering the edges. You want to be able to slip cash behind it. Add twine from one of the ArtC Collage Kits to each tag. Then simply turn over the tag and write your sentiment.
What do you think?
Subscribe to:
Posts
(Atom)


