Showing posts with label Tutti. Show all posts
Showing posts with label Tutti. Show all posts
Thursday, September 9, 2021
Fall Themed Friendship Card
Hi everyone, Steph Ackerman here today with lots of fun products from the store.


Creating a slimline card from Bazzill Juicy Pear Cardstock, I cut a panel from Dress My Crafts to create my card.

For the top layer, I used the Tutti Designs Slimline Fence Die for a different effect. The die allows the underlying layer to show.

The image was stamped and colored with Copic Markers, then die cut using a Tutti Designs Oval die. The image was then matted with brown cardstock, then added to the card with 3D Foam Adhesives for dimension. Fussy cutting leaves from the pattern paper, they were placed around the image.

The sentiment, from a Penny Black stamp, was stamped with Lawn Fawn Black Licorice Ink.
Thank you for visiting.
Thursday, May 20, 2021
Celebrating You (twice)
Hi everyone, Steph Ackerman here today thinking about you with Tutti Designs Dies.


Create 2 cards from Bazzill Rock Candy Cardstock. Score in half using Scor-Pal.
Die cut the Tutti Orchestra Corner die four times. Twice from Bazzill Marshmallow Cardstock and twice from green cardstock.

I experimented by doing the cards differently to see which layering I liked best.
For the first one, I cut the green stems and adhered them to the white floral base.
For the second one, I cut the white flowers and adhered them to the green floral base.

Adhere each design to the corner of each card. Because the designs are versatile you can arrange them in opposite corners to create 2 great cards.

Using a Tutti Oval Die, die cut white cardstock. Stamp a phrase from a Penny Black stamp set using Lawn Fawn Black Licorice Ink.

Which one do you prefer?
Thank you for visiting
Thursday, March 25, 2021
Masculine Card with Tutti Designs Dies
Hi everyone, Steph Ackerman here today with a masculine card. Masculine cards are a bit more challenging to create as you don't want all the flowers and frills, but you still want a nice card.


Using Tutti Designs Dotted Rectangle slimline dies, I die cut one layer from Bazzill Jawbreaker Cardstock and the next size down from pattern paper.

I needed a masculine card and this older Prima Marketing stamp was perfect. I colored him with Copic Markers and then fussy cut him.

Before placing him atop the card with EK Success 3D Dots for dimension, I inked him with Distress Oxide Ink - Ground Espresso.

I used a stamp from Art Impressions Watercolor Cling stamp set using Lawn Fawn Licorice Ink. I wanted a smaller sized sentiment so I die cut black cardstock with the smaller Tutti die, then moved it 1/2" along the die and recut that end.

The sentiment was then placed along side of the image.

Thank you for visiting
Thursday, December 31, 2020
Happy New Year Cards
Hi everyone, Steph Ackerman here today with lots of fun products from the store. Please visit the store for all the fun products I've used today.
Wishing you all a Happy New Year and a much better 2021!!!!

I used several Tutti Designs dies to create these mini cards. I found the size of the Tutti Designs Stitched Scalloped Rectangle Dies, once die cut from Bazzill Licorice Twist Cardstock and scored in half created amazing mini cards For the sencond layer I use Tutti Designs Stitched Rectangle Dies with papers from Dress My Crafts Whispering Love collection. I just cut the die cut panels in half to create the 2nd layer.

The Magnolia Happy New Year stamp was perfect for these cards so I colored them with Copic Markers before fussy cutting them.

Using a Tutti Designs Stitched Nesting Oval, I added the next layer to the card. They were also die cut from Bazzill Licorice Twist Cardstock because I wanted the ladies to stand out.

Each lady was placed atop an oval using Glue Dots for dimension.

Thee are cute mini cards, but they'd also be great used as tags hanging from a bottle of wine for hte New Year don't you think?

Thank you for visiting
Thursday, December 10, 2020
Merry Christmas - Be Jolly
Hi everyone, Steph Ackerman here today with lots of fun products from the store. Please visit the store for all the fun products I've used today.

I created an easel card to showcase the Stamping Bella Woodsies Christmas Morning Chicks stamp set. The easel card was created from Bazzill cardstock and an older paper from a Graphic 45 Christmas collection was added to both layers. The image was stamped with Lawn Fawn Black Licorice Ink, then colored with Copic Markers. It was then die cut with Lawn Fawn Rectangle Die then edged with Heartfelt Creations Fleur Borders and Pockets Dies to give it a lacey edge. The panel was added to Bazzill Lollipop Cardstock.


Using a Lawn Fawn Line Border Die - Merry Christmas - I also die cut it from Lollipop cardstock.

The image was added to the card with Glue Dots for dimension. Merry Christmas was added across the front of the card using Art Institute Glue. Using Tutti Designs Oval Dies, I created the stopper for the card base adhering it with Glue Dots for dimension.

Folded up, the card slips into a square envelope for easy mailing.

Thank you for visiting
Thursday, December 3, 2020
How to use Slimline Dies
Hi everyone, Steph Ackerman here today with lots of fun products from the store. Please visit the store for all the fun products I've used today.


Thank you for visiting

I've created 2 cards today using Tutti Designs Slimline dies - Stitched Scalloped Rectangle and Stitched Rectangle in 2 different ways.
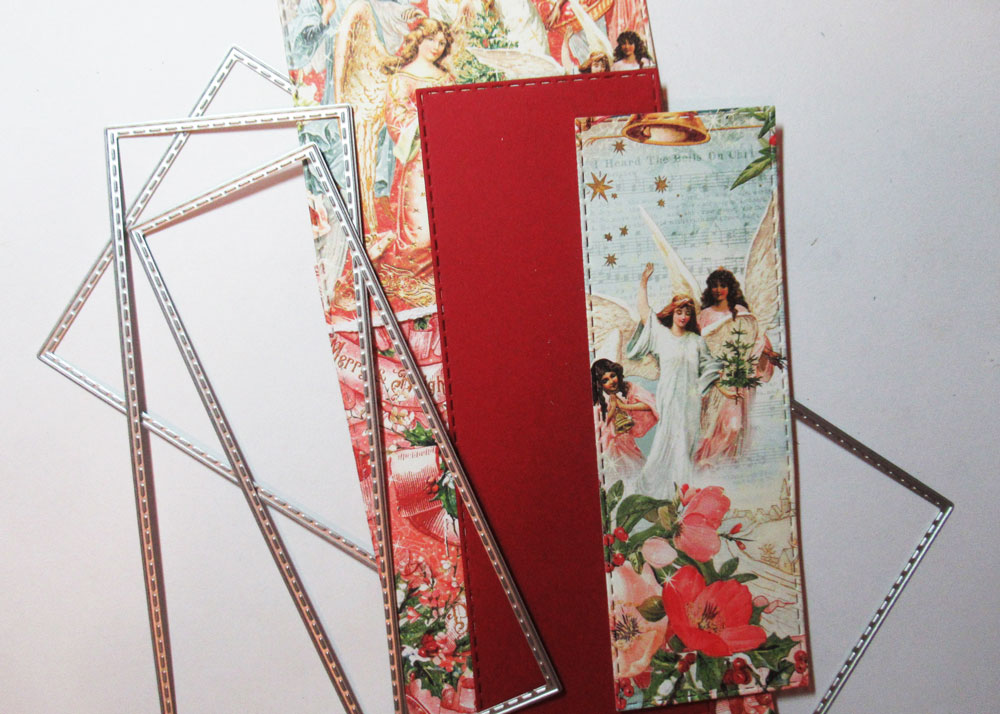
My first card was created from Bazzill Lollipop cardstock. Using papers from the Graphic 45 Joy to the World collection, along with Lollipop and green cardstock, I die cut the layers to create a true slimline card.

Prima poinsettias were added to to the layers with brads, along with a metal phrase from Tim Holtz Christmas Words collection. Glue Dots were used to provide dimension.

My next card is an A2 sized card and I used the same Tutti Designs Slimline dies to die cut the elements from Bazzill Lollipop cardstock and Graphic 45's Joy to the World papers.

I placed the scalloped layer on the card, cutting off the sections I did not need. Then I die cut the angel layer and cut off the sections I did not need. A poinsettia was added to the upper corner and a Tim Holtz Christmas Word was added along the edge. This is a great way to use slimline dies in another way with left over papers.

Thursday, November 26, 2020
Peace and Happiness
Hi everyone, Steph Ackerman here today with lots of fun products from the store. Please visit the store for all the fun products I've used today.
Have you seen all the slim line dies available in the store? From Lawn Fawn to Tutti Designs, the assortment is amazing and they work together well.


I die cut the Lawn Fawn Slimline Forest Border Die from Lawn Fawn Rainforest cardstock and Bazzill Marshmallow cardstock. I cut the forest off the white layer as I wanted the forest to be peaking out from snow mounds.

Next I inked the edges of the snow mound with Distress Oxide Inks in Faded Jeans and Speckled Egg using Ranger Ink Blending Tools.

Using Tutti Designs Stitched Rectangles Craft Die, I die cut Maja Design - Sunbleached cardstock, then inked it with Distress Oxide Ink in Speckled Egg and Faded Jeans. For definition, I inked around the edges with Distress Ink in Black Soot.


Create a card from Bazzill Marshmallow cardstock.
Adhere the layers together and place atop the card.

Keeping the card simple, I selected a stamp from my stash and inked it with Lawn Fawn Black Licorice Ink. I then stamped it directly on the card.

Thank you for visiting
Thursday, July 30, 2020
Let It Snow Snowflake Cards
Hi everyone, Steph Ackerman here today with lots of fun products from the store. Please visit the store for all the fun products I've used today.
It may still be the middle of summer, but there is no better way to cool off than by creating winter themed cards.
It may still be the middle of summer, but there is no better way to cool off than by creating winter themed cards.

I used Maja Designs Vintage Summer Basics 1916 to create both cards, die cutting the papers with PoppyStamps Craft Die - Snowflake Lattice Frame. As this paper is double sided, I created two cards using both sides of the paper.

Use the Spellbinders Tool 'n One to remove the left over die cut pieces that remained in the die.

Mat the die cut panels with the same paper, then wrap each panel with May Arts Sheer Light Blue Stitched ribbon. This gives the cards a wintry feel.

The Maja paper gives each card a wintry feel.

Add the die cut panels to 4 1/4" x 5 1/2" cards created from Bazzill Marshmallow cardstock and Bazzill Icy Mint cardstock. Use Nuvo Crystal Drops to create pearls in each of the snowflakes. Allow to dry completely.

Die cut Tutti Designs Oval Dies from the same paper and place atop the cards with Scrapbook Adhesives 3D Foam for dimension. Stamp and die cut the bench and lamp post using Lawn Fawn Winter in the Park stamps and dies and Lawn Fawn Soot Dye Ink. Place them atop the oval and add to the card with foam adhesives.

Die cut Bazzill Marshmallow cardstock with the Lawn Fawn Let It Snow Line Border Die. As the die cut phrase is flexible, you can customize the die cut for your projects. I wanted to shape them in the form of an arch on my cards.

Finally add Yellow Ice Stickles to the lanterns.
Thank you for visiting.
Thursday, June 18, 2020
Tropical Thank You Cards
Hi everyone, Steph Ackerman here today with lots of fun products from the store. Please visit the store for all the fun products I've used today.


Thank you for visiting

Using Heartfelt Creations Tropical Hibiscus stamps and coordinating dies, create the flowers using Bazzill Cardstock and Lawn Fawn Peach Fuzz Ink.

Use the Heartfelt Creations Deluxe Flower Shaping Tool to shape the flowers.

Create a square card from Lawn Fawn Kraft cardstock. Cut Bazzill Marshmallow Cardstock slightly smaller and die cut the center using a Tutti Designs Oval die. Add the die cut panel to the card. Die cut the white oval using the next size down die and die cut the peach frame using 2 dies to create the frame.

Using Memento Tuxedo Black Ink, stamp thank you on the white oval and place in the opening. Adhere the leaves to opposite sides of the card using Tattered Lace Detail Glue. Adhere the flowers on top.

Create a second card from Bazzill cardstock. Cut 7Gypsies Garden Words to size and mat with Bazzill Marshmallow cardstock before adhering to the card.

Using 2 sizes of the Tutti Designs Nesting Ovals, die cut both colors of cardstock and adhere to the card. Stamp thank you slightly off center. Adhere 2 sets of leaves and the flowers to the corner of the card.
Finish by adding Nuvo Drops to the flower centers.
Thank you for visiting
Subscribe to:
Posts
(Atom)


