Thursday, April 30, 2020
Sweet Fairy Cards with Poppystamps
Hi everyone, Steph Ackerman here today with lots of fun products from the store. Please visit the store for all the fun products I've used today.

Use Scor-Pal to create 2 cards from Bazzill Licorice Twist cardstock. I used Authentique's Romance 6" x 6" paper pad to create the layers on my cards.
Cut the base layers slightly smaller than the cards and adhere. The top 2 layers were die cut with Lawn Fawn Stitched Rectangle dies. Each panel was wrapped with pink ribbon before being added to the cards.

The fairies were die cut from the same paper pad using the Poppystamps Craft Die - Nimble Faerie. She was mounted on Bazzill Licorice Twist cardstock which was die cut with Lawn Fawn Small Stitched 4 Bar Rectangles. It was added to the card with Scrapbook Adhesives 3D Foam Squares.

The phrases are from Stamperia's Fly High stamp set, stamped with Memento Tuxedo Black Ink on scraps from the Authentique paper pad, matted with Licorice Twist and added to the cards.

Thank you for visiting

Use Scor-Pal to create 2 cards from Bazzill Licorice Twist cardstock. I used Authentique's Romance 6" x 6" paper pad to create the layers on my cards.
Cut the base layers slightly smaller than the cards and adhere. The top 2 layers were die cut with Lawn Fawn Stitched Rectangle dies. Each panel was wrapped with pink ribbon before being added to the cards.


The phrases are from Stamperia's Fly High stamp set, stamped with Memento Tuxedo Black Ink on scraps from the Authentique paper pad, matted with Licorice Twist and added to the cards.

Thank you for visiting
Saturday, April 25, 2020
Graphic 45 Fashion Forward Z Fold Card
Welcome back and Nancy, here, excited to share my tutorial on creating a Z fold card.
The Rubber Buggy carries all of the wonderful name-brand products and supplies for all of your craft needs with wonderful customer service and quick delivery.

The Z-fold card makes a fun 3D cards as these cards stand up on their own and fold nice and flat for posting. You can decorate a Z fold card with the addition of a couple of small strips of cardstock into a much more elaborate design.
I made my Z fold card with the beautiful Graphic 45 Fashion Forward collection which is made up of gorgeous papers, stickers and coordinating chipboards to celebrate the entire year with monthly imagery of glamorous ladies, timeless sentiments, and art deco florals for each season and holiday. This collection has a vibrant colors of sapphire blue, amethyst purple, emerald green, ruby red, and citrine yellow.
 |
| Graphic 45 Fashion Forward 12 x 12 Paper Pad and Graphic 45 Pattern and Solid Paper |
I will be using the Graphic 45 Fashion Forward May cardstock for my Z fold card along with the Graphic 45 Patterned/Solid paper pad. The Graphic 45 Fashion Forward May cardstock is available separately or in the Graphic 45 Fashion Forward Collection 12" x 12" paper pad.

 |
| Front of card when folded |

 |
| Inside of card with die cut flowers in the center of the card glued behind the narrow strip |
Instructions:
Here is my pattern: Using black 12" x 12" cardstock, cut your base 6" x 6". Cut the narrow strip of patterned paper of 1 1/2" x 12". Score both papers on the lines at 3" and 6" which creates a standard "Z" fold. Using your bone fold tool, fold at the score line the 6" and then folding the 3" fold line to the front. Now you have two Z's to fold.

While covering your Z card, before gluing the top picture to the card, you will want to adhere the narrow strip behind the picture and move it forward 1/2" on the top and 1/2" to the right on the inside to get the opening for your flower. Cut off any excess. TRY IT - SO FUN!

Decorate the card, taking care to keep all the pieces and parts of the card within the boundaries of the card's folds when closed. Adhere the parts and embellishments to the front, narrow cross piece and inside of card.
The patterned paper for the three parts of my card are 1/4" smaller than the frame meaning that my inside black cardstock measures 6" x 6", then my patterned paper will be 5 3/4" x 5 3/4". The 3" x 6" black cardstock, the patterned paper will measure 2 3/4" x 5 3/4".

I hope I have inspired you try out these products available at The Rubber Buggy on-line store. My cards and projects are always posted on Saturday. Keep watching and thank you so much for those wonderful comments as well as suggestions.
Enjoy and Happy Crafting!
Enjoy and Happy Crafting!
 |
Friday, April 24, 2020
Stamping Bella Graduation Card
Welcome back and Nancy, here, to share a graduation card made with the adorable
Stamping Bella-Curvy Girl With A Cocktail stamp set available at The Rubber Buggy on-line and retail stores.

Stamping Bella-Curvy Girl With A Cocktail stamp set comes with an adorable sentiment of a girl holding a drink which looks almost like she is giving a toast to congratulate someone.

I typed out the "2020" and "Congratulation on Your Graduation" and printed it on a laser printer (Has to be on a laser printer that uses a toner for the transfer foil). I used a transfer foil and foiled the sentiments through my laminator. If you are ever interested in using transfer foil versus other types of foiling, there is a lot of information on-line about it. I like the transfer foil since I can type up my own sentiments and then foil it. Very easy peasy once you do it the first time. I accidentally bought other type of foil and can't use it so make sure it is transfer foil. If you don't have a laser printer, just take it to any office supply store that prints off documents or customers.
I hope I have inspired you try out these products available at The Rubber Buggy on-line store. My cards and projects are always posted on Saturday. Keep watching and thank you so much for those wonderful comments as well as suggestions.
Enjoy and Happy Crafting!
Enjoy and Happy Crafting!
|
Thursday, April 23, 2020
Enjoy the Little Things
Hi everyone, Steph Ackerman here today with lots of fun products from the store. Please visit the store for all the fun products I've used today.

Heartfelt Creations has some wonderful dies and this Fleur Borders and Pocket Dies is no exception. This die set has 3 delicate dies and 3 background dies. Let me show you how I've used two of these dies today.

Starting with a sheet from Lawn Fawn's Knock on Wood paper pad, I selected the orange panel, cutting it to size. Next, I used Lawn Fawn's Vanilla Malt cardstock to die cut the filigree design, gluing it directly to the card with Tombow Mono Aqua Liquid Glue. I love the orange peeking out from behind the die.

The panel was added to a blue panel from the Lawn Fawn pack and brads were added to the die cut flowers. Several flowers from Prima Marketing's Capri Flowers were added to the corner. The stamp was inked with Memento Tuxedo Black Ink on Lawn Fawn's Vanilla Malt cardstock. I used Lawn Fawn Stitched Circle dies to die cut the phrase.


My next card uses the same die, plus the coordinating background die on another sheet of Lawn Fawn's Knock on Wood paper pad. Using a premade card, I cut a woodgrain panel from LemonCraft's House of Roses collection to fit, then used the die cut element as a pocket, adhering just the edges. Ranger Liquid Pearls were added to the die cut flower centers.

Thank you for visiting.
Saturday, April 18, 2020
Tiffany Loves to Text
Hi everyone! Nancy, here. Are you missing seeing your friends or family members right now during this shutdown and have been texting them with messages throughout the day? I would image this would definitely put a smile on their face when they open up this this special card from you.
Stamping Bella - Uptown Girl - Tiffany Loves to Text is so cute with three text sentiments for you to use on your card. I love that the bag is filled with spring time flowers which is perfect for this time of year. Also, Stamping Bella.com has many coloring tutorials called Stamping Bella Marker Geek U-Tubes for coloring their stamp images. I just google Stamping Bella Marker Geek, then the name of the stamp set and most of the time, I get a video on how they colored their stamp set. I view these U-Tubes videos often to learn very valuable techniques and color guides for coloring my Stamping Bella stamps.
Stamping Bella - Uptown Girl - Tiffany Loves to Text is so cute with three text sentiments for you to use on your card. I love that the bag is filled with spring time flowers which is perfect for this time of year. Also, Stamping Bella.com has many coloring tutorials called Stamping Bella Marker Geek U-Tubes for coloring their stamp images. I just google Stamping Bella Marker Geek, then the name of the stamp set and most of the time, I get a video on how they colored their stamp set. I view these U-Tubes videos often to learn very valuable techniques and color guides for coloring my Stamping Bella stamps.


The card above is a shaker card with the 28 Lilac Lane Shaker Sunrise Mix inside of the frame behind a sheet protector that was cut out and glued behind the white frame. I cut out five white frames for thickness for the shaker mix and adhered a cut out sheet protector behind one front white frame using Scor-Tape double-sided tape and the rest of the white frames adhered with Beacon 3-in-1 Advanced glue. I try to make my frames thick enough to move the shaker mix around. I just love the variety of colors of the 28 Lilac Lane Shaker Mixes.
I colored the background with Distress Oxide Inks: Tumbled Glass Spun Sugar, and Shaded Lilac using the Picket Fence Studio brushes and then stamped the sentiments from the Tiffany stamp set. I strongly recommend the Picket Fence Studio brushes for sponging. I just tap the ink on the brush, tap it on scrap paper first to get the heavy ink off, and then brush it on the paper. What I especially like about these brushes is that most of the ink comes off the brush and I can apply the next color of ink when blending the two colors side by side. When done, I just use a little soap and water and let dry to use again. These brushes don't wear out.

Tiffany was first stamped with Memento Tuxedo Black ink, let dry for a few minutes and then colored with Copic makers and cut out with scissors. I adhered Tiffany with glue. I used a hot glue gun to adhere the 6mm flat back string pearls, handmade bow and 10mm Wild Orchid Craft flowers.
I tried using other black ink for stamping and coloring but always prefer Memento Tuxedo Black ink since it doesn't bleed black ink while coloring with my Copic Markers.


I hope I have inspired you try out these products available at The Rubber Buggy on-line store. My cards and projects are always posted on Saturday. Keep watching and thank you so much for those wonderful comments as well as suggestions.
Enjoy and Happy Crafting!
|
Friday, April 17, 2020
Get Whale Soon
Have a fast recovery with this cute whale, cloud and little fishes card. Welcome and Nancy, here, to share another Get Well card during this pandemic and flu season. The Lawn Fawn Get Well Soon stamp set along with other Lawn Fawn stamps and die sets are perfect for wishing someone a speedy recovery or for simply offering some “feel better” support when times are tough.


I created a U-Tube on how I did my clouds with the beautiful Ranger Distress Ink pads and Lawn Fawn Puffy Cloud Border die which could be substituted for the Lawn Fawn Cloud Stencil.. I just love using the Picket Fence Studio brushes for sponging now.


I added the Lawn Fawn Pivot Popup Die Set for the inside of the card. This set includes everything you need to create a four-panel pop-up scene that twists open inside your card! Use the included hills, trees, and clouds to decorate your scene with the panels as a starting point to create your own pop-up masterpiece! This panel can be used on a portrait or landscape side of the card. You will need to watch the video on assembling the pivot before you begin. Lawn Fawn made a video that goes through the steps. Click on Here to take you to this video. I adhered the card using the Beacon 3-in-1 Advanced glue.
 |
| Lawn Fawn Pivot Popup Die Set |
 |
| Lawn Fawn Get Well Before & Stamp |
White cardstock
Lawn Fawn Dad and Me stamp set (Fishes on bottom of whale)
Tim Holtz Distress Oxide Ink: Tumbled Glass, Broken China
I hope I have inspired you try out these products available at The Rubber Buggy on-line store. My cards and projects are always posted on Saturday. Keep watching and thank you so much for those wonderful comments as well as suggestions.
Enjoy and Happy Crafting!
|
Thursday, April 16, 2020
Need a Hug? Card
Hi everyone, Steph Ackerman here today with lots of fun products from the store. Please visit the store for all the fun products I've used today.


Thank you for visiting

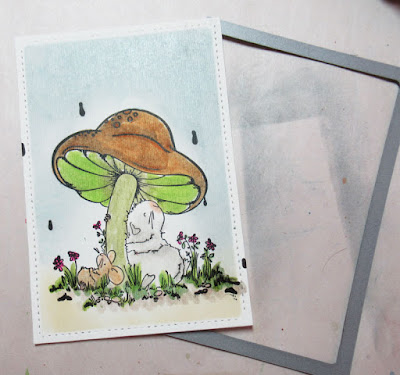
I stamped Stamping Bella's Gilbert and Maisy Under the Toadstool with Memento Tuxedo Black Ink, then colored the image with Copic Markers. Using Lawn Fawn Stitched Rectangle Dies, the image was die cut. Leaving the image in place, I added Ranger Distress Inks around the image using a Ranger Ink Blending Tool.

Removing the die, you can see a nice white edge around the image.

Creating a card from Bazzill Gumdrop cardstock, I added a panel from Lawn Fawn's Knock on Wood paper pad, then wrapped the card with Cotton Ribbon.

Matting the image with Bazzill Gumdrop cardstock, I added it to the card with Scrapbook Adhesives 3D Foam Squares for dimension. The sentiment was added to the corner.

To finish, Ranger Liquid Pearls in Merlot were added to the flower centers and the sentiment.
Thank you for visiting
Wednesday, April 15, 2020
Simple Stories Vintage Garden
Hello friends! Today I'm sharing a card set featuring
Simple Stories Simple Vintage Garden
This paper collection is just so gorgeous and has so many beautiful embellishments to coordinate with it. This collection comes with cut outs and embellishments to help you create gorgeous layouts and cards too!
If you love fussy cutting this paper collection is for you!
I used a Tim Holtz Stencil to create the background and then added
Lindy's Stamp Gang Magicals in Victorian Bouquet to color.
The Flowers are Prima Fruit Paradise and some from my stash.
The chipboard and pearls are from my stash.


Be sure to stop by the Rubber Buggy Store and pick up this beautiful collection!
Today is bittersweet for me as this is my last post for the Rubber Buggy design team. I was so fortunate to design for this amazing store and team. I made some lasting friends and was inspired everyday by their beautiful projects! Thank you Kellie for everything!
Thanks for stopping by the Rubber Buggy blog today.
Debbie
Debbie
Saturday, April 11, 2020
Lawn Fawn Flying High Five
Welcome back and Nancy, here. I am excited to share new arrivals of Lawn Fawn die, stamp and paper available at The Rubber Buggy on-line and retail stores. Make sure to check out all of the new arrivals coming to The Rubber Buggy during the week and get your orders in while these wonderful products and supplies are still available.

Wheeeee! Create your next cards with the Lawn Fawn Flying High Five stamp and die set. From flying balloons to trampolines, this stamp set gives lots of ways to create a fun party! I made two cards for you with the Lawn Fawn Flying High Five and Lawn Fawn Oliver Stitched Alphabet die set.

I cut out the adorable critters using the Lawn Fawn Flying High Five stamp and Lawn Fawn High Five die set and colored with Copic Markers. I cut out another Lawn Fawn Puffy Cloud Border using white glitter cardstock and adhered the entire card with Beacon 3-in-1 Advanced Glue.

If you have trouble figuring out how to glue this to the card, take another look at my card or view the Lawn Fawn tutorial where to glue the part of the pop up to the card. Also, I would highly recommend doing a quick sample card with the pop up glued to the inside to have with your die for future reference. I store my sample with these dies. I am referring back to my sample for every card that I make with this pop up die.
I cut out the Happy Birthday rainbow patterned paper with the Lawn Fawn Hello Sunshine Remix and also used this paper pad for the rest of the inside of the card.
 |
| Lawn Fawn Hello Sunshine Remix |
 |
| Lawn Fawn Flying High Five stamp |
 |
| Lawn Fawn Pop-Up Happy Birthday Die |
 | |
| Lawn Fawn Puffy Cloud Border
I hope I have inspired you try out these products available at The Rubber Buggy on-line store. My cards and projects are always posted on Saturday. Keep watching and thank you so much for those wonderful comments as well as suggestions.
Enjoy and Happy Crafting!
|
Subscribe to:
Posts
(Atom)


