Wednesday, July 31, 2013
Princess Peanelope Saturated Canary card
Hi everyone it's my Rubber Buggy
Thursday and I have a design team project I want to share with you. I
created this card by using a 6x6 purple cardstock background, then added
a 5x5 sheet of Websters pages in a beautiful pattern with lovely hot
air balloon and matching hues of the same colors I used to color this
image of Princess Peanelope from The Saturated Canary collection over at
The Rubber Buggy. I used these copics to color her:
E02, 21
RV 06, 42
BV11, 00, 08
YG67, 03
R30
E93
B14
YR18, 02, 04
Y38

I then added some flowers from my stash and these are a variety of different flowers from many different styles & textures. Then I added some Prima bling, an I love you sentiment, a websters pages cabuchon on top of 2 purple leather accent embellishments. I love these colors I don't normally use, but was thrilled to incorporate them and try something new. Thanks for looking and I hope you have a great day! ~Kelly Walkelmol
Magnolia summer scene
Hi again!
Pi here with a summer scene by Magnolia.
 I've
used three different stamps to create this scene and all is coloured
with copic markers. I've put stickles on her dress and on the paper
flowers, if you've put your name on the newsletter from Kellie, you know
these will soon be in store. The flowers are coloured with LSG a bit o'bubbly.
I've
used three different stamps to create this scene and all is coloured
with copic markers. I've put stickles on her dress and on the paper
flowers, if you've put your name on the newsletter from Kellie, you know
these will soon be in store. The flowers are coloured with LSG a bit o'bubbly.
Products used from the store:
Magnolia stamp bubbling Tilda
Magnolia stone path rubber stamp
Magnolia stamp little summer birds
Copic markers
Magnolia 12x12 paper, sea breeze rose path
WOC wild roses 40mm
WOC open roses 25mm
WOC open roses 10mm
Lace with satin center
Stamping supplies (memento ink, score tape, copic paper)
Thank you for visiting,
Hugs!
Pi here with a summer scene by Magnolia.
Products used from the store:
Magnolia stamp bubbling Tilda
Magnolia stone path rubber stamp
Magnolia stamp little summer birds
Copic markers
Magnolia 12x12 paper, sea breeze rose path
WOC wild roses 40mm
WOC open roses 25mm
WOC open roses 10mm
Lace with satin center
Stamping supplies (memento ink, score tape, copic paper)
Thank you for visiting,
Hugs!
Tuesday, July 30, 2013
Sending Happy Thoughts
Hi everyone!
It's Pi back again, it's been some time since my last post.

I made a card using paper from Graphic 45, Prima and Magnolia. The blue background is from G45 6x6 paper pad, solids and patterns from the new collection steampunk spells. And the two layered papers are from Prima engraver and Magnolia once upon a time.
I've coloured a few of the daisies with LSG a bit o bubbly and clam bake beige - they turned out gorgeous. The key is from Graphic 45 and tied to a button from my stash with twine from the store.
The doily is a die cut and I've layered a circle which I've stamped a Magnolia background on. The sentiment is a stamp from MFT.
Products used from the store:
Graphic 45, 6x6 solids and patterns paperpad, steampunk spells
Prima 6x6 paper pad, engraver
Magnolia 12x12, turquoise rose ornament
Bakers twine, seafoam
Graphic 45 staples, ornate metal keys
WOC, cosmos daisies
MFT die-namic decorative doily
Magnolia background stamp love
Tim Holtz distress ink, antique linen
Tim Holtz distress ink, walnut stain
Crystals
Thank you for visiting!
Hugs :)
It's Pi back again, it's been some time since my last post.
I made a card using paper from Graphic 45, Prima and Magnolia. The blue background is from G45 6x6 paper pad, solids and patterns from the new collection steampunk spells. And the two layered papers are from Prima engraver and Magnolia once upon a time.
I've coloured a few of the daisies with LSG a bit o bubbly and clam bake beige - they turned out gorgeous. The key is from Graphic 45 and tied to a button from my stash with twine from the store.
The doily is a die cut and I've layered a circle which I've stamped a Magnolia background on. The sentiment is a stamp from MFT.
Products used from the store:
Graphic 45, 6x6 solids and patterns paperpad, steampunk spells
Prima 6x6 paper pad, engraver
Magnolia 12x12, turquoise rose ornament
Bakers twine, seafoam
Graphic 45 staples, ornate metal keys
WOC, cosmos daisies
MFT die-namic decorative doily
Magnolia background stamp love
Tim Holtz distress ink, antique linen
Tim Holtz distress ink, walnut stain
Crystals
Thank you for visiting!
Hugs :)
Monday, July 29, 2013
Baby Tag
Hi everyone! It's Indah here. Today I want to show you a tag I made. I rarely make tags, but this one is special because it's going to my cousin who's about to give birth along with some gifts :)


I made this tag using Magnolia stamp called Little Cute Tilda. Isn't she adorable? I colored her in using my markers.
Don't forget to drop by The Rubber Buggy for more amazing cardmaking and scrapping supplies!
Friday, July 26, 2013
Happy Birthday!!!!
Hi Everyone!!! I am here on this fabulous Friday with my post for The Rubber Buggy, to show you some more inspiration using some wonderful stamps and products from the Store.
IT seems that I am on a birthday card marathon. Here is another birthday card, made using "Happy Birthday Elllie" from Saturated Canary Collection.

See you all back next Friday with some more inspiration. Check out the challenge blog for an awesome challenge, we'd love to see you participate.
Happy Stamping!!!!!
Thursday, July 25, 2013
Bohemian bazaar butterflies on a card
Hi everyone it's Kelly and I have been doing another simple card tutorial that I want to share and I made these for a binder for a friend to have as notecards. I used the Bohemian bazaar from the Graphic 45 paper collection I received from The Rubber Buggy. I am loving working with this paper it's so bright and vibrant and I loved making these butterflies because I knew the paper has the right appeal for what I wanted to showcase. I hope you like them, if you do click the link above to purchase from the store. These are beautiful papers! Thanks so much for looking!


Thank you for visiting, ~Kelly
Wednesday, July 24, 2013
Hello Girlfriend
Hi everyone, Steph here today and I'm loving this sweet Magnolia stamp - Tilda with Flower Pot. She is perfect for any card you need - whether it be a birthday or anniversary or just a hello.

I used some gorgeous papers from Graphic 45 - Steampunk Spells . As you can see it's not just for Halloween or steampunk projects. The double sided papers allow you to create any type of project.

Tilda was stamped with Memento Tuxedo Black Ink on Copic X-Press It Cardstock, then colored with Copic markers:
Pale Pastels
Skin Tones
Perfect Primaries
and fussy cut, then added to the card with foam adhesives for dimension. The die beneath is a Spellbidners die.
Thank you for visiting.
Tuesday, July 23, 2013
Get Well Soon
Hi everyone, Steph here today using Amy, a fun stamp from Whimsey stamp, one of the newest additions to the Store.
The papers are from Bo Bunny's Anthem 6" x 6" collection and include 36 beautiful red, white and blue pattern papers.

I used several patterns and then tied some white ribbons from May Arts across the center.
Using Memento Tuxedo Black Ink, I stamped the image and colored her with assorted Copic Markers:
Skin Tones
Floral Favorites
Pale Pastels
Thank you for visiting
Monday, July 22, 2013
Enjoy The Simple Things
Hi everyone! How's your Monday? Indah here with a new card I am going to show you. I made a 6x6 inch card for my niece :) I really love the colors here, so summery and bright.

Hope you like it. Thank you for visiting!

I stamped Magnolia Rocking Tilda with Memento Tuxedo Black ink and then colored her using my Copics.
Hope you like it. Thank you for visiting!
Friday, July 19, 2013
Your Birthday
Hi Everyone!!! Dawn here on this fabulous Friday with my post for The Rubber Buggy, to show you some more inspiration using some wonderful stamps and products from the Store.
Today I made a card using the stamp "Little Winged Friends: Your Birthday" from the Bild Malarna
Collection.

See you all back next Friday with some more inspiration. Check out the challenge blog for an awesome challenge, we'd love to see you participate.
Happy Stamping!!!!!
Today I made a card using the stamp "Little Winged Friends: Your Birthday" from the Bild Malarna
Collection.

See you all back next Friday with some more inspiration. Check out the challenge blog for an awesome challenge, we'd love to see you participate.
Happy Stamping!!!!!
Wednesday, July 17, 2013
Layering and fussy cutting
Hi scrappy friends it's Kelly. Today I have a card that is very simple but a perfect example of layering and fussy cutting. Sometimes you are in a hurry and aren't sure if you have time to color an image. It's in those times I like to get out the most vibrant and intricate paper pads that I own such as the bohemian bazaar from Graphic 45 sold at The Rubber Buggy and fussy cut the most interesting images. I then decide where to place them on a card and if I can adhere any flowers to add a little pizazz I will do that because I am the epitome of flowers anonymous.
Here is the card I created after fussy cutting the beautiful designs and the memories sign, I added a little ribbon, some flowers and presto....super simple but very lovely card for a friend or loved one. Thanks for looking have a great Thursday! ~Kelly

Here is the card I created after fussy cutting the beautiful designs and the memories sign, I added a little ribbon, some flowers and presto....super simple but very lovely card for a friend or loved one. Thanks for looking have a great Thursday! ~Kelly

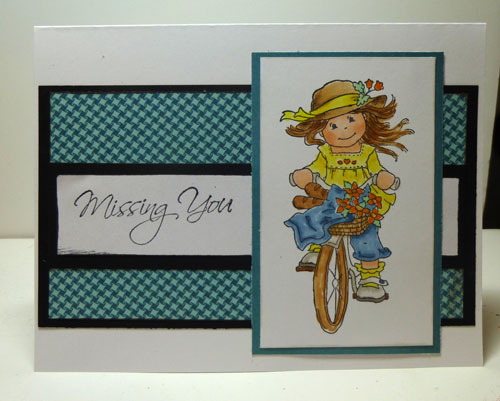
Missing You
Good morning Steph here with a fun Bildmalarma stamp today - Mimosa Picnic.
She was colored with assorted Copic Markers on Copic X-Press It Cardstock.
The pattern papers are from Graphic 45's Steampunk Spells, which is a fun collection of colors and designs.

Thank you for visiting.
She was colored with assorted Copic Markers on Copic X-Press It Cardstock.
The pattern papers are from Graphic 45's Steampunk Spells, which is a fun collection of colors and designs.
Thank you for visiting.
Tuesday, July 16, 2013
Layout by Pi
Hi everyone!
I wish to share a layout that I made with Magnolia paper. Love this paper, so fun and easy to make your own. Here I have stamped and splattered to make is more personal. And the wood grain has a beautiful white colour which makes it so easy to coordinate with colors and seasons :)
.JPG)
Products used from the store:
Magnolia new england wood paper 12x12
Magnolia tag die
Magnolia love background stamp
Graphic 45 paper 8x8 (this collection is the olde curiosity shoppe)
Graphic 45 french country stamp set #3
Graphic 45 packaging from metal brads
Spellbinders postage stamp nestabilities
Thank you for visiting!
Hugs!
Pi
I wish to share a layout that I made with Magnolia paper. Love this paper, so fun and easy to make your own. Here I have stamped and splattered to make is more personal. And the wood grain has a beautiful white colour which makes it so easy to coordinate with colors and seasons :)

Products used from the store:
Magnolia new england wood paper 12x12
Magnolia tag die
Magnolia love background stamp
Graphic 45 paper 8x8 (this collection is the olde curiosity shoppe)
Graphic 45 french country stamp set #3
Graphic 45 packaging from metal brads
Spellbinders postage stamp nestabilities
Thank you for visiting!
Hugs!
Pi
Sunday, July 14, 2013
Magnolia card with Tilda masking scene & washi tape
Hi all it's Deb here & today I'm showing a Magnolia scene card using 3 stamps - Tilda with egg & chicken, Stone Path & a great little wishing well background stamp by Pixie cottage.
Masking Technique:
First stamp Tilda, then cover her with a mask (to create a mask you need to stamp Tilda onto a scrap piece of paper and cut her out, then place directly over the origional image as a 'mask'), stamp the wishing well, repeat the masking process for the wishing well & with both masks in place then stamp the Stone Path.

I added 3 strips of washi tape to overlap the cards edges - Press the end sections that overlap the edges onto a piece of material several times untill the adhesive has been removed, this will also help them to curl back slightly.
Image has been coloured with Distress Inks & highlighted with Crystal Glamour Dust. Paper edges have been inked with Walnut Stain using a blending tool then sewn on the machine.

Distress Inks:
Skin - Tattered Rose, Vintage Photo shading with Walnut Stain
Cheeks - Tattered Rose mixed with Aged Mahogony
Hair - Antique Linen, Walnut Stain shading with Pumice Stone & Black Soot
Dress & Boots - Pumice Stone
Bird - Whethered Wood & Pumice Stone
Wishing Well - Whethered Wood, Pumice Stone shading with Blac Soot
Grass & leaves - Shabby Shutters, Bundled Sage
Highligted with White Sakura Pen-Touch & Crystal Glamour Dust

Suggestions for Rubber Buggy Products:
Thank you for visiting
Friday, July 12, 2013
Doo Bee Pop Tilda
Hi Everyone!!! Dawn here on this fabulous Friday with my post for The Rubber Buggy, to show you some more inspiration using some wonderful stamps and products from the Store.
Today I made a card using the stamp "Doo Bee Pop Tilda" from the Special Moments
Collection. My DP is from the Graphic 45 Secret Garden paper pad.

See you all back next Friday with some more inspiration. Check out the challenge blog for an awesome challenge, we'd love to see you participate.
Happy Stamping!!!!!
Thursday, July 11, 2013
Bohemian bazaar sign
Hi my crafty friends. I was asked to do a sign for a
cosmetics counter of our local mall where they are having a fragrance
summer event and they needed a very hawaiian luau style sign and what
better thing to choose than the beautiful flip flop that I so love to do
and have done many this year. This one is a bit different as it is 12
inches high; about 8 inches taller than the other ones but it was more
fun to do. I drew the template out myself and started with a basic
cardstock base then adhered the Bohemian Bazaar paper from The Rubber Buggy that
I received in my design team package. The other embellishments came
from either my stash or MBT. I love how the flip flop turned out and I
added the mat for the sign we just weren't sure how they wanted to word
it yet so there is no wording there for that reason.


If you are looking for a bright summer paper that is bold and vibrant for any layout or crafty need then this is the paper for you!
Thanks for looking have a great day! ~Kelly Dt The Rubber Buggy

If you are looking for a bright summer paper that is bold and vibrant for any layout or crafty need then this is the paper for you!
Thanks for looking have a great day! ~Kelly Dt The Rubber Buggy
Wednesday, July 10, 2013
Dino Love
Good morning everyone, Steph here today with a new Whimsey Stamp that I just adore! She is called Autumn Happiness.
She is, of course, colored with an assortment of Copic Markers after being stamped on Copic X-Press It Cardstock. Graphic 45's French Country 6" x 6" paper pad had the perfect papers for the backdrop.


Thank you for visiting.
Tuesday, July 9, 2013
Hi everyone!
It's Pi again!
If you follow me you'll know that I could not resist the project life trend :)
Last week I showed you how you could make your own project life kit with just a paper trimmer and a corner punch with Prima almanac collection for the rubber buggy.
This week I will show you how you can continue even further with some addition of stamps and bling.

Again I've used some digital prints to embellish the paper from Prima Divine on the outer two 3x4 cards. I then stamped sentiments on the top right corner, down left corner and the "lucky me". Just as I did last week - I once again fussy cut elements from the collection and made small banners. I used the washi tape from the divine collection as well. On the bottom right corner I used some bling as well :)
The only card that is left untouched is the 3x4 with tiles - that one has only rounded corners.
I hope you try it yourself:)
Thank you for visiting!
It's Pi again!
If you follow me you'll know that I could not resist the project life trend :)
Last week I showed you how you could make your own project life kit with just a paper trimmer and a corner punch with Prima almanac collection for the rubber buggy.
This week I will show you how you can continue even further with some addition of stamps and bling.
Again I've used some digital prints to embellish the paper from Prima Divine on the outer two 3x4 cards. I then stamped sentiments on the top right corner, down left corner and the "lucky me". Just as I did last week - I once again fussy cut elements from the collection and made small banners. I used the washi tape from the divine collection as well. On the bottom right corner I used some bling as well :)
The only card that is left untouched is the 3x4 with tiles - that one has only rounded corners.
I hope you try it yourself:)
Thank you for visiting!
Sunday, July 7, 2013
'Tilda Hiding Heart' Magnolia card by Deb.x
Morning all & hope you are all having a good weekend - the whether is just glorious here in Manchester (for a change) so enjoying this heat wave whilst it lasts!
Today I am going to share this lovely Magnolia card I made using this ever so cute 'Tilda hiding heart' image from the 'With Love '13' collection. Thie image topper has been die cut with Spellbinders Nestabilities Ovals die & sits on a Spellbinders Floral Ovals die cut from Core'dinations cardstock. 2 Magnolia Doo Hickey Vintage tag dies tucked underneath image to the top right.

Scrummy papers are by Maja Design & edges have been inked with Tim Holtz Distress Ink in Antique Linen then Walnut Stain using a blending tool, I then added stiches with a sewing machine. Image has been coloured with Distress Inks on Langton extra smooth watercolour paper.

Distress Inks:
Skin - Tattered Rose, Vintage Photo with Walnut Stain & Black Soot shading
Cheeks - Tattered Rose mixed with Aged Mahogony
Hair - Antique Linen & Walnut Stain with Black Soot shading
Dress - Spun Sugar & Victorian Velvet with Pumice Stone & Black Soot shading
Heart, bow & shoes - Pumice Stone & Black Soot
Highlights - Whtie Sakura Pen-Touch
Glitter -Crystal Glamour Dust

Sentiment stamp by LOTV on Spellbinders fancy tag 3 die cut from kraft cardstock & covered in Picket Fence Crackle Paint.

Magnolia Doo Hickey |Lovely Fence die cut from Core'dinations cardstock, shaped & highlighted with Picket Fence Crackle Paint.
Suggestions for Rubber Buggy Products:
Thank you for visiting
Friday, July 5, 2013
Love Love Tilda
Hi Everyone!!! Dawn here on this fabulous Friday with my post for The Rubber Buggy, to show you some more inspiration using some wonderful stamps and products from the Store.
Today I made a card using the stamp "LOVE LOVE LOVE TILDA" from the Special Moments
Collection. My DP is from the Graphic 45 Secret Garden paper pad.

See you all back next Friday with some more inspiration. Check out the challenge blog for an awesome challenge, we'd love to see you participate.
Happy Stamping!!!!!
Wednesday, July 3, 2013
G45 French country recipe album front
Hi everyone and Happy 4th of July! It's Kelly here with a fun dt project to share with you. I know most people are seeing red, white & blue but I decided to do something a little different for my design team project and it's a front page to a recipe album that I am working on. I used the French Country collection from The Rubber Buggy and I fussy cut some of the elements out and adhered the Good Food alphabet stickers on the front. Then I added the cute little ball diecut from my stash along with some twine which you can find at the store and adhered it as well and it makes a cute album cover for my recipes that I will hold some great dining items for the 4th of July. I wish you all a very Happy 4th if you celebrate and many blessings to all who have served for our freedoms!!!

Thank you for visiting, ~Kelly

Thank you for visiting, ~Kelly
Party, Party
Hi everyone, Steph here today.
I am using the new Bo Bunny Anthem Paper Pad. I loved the design of this paper and wanted to create a card around the design. Trimming it slightly, I added it to the front of my card and trimmed the card to match the design of the paper. I felt it would be perfect to use with Amy, a Wee Whimsey stamp. She is in the party mood and the paper is screaming party time.

Amy was stamped on Copic X-Press It Cardstock and then colored with Copic Markers:
Skin Tones
Pale Pastels
Perfect Primaries

I used some Ranger Antique Linen Distress Ink around the edges of the card.
Thank you for visiting.
Steph
Tuesday, July 2, 2013
Don't be afraid to try project life
Hi everyone!
I have a little different DT-post for you today. Instead of a card of a layout I wanted to show you how you easily can make your own project life kit.
Yes, I got sucked right in to this trend and I love the feeling of achivement even though you've barely finished a quater of the spread - LOL! I also caved in and bought a Becky Higgings core kit which is wonderful. But as I was thinking... One could just cut paper, round the corners and make these pocket fillers yourself.

So here I'm showing you a set with the Prima Almanac which you can find at The Rubber Buggy.
I've just cut the 6x6 paper in order to fit 4x6 and 3x4 pockets, rounded the corners and embellished them with cut outs from the element sheet in the paper. If you want a printed card there are lots of free downloads on the net, just google "project life downloads and print on designer paper. See the upper left 6x4 and the outer 3x4 for printables.

Apart from the second 3x4 from the left everything has been embellished with cut outs from the same paper pad as the rest of the paper. I've only used glue and TH tiny attacher to fastned them so all of this came together really fast.


Please, join me again next week at The Rubber Buggy were I will show you a spread of project life with Prima Divine paper pad.
Hugs!!!
//Pi
Thank you for visiting
I have a little different DT-post for you today. Instead of a card of a layout I wanted to show you how you easily can make your own project life kit.
Yes, I got sucked right in to this trend and I love the feeling of achivement even though you've barely finished a quater of the spread - LOL! I also caved in and bought a Becky Higgings core kit which is wonderful. But as I was thinking... One could just cut paper, round the corners and make these pocket fillers yourself.
So here I'm showing you a set with the Prima Almanac which you can find at The Rubber Buggy.
I've just cut the 6x6 paper in order to fit 4x6 and 3x4 pockets, rounded the corners and embellished them with cut outs from the element sheet in the paper. If you want a printed card there are lots of free downloads on the net, just google "project life downloads and print on designer paper. See the upper left 6x4 and the outer 3x4 for printables.
Apart from the second 3x4 from the left everything has been embellished with cut outs from the same paper pad as the rest of the paper. I've only used glue and TH tiny attacher to fastned them so all of this came together really fast.
Please, join me again next week at The Rubber Buggy were I will show you a spread of project life with Prima Divine paper pad.
Hugs!!!
//Pi
Thank you for visiting
Monday, July 1, 2013
Sending You Lots of Hugs
Hello everyone!
Indah here again. I hope you had a great weekend. I am here to show you a card I made using Magnolia's Roller Tilda.

Hope you like it! Thank you for visiting!
Indah here again. I hope you had a great weekend. I am here to show you a card I made using Magnolia's Roller Tilda.

I colored her using Copic markers then popped her up using some foam tape.
Subscribe to:
Posts
(Atom)


