Monday, February 29, 2016
Wedding page using Lemon Craft House of Roses

Hi Bev here today at The Rubber Buggy. I created this page using the LGS sketch below. I thought I'd share our wedding photo but printed it in black n white. I used my products from The Rubber Buggy with the beautiful flowers and accents. It was perfect for a wedding page.

Supply List:
The Rubber Buggy Products
Paper: Lemon Crafts House of Roses
Accents: Lemon Crafts button
Chipboard: Blue Fern Studios Deja Vu border
Markers: Copics
Ink: Tim Holtz ranger
Stamp: Blue Fern Studio Halftone
Circle Cutter: Kreaxions
Twine: Bella Creations Timeless twine
Other: stickles, pen

In the close ups you get a better view of the clusters, layers and details. This cluster has a stamp, circular label accents and butterflies.

This details the fun tag with circles and twine tied... a stamped image with additional circular accent and to the left a floral cluster fussy cut and inked.

Under the photo is a fabulous copic coloured chipboard, and a great cluster with journal card, circle, button, stamp image and fussy cut floral.

Here is a view of the central section with all the amazing clusters and accents all to showcase the black and white layered photo.


Thanks for viewing today... come back weekly to view more projects using The Rubber Buggy products.... all which are amazing.. be sure to check out the store.

Sunday, February 28, 2016
Heartfelt Creations Classic Sunflower Collection Mini Album with video

Today on The Rubber Buggy I am sharing a Mini Album created for my dear Friend Cathy using the Heartfelt Creations Classic Sunflower Collection. What an amazing collection. A great mix of colours, accents, tags and so many ways to use them.. alone or together.
Supply List:
The Rubber Buggy Products
Paper: Heartfelt Creations - Classic Sunflower Collection
Chipboard: Blue Fern Studio Grid Pieces
Markers: Copics
Ink: Tim Holtz ranger
Blending Tools: Tim Holtz
Album Base: A Little Yellow Bicycle Album
Glue: 3 in 1 Beacon
Other: ribbons, stickles, metal charms, dew drops, doilies,
burlap accents, flowers
The Rubber Buggy Products
Paper: Heartfelt Creations - Classic Sunflower Collection
Markers: Copics
Ink: Tim Holtz ranger
Blending Tools: Tim Holtz
Album Base: A Little Yellow Bicycle Album
Glue: 3 in 1 Beacon
Other: ribbons, stickles, metal charms, dew drops, doilies,
burlap accents, flowers
Enjoy the video for some great tips to making your mini albums too.
Here are some extra photo shots for your viewing to see more details of pages in the album and also some that showcase the finishing touches to a page.

First you start with you base. Mine is a Little Yellow Bicycle started album.

Start by covering each page by tracing on the back side, cutting and gluing down.

All glued down especially on the outer edges.

I prefer to lay the pages out in doubles to flow left to right.

Here is each page ups close finished. Dig into the collection for accents and then some from your stash. This one has fussy cut flowers, chipboard, and glitter using stickles.

This page has a border, matted photo and dew drop accents.

This page has fussy cut butterfly flourishes popped up, a ticket and framed photo.

Lots of different papers mixed together across centre to create a base for the photo. An added bow and ribbon accent.

Circles dominate this page along with a doily which is circular also. I added a base border, a bow and some stickles for glitter.

This page boasts a matted tag and more tag accents from my stash on top of it along with a title cut from the collection.

This side has a cardstock strip border, an upper and lower shield from papers, ticket accent with some small tags along with the fun burlap flowers.

The colour on this page was generated by using a frame paper and making it fit. The photo is double matted and a small floral cluster.

Starting with a strip of burlap and a boarder.. the circular frame for the photo and small floral accents I added some stickles and a ripped piece of accent paper.

The back cover has burlap accents below the matted floral journal card. A small floral cluster with some tags and a touch of stickles for glitter completed the album pages.
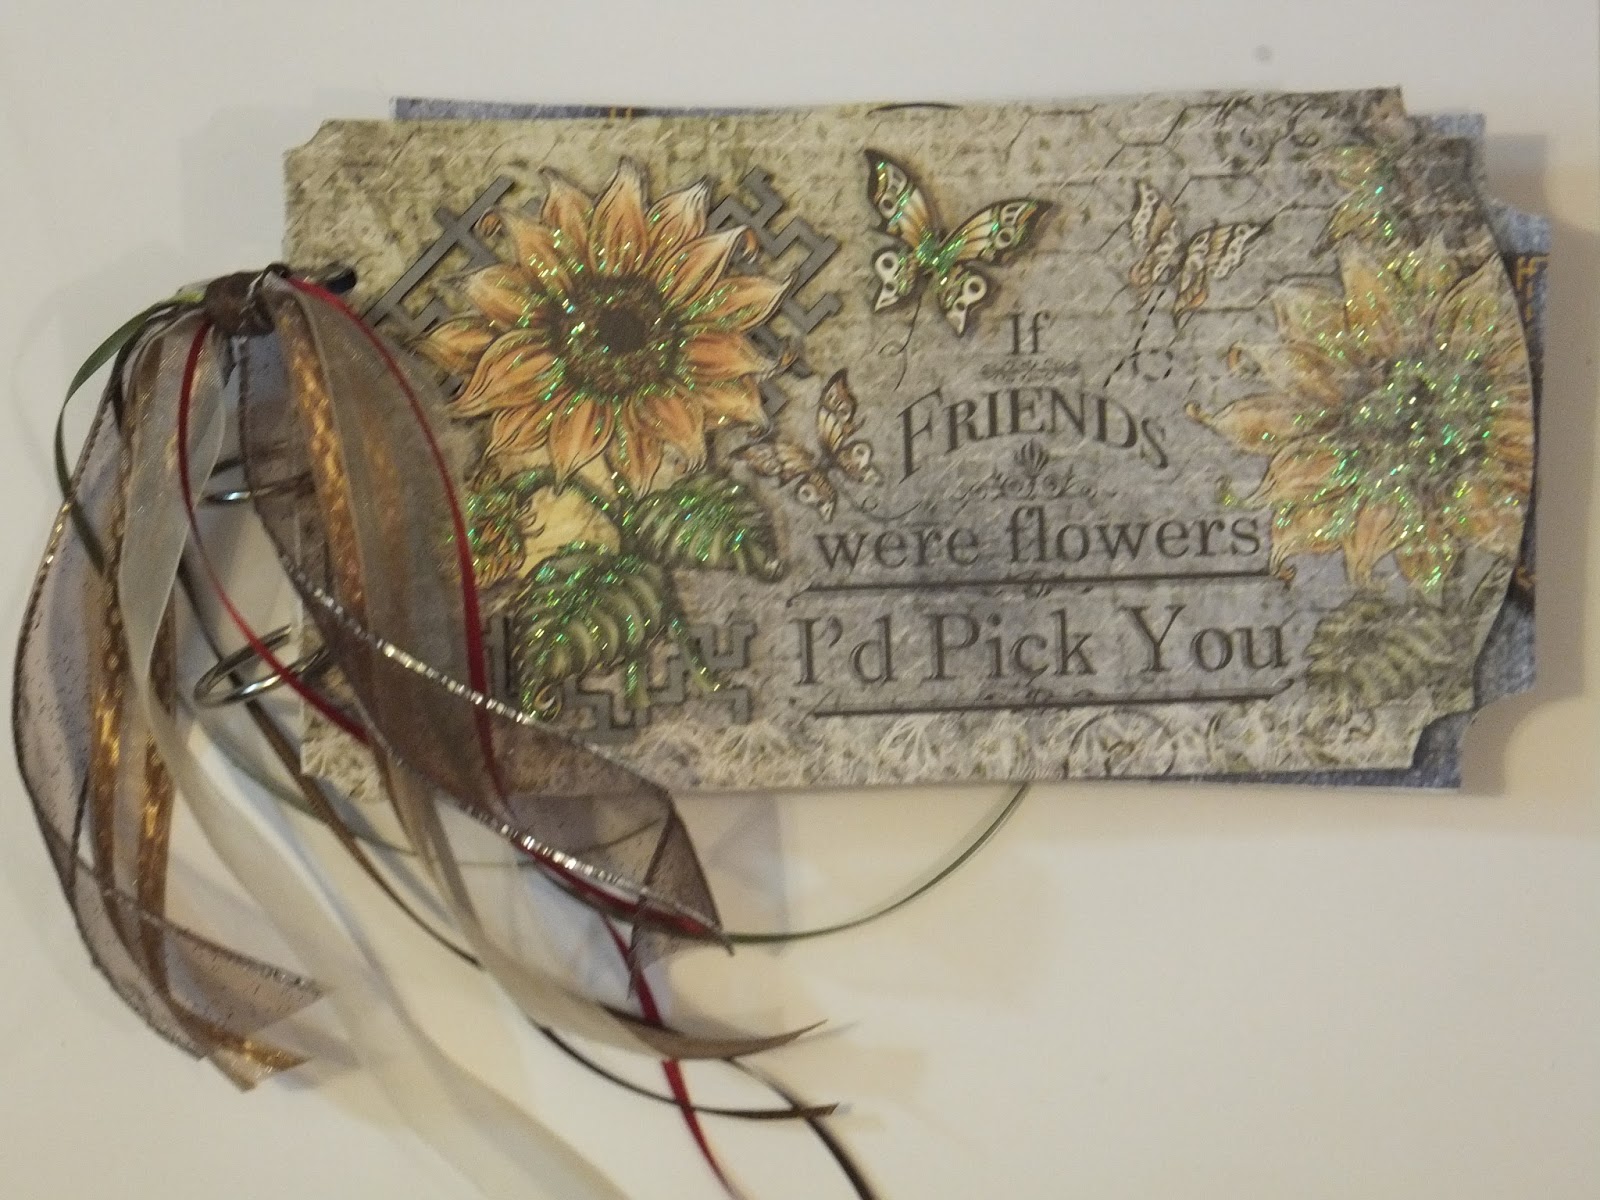
Add the rings, and tie off with multiple ribbons using matching colours.
Below are Instructions for you to print and follow when your ready to make you very own mini album.
*******************************************
Instructions: Start by picking your base backgrounds for your mini album. Pull together lots of papers that mix and match, some collection accents, borders, cards, tags etc. and then some added pieces from your stash. Choice some photos also... set all these things aside until you decide on the papers to cover each page of the album. You will have a front and back cover with double pages in between. Most times it’s best to choose double page match up colours so they have a flow from left to right. If you have specific photos to order lay them out to help pick papers to match your photos. Each album page whether plain or shaped will be hand drawn on the back side of paper to hand cut the pattern (usually cutting off just inside the pencil mark). When gluing pages to the chipboard shape be sure to glue to edges put not so much that it oozes out. Spread some throughout the centre and be sure to get glue where the punched out circles are marked so they hold firmly when punched out. This is the most important part... so the edges don’t pull away over time. Once you have separately done each double page, glued firmly and they are done... it’s now time to layout the photos, layers of papers and accents for each page. When all the pages are done… do a review and if they need a touch more of something you can reassess the use of accents, stickles to add sparkle, add more of some of the standard accents like borders, mats, tags, bows, brads, gemstones, doilies, twine, flowers and anything that suits each album page. The last thing is to add the stickles and lay each side out to fully dry before doing the other side. You must be patient when using stickles. Some accents can be popped up but don’t overdo it because if it’s too thick it won’t lay flat enough to display on your tables for viewing. Add the metal rings to bind it together and for accent… tie multi coloured ribbons onto the top ring.
Instructions: Start by picking your base backgrounds for your mini album. Pull together lots of papers that mix and match, some collection accents, borders, cards, tags etc. and then some added pieces from your stash. Choice some photos also... set all these things aside until you decide on the papers to cover each page of the album. You will have a front and back cover with double pages in between. Most times it’s best to choose double page match up colours so they have a flow from left to right. If you have specific photos to order lay them out to help pick papers to match your photos. Each album page whether plain or shaped will be hand drawn on the back side of paper to hand cut the pattern (usually cutting off just inside the pencil mark). When gluing pages to the chipboard shape be sure to glue to edges put not so much that it oozes out. Spread some throughout the centre and be sure to get glue where the punched out circles are marked so they hold firmly when punched out. This is the most important part... so the edges don’t pull away over time. Once you have separately done each double page, glued firmly and they are done... it’s now time to layout the photos, layers of papers and accents for each page. When all the pages are done… do a review and if they need a touch more of something you can reassess the use of accents, stickles to add sparkle, add more of some of the standard accents like borders, mats, tags, bows, brads, gemstones, doilies, twine, flowers and anything that suits each album page. The last thing is to add the stickles and lay each side out to fully dry before doing the other side. You must be patient when using stickles. Some accents can be popped up but don’t overdo it because if it’s too thick it won’t lay flat enough to display on your tables for viewing. Add the metal rings to bind it together and for accent… tie multi coloured ribbons onto the top ring.
Thanks for stopping by today.. see you again soon.

Friday, February 26, 2016
Birthday Card with Avery Elle!
Hi everyone!!
Noe here as every Friday... Have you seen all new brands that can be found now in the store? Kellie has brought one of my favorite brands ... Avery Elle !! I love their stamps and coordinated dies for my all projects!

Supply List:
Thank you for visiting
Noe here as every Friday... Have you seen all new brands that can be found now in the store? Kellie has brought one of my favorite brands ... Avery Elle !! I love their stamps and coordinated dies for my all projects!

Supply List:
- Ellie Avery Elle Clear Stamps
- Elle Die Avery Elle Elements
- Crazy Talk Tim Holtz Rubber Stamp
- Spectrum Noirs
- Distress Watercolor Cardstock
- Ranger Archival Ink Pad Jet Black
Thank you for visiting
Thursday, February 25, 2016
Thinking of You
Hi everyone, Steph Ackerman here on this damp and dreary Thursday. Hey, at least it's not snowing!

Have you seen the amazing papers and chipboard elements available in the store from Blue Fern Studios? The papers are amazing with their colors and textures and are quite a heavy stock.

I chose to use papers from the Serendipity collection, fussy cutting the elements I wanted to use on my card. This section was matted with Bazzill cardstock and then added to the card with Scrapbook Adhesives foam squares for dimension. Love this look.

Thank you for visiting.
Steph

Have you seen the amazing papers and chipboard elements available in the store from Blue Fern Studios? The papers are amazing with their colors and textures and are quite a heavy stock.

I chose to use papers from the Serendipity collection, fussy cutting the elements I wanted to use on my card. This section was matted with Bazzill cardstock and then added to the card with Scrapbook Adhesives foam squares for dimension. Love this look.

I tucked "thinking of you" amongst the fussy cut image.
Thank you for visiting.
Steph
Tuesday, February 23, 2016
Lawn Fawn garden
Hi everyone!
Pi here with a fun project.
This was actually my husband's idea. He recently planted some seeds and asked me to make him some signs to keep track of what's what.

I added some color by swiping the ink pad om my craft mat and then added water with a watercolor brush. I choose watercolor paper and archival ink because of the risk of water splashes. The signs was then glued to a coffee stick that I had cut in half.

That's really it, super easy!
Products from The Rubber Buggy:
Lawn Fawn stamp set Milo's ABC
Lawn Fawn ink Sunflower
Lawn Fawn ink Mermaid
Lawn Fawn ink Freshly cut grass
Archival ink jet black
Watercolor paper
Thank you for visiting!
Monday, February 22, 2016
An Autumn Story with Maja Design Enjoying Outdoors

Hi it's Bev here today at The Rubber Buggy with this fun page. It is created using 6x6 paper pad and chipboard... and mixing them together for a great layout .. and copic colouring makes matching colours perfect. This is my youngest Grand Daughter and a collage of fall photos. The colour combo was perfect together.. I added the fun matted tag with bead accents One photo is mated circular and the other fits the chipboard frame.. it's awesome.
Supply List:
Paper: Maja Design Enjoying Outdoors
Chipboard: Blue Fern Studios An Autumn Story, Mod Squares
Markers: copics
Other: paint, Stencil, beads, CS

The close ups allow you see the details better ... What fun layers with paint splatter and stenciling... and look at the great copic coloured chipboard that fit the photo.

More details showing the fabulous background.. and OMG the title is perfect. The accent pieces were a perfect match for this page... and a touch of bead bling is awesome.


Thanks for joining us today.. be sure to come back again.

Friday, February 19, 2016
Crazy Cats!
Hi everyone!!
Today I come to show a card in which I used Crazy Cats stamps that I fell in love as soon as I saw them ... they are so cute !! And so funny !!

I painte background and stamp using Distress inks and water brush.
Products used:

Thank you for visiting
Today I come to show a card in which I used Crazy Cats stamps that I fell in love as soon as I saw them ... they are so cute !! And so funny !!

I painte background and stamp using Distress inks and water brush.
Products used:
- Crazy Cats Tim Holtz Rubber Stamps
- Tim Holtz Water Brush Detailer Tip
- Distress Inks
- Distress Watercolor Cardstock

Thank you for visiting
Thursday, February 18, 2016
Hockey Birthday Card
Hi everyone, Steph Ackerman here on this very cold and snowy Thursday.
Do you have a family member or friend who loves hockey? Well, how about a hockey birthday card?

The image is Hockey from Stamping Bella and I colored it with assorted Copic Markers.


How about coloring the jersey with your favorite team colors?
Thanks for stopping by today.
Steph
Thank you for visiting
Do you have a family member or friend who loves hockey? Well, how about a hockey birthday card?

The image is Hockey from Stamping Bella and I colored it with assorted Copic Markers.

After fussy cutting the image, I adhered it to the Kaiser Hip Hip Happy Birthday stamp and matted them with cardstock.

Thanks for stopping by today.
Steph
Thank you for visiting
Tuesday, February 16, 2016
Happy birthday card with Lawn Fawn
Hi everyone!
Pi here and I'm here with a happy birthday scene created with Lawn Fawn stamps.

The scripty sayings clearstamps are so narrow and thin, you can easily manipulate them in any shape you'd like to - almost. A slight curve is no problem though.
The scene is made by masking it with a post-it note. I just cut a slope with my scissors, but you could use the hillside dies from Lawn Fawn as well. I only used on distress ink for the ground as well for the sky, just making it more or less intense by going over it randomly with my ink blender tool.
The trees are stamped with fisrt generetion stamping and double stamping, instead of second generation stamping as that turned out to be too light.
Products used from The Rubber Buggy store:
Lawn Fawn 12x12 Let's Polka paper
Lawn Fawn Snow day stamp set (bunnies)
Lawn Fawn Toboggan together stamp set (trees)
Distress ink Bundled sage
Distress ink Tumbled glass
Stamping supplies (acrylic block, memento tuxedo black ink, distress ink blending tool, double sided tape, neenah solar white cardstock)
Thank you for visiting!
Monday, February 15, 2016
Lemon Craft House of Roses - Family

Hi.. it's Bev here at The Rubber Buggy today I am sharing a fun page that started with a black background and the Turtle Soup sketch challenge for today. My favourite thing to scrap is family.. especially when it's a full family group photo. Celebrating with family is fun and we enjoy our time together.

Supply List:
The Rubber Buggy Products
Paper: Lemon Craft House of Roses
Accents: Lemon Craft buttons and labels 1
Chipboard: Blue Fern Studios Mod Squares
Marker: Copics
Other: paint, mesh, signo white gel pen, alpha stickers, black pen
Accents: Lemon Craft buttons and labels 1
Chipboard: Blue Fern Studios Mod Squares
Marker: Copics
Other: paint, mesh, signo white gel pen, alpha stickers, black pen

In the extra photo shots you can view more details. Here you see the background splatter and doodled circles along with the great clustered upper corner.

Following the sketch we have the main core layers with circles, strips and added button accents, some mesh and a matted photo. Lots of great colours, shapes and textures.

In this section is a great label, title and the great mod squares are multi coloured using copic markers.


Subscribe to:
Posts
(Atom)


