Showing posts with label Avery Elle. Show all posts
Showing posts with label Avery Elle. Show all posts
Tuesday, September 11, 2018
Dashing through the Snow

Hi Everyone it's Jennifer here with this Sweet Card using this
Cute Polar Bear and Rabbit. I have created a mountain scene in side
the shaker and Distress Inked the Sky with Dusty Concord. I also got to use
these really Gorgeous New papers from Lawn Fawn.


Bazzill


I hope you all have a Great Crafting Week
Jennifer
Tuesday, August 15, 2017
Oh Joy

Hi's Jennifer here and this week I have created a card using
the Moose from the Avery Elle - Snow Much Fun Stamp Set .
the Moose from the Avery Elle - Snow Much Fun Stamp Set .
It is also avaliable in Avery Elle - Snow Much Fun Die Set
You will remember I used this stamp set with the Polar Bear and Rabbit.
I stamped out my image with LF Jet Black Ink and coloured it
in Copics. I made a white base and layered it in red cardstock.
You will remember I used this stamp set with the Polar Bear and Rabbit.
I stamped out my image with LF Jet Black Ink and coloured it
in Copics. I made a white base and layered it in red cardstock.

I first cut 3 LF 4 Bar Small Stitched Rectangles
2 in white and 1 velumn in Cardstock.1 white rectangle I
cut the two snow slopes out off. LF Stitched Hillside Border Dies.
I taped down the first rectangle then the first slope I cut on top.
Then I scattered some trees from LF Snow Day
cut the two snow slopes out off. LF Stitched Hillside Border Dies.
I taped down the first rectangle then the first slope I cut on top.
Then I scattered some trees from LF Snow Day

I then used 3D Foam squares to attach the velumn with
embossed white snowflakes from LF Frosty Fairy Friends.

I then added another slope and more trees.To finish off
I used LF Big Scripty Words, Stamp and Dies Oh Joy
and scattered some sequins.

All these products and more are available at the
The Rubber Buggy Shop and don't forget to visit us on Facebook
Rubber Buggy Design Team Blog where there's a post nearly
everyday from one of the team.
Happy Crafting
Jennifer
Tuesday, August 8, 2017
Maggie and her Penguin

Hi it's Jennifer here and today I was going to do a Moose
Card from the Snow Much Fun Stamp Set but I really
wanted to colour up a Girl so I found this Adorable Girl
Mo-Manning - Maggie with a Penguin by Stamping Bella.
I coloured her up with
Copics
Face - E0000, E000, E00, E01, E11, R20
Dress - R32, R35, R37, R39, R59
Hat, Mittons, Tights -YR11, G21, G61, G63
Hair - E33, E25, E27
Penguin, Boots - W3, W5, W7, W9
Penguin Tummy - BG0000, B000
Penguin Beak - Y18, YR16

I then used my favorite dies LF Fancy Scalloped Rectangle Stackables
using Red Bazzil I cut the first layer then the next two white layers I used
LF Large Stitched 4 Bar Rectangles and LF 4 Bar Small Stitched Rectangles.
In between each white layer I used 3D Foam Tape.
I fussy cut Maggie out and used the foam tape under her.
I also used a few sequins in clear, Red and Green for effect but
what would have been good would have been some Nuvo Drops in the
colours to match. I also finished her jumper up with some Dylusions
Dylusions White Pen. The Sentiment was stamped with LF Jet Black Ink
and cut out with LF Small Stitched 4 Bar Rectangles
Card from the Snow Much Fun Stamp Set but I really
wanted to colour up a Girl so I found this Adorable Girl
Mo-Manning - Maggie with a Penguin by Stamping Bella.
I coloured her up with
Copics
Face - E0000, E000, E00, E01, E11, R20
Dress - R32, R35, R37, R39, R59
Hat, Mittons, Tights -YR11, G21, G61, G63
Hair - E33, E25, E27
Penguin, Boots - W3, W5, W7, W9
Penguin Tummy - BG0000, B000
Penguin Beak - Y18, YR16

I then used my favorite dies LF Fancy Scalloped Rectangle Stackables
using Red Bazzil I cut the first layer then the next two white layers I used
LF Large Stitched 4 Bar Rectangles and LF 4 Bar Small Stitched Rectangles.
In between each white layer I used 3D Foam Tape.
I fussy cut Maggie out and used the foam tape under her.
I also used a few sequins in clear, Red and Green for effect but
what would have been good would have been some Nuvo Drops in the
colours to match. I also finished her jumper up with some Dylusions
Dylusions White Pen. The Sentiment was stamped with LF Jet Black Ink
and cut out with LF Small Stitched 4 Bar Rectangles

All these products and more are available at the
The Rubber Buggy Shop and don't forget to visit us on Facebook
Rubber Buggy Design Team Blog where there's a post nearly
everyday from one of the team.
Happy Crafting
Jennifer
Tuesday, August 1, 2017
Snow Much Fun

Hi's Jennifer here with a very cute slider card.
I have used the Avery Elle - Snow Much Fun Stamp Set .
It is also avaliable in Avery Elle - Snow Much Fun Die Set
I sure wish I had used this Fun set much sooner there is
some very cute Winter/ Christmas look animals in it.
I am guessing you will see another card from it very soon.
I stamped out my image with LF Jet Black Ink and coloured it
in Copics. I first cut 2 white LF 4 Bar Small Stitched Rectangles
and 1 grey in Cardstock.
So to make the Background I used Distress Ink Tumbled Glass
and Distress Ink Peacock Feathers blended and sprayed with
water and mopped off on 1 of the white rectangles. I then cut
out of the grey one LF Stitched Mountain Border. I used white
for the mountain tops but you could cut white cardstock cover
them in Glue and then in Glitter.
The last rectangle I cut the two snow slopes out of
LF Stitched Hillside Border Dies and added
a slider slope for the sledge using the LF Slide on Over Dies.
I finished it off using scattered Lawn Fawn Mini Snowflakes
and clear sprinkled Sequins.
I sure wish I had used this Fun set much sooner there is
some very cute Winter/ Christmas look animals in it.
I am guessing you will see another card from it very soon.
I stamped out my image with LF Jet Black Ink and coloured it
in Copics. I first cut 2 white LF 4 Bar Small Stitched Rectangles
and 1 grey in Cardstock.
So to make the Background I used Distress Ink Tumbled Glass
and Distress Ink Peacock Feathers blended and sprayed with
water and mopped off on 1 of the white rectangles. I then cut
out of the grey one LF Stitched Mountain Border. I used white
for the mountain tops but you could cut white cardstock cover
them in Glue and then in Glitter.
The last rectangle I cut the two snow slopes out of
LF Stitched Hillside Border Dies and added
a slider slope for the sledge using the LF Slide on Over Dies.
I finished it off using scattered Lawn Fawn Mini Snowflakes
and clear sprinkled Sequins.

Using one of the sentiments for the inside of the card
before I glued it in.

All these products and more are available at the
The Rubber Buggy Shop and don't forget to visit us on Facebook
Rubber Buggy Design Team Blog where there's a post nearly
everyday from one of the team.
Happy Crafting
Jennifer
Friday, September 16, 2016
Combining Differents Stamps Sets
Hi everyone!!
Have you tried to combine stamps completely different on your projects? Even those who have nothing to do in theme or style?
The card that I show below is about this... Here we go !!

I've combined until four stamps sets of different styles and brands!! Could you find each of them on my card?

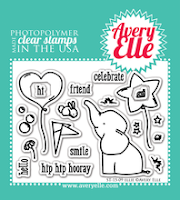
"Let´s Bokeh" was used for make the background and Ellie Elephant is easy to find!


Santa´s hat is from "You melt my heart" Stamp Set and the Sentiment is from "Holiday Greetings" Stamp Set.

Other products used in this card:
- Ellie Die
- Cross Stitched Frames Borders
- Candy Cane Stripes
- Crystal Drops Nuvo by Tonic Studios (in White and Antique Rose)
- Distress Inks Pads in differents colors
- Gold Embossing Powder

Hope you like!! Have a nice weekend!!

Thank you for visiting
Wednesday, July 13, 2016
Hello Chum

Hi Everyone this week I decided to do a Male Card using this Awesome
Stamp and Die Set Called Hello Chum .
I have Inked the backgrounds using Broken China, Chipped Sapphire and
Evergreen Bough. I have then sprayed Ranger Perfect Pearls
added to water over it to give a nice shine. Its very hard to photograph
the gorgeous shine which reflects off the sequins.

Copics used
C0, C01, C03, C05, C07, C09
R24, R27, R29
B23, B24, B26

This is the inside just to finish it off nicely.
Friday, March 11, 2016
B-Day Card (Black & Shine)
Hi everyone!!
Here Noe... First of all, I'm really sorry for not be able to publish my post last Friday as every Friday, I've been traveling and have not been unable to prepare a project on time! However, today I show a B-day Cardd with black background but very bright! Look!!

Products used from The Rubber Buggy Store:

Here Noe... First of all, I'm really sorry for not be able to publish my post last Friday as every Friday, I've been traveling and have not been unable to prepare a project on time! However, today I show a B-day Cardd with black background but very bright! Look!!

Products used from The Rubber Buggy Store:
- Ellie Avery Elle Clear Stamps
- Elle Die Avery Elle Elements
- Crazy Talk Tim Holtz Rubber Stamp
- Craft Medley Cup Sequins - Baby
- Gold Tinsel Ranger Embossing Powder
- Distress Watercolor Cardstock
- Ranger Archival Ink Pad Jet Black

Friday, February 26, 2016
Birthday Card with Avery Elle!
Hi everyone!!
Noe here as every Friday... Have you seen all new brands that can be found now in the store? Kellie has brought one of my favorite brands ... Avery Elle !! I love their stamps and coordinated dies for my all projects!

Supply List:
Thank you for visiting
Noe here as every Friday... Have you seen all new brands that can be found now in the store? Kellie has brought one of my favorite brands ... Avery Elle !! I love their stamps and coordinated dies for my all projects!

Supply List:
- Ellie Avery Elle Clear Stamps
- Elle Die Avery Elle Elements
- Crazy Talk Tim Holtz Rubber Stamp
- Spectrum Noirs
- Distress Watercolor Cardstock
- Ranger Archival Ink Pad Jet Black
Thank you for visiting
Subscribe to:
Posts
(Atom)


