Saturday, June 26, 2021
Graphic 45 Catch of The Day Scrapbook Fishing Page

I also used the Graphic 45 Catch of the Day journaling cards that comes in a variety of sizes in coastal themes that I used to frame my pictures. I just cut out the photos and glued these onto each of the journal cards.


I cut out the Catch of the Day with anchor and glued it to the blue wooden cardstock in this collection. I was able to match the lines of the wood and you won't be able to see the cut out. I also cut out the three images of stamps from this page and added the scrapbook.

I added the fish and starfish from the Stamperia Seaworld and first coated with black gesso and then brushed on Prima Marketing Redesign Brass wax along with the Prima Marketing Firebird wax. I adhered the moulds with Beacon 3-n-1 Advanced Glue.


I had another die set with a fishing pole, fish and bobbin that I cut out and adhered to the card. I added red/white and turquoise/white baker twine to the pictures. The top picture, I used one of the Graphic 45 Catch of the Day stickers that was in this paper packet.
So grab this gorgeous paper collection and have a fabulous crafting day and thanks for visiting.
The Rubber Buggy has the crafting supplies for your next project. So have fun crafting this weekend with these products. My cards and projects are always posted on Saturday. Keep watching and thank you so much for those wonderful comments as well as suggestions.
Enjoy and Happy Crafting!
 |
Thursday, June 24, 2021
Simple Stories Greeting Cards
Hi everyone, Steph Ackerman here today with lots of fun products from the store.


Have you seen the Simple Stories Simple Vintage Farmhouse Garden?

This collection has 24 double sided sheets of beautifully designed papers as well as 2 sheets of greeting card elements. I've created different sized cards using Pion Designs Pion Black cardstock.

I then mixed and matched the papers to create each card. The papers work extremely well together. All the layers were matted with Pion Black cardstock then placed on each card.

Finally, the greeting card elements were added to each card with EK Success 3D Dots for dimension. This collection has everything you need to create an assortment of cards.
Thank you for visiting.
Saturday, June 19, 2021
Stamperia Cosmos All Occasion Cards
Welcome back and Nancy, here to share my 'All Occasion" cards made with the gorgeous Stamperia Cosmos. So often, we need to make a few cards a head of time that could be used for almost any occasions. I have a lot of out doorsy family and friends. The Stamperia Cosmos paper collection with animals and birds in the nature with the natural blues and woodsy paper make for gorgeous projects and cards for them.

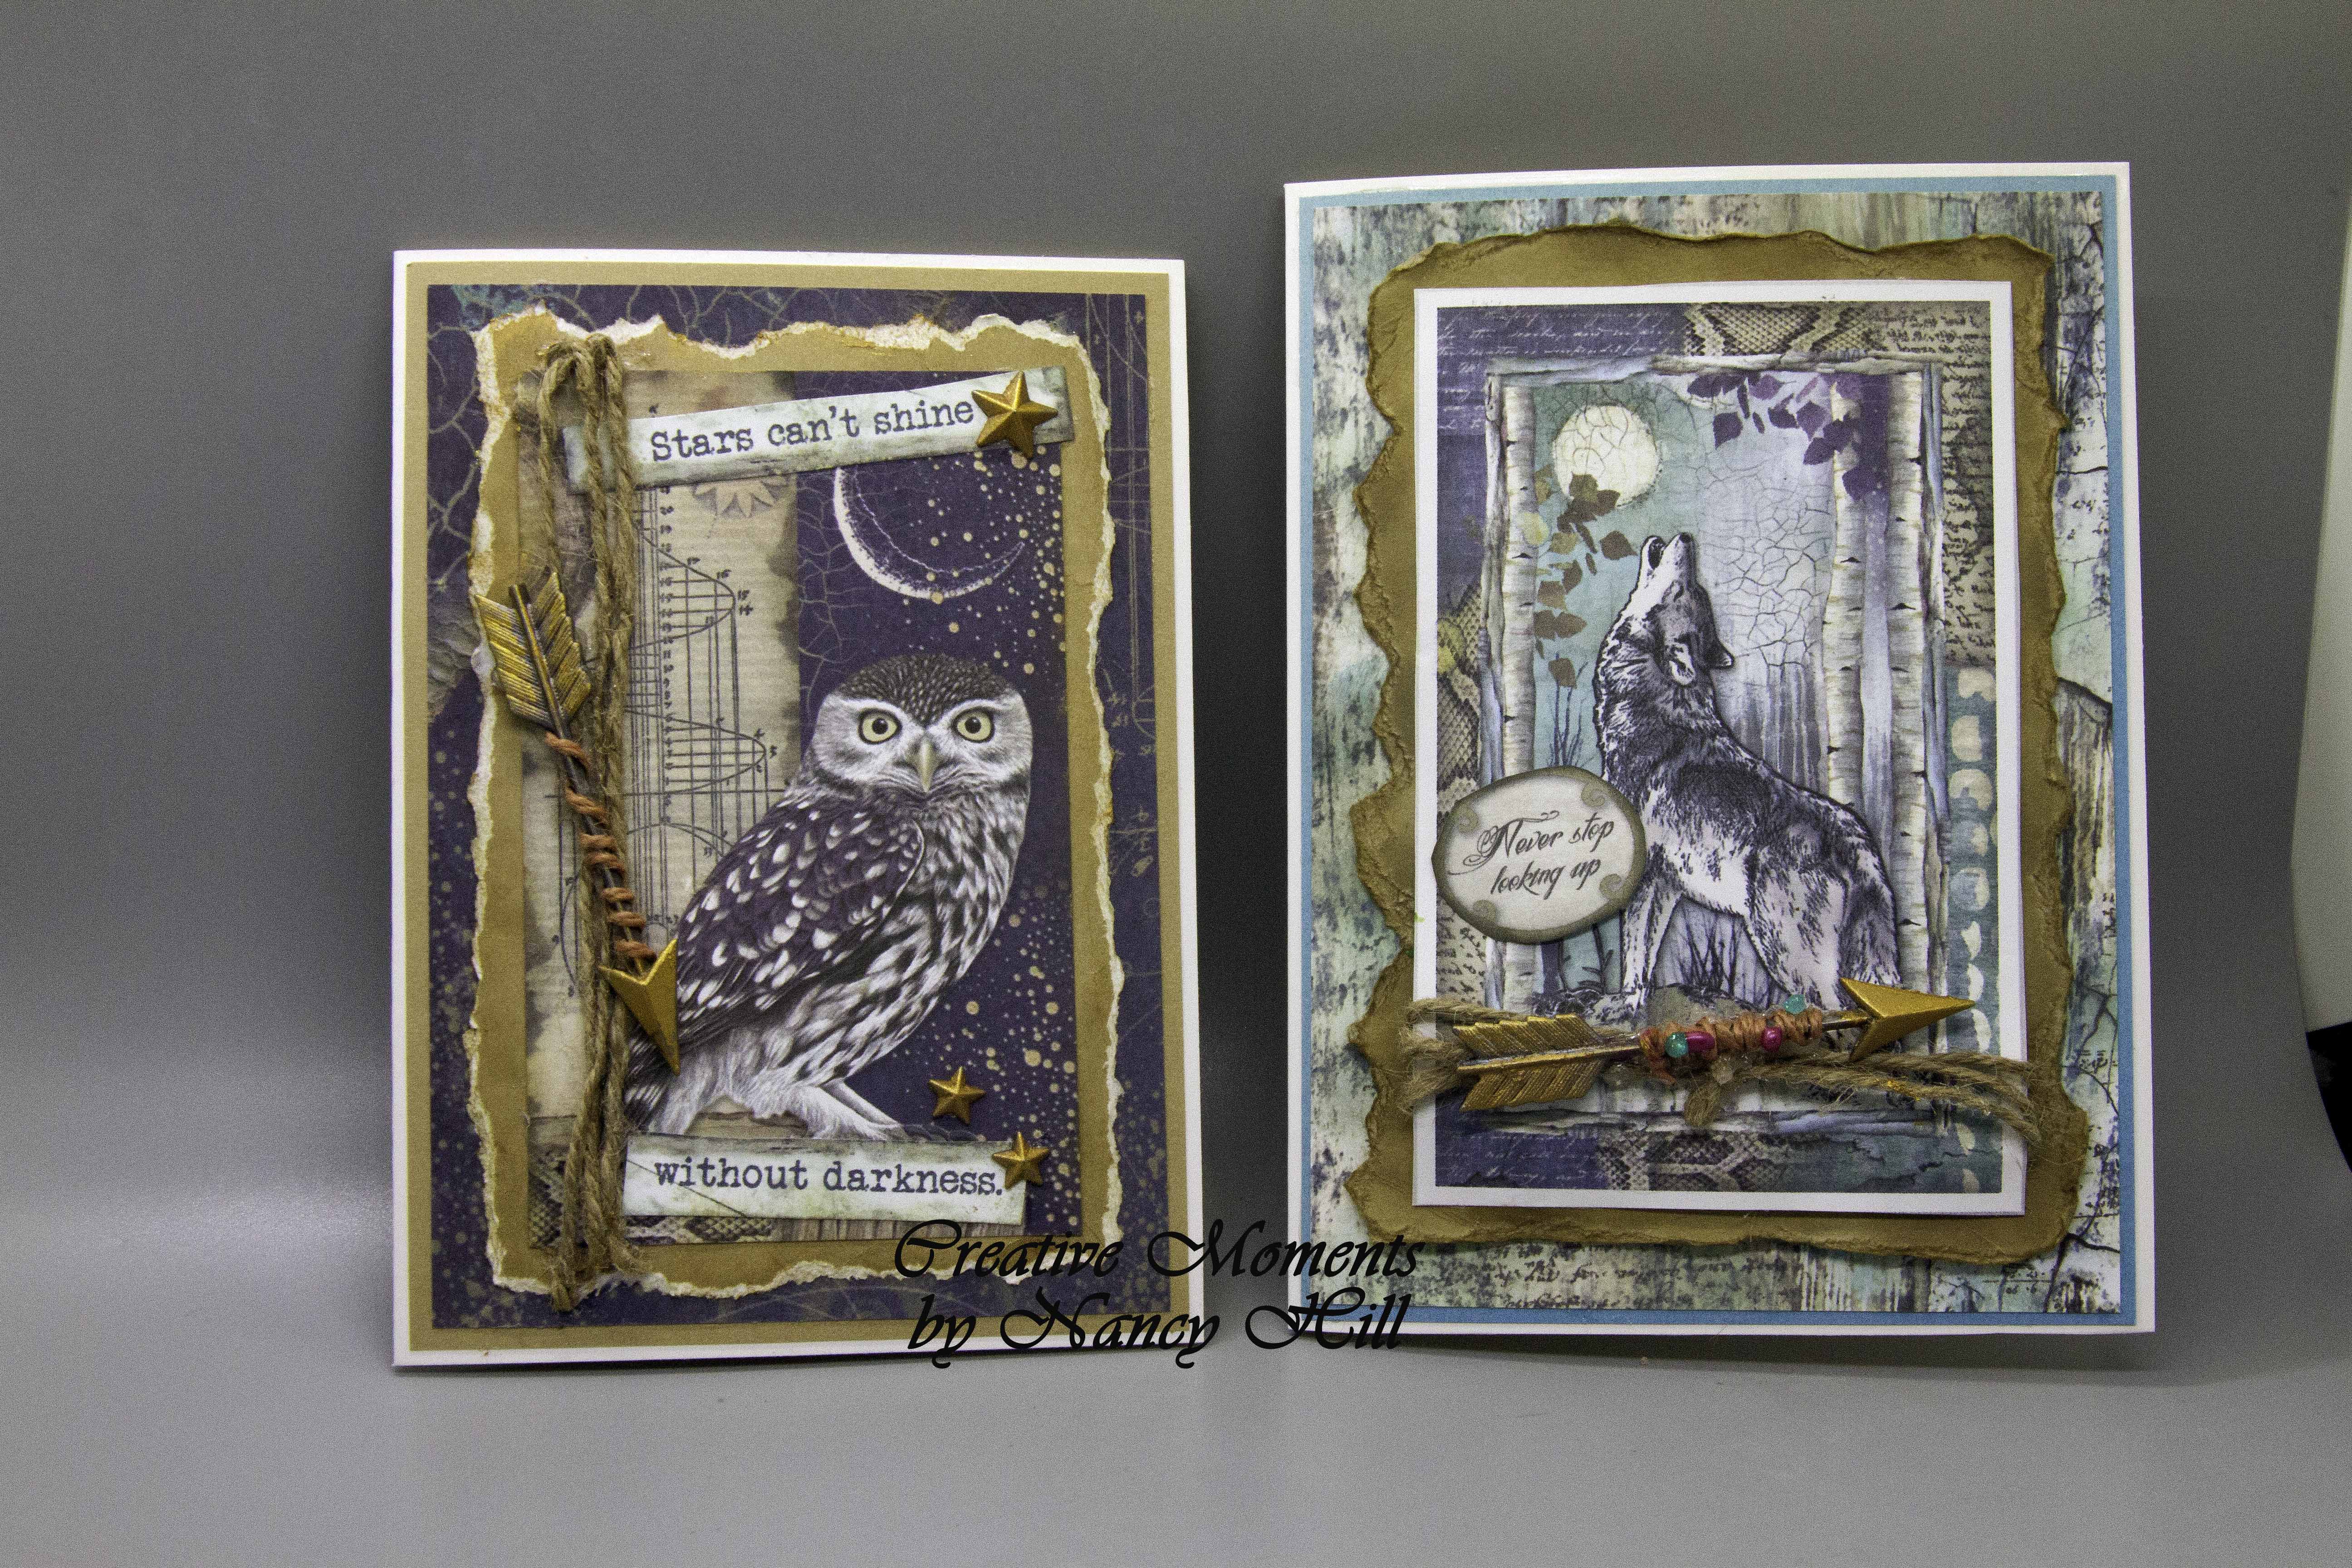

I just love this owl in this collection. I used one of the sentiments in the Stamperia Cosmos in cut it in two and added it to the card. I added some older Tim Holtz metal arrow embellishments and Prima Marketing Mechanicals Metal mini Stars and covered theses in clear gesso and added the gorgeous and now one of my all time favorites, Prima Marketing Redesign Brass Wax with my fingers and a brush. I used a hot glue gun to adhere the metal embellishments along with the May Art Jute
to the card. I used my fingers to tear the frame around the paper and sponged on a little Ranger Vintage Photo ink around the edges.


 |
| Prima Marketing Golden Desert Mojave |
 |
| Stamperia Cosmos |
 |
| Prima Marketing Redesign Brass Wax |
 |
| Prima Marketing Mechanical Mini Stars |
 May Art Jute The cards were adhered with the Beacon 3-in-1 Advanced Glue. Have a fabulous crafting day and thanks for visiting. The Rubber Buggy has the crafting supplies for your next project. So have fun crafting this weekend with these products. My cards and projects are always posted on Saturday. Keep watching and thank you so much for those wonderful comments as well as suggestions. Enjoy and Happy Crafting!
| |
Thursday, June 17, 2021
Graphic 45 Bird Watcher Card
Hi everyone, Steph Ackerman here today with lots of fun products from the store.


Cutting cardstock 6" x 10", I scored it at 5" and 7 1/2" along the long edge using the Scor-Pal. Then I cut the card on an angle from the 5" score line to 3" from the bottom edge. Fold on the score lines to create the card.

I used assorted papers from the Graphic 45 Bird Watcher collection: Feather Your Nest, Flock Together and Beautiful Morning, cutting each to fit the card's shape.

Since the papers are double sided, I was able to use both sides of the papers.

The paper are beautiful and coordinate so well together. On the back panel, I matted the bird paper with a sheet of cardstock from Tim Holtz Idea-ology Kraft Cardstock - Cool.

To finish, I cut the tags from Graphic 45 - Bird Watcher Learn to Fly paper. Matting each with a sheet of cardstock from Tim Holtz Idea-ology Kraft Cardstock - Cool, I placed the tag inside, then aligned the exterior one so it covered the inside tag. You only see the inside tag once the card is opened.

Thank you for visiting
Saturday, June 12, 2021
Mechanical Steampuck Birthday Card


Have a fabulous crafting day and thanks for visiting.
The Rubber Buggy has the crafting supplies for your next project. So have fun crafting this weekend with these products. My cards and projects are always posted on Saturday. Keep watching and thank you so much for those wonderful comments as well as suggestions.
Enjoy and Happy Crafting!
|
Thursday, June 10, 2021
You Brighten My Day with Simple Stories
Hi everyone, Steph Ackerman here today with lots of fun products from the store.


I wanted to create a bright and colorful card using one of the frames from the Simple Stories - Simple Vintage Farmhouse Garden Chipboard Frames set.

I wanted the frame to stand out but wanted some background dimension on the card so I used the Ciao Bella Blossom Stencil.

I used Ranger Distress Oxide Ink in Abandoned Coral, repeatedly moving the stencil around the card.

I poured Ranger Clear Embossing Powder over the stenciled design and used the Sizzix Making Essentials Anti Static Funnel Tray to catch the embossing powder. I usually get embossing powders and glitters everywhere, but this tray made it so easy to keep the embossing powder from exploding.

I think it made a wonderful background for the card.

I cut a panel of Simple Stories Vintage Farmhouse Garden to fit behind one of the frames, then adhered the panel to the card. Inside the card, I added another sheet of paper from this collection to finish.

The phrase was stamped with Lawn Fawn Black Licorice Ink, die cut with Lawn Fawn Small Stitched Circle Die and matted with a larger die.
Thank you for visiting
Saturday, June 5, 2021
Stamperia Hortsenia Shabby Chic Birthday Card


- First, create a 5″ x 7″ top fold card base from heavy white cardstock which I prefer 110 wt.
- Next, mat a 4 1/2" x 6 1/2″ panel of floral design paper from Stamperia Hortensia on purple cardstock measuring 4 3/4" x 5 3/4". Continue with layering as much as you want cutting 1/4" less for each layer. I love using double layering or more on many of my shabby chic cards.
- Now fussy cut the sentiments from the paper pack. Add the Stamperia Hortensia chipboard sentiment to the center along with the dragon fly and buttlerflies chipboard. NOTE: Stamperia Hortensia chipboard images are also found the the cardstock of Stamperia Hortensia paper pad.
- Now tie a double loop bow with purple seam binding ribbon. Adhere to the card and then add handmade flowers with a 5mm flat back pearl in the center or Wild Orchid Craft flowers.
- The inside card with covered with the Stamperia Hortensia paper. I scan part of one page and used my Photoshop to type in the birthday sentiment. I adhered it with the Beacon 3-n-1 Advanced glue.

Stamperia Hortensia is available 12" x 12" or 8" x 8"
So get crafting and have a fabulous day and thanks for visiting.
The Rubber Buggy has the crafting supplies for your next project. So have fun crafting this weekend with these products. My cards and projects are always posted on Saturday. Keep watching and thank you so much for those wonderful comments as well as suggestions.
Enjoy and Happy Crafting!
|
Thursday, June 3, 2021
Catch Your Dream Journal
Hi everyone, Steph Ackerman here today with lots of fun products from the store.


I found this Scrapaholics Chipboard - Catch Your Dream - an amazing element to work with. At approximately 8" x 2 3/4", it stands alone as a perfect embellishment.

I used assorted Ranger Distress Oxide Inks to add color - Abandoned Coral, Dried Marigold, Ground Espresso, and Mowed Lawn as my first layer of color.

I added Ranger Distress Oxide Ink in Faded Jeans for a final color.

Once all the colors were added, I added Ranger Clear Embossing Powder and heat set. Since I am forever getting embossing powder and glitters all over the place, I found the Sizzix - Making Essentials Anti Static Funnel Tray by Tim Holtz invaluable! Now all my powders stay within the confines of the Funnel Tray and easily pour back into the original jar.

I wanted to add this piece to a journal and the store has tons of journals you can use to document your dreams. To add a touch of color to the background I used Lindy's Stamp Gang Starburst Sprays. Each set of sprays are highly pigmented and achieve amazing results.

What a great way to remind yourself of what it is you want to achieve/do in your life. Alternatively, you could even use this piece on a canvas and hang on the wall so you see it every day as a reminder of what you are chasing.
Thank you for visiting
Subscribe to:
Posts
(Atom)


