Thursday, January 30, 2020
Travel Cards with Stamperia Around the World
Hi everyone, Steph Ackerman here today with lots of fun products from the store. Please visit the store for all the fun products I've used today.


Thank you for visiting

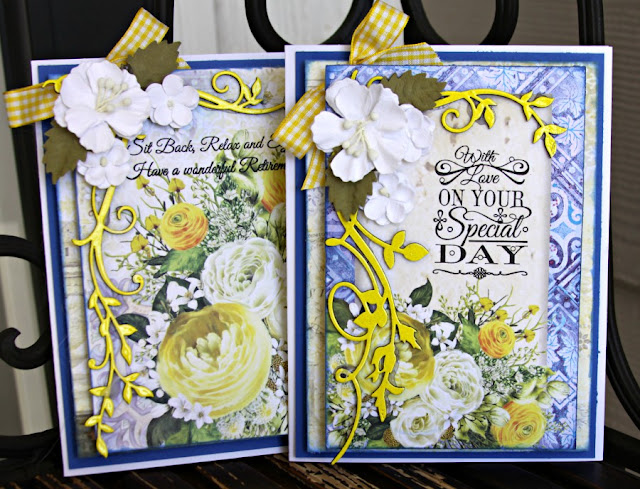
Using the Sizzix Planks die, die cut Sizzix Mat Board. Place a stencil on each plank then ink with Ranger Distress Ink - Walnut Stain.

Using papers from Stamperia's Around the World paper collection, create the cards. Use Lawn Fawn Stitched Rectangle dies to die cut each main layer.

Mat each layer with cardstock. Tear ticket pieces from the same paper collection, ink with brown ink and mat with cardstock.

Determine their placement, then add the mat board pieces on each card. Vary the placement on each card for a different effect.

Die cut the words using Sizzix Shadow Scrip #3 from brown and cream cardstocks. Adhere them together using Tattered Lace Detail Adhesive and add to each card as shown.
Thank you for visiting
Wednesday, January 29, 2020
Ciao Bella Card Set
Hello friends! Today I'm sharing a card set featuring
This paper collection is just so gorgeous and has so many beautiful embellishments to coordinate with it. I love the bright colors, it gives me Spring fever! It's Perfect for bright Spring/Easter layouts and card making!


The sentiment and ribbon are from my stash. The chipboard is by Scrapaholics.
Be sure to stop by the Rubber Buggy Store and pick up this beautiful collection!
Ciao Bella - Sicilia- 12 x 12 Prints Paper Collection.
49 and Market - Garden Seeds Flowers - Snow


Be sure to stop by the Rubber Buggy Store and pick up this beautiful collection!
Thanks for stopping by the Rubber Buggy blog today.
Debbie
Debbie
Saturday, January 25, 2020
Springtime Card
Welcome back and Nancy, here, excited to share another card with you today. I am showcasing the gorgeous Prima Marketing Provence Basic paper collection for the next couple weeks which should be in everyone's supplies for cards and projects this year! The Rubber Buggy on-line store carries all of the name-brand products and supplies you will need to create those amazing keepsake cards, scrapbook pages and beautiful craft projects! Get your order in while supplies last.

I colored the Tim Holtz Gum Drops clear resin heart with a pink Copic Markers. You can use other markers to change the clear to a colored heart. I cut out the image using a circle die and added a doily behind her. I added a strip of the Lemon Craft Provence paper behind the doily and cut out four crochet butterflies. I adhered the card using the Beacon 3-in-1 Advance Glue. I stamped the sentiment using the Wild Rose Studio circle sentiment and cut it out with a circle punch and adhered it to a scallop circle punch. I added a handmade rose binding bow and adhered the Wild Orchid Craft flowers around the card.
 |
| Tim Holtz Gum Drops (Colored with Pink Copic Marker) |
My card is made with the following supplies:
 |
| Lemon Craft My Sweet Provence Paper Pad |
Wild Orchid Craft Flowers
Seam Binding Ribbon - Rose
Tim Holtz Gum Drops (Colored with Pink Copic Marker)
Wild Rose Studio Birthday Stamp and substitute for Wild Rose Studio Circle Greeting Stamp Set that is now available
Memento Black Ink
Doily
Beacon 3 in 1 Advanced Glue
Stamp Tool
Circle and Scallop punch
I had so much fun making these cards and hope you will too. So have fun crafting this weekend.
My cards and projects are always posted on Saturdays at: https://hillfarmcards.blogspot.com/. Keep watching and thank you so much for those wonderful comments as well as suggestions.
Enjoy and Happy Crafting!

Nancy Hill
|
Thursday, January 23, 2020
Hello Valentine Cat
Hi everyone, Steph Ackerman here today with lots of fun products from the store. Please visit the store for all the fun products I've used today.

Stamp Wild Rose Studio Cat with Heart on white cardstock using Memento Tuxedo Black Ink. Add color her with Ranger Tea Dye Distress Ink using Heartfelt Creations Art Daubers. Use Ranger Weathered Wood Distress Ink to add color around the cat

Create a card with papers from the Authentique Romance 6" x 6" paper pad, matting each with Bazzill Licorice Twist Cardstock. Wrap white ribbon around the top panel.


Isn't she just adorable?

Thank you for visiting
Wednesday, January 22, 2020
Valentines Using Christmas Collection
Hello Rubber Buggy friends! Debbie with you today sharing a couple of Valentine cards I created featuring Stamperia Winter Botanic. These fun cards are easy to make and turn out great! The collection is typically a Christmas Collection and comes with these circle tags and cut out panels that are perfect for card making. I used a Tutti Designs Nesting Stitched Circle dies to cut the circle tags out and Tutti Designs Nesting Stitched Heart Dies I stamped a sentiment from my stash. The flowers are 49 and Market Blossom Blends.


The ribbon and Adhesive gem are from my stash.
Hope you give these fun cards a try!
Thanks for stopping by the Rubber Buggy blog today!
Debbie
Monday, January 20, 2020
Post It Notes/ Pen Gifts - cute for any Occasion
Hi... Bev here today at The Rubber Buggy. I am sharing some really cute Post It Notes/ with Pen decorated using Mintay Journal Tag sheets and accents. They are cute, simple and quick to make.

The Rubber Buggy Supplies:


INSTRUCTIONS TO MAKE POST IT NOTE/ PEN GIFTS
To make these follow these simple easy instructions.... and have fun... decorate for any special occasion or celebration when you want a small token or hostess gift.


The Rubber Buggy Supplies:
- Paper: Mintay Collections
- Ink: Tim Holtz Distress Vintage Photo
- Glue: Beacon 3-in-1 Glue,
- Accents: Scrapbook 3D foam
- Machine/ tools: Tim Holtz 5" mini Snips, Fiskar Paper Trummer,
- Other: lace, chipboard, black pen, cardstock


INSTRUCTIONS TO MAKE POST IT NOTE/ PEN GIFTS
To make these follow these simple easy instructions.... and have fun... decorate for any special occasion or celebration when you want a small token or hostess gift.

Using store bought post it or sticky notes.... measure and cut 2 sheets of paper to fit the front, end panel and back of the post it notes. (just slightly bigger to allow for the curve and corners of the cardboard)
Then cut a front panel, back panel the size of post it notes... using medium to heavy cardboard.
For the end size the small piece and cut a cardboard... but cut it slightly smaller .. you will be leaving a spacer between the sides of end panel.... see photo below.


Above is a photo of the cardboards as they will be glued to both sides of the 2 papers. (If you cut a slight bit larger you can always cut the ends after gluing and getting the correct size.)

When gluing the 2nd paper to cardboard be sure to add extra glue in the valley fold space between and using your scoring tool to push the papers firmly between the folds.

The extra space allows for your base to fold easier.
Attach the back of the post it notes onto full back of the cover.
**** to attach the pens on a ribbon tie the end of ribbon to the pen ***** leave extra length of ribbon for the pen to reach around and write to bottom of post it note. Glue the other end of pen ribbon onto the end panel of the base... glue full end panel and glue to end of base. Hold firmly until it sets.
Now tie another ribbon around the base and pen and tie a bow.

These 2 are decorated for Valentines Day.... but like I mentioned.. you can decorate for any occasion.


Thanks for stopping by... hope to see you again soon ... but in the mean time be sure to stop by the STORE where these items and so many others are available. Also take note of all the products that aren't carried in our regular local stores. ... AND the service is A1.

Saturday, January 18, 2020
Lawn Fawn Get Better Mice
Welcome back and Nancy, here, excited to share another mice card with you today. The new arrival of the Lawn Fawn dies and stamps have these adorable mice, sentiments and hearts available for Valentines besides other occasions and holidays. All of these wonderful products are available at
The Rubber Buggy on-line and retail store. Get your order in while supplies last since this collection is way too cute.
I made another Lawn Fawn Reveal Wheel card using the Lawn Fawn You’re Just My Type and Lawn Fawn Love Poems! Lawn Fawn designed these stamp sets to work perfectly with lots of Lawn Fawn interactive die sets such as the Lawn Fawn Square or Rectangle Reveal Wheel die sets.


This Lawn Fawn Reveal Add On Wheel Square die set that is purchased separately to add to the Lawn Fawn Reveal Wheel die set includes window and square frame for a beautiful heart that is perfect for Valentine’s Day and “I love you” cards! Plus, Lawn Fawn stamps have sentiments to fit in the windows of the reveal wheel and there are a variety of different shapes of reveal wheel window add-on dies to add to your collection. Many of the window frames have templates available for easy stamping on the cut out wheel circle.
If you haven' made a reveal wheel card, the Lawn Fawn has wonderful videos to guide you for the first time. Just click Here to view their video instructions. I would highly recommend viewing the tutorial first for helpful guidance. Spin the wheel to reveal different sentiments of photos of my card showing the four sentiments stamped on the circle wheel.


 Lawn Fawn Fancy Wavy Banner set has three dies that cut four different style banners. I used the coordinating wavy stamp in the Lawn Fawn Love Poems stamp set.
I added the tiny hearts. You will find all possibilities and occasions for the Lawn Fawn Heart Shaker Gift tag die for other projects and cards. Helpful hint: Most of these very tiny hearts will remain in the cardstock after the die cut. On the back of the cardstock, adhere the glue or spray adhesive on all of the hearts. Turn over and then use a pointy tool to poke out each heart directly where you want these hearts to lay on your card. Otherwise, these tiny hearts are very difficult to individually glue and set on the card with your fingers.
I sponged on the Ranger Archival Magenta ink around the card before adding the mice and hearts.
So have fun crafting this weekend with these products. Order now while these gorgeous dies, papers and stamps are still available. I hope I have inspired you try out these products available at The Rubber Buggy on-line store. My cards and projects are always posted on Saturday. Keep watching and thank you so much for those wonderful comments as well as suggestions.
Enjoy and Happy Crafting!
|
Subscribe to:
Posts
(Atom)


