Wednesday, April 30, 2014
On Your Wedding Day
Good morning Steph here today with a beautiful stamp from Wild Rose Studio - At the Alter. It truly shows off the wedding couple.

I stamped the couple with Memento Tuxedo Black Ink on Copic X-Press It cardstock, then colored with Copic markers. After die cutting into shape, I inked the edges with Ranger Walnut Stain Distress Ink. To finish, the sentiment, also from Wild Rose Studio - Romantic Greetings - was stamped with Memento Tuxedo Black Ink on Copic X-Press It cardstock and die cut.

May Arts Sheer Ribbon was tied around the card and Pink Roses from Wild Orchid Crafts were added about the image.
Thank you for visiting
I stamped the couple with Memento Tuxedo Black Ink on Copic X-Press It cardstock, then colored with Copic markers. After die cutting into shape, I inked the edges with Ranger Walnut Stain Distress Ink. To finish, the sentiment, also from Wild Rose Studio - Romantic Greetings - was stamped with Memento Tuxedo Black Ink on Copic X-Press It cardstock and die cut.
May Arts Sheer Ribbon was tied around the card and Pink Roses from Wild Orchid Crafts were added about the image.
Thank you for visiting
Tuesday, April 29, 2014
Beautiful ballon card
Hi everyone!
Pi here again:)
Kellie is stocking the store with some pretty awesome products at the moment. I see mixed media and art journaling in the future :)
.JPG)
Here I am again with some old techniques. I mixed tumbled glass, chipped saphire and seedless preserves distress ink on my craft mat. Misted it some and ran my watercolor cardstock in it and it became this wonderful background.
I just have the perfect stamp set in my stash from MFT - up up and away. The clouds are stamped in chipped saphire and the air ballons in the background is stamped in weathered wood. The sentiment is stamped with memento ink in tuxedo black. The beautiful ballon die cut from Memory box is also cut from watercolour cardstock and rubbed and misted with milled lavender. I then edged it with seedless preserves and stamped tiny dots to add sturcture with a clearstamp from Kaisercraft.
To finish the card I topped it of with some flat back crystals:)
Thank you for visiting!!!
Pi here again:)
Kellie is stocking the store with some pretty awesome products at the moment. I see mixed media and art journaling in the future :)
Here I am again with some old techniques. I mixed tumbled glass, chipped saphire and seedless preserves distress ink on my craft mat. Misted it some and ran my watercolor cardstock in it and it became this wonderful background.
I just have the perfect stamp set in my stash from MFT - up up and away. The clouds are stamped in chipped saphire and the air ballons in the background is stamped in weathered wood. The sentiment is stamped with memento ink in tuxedo black. The beautiful ballon die cut from Memory box is also cut from watercolour cardstock and rubbed and misted with milled lavender. I then edged it with seedless preserves and stamped tiny dots to add sturcture with a clearstamp from Kaisercraft.
To finish the card I topped it of with some flat back crystals:)
Thank you for visiting!!!
Thursday, April 24, 2014
Celebrate Spring Graphic 45 Sweet Sentiments
Hi everyone. Hope you are having a blessed spring, it's been beautiful here which has caused me to spend much more time outside and less time inside being able to craft but I did come up with this beautiful little spring bag that I am using to send a special gift out to a friend.
I used the Sweet Sentiments line from Graphic 45 available at The Rubber Buggy. I fussy cut the diecut cards and adhered them with foam adhesive for dimension. I used a bit of trims to accent and a doily to create a beautiful opening/closure for the top. The butterflies were also fussy cut from the paper, as well as the title. I also used Prima flowers from the store at the bottom they are from the Divine line. I hope you like it!

Thank you for visiting ~Kelly
I used the Sweet Sentiments line from Graphic 45 available at The Rubber Buggy. I fussy cut the diecut cards and adhered them with foam adhesive for dimension. I used a bit of trims to accent and a doily to create a beautiful opening/closure for the top. The butterflies were also fussy cut from the paper, as well as the title. I also used Prima flowers from the store at the bottom they are from the Divine line. I hope you like it!
Thank you for visiting ~Kelly
Wednesday, April 23, 2014
Just a Note
Hi everyone. Steph here today.
Graphic 45 creates some amazing papers and I've used Ladies Diary in conjunction with some lovely products available in the store.

The cardstock is from Bazzill. The ribbon is from May Arts and was tied around the base card before adding some torn paper and another print on top. A memo pin from Tim Holtz was added to the ribbon knot and a sentiment from Wild Rose Studio was added to the pin stamped with Walnut Stain Distress Ink.

Thank you for visiting.
Graphic 45 creates some amazing papers and I've used Ladies Diary in conjunction with some lovely products available in the store.
The cardstock is from Bazzill. The ribbon is from May Arts and was tied around the base card before adding some torn paper and another print on top. A memo pin from Tim Holtz was added to the ribbon knot and a sentiment from Wild Rose Studio was added to the pin stamped with Walnut Stain Distress Ink.
Thank you for visiting.
Tuesday, April 22, 2014
Sweet Magnolia card
Hi everyone!
Pi here again and on time - LOL!
This card is really not so tricky as it looks. But it's all in the details...
.JPG)
A lot is made with the boarder around the image which is die cut with a spellbinder die and the flowers are coloured with copic marker and alcohol blender solution, add some perfect pearls and stickles - easy peasy, the toughest part is to be patient when they are drying.
Products used from the store:
Magnolia stamp BUBBLING TILDA
Magnolia stamp STONE PATH
WOC open roses 25mm
WOC open roses 10mm
Flat back pearls
Copic markers
Grossgrain ribbon, green
Stickles, DIAMOND
Spellbinder nestabilities, DECORATIVE LABEL ONE
Paper is from Prima marketing, Divine - unfortunately no longer avaliable in the store
Thanks for visiting!!
Pi here again and on time - LOL!
This card is really not so tricky as it looks. But it's all in the details...
A lot is made with the boarder around the image which is die cut with a spellbinder die and the flowers are coloured with copic marker and alcohol blender solution, add some perfect pearls and stickles - easy peasy, the toughest part is to be patient when they are drying.
Products used from the store:
Magnolia stamp BUBBLING TILDA
Magnolia stamp STONE PATH
WOC open roses 25mm
WOC open roses 10mm
Flat back pearls
Copic markers
Grossgrain ribbon, green
Stickles, DIAMOND
Spellbinder nestabilities, DECORATIVE LABEL ONE
Paper is from Prima marketing, Divine - unfortunately no longer avaliable in the store
Thanks for visiting!!
Monday, April 21, 2014
Sweet Box Card
Happy Monday all! I’m here with a very sweet box card for my The Rubber Buggy DT
post. I love fancy fold cards and this is so unique. It opens up to a box!


Thank you for visiting!
Opened/inside look:
I used Kaisercraft's Way of Life stamp, truly one of my fave stamps! So versatile. Then I embossed it using gold embossing powder. Hope you all like it!
Thank you for visiting!
Friday, April 18, 2014
Meet Our New Design Team Member!
Please take a moment to meet with Gina Knott our newest Design Team Member here at The Rubber Buggy.
Gina joins us from the U.K. and I have stocked her blog for sometime now and when I finally decided to ask if she would like to join us and she said yes I was super excited as I love her style and I hope you do to.
Keep your eye out for her upcoming weekly post as she is still waiting for her design team package to arrive so she can start creating some wonderful projects to share with us.
Here is a what Gina has to say:
Hi everyone,
My name is Gina and I live in Reading, Berkshire U.K. I am married with two wonderful grown up
sons. The eldest Mike works for a large well known I.T. company and the
youngest George is a Captain in the British Army, both of them have flown the
nest. I am very lucky as my husband
(Phil) is very supportive of my crafting and never moans or groans that I spend
most of my spare time in my craft room. I work in a local secondary school. My
Mum introduced to me to card making bout 8 years ago and I have been hooked
ever since. For several years I was into decoupage and one day I tried stamping
and have never looked back. All my
images are coloured with Copics and I add a few highlights with pencils. It can
take me a whole evening to colour one image, but I totally love it. I started my blog just over a year ago and
was so lucky and honoured to be invited onto several Design Teams. Recently I
have been asked by two different companies to design some cards using their
images for a T.V. programme. I sell my
cards on Ebay to fund my ever-expanding hobby. Thank you Kellie for inviting me
to join the Rubber Buggy, I am so very happy to be joining the team; I
absolutely adore the products in the shop. I hope you enjoy my creations.
Wee Stamps - Amy
Happy
Friday Everyone!!! Hope you all had a great week. I've been sick with
a stomach virus for about 2 weeks now and am just now starting to feel
better. So that has out a damper on any crafting these past 2 weeks.
So instead of having a NEW creation today, I am going to showcase a
creation that I created in the past.
This is a card that was first shown on January 17th, 2014, I really like how it turned out.
Today I am going to show you a card using "Amy" from the Wee Stamps Collection. Hope you all like it!!!!!


This is a card that was first shown on January 17th, 2014, I really like how it turned out.
Today I am going to show you a card using "Amy" from the Wee Stamps Collection. Hope you all like it!!!!!
Products used:
Bazill cardstock
Pearls
Check out the products that I used in the Rubber Buggy Store. Hope this has inspired you to get out those stamps and create something. Check out the Challenge Blog for an awesome challenge going on this month.
Thursday, April 17, 2014
By the Sea Graphic 45 card
Hi friends it's Kelly here with a card made from the beautiful By the Sea line from Graphic 45. I made this to compliment summer pics and pages from last year and I just enjoyed fussy cutting these little elements from the paper to put them together. I used a little pop adhesive to make them 3-d and off the page then added some flower and layered the fussy cut seashells in the corner above the ribbon. I also used a few Bo Bunny jewels in the corner of the Postage diecut also from the collection, just a little sparkle. You can still get these papers and paper pad and elements from the Rubber Buggy store. They truly are amazing and you will love them for your summer pics.

Thank you for visiting ~Kelly
Thank you for visiting ~Kelly
Baby shower tag
Hi everyone!
Wow time really flies.
For my DT-project for The Rubber Buggy this week I made a gift tag.
I made plenty of these in no time at all:)
.JPG)
Products from the store:
Smooth white paper
Memory box die, baby carriage
Bakers twine, orange
Flat back pearls
Thanks for visiting!
Wow time really flies.
For my DT-project for The Rubber Buggy this week I made a gift tag.
I made plenty of these in no time at all:)
Products from the store:
Smooth white paper
Memory box die, baby carriage
Bakers twine, orange
Flat back pearls
Thanks for visiting!
Wednesday, April 16, 2014
Thinking of You
Hi everyone, Steph here with a wonderful stamp from Wild Rose Studio - Bella with Dahlia. She was stamped with Tuxedo Black Memento Ink on Copic X-press It cardstock, then colored with assorted Zig markers.
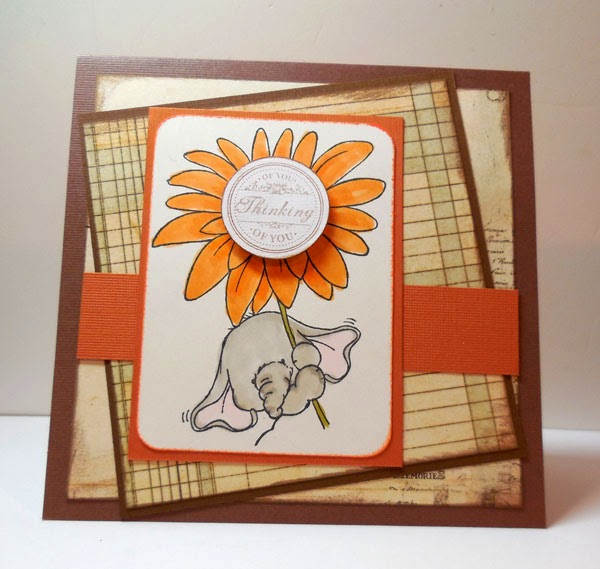
The paper is from Prima Marketing and was inked with Ranger Walnut Distress Ink.

The sentiment is from Wild Rose Studio, stamped with Ranger Walnut Distress Ink and added to the center of the Dahlia with foam adhesives for dimension. Makes a fun flower center don't you think?
Thank you for visiting
The paper is from Prima Marketing and was inked with Ranger Walnut Distress Ink.
The sentiment is from Wild Rose Studio, stamped with Ranger Walnut Distress Ink and added to the center of the Dahlia with foam adhesives for dimension. Makes a fun flower center don't you think?
Thank you for visiting
Friday, April 11, 2014
Listen to your heart Tag
Good morning Steph here today with a tag using assorted Tim Holtz products.
I love mixing assorted products and this tag is no exception. So stamp to your heart's content and see what unfolds.

Supplies used:
Kaiser Decorative Pieces
Tim Holtz Distress Inks
May Arts ribbon
May Arts Twine
Memory Box Chevron stencil
Thank you for visiting
I love mixing assorted products and this tag is no exception. So stamp to your heart's content and see what unfolds.
Supplies used:
Kaiser Decorative Pieces
Tim Holtz Distress Inks
May Arts ribbon
May Arts Twine
Memory Box Chevron stencil
Thank you for visiting
Thursday, April 10, 2014
So Sorry sympathy card
This was a sympathy card my daughter wanted for one of her best
friends whose grandma just passed away. We used the Bo Bunny collection
because of the bright colors to cheer her up.

Materials used:
The Rubber Buggy
Bo Bunny Key Lime papers
Other
Stampin up butterflies die
Quickutz labels die
Thanks so much for looking. ~Kelly
Materials used:
The Rubber Buggy
Bo Bunny Key Lime papers
Other
Stampin up butterflies die
Quickutz labels die
Thanks so much for looking. ~Kelly
Tuesday, April 8, 2014
Tim Holtz technique with G45
Hi everyone!
Pi here again and I hope you all are fine and crafting away :)
With spring just around the corner and the days starting to be a little brighter and longer in Sweden, it's hard not to start thinking in pastel and light colour schemes.
.JPG)
Here I have returned to where I started with Tim Holtz classic background technique where he just dabs the ink pad on a craft sheet and mists, then dabs the tags in the colour to create the background.
Loved the subtle and shabby effect that came out. I then stamped the postcard in various angles with the tattered rose, some bumble bees in milled lavender and the leaves with bundled sage. Doesn't it really looks like G45 soft pastel palette? I can really see this tag work with sweet sentiment and botanical tea. I used perfect pearl over the tag, unfortunately the camera wouldn't pick it up.
.JPG) Products used from the store:
Products used from the store:
G45 ivory tag album
G45 stamp set #3, FRENCH COUNTRY
G45 staples, shabby chic ornate metal keys
G45 staples, shabby chic ornate metal keyholes
Perfect pearl BISCOTTI
Distress ink, BUNDLED SAGE
Distress ink, TATTERED ROSE
Distress ink, MILLED LAVENDER
I hope you liked it!
It was so much fun using this technique again:)
Thanks for watching!
Pi here again and I hope you all are fine and crafting away :)
With spring just around the corner and the days starting to be a little brighter and longer in Sweden, it's hard not to start thinking in pastel and light colour schemes.

Here I have returned to where I started with Tim Holtz classic background technique where he just dabs the ink pad on a craft sheet and mists, then dabs the tags in the colour to create the background.
Loved the subtle and shabby effect that came out. I then stamped the postcard in various angles with the tattered rose, some bumble bees in milled lavender and the leaves with bundled sage. Doesn't it really looks like G45 soft pastel palette? I can really see this tag work with sweet sentiment and botanical tea. I used perfect pearl over the tag, unfortunately the camera wouldn't pick it up.
G45 ivory tag album
G45 stamp set #3, FRENCH COUNTRY
G45 staples, shabby chic ornate metal keys
G45 staples, shabby chic ornate metal keyholes
Perfect pearl BISCOTTI
Distress ink, BUNDLED SAGE
Distress ink, TATTERED ROSE
Distress ink, MILLED LAVENDER
I hope you liked it!
It was so much fun using this technique again:)
Thanks for watching!
Thursday, April 3, 2014
Graphic 45 By the Sea layout 12x12
Hi everyone it's Kelly and I want to share this layout with you of my daughter at the seashore. I did whiteout the photos of her in her bathing suit but I wanted to share that I used the Graphic 45 By the Sea paper pad and I loved it. The hearts and the arrows at the bottom were from the paper line as well as the journaling spot on the upper right hand corner. It's pretty simple but yet I really like how it displays the colors of the paper and the photos.

Thank you for visiting ~Kelly
Thank you for visiting ~Kelly
Wednesday, April 2, 2014
It's raining.......
Good morning Steph here today with one of my favorite Stampin Bella stamps - Lolly and Her Brolly.
I stamped her on Copic X-Press It cardstock and then colored her with Copic Markers

I stamped her on Copic X-Press It cardstock and then colored her with Copic Markers
Thank you for visiting.
Paper bow card
Hi everyone!
Pi here with a belated card for April 1st.
Here is a quick, easy and fun card to make.
.JPG)
I folded a doily and masked some chicken wire with distress ink. Then my fav part was the paper bow. I've seen many of you use this type of bow for a long time, but if you know me I'm a bit of a slow starter. I've always prefered (and struggled) with ribbon and trim instead. But no more, I'm so hooked on these babies now - LOL!
Products used from the store:
6x6 Maja Design, SKÄRGÅRDSLIV
TCW stencil 6x6 mini chicken wire
5x5 Doilies
Tim Holtz distress ink, PEELED PAINT
Thank for visiting!
Pi here with a belated card for April 1st.
Here is a quick, easy and fun card to make.
I folded a doily and masked some chicken wire with distress ink. Then my fav part was the paper bow. I've seen many of you use this type of bow for a long time, but if you know me I'm a bit of a slow starter. I've always prefered (and struggled) with ribbon and trim instead. But no more, I'm so hooked on these babies now - LOL!
Products used from the store:
6x6 Maja Design, SKÄRGÅRDSLIV
TCW stencil 6x6 mini chicken wire
5x5 Doilies
Tim Holtz distress ink, PEELED PAINT
Thank for visiting!
Subscribe to:
Posts
(Atom)


