Showing posts with label prima. Show all posts
Showing posts with label prima. Show all posts
Thursday, March 17, 2022
Creative Use of Diecuts

Welcome to the Rubber Buggy blog. Today I am sharing a creative use of your diecuts and florals with a touch of white gesso to live up your embellishments.

I used the newly released Sime Stories Indigo Garden along with a Prima Butterfly Borders chipboard piece. I used Dina Wakley white gesso to cover the chipboard piece so it blended with all the color’s

I added some pink flowers and applied some gesso sparingly which gives it a nice shabby look.

I hope everyone enjoyed my post and thanks for stopping by
Thank you for visiting
Thursday, August 12, 2021
Mixed Media Tags with Simple Stories
Hi everyone, Steph Ackerman here today with lots of fun products from the store.

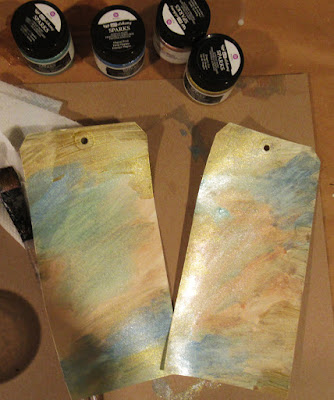


Wanting something a little different, I used Prima Marketing Art Alchemy Acrylic Paints on large tags from Dylusions Journal Tags #10. The colors are gorgeous so I mixed up an assortment of colors including Ice Queen, Gold Amber, Frozen Berries and Soft Satin and painted them randomly on the tags.

Next I used one of the Ciao Bella Stencils with Lawn Fawn's Freshly Cut Grass Ink, randomly adding a pattern around the tag.

Net I cut apart Simple Stories Simple Vintage Farmhouse papers to decorate the tags.

I also fussy cut the words to fit the tags. This is a little time consuming as the words are delicate, but the results were worth it.

Next, I used a script stamp (similar to this Ciao Bella Stamp) and randomly stamped it about the tags. Then I added May Arts Celery Green Sheer Ribbon to finish off the tags.

Thank you for visiting
Thursday, May 21, 2020
Anniversary Cards with Tutti Designs
Hi everyone, Steph Ackerman here today with lots of fun products from the store. Please visit the store for all the fun products I've used today.

I had small amounts of Prima Marketing Art Alchemy paints in Flame and Gold remaining so I decided to create some backgrounds by painting the left over paints on Strathmore Watercolor Paper. It doesn't look very pretty, but the resulting card definitely is!


I adhered Bazzill Marshmallow Cardstock behind the die cut panel giving emphasis to the die cut areas. The die cut panel was matted with pink cardstock.


Thank you for visiting

I had small amounts of Prima Marketing Art Alchemy paints in Flame and Gold remaining so I decided to create some backgrounds by painting the left over paints on Strathmore Watercolor Paper. It doesn't look very pretty, but the resulting card definitely is!

I created the card using Maja Designs Vintage Summer Basics 1910 with the Tutti Designs Bird Tapestry die. For definition, I cut the painted panel to fit behind the die.

I added brads to the flowers, then inked the edges of the panel with Lawn Fawn Sunflower Ink and then matted it with Bazzill Gold Coins Cardstock.

The panel was then added to Maja Design Vintage Summer Basics 1912 and Bazzill Gold Coins Cardstock. It was then added to a pink card with Scrapbook Adhesives 3D Foam Squares.

Nuvo Crystal Drops in Party Pink were added to the corner designs. The phrase, from Art Impressions Watercolor Cling stamps, was stamped with Memento Tuxedo Black Ink on a scrap of Vintage Summer Basics 1912 and pink cardstock.

My 2nd card was created using Maja Designs Vintage Summer Basics 1933 and the same Tutti Designs die. A totally different effect was created.


Vintage Summer Basics 1910 was added to a pink card and the phrase, from Art Impressions Watercolor Cling stamps was stamped with Memento Tuxedo Black Ink on Bazzil Marshmallow Cardstock.

I used a Tutti Designs Oval Die to die cut the phrase and a larger mat. It was added to the card with Scrapbook Adhesives 3D Foam Squares. Raspberry Liquid Pearls were added to the corners of the card.
Thank you for visiting
Thursday, April 23, 2020
Enjoy the Little Things
Hi everyone, Steph Ackerman here today with lots of fun products from the store. Please visit the store for all the fun products I've used today.

Heartfelt Creations has some wonderful dies and this Fleur Borders and Pocket Dies is no exception. This die set has 3 delicate dies and 3 background dies. Let me show you how I've used two of these dies today.

Starting with a sheet from Lawn Fawn's Knock on Wood paper pad, I selected the orange panel, cutting it to size. Next, I used Lawn Fawn's Vanilla Malt cardstock to die cut the filigree design, gluing it directly to the card with Tombow Mono Aqua Liquid Glue. I love the orange peeking out from behind the die.

The panel was added to a blue panel from the Lawn Fawn pack and brads were added to the die cut flowers. Several flowers from Prima Marketing's Capri Flowers were added to the corner. The stamp was inked with Memento Tuxedo Black Ink on Lawn Fawn's Vanilla Malt cardstock. I used Lawn Fawn Stitched Circle dies to die cut the phrase.


My next card uses the same die, plus the coordinating background die on another sheet of Lawn Fawn's Knock on Wood paper pad. Using a premade card, I cut a woodgrain panel from LemonCraft's House of Roses collection to fit, then used the die cut element as a pocket, adhering just the edges. Ranger Liquid Pearls were added to the die cut flower centers.

Thank you for visiting.
Thursday, February 20, 2020
Wander and Explore Panel
Hi everyone, Steph Ackerman here today with lots of fun products from the store. Please visit the store for all the fun products I've used today.

I found some left over wood panels in a local craft store after the holidays and knew they would work for a mixed media project.

I began by adding gesso to the panel. Once dry, I sprayed Tim Holtz Distress Oxide Spray Inks in Cracked Pistachio, Mermaid Lagoon and Iced Spruce across the panel. Heat set each color, then use Tim Holtz Dotted Layering Stencil with modeling paste as well as Tim Holtz Slate Layering Stencil with modeling paste to add dimension. Allow to dry thoroughly.


Then go to town with assorted embellishment, adding them around the panel. Once all the elements are down, add Prima Art Stones randomly about the panel.

Finish the panel by adding die cut words from Sizzix Thinlits, Shadow #3. Die cut each from Bazzill Marshmallow and Licorice Twist cardstocks. Place them randomly around the panel.
Thank you for visiting

I found some left over wood panels in a local craft store after the holidays and knew they would work for a mixed media project.

I began by adding gesso to the panel. Once dry, I sprayed Tim Holtz Distress Oxide Spray Inks in Cracked Pistachio, Mermaid Lagoon and Iced Spruce across the panel. Heat set each color, then use Tim Holtz Dotted Layering Stencil with modeling paste as well as Tim Holtz Slate Layering Stencil with modeling paste to add dimension. Allow to dry thoroughly.

Using a script stamp with Memento Tuxedo Black Ink, stamp around the panel.


Finish the panel by adding die cut words from Sizzix Thinlits, Shadow #3. Die cut each from Bazzill Marshmallow and Licorice Twist cardstocks. Place them randomly around the panel.
Thank you for visiting
Thursday, December 5, 2019
Prima Christmas Cards
Hi everyone, Steph Ackerman here today with lots of fun products from the store. Please visit the store for all the fun products I've used today.


Thank you for visiting

It's not too late to get those Christmas cards ready, so let me show you how I've created them using the Prima Marketing Christmas in the Country paper pad.

Cut Bazzill Candy Bar Cardstock 6" x 12". Using Scor-Pal Scoring Board, score at 6" to create top folding cards. Using a woodgrain panel as the background, cut to fit the card. Mat the Santa paper with cardstock and add to the card.

Fussy cut assorted tags from the collection, mat with cardstock and fussy cut again. Layer them on the card. Stamp Merry Christmas using Lawn Fawn Ho Ho Holidays stamps with Memento Tuxedo Black Ink. Mat with cardstock and add to the card with Scrapbook Adhesives 3D Foam Adhesives. Add Ranger Liquid Pearls in Shocking to the corners of the phrase. Also add the Liquid Pearls randomly to the berries on the paper.

For the second card, I used several papers from the same collection, selecting a plaid panel for the background. Then I layered the top panel with Scrapbook Adhesives 3D Foam Adhesives. A wordy paper strip was added across the card. Lawn Fawn Christmas stamps were stamped with Memento Tuxedo Black Ink, matted with cardstock and cut into a pennant shape.

To finish, I used Prima Marketing flowers with a pretty Prima Marketing brad.

Thank you for visiting
Thursday, November 28, 2019
Christmas Gift Bag Ensemble
Happy Thanksgiving everyone. Steph Ackerman here today with lots of fun products from the store. Please visit the store for all the fun products I've used today.
The Maja Designs Holiday in the Alps paper pad at 6" x 6" contains 2 sheets each of 18 double sided papers.


Thank you for visiting
The Maja Designs Holiday in the Alps paper pad at 6" x 6" contains 2 sheets each of 18 double sided papers.

Placing one of the papers on Bazzill Wax Lips cardstock really emphasized the pretty papers. This was then adhered directly on the gift bag.

Using Lawn Fawn Stitched Circle dies, I die cut Bazzill cardstock and a panel from the Alps collection, adding it to the center of the gift bag.

For the card, I cut Lawn Fawn Kraft Cardstock 4 1/4" x 11 and scored it with a Scor-Pal Scoring Board to create a top folding card.

Cutting papers to fit the card, I matted each with cardstock. The larger panel was wrapped with ribbon and placed on the card. The smaller panel was added to the card with Scrapbook Adhesives 3D Foam Adhesives for dimension.

Lawn Fawn Christmas stamps were stamped with Memento Tuxedo Black Ink, then matted with cardstock. The words were then added to the card with Scrapbook Adhesives 3D Foam Adhesives for dimension.

Such a pretty combination.

Thank you for visiting
Thursday, October 31, 2019
Thinking of You Mixed Media Cards
Hi everyone, Steph Ackerman here today with lots of products from the store. Please visit the store for all the fun products I've used today.


Thank you for visiting


I've used a Stamperia Texture Mold with Prima Icing Paste, but you can also use Stamperia Modeling Paste to achieve the same effect.. As you can see the design failed to come out of the mold complete, so I chose to cut it apart.

I cut the mold apart, finding elements I wanted to use on several cards.


Creating a card from Bazzill Licorice Twist Cardstock, I scored it with the Scor-Pal Scoring Tool to create a top fold card. I die cut 2 layers with Lawn Fawn Outside In Rectangle Dies, then used Lawn Fawn Stitched Windy Backdrop on the top layers.

I used Ranger Distress Ink in Vintage Photo to ink the portions of the mold I was using.

Using Beacon 3-in-1 Advanced Craft Adhesive, I adhere the mold elements to each card.

The Prima Doll stamps were colored with Copic Markers then fussy cut for each of the cards.

Placing each stamp off center, I adhered her to the card with Scrapbook Adhesives for dimension. Then I added other elements from 7Gypsies Archtextures Trinkets - Ink Pens and Mason Jars to add visual interest.

Finally I stamped a phrase from 49 and Market's Gabi's Hibiscus stamp set and used a mini clothes pin which can be found in the ArtC Ephemera Collage Kit, to adhere them to the cards.

Thank you for visiting
Subscribe to:
Posts
(Atom)


