Showing posts with label Ciao Bella. Show all posts
Showing posts with label Ciao Bella. Show all posts
Thursday, September 2, 2021
Thanks with Stamping Bella
Hi everyone, Steph Ackerman here today with lots of fun products from the store.


Ciao Bella has some beautiful stencil and I've used Ciao Bella Blossom stencil to create the background of my card. I first inked the stencil with Ranger Distress Oxide Ink in Abandoned Coral.

Since I was using the stencil on dark cardstock, I then used Ranger Clear Embossing Powder on top to give the design dimension.

Since I usually get embossing powder everyway, the Sizzix Anti-Static Funnel Tray by Tim Holtz is the perfect tray to keep the powder confined and then it easily poured back into its original jar.

I matted the panel with white cardstock.

Wrapping the panel with ribbon, I then added the panel to a card created with Bazzill Pale Rose Cardstock using 3D Foam Adhesives for dimension.

I stamped Stampingbella's Daisy Squidgy and colored her with Copic Markers. Thanks, which was included with the stamp set, was stamped and tied to the ribbon with Baker's Twine.

Thank you for visiting.
Thursday, August 12, 2021
Mixed Media Tags with Simple Stories
Hi everyone, Steph Ackerman here today with lots of fun products from the store.

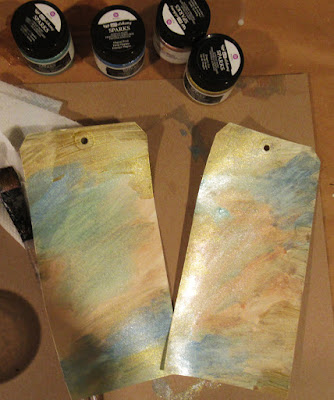


Wanting something a little different, I used Prima Marketing Art Alchemy Acrylic Paints on large tags from Dylusions Journal Tags #10. The colors are gorgeous so I mixed up an assortment of colors including Ice Queen, Gold Amber, Frozen Berries and Soft Satin and painted them randomly on the tags.

Next I used one of the Ciao Bella Stencils with Lawn Fawn's Freshly Cut Grass Ink, randomly adding a pattern around the tag.

Net I cut apart Simple Stories Simple Vintage Farmhouse papers to decorate the tags.

I also fussy cut the words to fit the tags. This is a little time consuming as the words are delicate, but the results were worth it.

Next, I used a script stamp (similar to this Ciao Bella Stamp) and randomly stamped it about the tags. Then I added May Arts Celery Green Sheer Ribbon to finish off the tags.

Thank you for visiting
Thursday, July 22, 2021
Ciao Bella Stenciled Cards
Hi everyone, Steph Ackerman here today with lots of fun products from the store.


The Cia Bella Fern Stencil measures 5" x 8" and is perfect to use as a background for your projects.

Using the Ranger Ink Blending Tool, I inked the stencil with Distress Oxide Ink in Bundled Sage and Mowed Lawn.

Once the first panel was inked, I flipped over the stencil, and, using a baby wipe, inked up a 2nd panel. This process creates a negative, watercolor effect.

Next, I took several tags from the Scrapaholics - Chipboard - ExploreTag Set, and inked with Distress Oxide Ink.

Wrapping May Arts Sheer Celery Ribbon lengthwise around one panel, I tied the tag to the ribbon with Baker's Twine.

I wrapped the same ribbon horizontally around the second panel, also tying the tag to the ribbon with Baker's Twine.

The panels were added to cards created from Echo Park - Let's Go Camping cardstock. The panels were added to the cards with EK Success 3D Dots for dimension.
Thank you for visiting
Thursday, July 1, 2021
Stenciled Sympathy Cards
Hi everyone, Steph Ackerman here today with lots of fun products from the store.


Use the Ciao Bella Stencil - Blossom, I inked cardstock using Distress Oxide Ink - Abandoned Coral.

Using Ranger Clear Embossing Powder, I covered the panel, caught the excess power in the Sizzix Making Essentials Anti Static Funnel Tray by Tim Holtz, then heat set the panel. This tray is perfect for me as I was constantly getting my powders everywhere, and this tray keeps everything confined.

With the ink still wet on the stencil, I flipped the stencil over onto Strathmore Watercolor paper, and using a baby wipe, rubbed the back of the stencil.

This process moves the ink off the stencil and onto the paper. And this is the result - a whimsical watercolor effect.

Each panel was matted with cardstock from Lawn Fawn's Tropical collection.

Cards and ovals were created from Pion Designs Pion Black cardstock. The panels were wrapped with ribbon before being added to the cards.

Sorry was stamped with Lawn Fawn Black Licorice Ink, embossed and die cut.

The tiny phrase was also stamped with Lawn Fawn Black Licorice ink then die cut with the smallest Lawn Fawn Small Stitched Rectangle. Since I wanted it a little smaller, after the first cut, I rearranged the die and cut it again. This kept the stitching on the panel.

Thank you for visiting
Thursday, June 10, 2021
You Brighten My Day with Simple Stories
Hi everyone, Steph Ackerman here today with lots of fun products from the store.


I wanted to create a bright and colorful card using one of the frames from the Simple Stories - Simple Vintage Farmhouse Garden Chipboard Frames set.

I wanted the frame to stand out but wanted some background dimension on the card so I used the Ciao Bella Blossom Stencil.

I used Ranger Distress Oxide Ink in Abandoned Coral, repeatedly moving the stencil around the card.

I poured Ranger Clear Embossing Powder over the stenciled design and used the Sizzix Making Essentials Anti Static Funnel Tray to catch the embossing powder. I usually get embossing powders and glitters everywhere, but this tray made it so easy to keep the embossing powder from exploding.

I think it made a wonderful background for the card.

I cut a panel of Simple Stories Vintage Farmhouse Garden to fit behind one of the frames, then adhered the panel to the card. Inside the card, I added another sheet of paper from this collection to finish.

The phrase was stamped with Lawn Fawn Black Licorice Ink, die cut with Lawn Fawn Small Stitched Circle Die and matted with a larger die.
Thank you for visiting
Thursday, January 7, 2021
Mini Album with Ciao Bella Frozen Roses Collection
Hi everyone, Steph Ackerman here today with lots of fun products from the store. Please visit the store for all the fun products I've used today.


The Ciao Bella Frozen Roses 6x6 paper collection is a fun collection of 24 double sided papers perfectly suited for winter. I had a mini album in my stash and decided to decorate it with these wonderful papers. Bazzill Lollipop Cardstock was used as a mat for each page. I used large circle dies, but you could also use a plate and free hand cut each page.

Selecting one of the papers for the cover, I used Nuvo Jewel Drops to add color to the flowers by the gazebo. I used a Lawn Fawn line die to add happy holidays across the top of the album.

Additional Nuvu Jewel Drops were added throughout the album.

The interior pages are comprised of images from this collection which I fussy cut.

I created a pocket on one of the pages and inserted a tag from the collection tied with May Arts Sheer Ribbon. A perfect place to add a sentiment or a photo.

There are lots of berries on these papers so I added Ranger Liquid Pearls in Garnet to the berries to give them dimension throughout the album.

Aren't the papers gorgeous? They are so detailed and really put you in a winter mood.

Creating a mini album can be a continuous feat, always finding something else to add, so at some point I needed to stop!!!

Thank you for visiting
Monday, March 18, 2019
Memories layout page at The Rubber Buggy

Hi it's Bev here at The Rubber Buggy. I am sharing a "dream" page using a photo of my eldest Grand Daughter and her friend spending time together. I am using Ciao Bella Le Repubbliche Marinare Collection, 49 and Market Flowers and lots of other products. With the colouring in the papers I chose to use the chipboards naked to coordinate ... perfect colouring match.
The Rubber Buggy Products
Paper: Ciao Bella Repubbliche Marinare Collection
Flowers: 49 and Market Garden Seeds Cotton,
Medium: Prima Market White Gold Icing paste
Stencil: Crafters Workshop, TCW 605
Paper: Ciao Bella Repubbliche Marinare Collection
Flowers: 49 and Market Garden Seeds Cotton,
Medium: Prima Market White Gold Icing paste
Stencil: Crafters Workshop, TCW 605
Glue: Beacon 3-in-1 Glue,
Accents: Scrapbook 3D foam
Machine/ tools: EK success cutter bee scissors, Fiskar Paper Trummer,
Other: stickers, pearl flourishes, paint,

For this page I paint splattered in green and stenciled in gold. I then fussy cut on right side to slide in a piece of dark brown burlap type accent ribbon.

Next I chose the circle panel for a photo background, pulled basic alpha letters for the word "dream" and also grabbed more chipboards and added sticker to the cluster.

In the close up views you can see the floral accents in better detail.


Thanks for stopping by... hope to see you again soon.... but in the mean time be sure to stop by the STORE where these items and so many others are available. Also take note of all the products that aren't carried in our regular local stores. ... AND the service is A1.

Subscribe to:
Posts
(Atom)