Showing posts with label Ribbons. Show all posts
Showing posts with label Ribbons. Show all posts
Thursday, July 22, 2021
Ciao Bella Stenciled Cards
Hi everyone, Steph Ackerman here today with lots of fun products from the store.


The Cia Bella Fern Stencil measures 5" x 8" and is perfect to use as a background for your projects.

Using the Ranger Ink Blending Tool, I inked the stencil with Distress Oxide Ink in Bundled Sage and Mowed Lawn.

Once the first panel was inked, I flipped over the stencil, and, using a baby wipe, inked up a 2nd panel. This process creates a negative, watercolor effect.

Next, I took several tags from the Scrapaholics - Chipboard - ExploreTag Set, and inked with Distress Oxide Ink.

Wrapping May Arts Sheer Celery Ribbon lengthwise around one panel, I tied the tag to the ribbon with Baker's Twine.

I wrapped the same ribbon horizontally around the second panel, also tying the tag to the ribbon with Baker's Twine.

The panels were added to cards created from Echo Park - Let's Go Camping cardstock. The panels were added to the cards with EK Success 3D Dots for dimension.
Thank you for visiting
Thursday, July 1, 2021
Stenciled Sympathy Cards
Hi everyone, Steph Ackerman here today with lots of fun products from the store.


Use the Ciao Bella Stencil - Blossom, I inked cardstock using Distress Oxide Ink - Abandoned Coral.

Using Ranger Clear Embossing Powder, I covered the panel, caught the excess power in the Sizzix Making Essentials Anti Static Funnel Tray by Tim Holtz, then heat set the panel. This tray is perfect for me as I was constantly getting my powders everywhere, and this tray keeps everything confined.

With the ink still wet on the stencil, I flipped the stencil over onto Strathmore Watercolor paper, and using a baby wipe, rubbed the back of the stencil.

This process moves the ink off the stencil and onto the paper. And this is the result - a whimsical watercolor effect.

Each panel was matted with cardstock from Lawn Fawn's Tropical collection.

Cards and ovals were created from Pion Designs Pion Black cardstock. The panels were wrapped with ribbon before being added to the cards.

Sorry was stamped with Lawn Fawn Black Licorice Ink, embossed and die cut.

The tiny phrase was also stamped with Lawn Fawn Black Licorice ink then die cut with the smallest Lawn Fawn Small Stitched Rectangle. Since I wanted it a little smaller, after the first cut, I rearranged the die and cut it again. This kept the stitching on the panel.

Thank you for visiting
Thursday, April 8, 2021
Stamping Bella Thanks Card
Hi everyone, Steph Ackerman here to share a sweet thank you card.
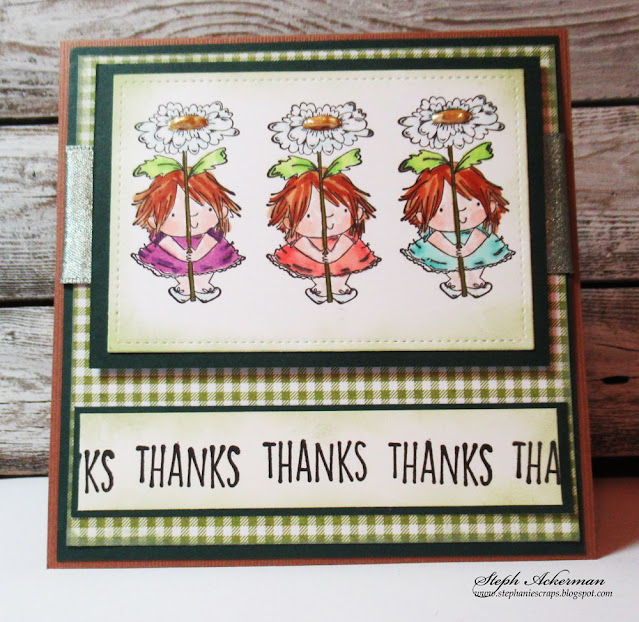


This Stamping Bella stamp set - Daisy Squidgy is so much fun to create with. The stamp set comes with 2 different sized images and a sentiment.

I stamped the smaller image three times on white cardstock, then die cut it with Lawn Fawn Small Stitched Rectangle Stackables. After coloring with Copic Markers, I added Liquid Pearls to the centers of the daisies. The panel was matted with Echo Park Dark Green Cardstock.

Creating a card from Echo Park Brown Cardstock, I wrapped a checked panel with ribbon and adhered the panel to the card.

Thanks was stamped repeatedly on a scrap of cardstock, then cut to fit the card.

Thank you for visiting
Thursday, October 17, 2019
Happy Holidays with Wild Rose Studio
Hi everyone, Steph Ackerman here today with lots of fun products from the store. Please visit the store for all the fun products I've used today.

Christmas is only 11 weeks away so it's time to start creating Christmas cards. I've used the Mia with Candy from Wild Rose Studio - a sweet stamp, perfect for your Christmas cards or even general holiday cards. I stamped her twice on Lawn Fawn white cardstock with Memento Tuxedo Black Ink then colored the images with Copic Markers.

I die cut the images using Lawn Fawn Small Stitched Circle Dies, then added them to green cardstock which was die cut with Lawn Fawn Large Stitched Circle Dies.

The cards were created using Bazzill Wax Lips cardstock, cut to 5 1/2" x 11" and scored in half with Scor-Pal Scoring Board. The papers are from Graphic 45's Joy To The World collection which I mixed and matched to create my cards.
May Arts Sheer Ribbon was wrapped around the panels before adding the images with Scrapbook Adhesives 3D Foam Adhesives for dimension. Baker'sTwine was then tied around the ribbon to add some color.
The included phrase was stamped with Memento Tuxedo Black Ink on Lawn Fawn white cardstock, matted with green and red cardstock and then added to the card with Scrapbook Adhesives 3D Foam Adhesives for dimension.
Thank you for visiting

Christmas is only 11 weeks away so it's time to start creating Christmas cards. I've used the Mia with Candy from Wild Rose Studio - a sweet stamp, perfect for your Christmas cards or even general holiday cards. I stamped her twice on Lawn Fawn white cardstock with Memento Tuxedo Black Ink then colored the images with Copic Markers.

I die cut the images using Lawn Fawn Small Stitched Circle Dies, then added them to green cardstock which was die cut with Lawn Fawn Large Stitched Circle Dies.

The cards were created using Bazzill Wax Lips cardstock, cut to 5 1/2" x 11" and scored in half with Scor-Pal Scoring Board. The papers are from Graphic 45's Joy To The World collection which I mixed and matched to create my cards.
May Arts Sheer Ribbon was wrapped around the panels before adding the images with Scrapbook Adhesives 3D Foam Adhesives for dimension. Baker'sTwine was then tied around the ribbon to add some color.
The included phrase was stamped with Memento Tuxedo Black Ink on Lawn Fawn white cardstock, matted with green and red cardstock and then added to the card with Scrapbook Adhesives 3D Foam Adhesives for dimension.
Thank you for visiting
Thursday, September 26, 2019
Enjoy Every Moment
Hi everyone, Steph Ackerman here today with lots of fun products from the store. Please visit the store for all the fun products I've used today.

I'm using Stamping Bella's Gilbert and Maisy under the Toadstool, stamping the image with Memento Tuxedo Black Ink on Lawn Fawn White cardstock, then coloring it with Copic Markers.

The image was die cut with Lawn Fawn Small Stitched Rectangle Stackable dies then matted on Bazzill Wax Lips cardstock.

A plaid background was also matted with Bazzill Wax Lips cardstock, then wrapped with Sheer White Stitched Ribbon. The stamped panel was added to the card with Scrapbook Adhesives 3D Foam Adhesives.

The phrase is from 49th and Market - Valerie's Enjoy Every Moment Stamp Set. It was also stamped with Memento Tuxedo Black Ink on Lawn Fawn White cardstock, matted with Bazzill Wax Lips cardstock and placed on the card.

Thank you for visiting
Tuesday, May 5, 2015
Darling child scrapbook layout
Hi everyone!
Pi here with another scrapbook layout.
Did you see Bev's gorgeous layout yesterday?
One can only do ones best to follow that - LOL!

The journaling is acutally the lyric from a Swedish song by Jessica Nilsson, that I read as a poem on my son's Christening. It simply says how much we've longed for our child and how our lifes has a new meaning and purpose now.

 I
mixed products from my stash with great pieces from The Rubber Buggy
store. The background is a textured cardstock from my stash, but if you
are looking for more muted tones, please check out Pion Designs palette papers. They are sturdier than their pattern papers and I'm pretty sure that Pion blue IV is a good match to the colour I've used.
I
mixed products from my stash with great pieces from The Rubber Buggy
store. The background is a textured cardstock from my stash, but if you
are looking for more muted tones, please check out Pion Designs palette papers. They are sturdier than their pattern papers and I'm pretty sure that Pion blue IV is a good match to the colour I've used.
I'm very happy with my combination of different embellishments to add texture and depht to my page. The white lace is perfectly dainty and yet, simple enough to fit a boy layout. I tried a number of venice drop lace, but it just looked to girly for my taste. Underneath the green lace from my stash I layered a white grossgrain ribbon. I'm super excited to have found such a good use of a doily. Love them, but they rarely look good on my projects from some reason? But here I thought it was the perfect match :)
My favorite pieces however on this layout is the shabby staples from Graphic 45. They add just a little weight to the layout.
Products used from the store:
Graphic 45 staples shabby chic ornate metal key holes
Graphic 45 staples shabby chic ornate metal keys
White lace w satin center
White grossgrain ribbon w satin edge
Doilies 5,5inches
Stamping supplies (doublesided tape, score tape, scissors)
Thank you for visiting!
Pi here with another scrapbook layout.
Did you see Bev's gorgeous layout yesterday?
One can only do ones best to follow that - LOL!
The journaling is acutally the lyric from a Swedish song by Jessica Nilsson, that I read as a poem on my son's Christening. It simply says how much we've longed for our child and how our lifes has a new meaning and purpose now.
I
mixed products from my stash with great pieces from The Rubber Buggy
store. The background is a textured cardstock from my stash, but if you
are looking for more muted tones, please check out Pion Designs palette papers. They are sturdier than their pattern papers and I'm pretty sure that Pion blue IV is a good match to the colour I've used.I'm very happy with my combination of different embellishments to add texture and depht to my page. The white lace is perfectly dainty and yet, simple enough to fit a boy layout. I tried a number of venice drop lace, but it just looked to girly for my taste. Underneath the green lace from my stash I layered a white grossgrain ribbon. I'm super excited to have found such a good use of a doily. Love them, but they rarely look good on my projects from some reason? But here I thought it was the perfect match :)
My favorite pieces however on this layout is the shabby staples from Graphic 45. They add just a little weight to the layout.
Products used from the store:
Graphic 45 staples shabby chic ornate metal key holes
Graphic 45 staples shabby chic ornate metal keys
White lace w satin center
White grossgrain ribbon w satin edge
Doilies 5,5inches
Stamping supplies (doublesided tape, score tape, scissors)
Thank you for visiting!
Tuesday, February 25, 2014
Birthday card with G45 and Kaisercraft
Hi everyone!
Pi here and I hope you all is well with you!
This week I have a birthday coming up, but that was no biggie with such wonderful products to play with :)


Have you seen the new clear stamps from Kaisercraft? If not you need to check them out! I want the entire collection.
All the layers on the card is from Graphic 45 6x6 paper pad, patterns & solids, FRENCH COUNTRY.
Products from the store:
Graphic 45, 6x6 paper pad, patterns & solids, FRENCH COUNTRY.
Kaisercraft clear stamp BIRTHDAY
WOC carnations
Bakers Twine, celery
Magnolia, vintage berries, creamy
Grossgrain ribbon w satin edge, white
Stamping supplies (memento ink, score tape)
Thank you for visiting!
Pi here and I hope you all is well with you!
This week I have a birthday coming up, but that was no biggie with such wonderful products to play with :)


Have you seen the new clear stamps from Kaisercraft? If not you need to check them out! I want the entire collection.
All the layers on the card is from Graphic 45 6x6 paper pad, patterns & solids, FRENCH COUNTRY.
Products from the store:
Graphic 45, 6x6 paper pad, patterns & solids, FRENCH COUNTRY.
Kaisercraft clear stamp BIRTHDAY
WOC carnations
Bakers Twine, celery
Magnolia, vintage berries, creamy
Grossgrain ribbon w satin edge, white
Stamping supplies (memento ink, score tape)
Thank you for visiting!
Wednesday, April 17, 2013
Prima Hello Pastel 12 x 12 layout "Family"
Hello everyone it's Kelly. You may have noticed that I have been doing quite a bit with the Hello Pastel collection, well there is so much you can do with this paper and embellishments that I am addicted and cannot stop. I wanted to share with you a layout I made to enter over at the Prima BAP challenge but almost everything you see you can purchase over at The Rubber Buggy.
This was a very simple layout and didn't require a lot of time so it's one that would be easy for anyone to do and not feel intimidated about as I do sometimes with the more detailed projects.

I used:
Hello Pastel 6x6 paper line
Hello Pastel flower embellishments
Thank you for visiting ~Kelly Walkelmol for The Rubber Buggy
This was a very simple layout and didn't require a lot of time so it's one that would be easy for anyone to do and not feel intimidated about as I do sometimes with the more detailed projects.

I used:
Hello Pastel 6x6 paper line
Hello Pastel flower embellishments
Thank you for visiting ~Kelly Walkelmol for The Rubber Buggy
Subscribe to:
Posts
(Atom)


