Friday, August 30, 2013
My Angel
Good morning, Steph here today with a sweet stamp from Penny Black. In the Slapstick line, this stamp is from Mo Manning and her name is Angel Among Us. Who wouldn't want to receive this sweet card - whether for a congratulations on a new arrival to a thinking of you card.

She was stamped with Memento Ink on Copic XPress It cardstock and then colored with Copic Markers before fussy cutting and placing her on a circle of black - showcasing the subtle coloring. The pattern paper is from Prima Marketing.
Thank you for visiting.

She was stamped with Memento Ink on Copic XPress It cardstock and then colored with Copic Markers before fussy cutting and placing her on a circle of black - showcasing the subtle coloring. The pattern paper is from Prima Marketing.
Thank you for visiting.
Wednesday, August 28, 2013
Buildings by the harbor Magnolia style
Hi Rubber Buggy friends it's Kelly here. Today I worked on a layout for you to show case the new Magnolia stamps mini houses. It is styled to contain 3 little beach/cabana style houses and they have a by the sea feel to them with their woodgrain fronts and little broken steps to the doors. They are teeny tiny but as you can see I stamped them out on pattern paper and gave them such a unique and interesting hook on texture then pop dotted up it really adds a little ooomph to this layout.


The paper collection I used was the Bo Bunny Key Lime collection including paper & diecuts from these as well as the jewels to finish it at the top...girly style. The flowers I used were from the Divine collection for the larger 2 flowers, and then the Hello Pastel collection mini gray stripe flower all from PRIMA. I also added little mini olive mulberry leaves to these as well posting a very cute adorable accent to a fun page and a fun trip that I took with my daughter and sister. I really love how all the elements went together from the yellow doily down to the chevron trim fish tail banner at the top layer, layer, layer and it's super cute! You can find all these items over at The Rubber Buggy .
Thank you for visiting ~Kelly
Tuesday, August 27, 2013
Magnolia ahoy!
Hi everyone!
It's Pi here with another terrific Tuesday post for you all :)
What do you think of my sailer card?

I've had this amazing Maja design paper for years and I thought it was well overdue to put them to good use and how could you resist this adorable Tilda stamp:) As usual I coloured her with my copic markers. I used the E-series and B9-serie, there are some traces of the C01 and C03 in there as well.
The smaller roses are coloured with LSG whale watch blue and the larger one with afternoon delight demin.I've also tucked some buttons from my stash, I just cut the back thing of with my pliers. In the mix of flowers and die cuts I've also tucked some vintage berries, leaving the frosted ones out. I made the post card myself with postage stamps from Magnolia.
Products used from the store:
Magnolia rubber stamp, dangling sea Tilda
WOC wild rose. 40mm
WOC open rose, 25mm
Magnolia vintage berries white
MFT die-namic leafy flourish lg
MFT die-namic leafy flourish sm
Lace with pearl center
Flat backs
copics
Thank you for visiting!
It's Pi here with another terrific Tuesday post for you all :)
What do you think of my sailer card?
I've had this amazing Maja design paper for years and I thought it was well overdue to put them to good use and how could you resist this adorable Tilda stamp:) As usual I coloured her with my copic markers. I used the E-series and B9-serie, there are some traces of the C01 and C03 in there as well.
The smaller roses are coloured with LSG whale watch blue and the larger one with afternoon delight demin.I've also tucked some buttons from my stash, I just cut the back thing of with my pliers. In the mix of flowers and die cuts I've also tucked some vintage berries, leaving the frosted ones out. I made the post card myself with postage stamps from Magnolia.
Products used from the store:
Magnolia rubber stamp, dangling sea Tilda
WOC wild rose. 40mm
WOC open rose, 25mm
Magnolia vintage berries white
MFT die-namic leafy flourish lg
MFT die-namic leafy flourish sm
Lace with pearl center
Flat backs
copics
Thank you for visiting!
Monday, August 26, 2013
Happy Haunting
Hello, it's Indah again! It's almost the end of August, and you know what that means! It's time to get out those creepy crafting supplies and let them play! Just like I did here, I made a Halloween card!

I made this card using Witch Tilda which then I colored using Copic markers. Hope you like it and creates more Halloween cards! :)
Saturday, August 24, 2013
Bikini Tilda, Sea Breeze collection by Deb.x
Hi there, it's Deb here & today I'm sharing another Magnolia card with you. I thought I'd ink up my brand new Bikini Tilda & use the matching papers to showcase the new Sea Breeze collection.
The papers I used are Vintage Summer Roses, Grandpas Rose Garden, from the Sea Breeze collection & New England Wood from Bon Voyage collection. I distressed the edges with Antique Linen and Walnut Stain using a blending tool then scored with the edge of the scissors.

The card blank & Vintage tag eyelet is kraft cardstock & papers are matted onto white Bazzil cardstock. Tim Holtz on the edge scrollwork die has been cut from kraft & distressed with Snow Tex. The bunting (which I have to say is my absolute favourite thing at the mo!) I hand cut & curled around the twine. I then wrapped the twine around my finger & secured the loops with staples.

The image has been coloured with Tim Holtz Distress Inks on watercolour paper with a (dry) watercolour brush. Stamps around the image are HOTP & LOTV. The topper is mounted on a Spellbinders die that I cut from kraft card, distressed with Picket Fence Distress Stain & threaded with thick twine. I then edged the Tilda topper with pearl bead string. The 2 clay corners are handmade with Martha Stewart clay moulds & white air-dry clay.

Distress Inks:
Skin - Tattered Rose, Vintage Photo
Cheeks - Tattered Rose mixed with Aged Mahogony
Hair - Antique Linen, Walnut Stain
Bikini & Flowers red - Aged Mahogony
Highlighted with Sakura Pen-Touch - White

The swirl above is a Doo Huckey die & the die cut flowers are a Marriane design rolled roses die. Other flowers are mainly Kort & Godt.

I LOVE making bunting & whilst everyone seems to be out of stock of the lovely Mganolia Doo Hickey bunting dies at the moment - I thought I'd hand cut my own! I left a tab that I curled around the thick twine, then cut little knotches & distressed for a shabby chic look, I then spelled out 'fun' in mini-alphas.

Above shows the removable Doo Hickey Vintage tag with Tim Holtz stamped sentiment & Blue Moon silver heart charm. Below shows peek of inside! Sentiment is from HOTP CD-rom.

Suggestions for Rubber Buggy Products:
Thank you for visiting
Friday, August 23, 2013
Tilda With Daisy
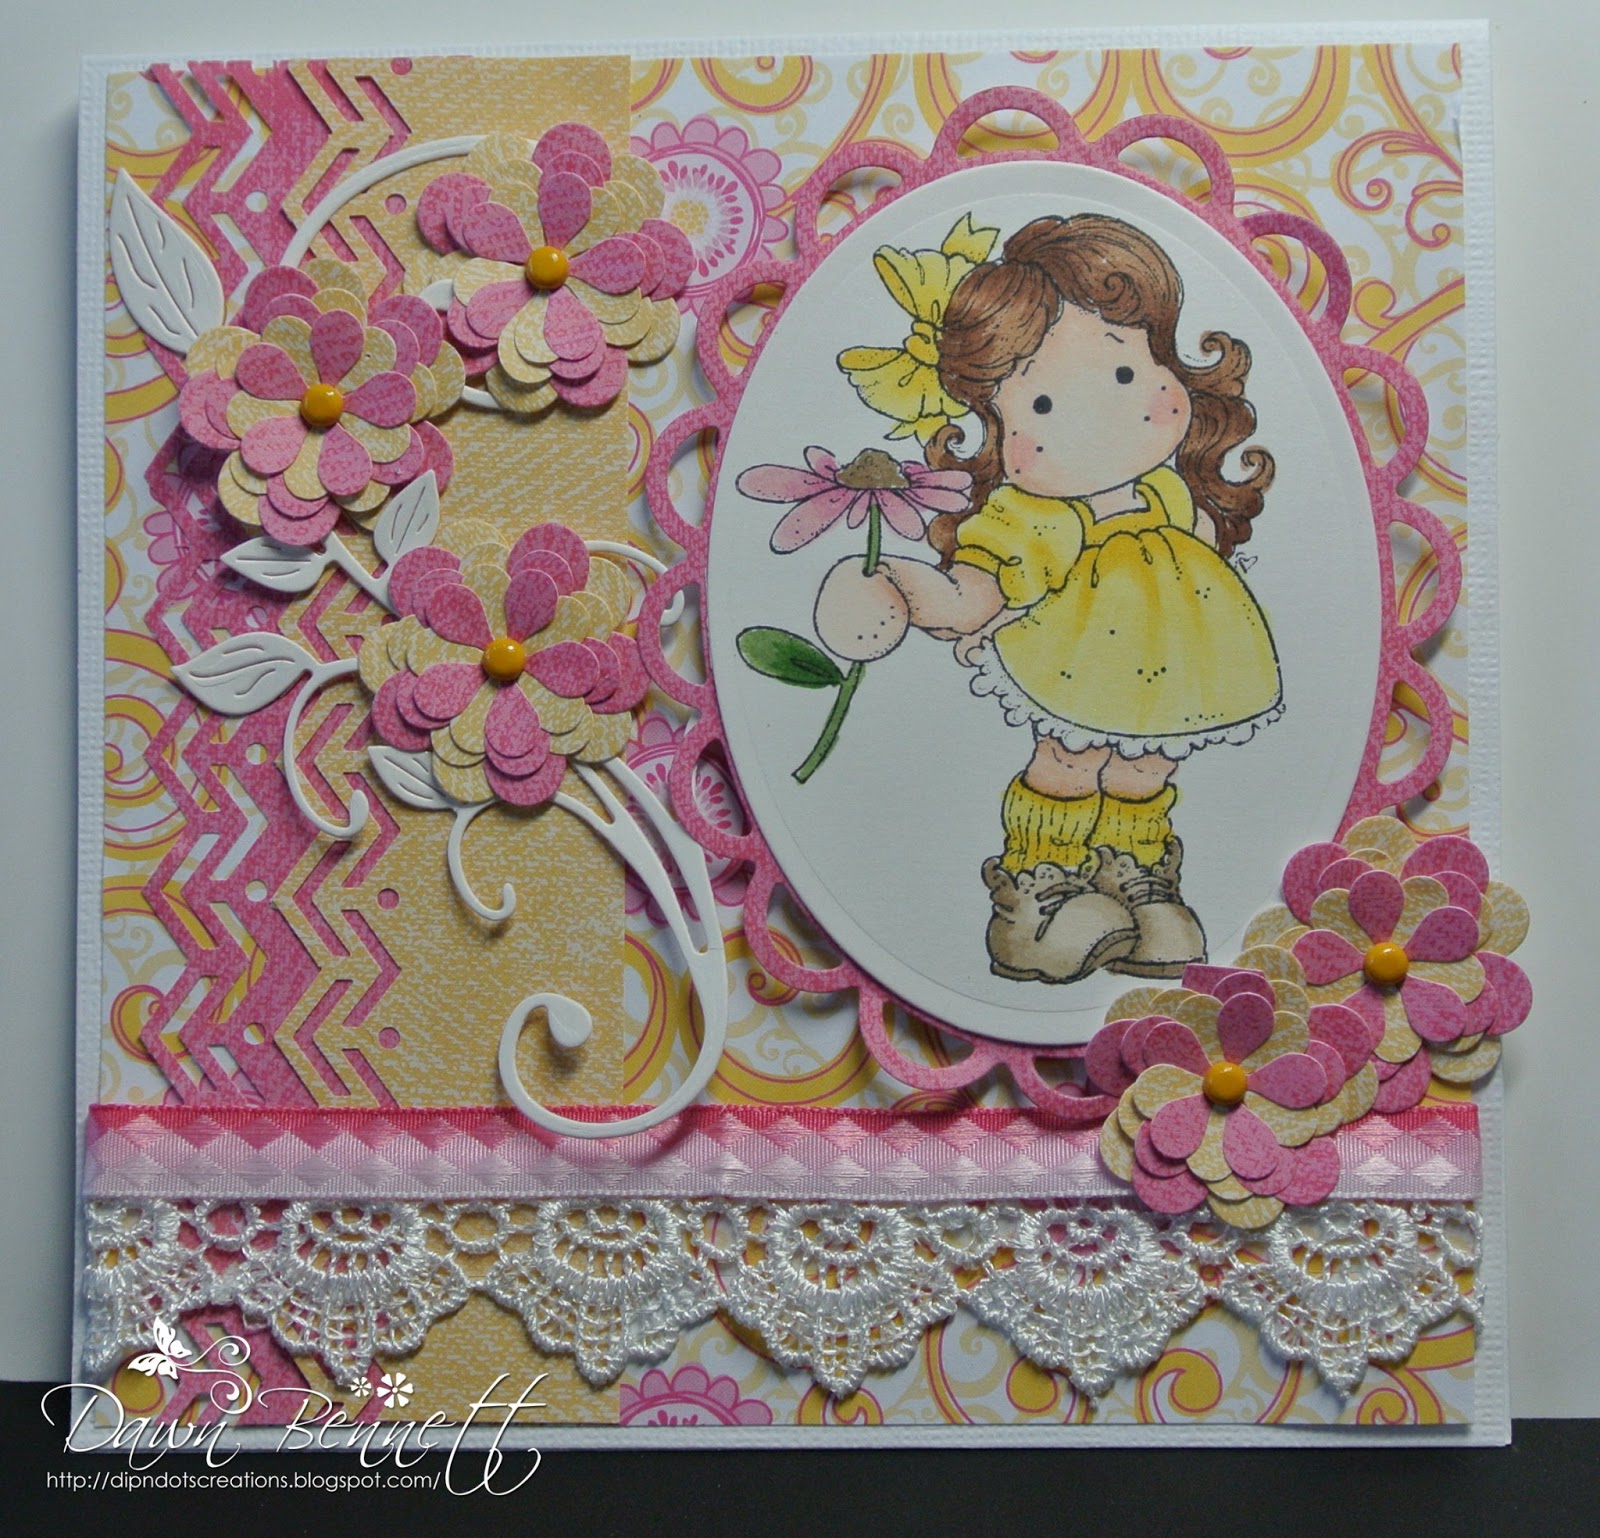
Hi Everyone!!! Dawn here on this fabulous Friday with my post for The Rubber Buggy, to show you some more inspiration using some wonderful stamps and products from the Store.
Today I used a stamp called "Tilda With Daisy" from the Sweet Crazy Love 2012 collection.

 My card measures 6" square. I stamped my image
onto some cryogen CS and colored her in using
copics. Here's a closer peek at my colored image.
I used some of my flower dies to create my flowers and for the flourish. I added some lace and ribbon.
See you all back next Friday with some more inspiration. The challenge blog is up and running, so checkout the awesome challenge we have in store for you all.....
Happy Stamping!!!!!
Wednesday, August 21, 2013
Back to school
I was unable to get my challenge card for the Rubber Buggy in time for the challenge blog so I wanted to share it here with you on the Design team blog. It is using the Geekin it girl by Saturated Canary sold at The Rubber Buggy. I basically layered my papers and added a few embellishments including journey metal tag and twine. I added a little flat back pearl to the fishtale banner and a few flowers from my stash and here is the finished product and I love how it came out. Super cute! Hope you like it and head over to the Rubber Buggy store to purchase the adorable stamp and some pretty flowers to create your own card!
 Thanks for looking ~Kelly

Cycling by....
Hi everyone, Steph here today and I'm loving this awesome Bildmalarna Stamp - Picnic , stamping her with Memento Tuxedo Black Ink on Copic Xpress It Cardstock. She was colored with Copic Markers and then fussy cut. Dimensional adhesives were used to help her stand out from the background.

I chose to create a smaller card - measuring approximately 3 1/2" x 5". A layer of Prima Divine 6" x 6" paper pad was added to the card, then some postcard elements were cut out and matted with cardstock to create a new layer of dimension.

S
Thank you for visiting.

I chose to create a smaller card - measuring approximately 3 1/2" x 5". A layer of Prima Divine 6" x 6" paper pad was added to the card, then some postcard elements were cut out and matted with cardstock to create a new layer of dimension.

S
Thank you for visiting.
Tuesday, August 20, 2013
Art journaling using distress ink and graphic 45 stamps
Hi everyone!
Pi here, doing something unusual for my usual Tuesday post at The Rubber Buggy - art journaling!
I've seen so many beautiful samples of art journaling and I've been trying to make some of my own, but I've still got a lot to learn. I thought I'd show you a spread though. It was very easy to put this one together and I like it because I think I got a lot from using just a few products - distress ink and Graphic 45 french country stamp #3.
.JPG)
First I distressed the entire page using peeled paint, tumbled glass, tattered rose and victorian velvet. I then pencilled my sentiment and filled it with a copic marker (black100). Then I stamped all over the pages in different colours. I hope you can tell that the post card stamp is used randomly partial in black soot, the bumble bee in mustard seed and the flour de lie in blue. If you look closely you'll notice that I made a border at the bottom using the branches in pine needle green. I've also stamped the "sign" stamp in peeled paint and tattered rose, sometimes right on top of each other so it looks like a shadow.

Well, I think I will be pleased eventually with the page, it grows on me. But like I said I still have a lot to learn:)
Products used from the store:
Tim Holtz distress ink
Graphic 45 French country stamp set #3
Copic marker B100
Thank you for visiting!
Pi here, doing something unusual for my usual Tuesday post at The Rubber Buggy - art journaling!
I've seen so many beautiful samples of art journaling and I've been trying to make some of my own, but I've still got a lot to learn. I thought I'd show you a spread though. It was very easy to put this one together and I like it because I think I got a lot from using just a few products - distress ink and Graphic 45 french country stamp #3.
First I distressed the entire page using peeled paint, tumbled glass, tattered rose and victorian velvet. I then pencilled my sentiment and filled it with a copic marker (black100). Then I stamped all over the pages in different colours. I hope you can tell that the post card stamp is used randomly partial in black soot, the bumble bee in mustard seed and the flour de lie in blue. If you look closely you'll notice that I made a border at the bottom using the branches in pine needle green. I've also stamped the "sign" stamp in peeled paint and tattered rose, sometimes right on top of each other so it looks like a shadow.
Well, I think I will be pleased eventually with the page, it grows on me. But like I said I still have a lot to learn:)
Products used from the store:
Tim Holtz distress ink
Graphic 45 French country stamp set #3
Copic marker B100
Thank you for visiting!
Monday, August 19, 2013
For You From Me
Hi everyone! Indah here with a new card to share with you :) I made this 6x6
card using one of the Special Moments collections from Magnolia Stamps.

I stamped her using Memento ink then colored her in using Copic markers. The
stamp is Tripping Flower Tilda from Magnolia.
Hope you like this sweet card :) I’ll see you again soon!

Hope you like this sweet card :) I’ll see you again soon!
Saturday, August 17, 2013
'Jardin' Magnolia card, Delightful Tilda, Special Moments 2013 by Deb.x
Hello Rubber Buggy fans it's Deb here (click here to visit my blog) & today I'm really excited to be back posting for my Rubber Buggy Saturday spot - appologies for my absence & lets see if we can do some making up for it by bringing you some great inspiration!
Today I've made a Magnolia card using 'Delightful' Tilda who I have to say is my absolute fave Tilda so far - just how much more appealing can these images get?!! I decided on some yummy lilac papers by Maja Design in my favourite shabby chic style, which seems to have given the card a slight Weddingy feel.

The lattice effect die is by Spellbinders, cut from Core'dinations Whitewash cardstock. I also cut the Lovely Fence die, Scalloped circle matt & large lilac flower from the same card.

I coloured with image with Distress Inks onto Watercolour paper with a normal watercolour brush. The dress has been painted in Shaded Lilac which is a fab new colour that I LOVE & it didn't really need anything adding to look great & perfectly match the papers, but that's why I love DI's so much - they have such a complex depth of colour pre-mixed which to achieve yourself with normal watercolour paints you would have to do some serious mixing & really know your stuff. DI's take all of this hard work away & are ready mixed into these stunning shades that I guarentee you perfectly compliment EVERY designer paper collection I've ever come across!

Distress Inks:
Skin - Tattered Rose, Vintage Photo
Cheeks - Tattered Rose mixed with Aged Mahogony
Hair - Antique Linen, Walnut Stain
Dress - Shaded Lilac
Tights - Pumice Stone

Flowers are a mixture of Kort & Godt and Prima. I sprinkled around the image and on some of the paper corners with White Frantage Embossing Powder then added some white pearl bead string. Below I spelled out 'jardin' in mini-alphas on the So Wrapped Doo Hickey die.

Above shows the Magnolia Doo Hicket So Lovely die with shabby seam binding bows, Tim Holtz Hardware Findings die cut from grungeboard and covered in Snow Tex & silver bird cage charm available from The Rubber Buggy. Below shows the bottom of the hindge from the Hardware Findings made in same way as lock.

Suggestions for The Rubber Buggy Products:
Thank you for visiting
Wednesday, August 14, 2013
Decorative paper strip card
Hi fellow crafty friends it's Kelly. I am here to share with you today a card that I made today inspired by a post that featured washi tape. I loved the idea and layout of the card but I did not have the washi that I wanted to use so I decided to make a similar card using strips of Bohemian bazaar paper from The Rubber Buggy. After I adhered them I cut a small note card from the collection and popped it up with adhesive then added a twine bow at the top and some small carnation flowers and a mulberry rose flower from the Rubber Buggy store. The turquoise colored rose flower is actually a Prima flower from the Hello Pastel collection also available at The Rubber Buggy. I hope you like it, a simple card takes about 10 minutes to make and is very practical for any design of paper you need to accomodate a card for. Thanks for watching for my blog post and I hope you enjoy the Rubber Buggy products, if so please head over to the store and catch up on all the amazing new items including stamps and inks. Have a great day! ~Kelly Walkelmol


Hello Friend
Hi everyone, Steph here today with a fun new stamp available in the store.
I was thrilled when Kelly added the new Prima Marketing Dolls to the store and I just had to pick up several.
Today I'm using DOLL #5. I stamped her on Copic Xpress It Cardstock and also on a pattern paper from Bo Bunny's Trail Mix collection. I fussy cut the doll and the dress then assembled them. How sweet she looked!
But then I ran into a problem. I wanted to create a 5 1/2" x 5 1/2" card but the doll measures almost 7". So, I decided to chop off her legs!!!! Oh my, not really what I wanted to do, but she still looks good, even without legs!!! A little bit of brown ink around the edges and you'd never know she had legs to begin with!
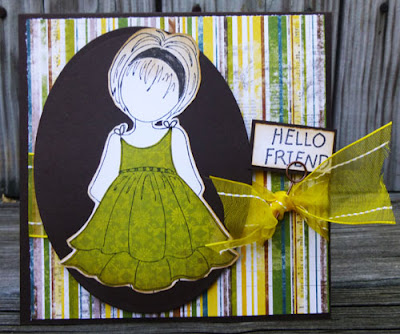
I cut another sheet of paper from the Bo Bunny Trail Mix Collection 5 1/4" x 5 1/4", then tied some beautiful May Arts Yellow Sheer Ribbon around this panel. Placing a large die cut oval on top, I then added my doll with foam adhesives for dimension.
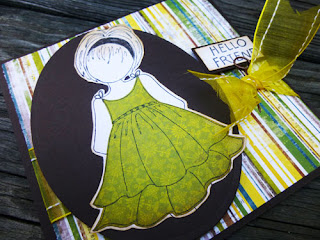
The little pin is from Tim Holtz and is called a Memo Pin. It's perfect for holding a little message so I added my sentiment.
Thank you for visiting
Tuesday, August 13, 2013
Prima Engraver card
Hi everyone!
It's time for a new Tuesday post from Pi:)
Have you seen all the stickles Kellie stocked recently?

I'm showing a card made with the negative from a die cut in the focus. The layout is based on MFT WSC136.
Products used from the store:
Prima Engraver paper pad
MFT die-namics decorative doily (part of)
MFT die--namic large leafy flourish
MFT die-namic leafy flourish
Tim Holtz Tissue tape symphony
Twine
Crystals
Thank you for visiting!
Stay tuned for our upcoming challenge tomorrow :)
Monday, August 12, 2013
Movie Inspired
Hi everyone! It's Monday again and it's Indah here with a card to share with you all :)
I was looking at my stamps and felt inspired to make cards that were inspired by movies. If you see the stamps at the store it's easy to pick out stamps that are inspired by movies. So I went and made one that wasn't too obvious. I made this card inspired by Bridget Jone's Diary :)

I was looking at my stamps and felt inspired to make cards that were inspired by movies. If you see the stamps at the store it's easy to pick out stamps that are inspired by movies. So I went and made one that wasn't too obvious. I made this card inspired by Bridget Jone's Diary :)

I used Invitation Tilda from Magnolia and I colored her in using Copic markers. This card was so fun to make and I hope it inspires you to make a card that resembles or inspired by a movie :)
Friday, August 9, 2013
A blast from the past
Hi Everyone!!! I have been MIA for the past 2 weeks, I am dealing
with some family issues and some health issues. So I am going to go
back and show you a card I made in the past. This is one of my
favorites and I hope you all enjoy it. I am here on this fabulous
Friday with my post for The Rubber Buggy, to show you some more inspiration using some wonderful stamps and products from the Store.
 Today I used a stamp called "Little Ladybug" from the Saturated Canary collection.
See you all back next Friday with some more inspiration. The challenge blog is up and running, so checkout the awesome challenge we have in store for you all.....
Happy Stamping!!!!!

See you all back next Friday with some more inspiration. The challenge blog is up and running, so checkout the awesome challenge we have in store for you all.....
Happy Stamping!!!!!
Thursday, August 8, 2013
Princess Tilda Magnolia stamped card
Good morning crafty friends it's Kelly with a very bright project for you today. I used an image from The Rubber Buggy called Princess Pea Tilda from the Magnolia collection. She is super cute and sitting down so I incorporated a Graphic 45 paper stack in to this mix, the bright colors are perfect and I cut a little notecard out to make her sit on and she is just darling. It's a pretty simple card I cut a 6x6 piece of the G45 Bohemian Bazaar from the Rubber Buggy. I glimmermisted a mask by Christi Tomlinson called vintage lace and cut it out to make my own doily background. I then adhered the image over top of the notecard and then adhered that to the card and added a few little embellishments along with a saying and trimmed it out with green twine at the top. I decided I wanted her to pop a little after finishing the card so I added some stickles to her hair & body. Here she is:

The copic colors I used were:
E02, 21
RV 022, 09, 06
FRV1
B18, 93, 000
Thanks so much for looking & commenting and have a great day! ~Kelly Walkelmol

The copic colors I used were:
E02, 21
RV 022, 09, 06
FRV1
B18, 93, 000
Thanks so much for looking & commenting and have a great day! ~Kelly Walkelmol
Wednesday, August 7, 2013
Gift Bag
Hi everyone, Steph here today.
Rather than create a card this week, I chose to create a gift bag. There is something truly unique about giving someone a gift in a gift bag you have created. I love creating gift bags - each one comes out so different and it is something the recipient loves to admire before opening their gift!!! and

I used Bildmalarna's Picnic stamp, stamping her with Memento Tuxedo Black Ink on Copic Xpress It Cardstock. I then colored her with Copic Markers and fussy cut her.
The pattern papers are from Graphic 45 - French Country- what an amazing paper collection. I die cut an oval on which to mount the image, then added the image with foam adhesives for dimension.

Thank you for visiting.
Tuesday, August 6, 2013
Graphic 45 steampunk spell card
Hi everyone!
Pi here to present my latest creation with G45
.JPG)
To achieve the inverse scalloped edge I used the MFT die-namic picket fence, only the top.
If I haven't told you already, I'm a hoarder and my closet is filled to the brim. I therefore caved in and used one of my treasured prima blings.
Products used from the store:
Graphic 45, steampunk spells, 8x8 paper pad
Graphic 45, steampunk spells patterns & solids, 6x6 paper pad
Graphic 45, staples, metal ornate keyholes
Graphic 45, staples, metal ornate keys
Graphic 45, steampunk spells, chipboard 1
MFT die-namic, picket fence
WOC wild rose, 40mm
WOC open rose, 10mm
WOC open rose, 25mm
WOC hip rose buds
Prima distress tool
Thank you for visiting!
Hugs!
Pi here to present my latest creation with G45

To achieve the inverse scalloped edge I used the MFT die-namic picket fence, only the top.
If I haven't told you already, I'm a hoarder and my closet is filled to the brim. I therefore caved in and used one of my treasured prima blings.
Products used from the store:
Graphic 45, steampunk spells, 8x8 paper pad
Graphic 45, steampunk spells patterns & solids, 6x6 paper pad
Graphic 45, staples, metal ornate keyholes
Graphic 45, staples, metal ornate keys
Graphic 45, steampunk spells, chipboard 1
MFT die-namic, picket fence
WOC wild rose, 40mm
WOC open rose, 10mm
WOC open rose, 25mm
WOC hip rose buds
Prima distress tool
Thank you for visiting!
Hugs!
Subscribe to:
Posts
(Atom)


