Saturday, April 30, 2022
Alice's Tea Party
Grab a cup of tea and visit with me today as we create a bit of magic with the new Graphic 45 Alice in Wonderland Tea Party collection. Nancy, here, to share a very fun card with the new arrival of of Alice's favorite cast of characters especially the adorable Alice's bunny. You will love the soft blues, grass greens, and precious corals and pinks. The Rubber Buggy carries the entire collection and you won't want to miss out of having this in your crafting supply this year.


To get that beautiful gold sentiment on cardstock, I typed the sentiment and printed on cardstock on my toner ink printer and then ran the cardstock through my laminator with gold foil on top. If you don't have a toner ink printer, take you printed out cardstock to a printing shop that has a toner ink printer since most printer shops use toner.
Also, Scrapiniec Wonderland has several chipboards of Alice In Wonderland that coordinates beautifully well with this story.

Additional supplies used:
So get crafting and have a fabulous day and thanks for visiting.
The Rubber Buggy has the crafting supplies for your next project. So have fun crafting this weekend with these products. My cards and projects are always posted on Saturday. Keep watching and thank you so much for those wonderful comments as well as suggestions. Enjoy and Happy Crafting!

The Rubber Buggy has the crafting supplies for your next project. So have fun crafting this weekend with these products. My cards and projects are always posted on Saturday. Keep watching and thank you so much for those wonderful comments as well as suggestions.
Enjoy and Happy Crafting!
 |
Saturday, April 23, 2022
Alice in Wonderland Gift Box
Welcome to the continuation of my projects of Alice's story with added characters and new items such as playing cards and Alice becoming Queen using the Graphic 45 Alice in Wonderland Tea Party collection, Stamperia Alice in Wonderland chipboards and Scrapiniec Wonderland chipboards for altering a wooden gift box for my sis. Nancy, here, to share a very fun mixed media project with Alice's favorite Wonderland fantasy characters showcasing Alice's bunny throughout my project. Alice spots this white rabbit and tumbles down a hole after him which leads her to a magical place called Wonderland. The Rubber Buggy carries these entire collections of Alice in Wonderland and you won't want to miss out of having these collections in your crafting supply to create your projects and cards.


Box measures 6" square. I unscrewed the hard ware on the wooden box before covering it with Graphic 45 Alice's Tea Party paper. I used Beacon 3-n-1 glue and a hot glue gun throughout my project. I used Scrapbook 3D foam tape adhesive for under the characters that I fussy cut out like the bunny and tea pots. I colored the Scrapiniec chipboards with Copic markers but any colored ink or acrylic paint could be used. I sponged on Distress ink on the inside wood of the box to blend in with the paper. I used many of the stickers from the collection and fussy cut many of the characters as well as the Stamperia Alice's In Wonderland chipboard. I finished the project with the Graphic 45 pink flowers.
 |
| Scrapiniec Wonderland Big Background |
 |
| Scrapiniec Wonderland Cards |
 |
| Graphic 45 Alice's Tea Party |
 |
| Graphic 45 Flower Assortment Pink |
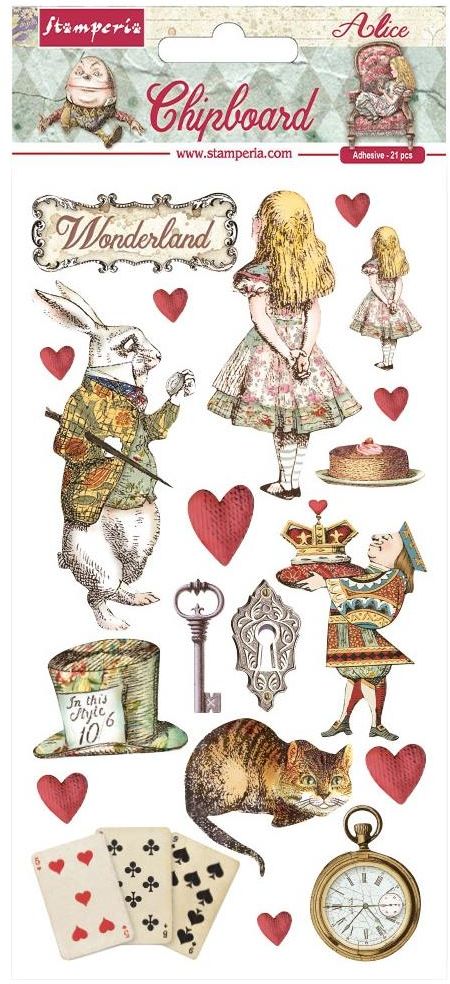 |
| Stamperia Alice in Wonderland Chipboard |
Additional supplies used:
Scrapbook 3D foam tape adhesive
So get crafting and have a fabulous day and thanks for visiting.
The Rubber Buggy has the crafting supplies for your next project. So have fun crafting this weekend with these products. My cards and projects are always posted on Saturday. Keep watching and thank you so much for those wonderful comments as well as suggestions. Enjoy and Happy Crafting!
The Rubber Buggy has the crafting supplies for your next project. So have fun crafting this weekend with these products. My cards and projects are always posted on Saturday. Keep watching and thank you so much for those wonderful comments as well as suggestions.
Enjoy and Happy Crafting!
|
Saturday, April 16, 2022
Lawn Fawn Platform Pop Up Spring Card
Welcome back and Nancy, here. Tell someone how berry special they are or for an Easter greeting with these adorable kiddos dressed up for spring and Easter. The Lawn Fawn Platform Pop Up along with the Lawn Fawn Platform Pop Up Add-on create these interactive card that folds completely flat to fit in a 4"x6" envelope, when opens to reveal a fun, pop-up surprise! This set comes complete with cute bow with a "hello" sentiment, heart, hill, grass, and stitched flower dies.


I love making these cards for all of my grand kiddos for all ages for different occasions. The Lawn Fawn interactive die sets are their favorite and Lawn Fawn creates adorable stamp sets that just bring a smile to anyone faces. The card with the add-on closes at 5 1/4" x 3 5/8" and when open, 3 7/8" x 3 5/8" and fits well in a 4" x 6" envelope.
Lawn Fawn always creates video tutorials on assembling their interactive die sets. For this Lawn Fawn Platform Pop Up video, click HERE.
Supplies:
Lawn Fawn Platform Pop Up Die set
Copic Markers
Instructions: Card measures 5 1/4" x 3 5/8"
For Each Card:
- Cut out a 6" x 12" Lawn Fawn Flower Market paper pad
- Cut two Lawn Fawn Platform Pop Up Die on the 6" x 12" paper
- Cut three of the "T" shaped Lawn Fawn Platform Pop up die with white cardstock
- Follow the assembling with the Lawn Fawn U-Tube video by clicking HERE. using Scor tape to assemble this die set.
- Stamp the Lawn Fawn Easter Party and Lawn Fawn Berry Special Stamp set with Lawn Fawn Black Ink and color with ink markers
- Cut out the sides of the Lawn Fawn Platform Pop Up die set and adhere to the platform with glue.
- Cut out the Lawn Fawn Strawberry Patch die set with red, yellow and bright green cardstock.
- Use the flowers from the Lawn Fawn Platform die set for the flowers for the strawberry patch and adhere to the Lawn Fawn Platform pop up.
- Also stamp the Lawn Fawn Magic Spring Message to one of the smaller squares in the Lawn Fawn Platform Pop Up die set and adhere to the Lawn Fawn Platform add on to the Easter Card.
- I added the bees from the Lawn Fawn Berry Special stamp set and glued the bees on clear acetate and glue to card to make the bees look like they are flying.
So get crafting and have a fabulous day and thanks for visiting.
The Rubber Buggy has the crafting supplies for your next project. So have fun crafting this weekend with these products. My cards and projects are always posted on Saturday. Keep watching and thank you so much for those wonderful comments as well as suggestions.
Enjoy and Happy Crafting!
|
Saturday, April 9, 2022
Rainy Day Lawn Fawn Birthday Card
Welcome back and Nancy, here. Make a splash with these cute bears from Lawn Fawn Rainy Day stamp and die collection along with the Lawn Fawn Rainy Sky Stencil and paste for a fun and dimensional rainy backdrop. They are ready to play in the spring rain for any occasion cards.


Supplies:
Lawn Fawn Rainy Day Stamp and coordinating Lawn Fawn Rainy Day die set
Lawn Fawn Cloudy Die set
Lawn Fawn All the Clouds Stamp or Lawn Fawn Out of This World Stamp set
Lawn Fawn Hello Sunshine Paper pad
Copic Markers
Instructions: Card measures 5 1/4" x 6"
- Cut out base of card with heavy white cardstock at 10" x 6" and score in center. Fold
- Cut out 5" x 5 3/4" patterned red of Lawn Fawn Hello Sunshine Paper
- Cut out 4 3/4" x 5 1/2" Light Blue Cardstock
- Apply clear or clear glitter paste with Lawn Fawn Rainy Sky stencil and let dry
- Stamp sun out of Lawn Fawn Out of This World Stamp set with yellow cardstock. Die cut clouds with white cardstock the Lawn Fawn Cloudy die and glue the sun behind clouds and glue to blue cardstock. Trim excess die cut.
- Die cut the Lawn Fawn Fence Border with white cardstock and Lawn Fawn Grassy border with green cardstock. Arrange and glue together. Glue to blue cardstock and trim off excess die cuts.
- Stamp with black ink and color images with Copic Markers. Die cut, fussy cut or use a Scan and Cut machine to cut out images. Glue to card along with cloud. Stamp the Happy Birthday with Lawn Fawn Out of This World Stamp set and rainy hearts from the Lawn Fawn Rainy Day stamp set.
- Inside of the card: Follow the instructions above to do the inside of the card with the sun, grassy border and critters from the Lawn Fawn Rainy Day stamp set.
- Enjoy your wonderful creation!
So get crafting and have a fabulous day and thanks for visiting.
The Rubber Buggy has the crafting supplies for your next project. So have fun crafting this weekend with these products. My cards and projects are always posted on Saturday. Keep watching and thank you so much for those wonderful comments as well as suggestions.
Enjoy and Happy Crafting!
|
Saturday, April 2, 2022
Prima Marketing Golden Desert Birthday Card


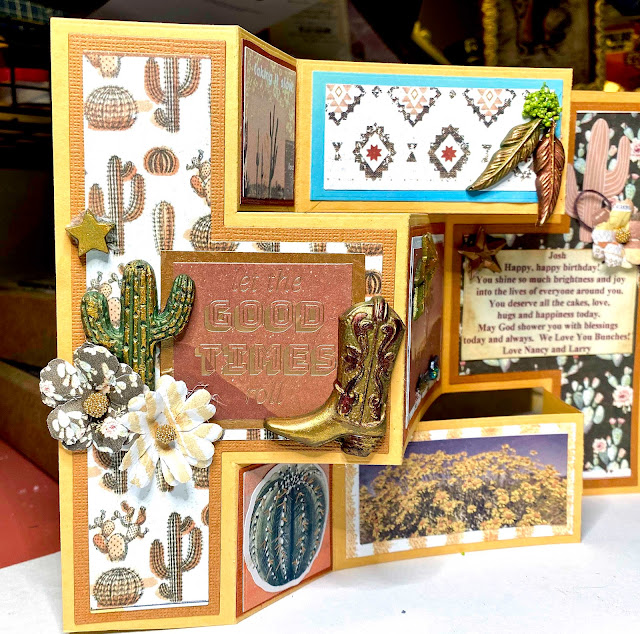
Welcome back and Nancy, here, to share my tri-fold shutter card made with the beautiful Prima Marketing Golden Desert collection and Prima Marketing Desert Mold with acrylic paints and waxes available at The Rubber Buggy.
I grew up in the Southwest and loved my desert adventures through the gorgeous flowering cactus, red rocks, and desert flowers. I think of the colors of turquoise, coral and rich reddish brown, golden yellow colors so the Prima Marketing Golden Desert collection inspired me to make this tri-fold shutter card. The Prima Marketing Golden Desert mold has the adorable desert cactus with the stars and beautiful cowboy boot which made me want to use this for a Southwestern card.
Supplies:
Prima Marketing-Redesign-Element Wax
Beacon 3-n-1 Advance Glue & Hot Glue Gun
Epoxy Resin (non-toxic)
NUVO Glitter Drops-Auburn and Blue Lagoon
Tim Holtz Metal Arrow Adornment

GATHER YOUR EQUIPMENT
Epoxy resin comes in two bottles. Make sure you get the non-toxic epoxy resin, otherwise, the entire house will smell like this resin
- Disposable latex or reusable rubber gloves
- Clean mixing cups
- Clean mixing sticks
- Small plastic (measuring cup)
Ensure you are always starting with clean cups and brushes to avoid any dirt or debris from falling into the resin mixture. Next, dispense the resin and hardener into a clean plastic cup. An accurate ratio is essential for epoxy to fully cure and develop its physical properties.
Wear rubber gloves and I like the reusable surgical or hospital gloves. The epoxy is sticky and hard to get off the hands after a few washes. If I get some on my hands, I use a farmer's soap to clean my hands as much as possible and then put lotion on to get rid of the left over stickiness.
- After the two parts are poured at the correct ratio, mix them together thoroughly for a full 2 - 3 minutes with a mixing stick. Mix longer for larger quantities.
- Be sure to scrape the sides, corners, and bottom of the container several times during mixing. This will ensure that all the hardener is thoroughly mixed with the epoxy and should prevent the resin from having an improper cure.
- Make sure to scrape both sides of the mixing cup also. If the mixture doesn't have a single consistency (streaks remain), continue mixing until fully blended
- I mixed about a teaspoon of mica powder in the resin and stir. If you get bubbles in the resin while stirring, just tap the bottom of the cup before pouring and you can also use the scalping tool to pop the bubbles.
- I lay my mold on a flat surface but I have an ole tile covered with a plastic store bag to throw away the next day if I get too much resin on it. Try not to pour over the mold castings but this is when I get the expire credit card, or Mod Podge scrapper to get all of the excess resin on top of the mold. Let dry over night but for larger deep mold, I let dry up to 18 hours.
- With a silicone mold, it is easy to pop out each mold/casting. I still do it gently on moldings with fine detail. Occasionally, you will have extra resin on the edges of the moldings. I use scissors to cut the extra away.

The fun part begins by using your fingers or a Prima Marketing brush to apply the Prima Marketing waxes or acrylic paint to the resin. I use a hot glue gun to adhere the castings on any card or project.

So get crafting and have a fabulous day and thanks for visiting.
The Rubber Buggy has the crafting supplies for your next project. So have fun crafting this weekend with these products. My cards and projects are always posted on Saturday. Keep watching and thank you so much for those wonderful comments as well as suggestions.
Enjoy and Happy Crafting!
|
Subscribe to:
Posts
(Atom)


