Saturday, December 30, 2017
Birthday Card for My Daughter

 |
| Wild Rose Studio Bunny and Butterfly Stamp |
The pink patterned paper is from the Heartfelt Creations Botanic Orchid paper and the lavender and pink solid colors are the Bazzill cardstock.
I can't wait to see the possibilities that you will create making using the beautiful Wild Rose Studio Bunny with Butterfly stamp on your cards or projects. You can purchase these dies and supplies from The Rubber Buggy on-line store.
Enjoy and Happy Crafting!
 |
| Nancy Hill The Rubber Buggy Design Team |
Thursday, December 28, 2017
Happy New Year Party Girls
Hi everyone, Steph Ackerman here today using products from the Rubber Buggy Store to create some cards for the New Year. It's time to think new so if you haven't visited the store recently, you are missing out on a lot of fun products

I used the Stamping Bella Stamp - Opal the Optimist, stamping her in Memento Tuxedo Black Ink. Once fussy cut, I colored her with assorted Copic Markers.


To create some visual interest, I placed a Memory Box corner die on the cardstock panels and die cut. Then behind the die cut I placed papers from the Lemon Craft Christmas Carols 6" x 6" paper pad. Using Spellbinders oval dies, I stamped and die cut the sentiment, then used foam adhesives under the sentiments to make them pop.
Thank you for visiting

I used the Stamping Bella Stamp - Opal the Optimist, stamping her in Memento Tuxedo Black Ink. Once fussy cut, I colored her with assorted Copic Markers.

The cards were created from Bazzill Marshmallow cardstock. Using Scor- Pal, I created top folding card, then cut Bazzill Licorice and Bazzill Jelly Bean cardstock to fit the cards.

Thank you for visiting
Tuesday, December 26, 2017
Happy New Year
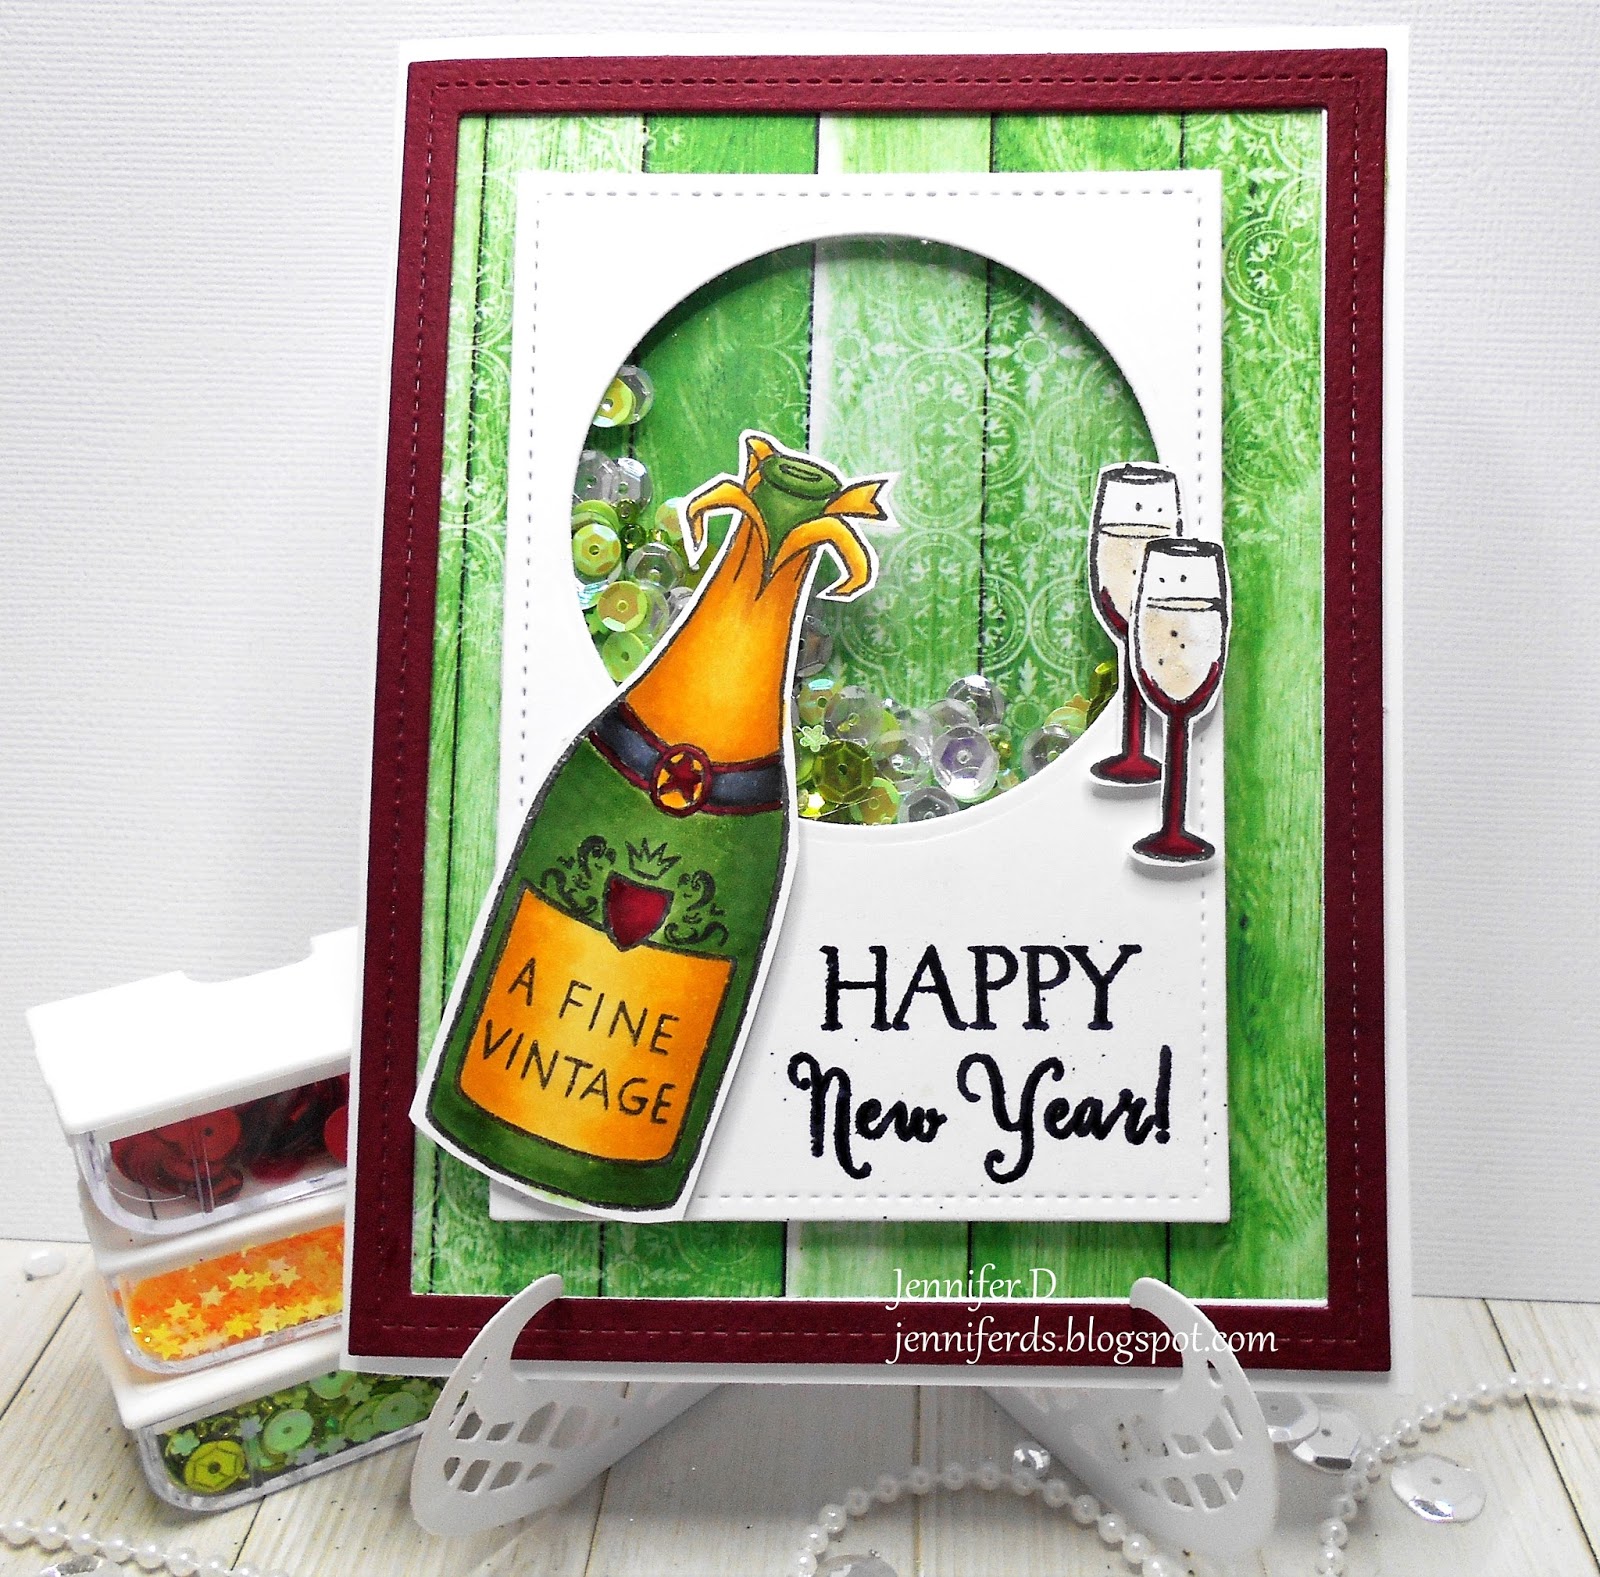
Hi it's Jennifer here with a New Years Card. I used the
Wild Rose Studio Boozy Santa coloured the wine bottle
up using Copics
Y21, Y17, YR23
C5, C6, C7
G21, YG63, YG67
R37, R39, R59
I have stamped the Sentiment with Verse a Mark and Black Embossing Powder.
I also used the Misti to get it straight. Yes I did turn it into a Shaker Card.
The Papers are from Lemon Craft Every Day Spring. I've used the
Hoping you all have a Wonderful and Exciting
2018
Jennifer
Monday, December 25, 2017
Best Wishes Cards made for The Rubber Buggy using Blue Fern Studios Home Spun

Hi Bev here today. I am doing a simple easy blog post for The Rubber Buggy sharing 2 cards that went together so quick and easy using cut pieces from the pattern Blue Fern Studios Home Spun Collection, the chipboards and the tutti Best Wishes small words.

I pulled lots of pieces and started to assemble the card.

Gave it some extra lace and brads and a great die cut title.

and up next is my next card using all the same products.... just different layers accents and fabulous images from the pattern papers.

Used layers, brads, ribbon and pop up image of the house.


From the side you can see the layers of the house.
Thanks for stopping by... Hope to see you again soon.


Sunday, December 24, 2017
15 Minute Christmas Card

Good morning it's Jennifer from Australia and it is already
Christmas here. So I am going to show you a quick last minute
card you can just whip up.
So I have just die cut the largest LF Small Stitched Rectangle
twice and then placed random snowflakes from the
LF Mini Snowflakes and LF Stitched Snowflakes and diecut them
but I left them in place. The second rectangle I glued on the
back so the pieces didn't fall out.
Next I diecut the same Snowflakes in Glitter Paper and glued
them on top. I then Layered the the rectangle on glitter paper and
then on to LF Fancy Scalloped Rectangle and on to a card base.
Cut and stamped LF Winter Big Scripty Words in matching ink and
done. Well I did add a few Pearls for the the Snowflakes.

OK Everyone have a Really Lovely Christmas and New Years
and see you back next week. Off to bake lunch for Dinner and Tea 20ish
plus family and friends.
Merry Christmas
Love
Jennifer
Saturday, December 23, 2017
Merry Christmas Teddy Bear

I created a Christmas card with this adorable bear from the Wild Rose Studio Teddy With Flowers. I just love this little bear and will use this stamp for several occasions and holidays besides Christmas. I colored the bear with a variety of brown colored chalk and used a red Copic marker for the shirt.
 |
| Wild Rose Studio Teddy With Flowers |
I added poinsettias using the Heartfelt Creations Celebrate The Season Ornate Sleigh and Present die set. I cut out 6 poinsettias using red cardstock and glued two for each flower. I added five holly leaves that are also in this die set. I added with glue the US Artquest Mini Prills - You Had Me at Yellow to the center of each poinsettia flower. Behind the bear is the Heartfelt Creations Decorative Oval die cut out with white shimmer cardstock.
 |
| Heartfelt Creations Celebrate The Season Ornate Sleigh and Present Die Set |
I can't wait to see the possibilities that you will create making using the beautiful Wild Rose Studio Teddy Bear stamp on your cards or projects. You can purchase these dies and supplies from The Rubber Buggy on-line store.
Enjoy and Happy Crafting!
|
| Nancy Hill The Rubber Buggy Design Team |
Thursday, December 21, 2017
'Tis the Season
Hi everyone, Steph Ackerman here today using products from the Rubber Buggy Store to finish up my Christmas cards. If you haven't visited the store recently, you are missing out on a lot of fun products.

Using the snow trees from the Art Impressions Trees Stamp Set, I stamped it 4 times, masking the previous image.


To create the card, I used papers from the LemonCraft Christmas Carols 6" x 6" paper pad, adding the music paper to Bazzill Gumdrop Cardstock. A strip of cardstock was added across the card. The trees were die cut with Spellbinders dies and matted with pattern paper from the same paper pack. A sentiment was added to the right side.

Thank you for visiting.

Using the snow trees from the Art Impressions Trees Stamp Set, I stamped it 4 times, masking the previous image.

Using a Tim Holtz water brush, I lightly blended the ink into the images. I love the subtle look the water brush adds to the images. It really softens the images.

To create the card, I used papers from the LemonCraft Christmas Carols 6" x 6" paper pad, adding the music paper to Bazzill Gumdrop Cardstock. A strip of cardstock was added across the card. The trees were die cut with Spellbinders dies and matted with pattern paper from the same paper pack. A sentiment was added to the right side.

Thank you for visiting.
Wednesday, December 20, 2017
Easy Vintage Card with Netra
Hello everyone !
With the countdown to Christmas, I thought it'd be
wonderful to create some card as the time whines down.
I used the new Beautiful Remnants collection by Blue Fern Studios and
boy, its was so easy to use.
I made a card that could go for anything. I used pinks and kept
my supplies minimal.

With the paper having so much stunning design I just
added some flowers. I could not bare to cover it up.

Pink Parfum Sticker can be found HERE and is from ArtC.

Shimmering flowers can be found HERE and are from 49th & Market.
Polka Dot flower can be found HERE and are from Prima.
Big Flower can be HERE and is also from 49th & Market.
I hope you like this card. It was fun to make and
a great way to showcase your favorite flowers and most
stunning papers.
Happy Holidays !
Thank you for visiting
Monday, December 18, 2017
Graphic 45 Winter Wonderland.... celebrating Christmas

Hi.... Bev here today. So are you ready for Christmas. ...well this is a photo-less page waiting for my 2017 Christmas photo. Can't wait to celebrate with family and take lots of xmas photos.
The Collection is Graphic 45 Winter Wonderland. For this specific page I made all the accents myself using the papers from the pad. You don't always have all the accents and there are so many fun things you can fussy cut, layer and pop up.

I started with this large circle... and punched the outer edges .

I fussy cut the bird and some flowers. I also cut the section of the title.

I fussy cut the upper edge of the flower to slide the punched circle under.

I foam popped up the accents to give depth and dimension to the page.

In this close up you can also see I added stickles to sparkle on the page.

More stickles on the bird too.

From this side view you can see the depth of popping up. On the title I added glossy accents to the letters.


Thanks for stopping by and see you again soon. Be sure to visit the store to view this collection and the many other products available.


Sunday, December 17, 2017
Blue Fern Studio Remnants Collection is at The Rubber Buggy
OMG this Blue Fern Studio Remnants Collection is amazing. Be sure to check it out in the store after viewing the Collection in the video.
Links: http://www.therubberbuggy.com/remnants/
STORE: https://www.therubberbuggy.com/
BLOG: https://therubberbuggy.blogspot.ca/
Thanks for stopping by today... can't wait to see you again soon,

Saturday, December 16, 2017
Ornate Sleds


Creating an explosion card with the Heartfelt Creations sled, is only limited to your imagination. All you need to do is to learn the basics for this design and then fill up the spaces with your own inspirations and creativity! If you’ve never made 3D cards before, this is an excellent place to start. It looks time-consuming but after the first 3D card like this one, the next one is easier and faster to put together. You can use a ruler and scissor to cut your strips inside the sled and score the crease lines, or you can use a score board, whichever you prefer. Either way, the results will be a fantastic card for little effort! I’ve made a few pop up box cards using just a 12" x 12" cardstock but this sled with the pop up tree and presents is surprisingly simple to make and yet still rewardingly impressive to give to a loved one.
This sled is able to fold down just like any explosion card. Basically, I used the same technique for this card and created a tutorial on the measurements using this Heartfelt Creations Celebrate The Season Ornate Sled.
Instructions:
 |
Heartfelt Creations Celebrate The Season Ornate Sled |
Using the Heartfelt Creations Celebrate The Season Ornate Sled stamp and die set, emboss two sleds with NUVO Silver Moonlight Glitter embossing powder and die cut. I like using 110 lb weight cardstock for sturdiness for cards like this one. If you don't have this heavier weight of cardstock, cut out two extra sleds to glue behind the embossed sleds.
Cut out 10 poinsettia flowers and 4 holly leaves using the Heartfelt Creations Celebrate The Season Ornate Sled die set. I colored theses poinsettias and holly leaves with Copic Markers and used my fingers to pinch the center of each petal for the poinsettias and holly leaves. Glue two poinsettias together and apply glue to the center of each poinsettia and add US Artquest Mini Prills - You Had Me At Yellow. Glue the poinsettias with holly leaves on the sled.
Cut out the label "Enjoy"found in the Heartfelt Creations Celebrate The Season paper.
Tutorial For Support for Inside:


Fold left on one end and fold right on the other end of each strip. Glue or use 1/2" wide Scor Tape to each end of the strips.
I like folding the strips down first (photo below) and then apply adhesive such as glue or Scor Tape before sticking the last strip.

Step 2 Gluing Support to Sled: Adhere the inside support of the card to the sled using glue or two-side adhesive tape.


When the inside support is glued, the card will be able to fold down even after the toppers.
Step 3 Toppers: Stamps the presents using the Heartfelt Creations Celebrate The Season - Gift Wrapped Presents stamp set with Memento Tuxedo Black Ink and die cut using the die set. Color the presents with Copic Markers.
 |
| Heartfelt Creations Celebrate The Season Gift Wrapped Presents Stamp Set |
 |
| Heartfelt Creations Snow Kissed Spruce stamp |
Using dark green cardstock, stamp the medium sized pine tree using the Heartfelt Creations Snow Kissed Spruce stamp with Memento Tuxedo black ink and die cut using the Heartfelt Creations Snow Kissed Frolicky Frosty and Spruce die set. To attach the presents and tree to support frame on the inside of the sled, cut out 9 strips of white cardstock measuring 1/2" wide and 3" long. Depending on the size of each present, adhere the end of each strip behind the present and tree. Before permanently adhering each present and tree to the inside, I use double-side tape that isn't too sticky kept arranging the presents and tree to the support until I got the arrangement I wanted as well as making sure the card is still able to fold. When I was satisfied with the arrangement, I used permanent adhesive to the ends of the strip and glued each one to the support frame on the inside of the sled. I cut off any strip that extended below the support frame.
I hope you'll give this card a go. It might be a little bit of a challenge but it's definitely worth the effort.
 |
| Nancy Hill, Design Team for The Rubber Buggy |
Subscribe to:
Posts
(Atom)


