Showing posts with label Heartfelt Creations Decorative Oval. Show all posts
Showing posts with label Heartfelt Creations Decorative Oval. Show all posts
Saturday, December 23, 2017
Merry Christmas Teddy Bear

I created a Christmas card with this adorable bear from the Wild Rose Studio Teddy With Flowers. I just love this little bear and will use this stamp for several occasions and holidays besides Christmas. I colored the bear with a variety of brown colored chalk and used a red Copic marker for the shirt.
 |
| Wild Rose Studio Teddy With Flowers |
I added poinsettias using the Heartfelt Creations Celebrate The Season Ornate Sleigh and Present die set. I cut out 6 poinsettias using red cardstock and glued two for each flower. I added five holly leaves that are also in this die set. I added with glue the US Artquest Mini Prills - You Had Me at Yellow to the center of each poinsettia flower. Behind the bear is the Heartfelt Creations Decorative Oval die cut out with white shimmer cardstock.
 |
| Heartfelt Creations Celebrate The Season Ornate Sleigh and Present Die Set |
I can't wait to see the possibilities that you will create making using the beautiful Wild Rose Studio Teddy Bear stamp on your cards or projects. You can purchase these dies and supplies from The Rubber Buggy on-line store.
Enjoy and Happy Crafting!
 |
| Nancy Hill The Rubber Buggy Design Team |
Thursday, October 5, 2017
Fairy Holly with Lemon Craft
Hi everyone, Steph Ackerman here today working with a bunch of products from the Rubber Buggy Store. Have you checked out the store lately? It has so many wonderful new products.


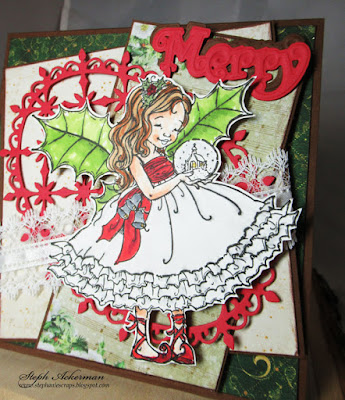
Merry is a Spellbinders die which was die cut from red and brown cardstock.

Isn't she sweet?
Thank you for visiting

Using my Scor-Pal, I created a card from Bazzill cardstock. The next layers are from the Lemon Craft Christmas Carols 6x6 pad. Each layer of Lemon Craft was angled and matted with cardstock.

On top of these layers, I added a Decorative Oval from Heartfelt Creations, then wrapped the panel with White Lace May Arts ribbon. This panel was added to the card with 3D foam adhesives.

I stamped the Penny Black image - Fairy Holly - on Neenah White cardstock, then colored her with Copic Markers. I wanted her to be free so I fussy cut her before adding her with foam adhesives.


Thank you for visiting
Saturday, July 22, 2017
Cascading Fuchsia

This week, I made a card using the gorgeous Heartfelt Creation collections of paper, dies and stamps along with using Copic Markers, NUVO Embellishment Mousse colors and NUVO Crystal Drops.
Supplies:
Heartfelt Creations Die - Cascading Fuchsia
Heartfelt Creations Stamp Set - Cascading Fuchsia
Heartfelt Creations Fuchsia Cluster Stamp Set
Heartfelt Creations Classic Rose Vine Die
Heartfelt Creations Classic Petunia 12" x 12" paper collection
Heartfelt Creations Fleur Border and Pocket die set
Heartfelt Creations Decorative Oval Die
NUVO Crystal Drops - Rhubarb Crumble
NUVO Embellishment Mousse Peony Pink
NUVO Embellishment Mousse Mother of Pearl
Copic Markers
Ranger White Embossing Powder
Ranger Dye Black Tie Ink Pad
Poppy Stamp Theo Butterfly Die
4mm flat back pearl string
Neenah Premium White Gold Metallic Card Stock
Neenah Premium Extra Heavy White Card Stock
My Petunia - Misti Stamp Tool
Scor-Tape 1/2" wide
Pink and Rose Red Card Stock
Instructions:
Completed card measures 7" x 8". I have to always use the Misti stamp tool for all of my stamping. Otherwise, I get too many problems that can't be fixed of areas where the ink isn't stamped. If you don't know how to us the Misti, I have a U-Tube tutorial on my blog and the huge benefits using this tool (I can say enough about the positive benefits of using this stamp tool).
I stamped the Heartfelt Creations Cascading Fuchia with the Ranger Black Ink and cut it out using the oval die in the Heartfelt Creations Decorative Oval die set. I colored the flowers using Copic markers. I cut out the Heartfelt Creations Decorative Oval with the Neenah White Gold metallic card stock and adhered the oval on the decorative oval.
Cut out four of the smaller borders in the Heartfelt Creations Fleur Border die set using the white gold metallic card stock. Cut 6 1/4" x 7" of the patterned paper found in the Heartfelt Creations Classic Petunia paper collection. Adhere the borders and oval on the patterned paper. Cut out 6 3/4" x 7 1/4" of the white card stock and 7" x 8" of the purple card stock and adhere together and adhere the patterned paper on top. Adhere the flat back pearls string to the decorative oval around the stamped image.
I embossed with the Ranger White Embossing powder the Heartfelt Creations Cascading Fuchsia large and medium size flowers. The top of each flower was cut using white card stock. I used a samll flower bud with wire to assemble my flowers but you can use a silk flower wire and cut off about 2" and wrap aluminum foil or cotton ball around the wire and glue it together to assemble each flower. Also, Heartfelt Creations has their own U-Tube on how they make the Cascading Fuchsia flower, by clicking HERE. The reason that I haven't make the U-Tube yet, is that I am still trying different to create techniques of my own style. I cut out the flowers with the Heartfelt Creations Fuchsia die set and used my fingers to spread the NUVO Mousse Peony Pink on the tips of each petal. I turn the petals over and use a flower ball molding tool, to mold each petal. If your card stock is too heavy, use a light amount of spray to soften the paper. Afterward, I use a embossing heat gun to dry the petals. I tried other ways of applying the NUVO on front of the flower petals but prefer using my fingers. Afterwards, I poke a hole in the center of each group of petals and pull each one through the wire and adhere together. I add glue in the center of the flower and add the stamen. I used the NUVO Crystal Drop Rhubarb Crumble to the ends of each stamen and let dry. I color two beads with the NUVO Crystal Drop Rhubarb Crumble and pull through the wire and glue the beads to the flower. I die cut one Heartfelt Creations Classic Rose Vine and adhere to the top of the oval. I cut part of the back of each flower and adhere to the top of the vine. I made and adhere the bow using the 1/2" wide Scor-Tape. I love this tape because I can take the bow off of the tape to rearrange the bow and the tape remains sticky. .
I cut out the Poppy Stamp Theo Butterfly die and applied using my fingers the NUVO Mousse Peony Pink and NUVO Mousse Mother of Pearl. I adhere it with glue to the bow.
The Rubber Buggy Design Team has something new to share with you each day. Pop in and see for yourself what is being shared by this talented group of inspiring designers!!
In the meantime, here are all The Rubber Buggy quick links you will need:
Thank you again for stopping by
Nancy Hill
Designer for The Rubber Buggy

Saturday, May 6, 2017
Flowering Dogwood Happy Birthday Card

The Rubber Buggy on-line store carries all of these supplies to make this card. They offer great customer service and fast delivery on all of your orders.
I made this card using the Heartfelt Creations paper, dies and stamps besides the NUVO Crystal Drops and NUVO Mousse that comes in so many colors.
Do you know that if you use a wonderful stamping tool like the MISTI that Rubber Buggy carries, you can do so many different techniques in stamping.

I just love the prills for the center of my flowers. I took my fingers and dipped it in the NUVO Aqua Mist Mousse and applied it to the center of the flowers and glued mini prills in the center. I added NUVO Apple Green Crystal Drops to the pattern flowers and the small die cut flowers. I colored the small die cut dogwoods with colored pencils and Copic markers.
I just love the Heartfelt Creations Decorative Oval. I added 5mm flatback pearls.


Supply Links to The Rubber Buggy
The Rubber Buggy Design Team has something new to share with you each day. Pop in and see for yourself what is being shared by this talented group of inspiring designers!!
Have a fabulous crafting day!
I'll be back again next Saturday with a new card or project.
In the meantime, here are all The Rubber Buggy quick links you will need:
Thank you again for stopping by
Nancy Hill
Designer for The Rubber Buggy
Subscribe to:
Posts
(Atom)


