Showing posts with label spellbinders. Show all posts
Showing posts with label spellbinders. Show all posts
Monday, January 8, 2024
Bohemian Slider

everyone it’s a New Year and with that comes new inspiration and new crafty goodies from The Rubber Buggy❤️

I created this slimline card using Bohemian Wedding from Mintay the deep dark sultry colors in this paper collection is absolutely stunning 🤩

Thank you for visiting
Sunday, March 19, 2023
Easy 3D Florals
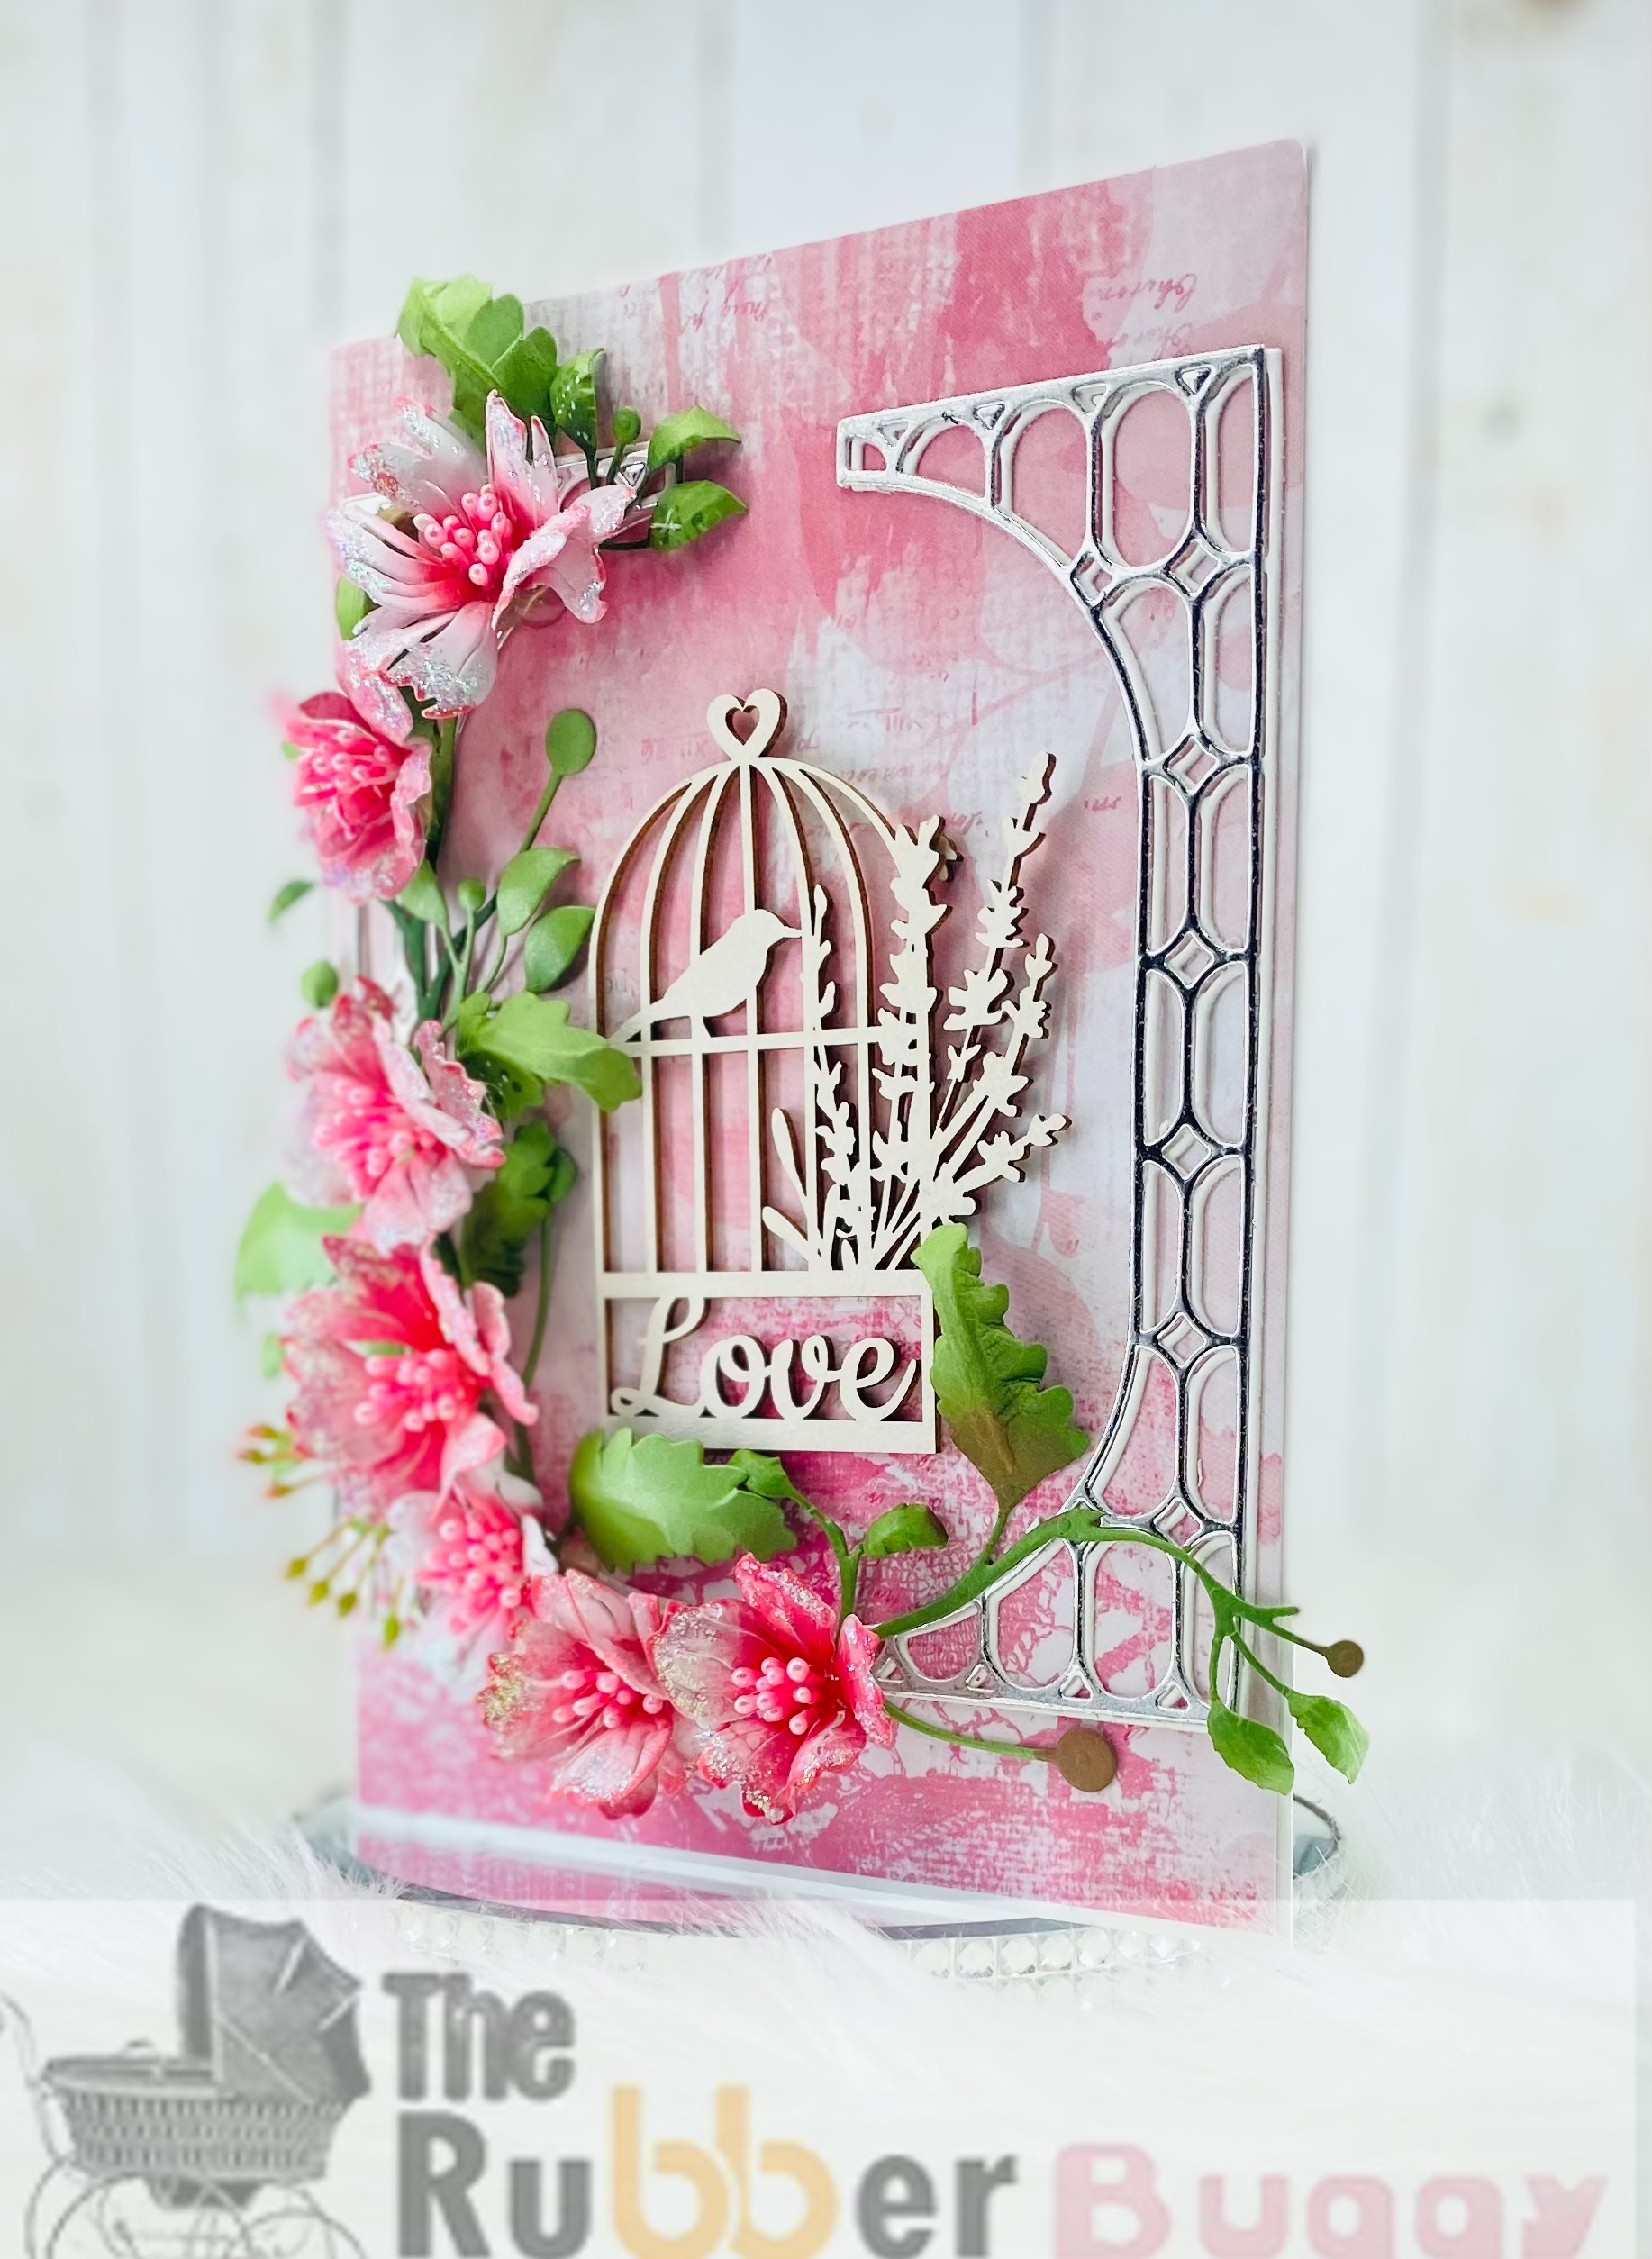
Hi everyone today I am sharing these 3D florals I made using Spellbinder dies Stylish Ovals and The Be Bold Collection

Instead of leaving the florals as is I decided to give them a 3d look by shaping and cupping the flowers use a foam mold pad. I inked the edges in a Hybrid Ink a tad darker than the pinks in the paper collection itself which is Blossom.

I used a chipboard piece from Laserowe LOVE "Birdcage" to decorate the front so as not to take too much away from the dies itself.
Thursday, August 4, 2022
Slimline Distress Background
Welcome back to the Rubber Buggy blog 🥰 today I am sharing the girl everyone knows and loves Tilda. TRB has a huge selection of this beautiful girl in the large and small size

I used The Crafters Workshop new Halftones stencil to make the background by using blending brushes from Spellbinders with distress inks😍

Then I used some decorative chipboard pieces from Scrapiniec to create a decorative piece to balance the image with and give it some umpfff. We have started carrying more product from Spellbinders so be sure to check out all the new goodies in the TRB store. They carry a lot of those hard to get items from foreign craft shops like P13, Mintay, Lexi Design and more so take a stroll through the shop Kelli is always stocking new stuff ❤️❤️ Especially if you are a shabby chic vintage sort of gal oooppp or dude 🤪
Thursday, July 30, 2020
Let It Snow Snowflake Cards
Hi everyone, Steph Ackerman here today with lots of fun products from the store. Please visit the store for all the fun products I've used today.
It may still be the middle of summer, but there is no better way to cool off than by creating winter themed cards.
It may still be the middle of summer, but there is no better way to cool off than by creating winter themed cards.

I used Maja Designs Vintage Summer Basics 1916 to create both cards, die cutting the papers with PoppyStamps Craft Die - Snowflake Lattice Frame. As this paper is double sided, I created two cards using both sides of the paper.

Use the Spellbinders Tool 'n One to remove the left over die cut pieces that remained in the die.

Mat the die cut panels with the same paper, then wrap each panel with May Arts Sheer Light Blue Stitched ribbon. This gives the cards a wintry feel.

The Maja paper gives each card a wintry feel.

Add the die cut panels to 4 1/4" x 5 1/2" cards created from Bazzill Marshmallow cardstock and Bazzill Icy Mint cardstock. Use Nuvo Crystal Drops to create pearls in each of the snowflakes. Allow to dry completely.

Die cut Tutti Designs Oval Dies from the same paper and place atop the cards with Scrapbook Adhesives 3D Foam for dimension. Stamp and die cut the bench and lamp post using Lawn Fawn Winter in the Park stamps and dies and Lawn Fawn Soot Dye Ink. Place them atop the oval and add to the card with foam adhesives.

Die cut Bazzill Marshmallow cardstock with the Lawn Fawn Let It Snow Line Border Die. As the die cut phrase is flexible, you can customize the die cut for your projects. I wanted to shape them in the form of an arch on my cards.

Finally add Yellow Ice Stickles to the lanterns.
Thank you for visiting.
Thursday, December 13, 2018
Merry Christmas with Rudi
Hi everyone, Steph Ackerman here today with lots of fun products from the store. Please visit the store for all the fun products I've used today.

I created a card from Bazzill cardstock. A checkered panel is the Swan's A Swimming pattern paper from Graphic 45's Twelve Days of Christmas collection.


Nuvo Crystal Drops in Oyster Gray added some glitter to her boots and scarf.
Thank you for visiting.

I created a card from Bazzill cardstock. A checkered panel is the Swan's A Swimming pattern paper from Graphic 45's Twelve Days of Christmas collection.

Using the Julie Nutting Stamp and die set - Rudi - I stamped each with Memento Tuxedo Black Ink, then die cut with the included dies.

Rudi was colored with Copic Markers. then matted atop another panel from Graphic 45's Twelve Days of Christmas collection.

She was added to the card with Scrapbook Adhesives 3D Foam Adhesives.

Nuvo Crystal Drops in Oyster Gray added some glitter to her boots and scarf.
Thank you for visiting.
Thursday, November 8, 2018
Wild Rose Little Robins
Hi everyone, Steph Ackerman here today with lots of fun products from the store. Please visit the store for all the fun products I've used today.

I began by creating 2 cards from red and green cardstock. Using a Scor-Buddy, I scored each cardstock panel to create 4 1/4" x 5 1/2" cards.

Using assorted papers from Graphic 45 - Twelve Days of Christmas and LemonCraft - Christmas Carols, I created my first card. The Wild Rose Studio Little Robins were stamped with Lawn Fawn Jet Black Ink. One image was then die cut with Lawn Fawn dies.

Both images were colored with Copic Markers and Ranger Ice Stickles was added to the hat.


Thank you for visiting


Both images were colored with Copic Markers and Ranger Ice Stickles was added to the hat.

After die cutting the 2nd robin, I matted it with a larger die and added it to the card. Nuvo Crystal Drops -Oyster Gray were added around the image.

Thank you for visiting
Thursday, October 25, 2018
Autumn Greetings
Hi everyone, Steph Ackerman here today with lots of fun products from the store. Please visit the store for all the fun products I've used today.

To create the box bottom, cut Bazzill Lollipop Cardstock 3" x 3". Use Scor-Pal or Scor-Buddy to score every 1/2" around the cardstock. Fold on the scored lines. Use Scor-Tape to seal.

Cut Graphic 45 - Time to Flourish - November Flourish paper to a 6" x 9" panel. Place Scor-Tape around the sides of the box bottom and wrap the paper around the bottom. Create a seam along the back by adding Scor-Tape to seal.

Using Spellbinders circle dies, die cut cardstock creating handles. Die cut the phrase from pattern paper, mat with cardstock and tie to the handles with twine.

Create a coordinating card using the sentiment in the pattern paper as the focal point.
Thank you for visiting
Thursday, October 4, 2018
Happy Fall Cards
Hi everyone, Steph Ackerman here today with lots of fun products from the store. Please visit the store for all the fun products I've used today.

Fall is a wonderful time of year full of beautiful colors. Check out these fun cards I've created using papers from the Authentique Pastime 6" x 6" paper pad and a Lawn Fawn die.

This Authentique paper pad has some amazing papers that can be used for any occasion. I chose the wood grain paper to use as the card base, then added a torn strip across the center. Happy fall is a Lawn Fawn die, which die cut cardstock beautifully.

I selected another paper from this paper pad and die cut it with the Lawn Fawn Quilted Backdrop die. It gives a really nice texture to the background. A strip of cardstock was added across the card and a torn strip of striped paper added on top. The Happy fall Lawn Fawn die was used again atop the striped panel.


The tags are from the 49 and Market Cottage Life Cottage Cuts which I felt worked well with my fall cards. 2 of them were matted with cardstock and wrapped with twine before being added to the card with Scrapbook Adhesives 3D Foam Squares.
Thank you for visiting

Fall is a wonderful time of year full of beautiful colors. Check out these fun cards I've created using papers from the Authentique Pastime 6" x 6" paper pad and a Lawn Fawn die.

This Authentique paper pad has some amazing papers that can be used for any occasion. I chose the wood grain paper to use as the card base, then added a torn strip across the center. Happy fall is a Lawn Fawn die, which die cut cardstock beautifully.

I selected another paper from this paper pad and die cut it with the Lawn Fawn Quilted Backdrop die. It gives a really nice texture to the background. A strip of cardstock was added across the card and a torn strip of striped paper added on top. The Happy fall Lawn Fawn die was used again atop the striped panel.

The pumpkin was created from another Authentique paper in this paper pack and a Spellbinders oval die.

The tags are from the 49 and Market Cottage Life Cottage Cuts which I felt worked well with my fall cards. 2 of them were matted with cardstock and wrapped with twine before being added to the card with Scrapbook Adhesives 3D Foam Squares.
Thursday, September 27, 2018
Your Kindness Spreads like sunshine
Hi everyone, Steph Ackerman here today with lots of fun products from the store. Please visit the store for all the fun products I've used today.


I created a card from Bazzill Jawbreaker cardstock and added a panel from the Authentique Pastime 6" x 6" paper pad on top. The stamped image was then placed in the center of the card with Scrapbook Adhesives 3D Foam Adhesives.
The phrase is from Art Impression's Sentiment stamp set which was also stamped with Memento Tuxedo Black Ink .
Thank you for visiting

I found this adorable little stamp from Carabelle Studios in the store and I knew she'd be perfect to send to a friend.

I stamped Celine with Memento Tuxedo Black Ink three times on a panel of white. The panel was die cut with Spellbinders oval dies. Using assorted Copic Markers, I added color, then placed the oval on another oval die cut from the Authentique Pastime 6" x 6" paper pad.

The phrase is from Art Impression's Sentiment stamp set which was also stamped with Memento Tuxedo Black Ink .
Thank you for visiting
Thursday, September 13, 2018
49 and Market Cards
Hi everyone, Steph Ackerman here today with lots of fun products from the store. Please visit the store for all the fun products I've used today.


The card was created from layers of papers included in this collection and wrapped with May Arts ribbon. The die cut cart was then added on top with 3d foam adhesives. The phrase, from 49 and Market's Valerie's Enjoy Every Moment, was added around the cart.


Thank you for visiting
Have you seen the 49 and Market Cottage Life collection? It is gorgeous.

Selecting the Fresh Delivery page from the Cottage Life collection as the focal point, I die cut the cart with Spellbinders dies, then matted it with the reverse side.

The card was created from layers of papers included in this collection and wrapped with May Arts ribbon. The die cut cart was then added on top with 3d foam adhesives. The phrase, from 49 and Market's Valerie's Enjoy Every Moment, was added around the cart.

This collection comes with 2 sheets of each page so I was able to create a second card. This card starts out the same way, die cutting the cart into a circle using Spellbinders dies.

A simple panel was added to the card and wrapped with May Arts ribbon. Best Wishes is from Wild Rose Studio's Every Day Sentiments.

Thursday, September 6, 2018
Sweet Baby Cards with Stamping Bella
Hi everyone, Steph Ackerman here today with lots of fun products from the store. Please visit the store for all the fun products I've used today.
I'm using Toby is Two stamps from Stamping Bella. Using the same stamp, I created 2 baby cards,. By changing up the colors I got a boy and a girl card.

I created a boy card by coloring Toby with shades of blue and green Copic Markers. The card was created using papers from the 49 and Market Cottage Life collection. Toby was fussy cut and added with 3d foam adhesives atop Spellbinders die cut circles.


The phrase, included with the stamp, was cut apart and added to the cards.
Thank you for visiting
I'm using Toby is Two stamps from Stamping Bella. Using the same stamp, I created 2 baby cards,. By changing up the colors I got a boy and a girl card.

I created a boy card by coloring Toby with shades of blue and green Copic Markers. The card was created using papers from the 49 and Market Cottage Life collection. Toby was fussy cut and added with 3d foam adhesives atop Spellbinders die cut circles.

I created a girl card by coloring Toby with shades of blue and pink Copic Markers. The card was created using papers from Prima Marketing Rossi Belle collection. Toby was fussy cut and added with 3d foam adhesives atop Spellbinders die cut circles.

The phrase, included with the stamp, was cut apart and added to the cards.
Thank you for visiting
Thursday, August 30, 2018
North Pole Rudi
Hi everyone, Steph Ackerman here today with lots of fun products from the store. Please visit the store for all the fun products I've used today.


I wanted her a little "rugged" so I selected a burlap type paper from Stamperia's Roses, Laces and Wood paper pack which was placed on a card created from Bazzill Candy Bar cardstock. Spellbinders dies were used on an additional sheet from the Stamperia collection. Rudi was added with foam adhesives and a Stamperia tag was slipped behind her.

The North Pole sign was added to the tag and Nuvo Crystal Drops added for dimension.

Thank you for visiting

I've used Rudi this week. She is a lovely stamp and die set combination from Julie Nutting for Prima. Wow, can't tell how much I love this stamp set and the die! Of course, I had to color her with assorted Copic Markers.


The North Pole sign was added to the tag and Nuvo Crystal Drops added for dimension.

I see lots of Rudi creations in my future!!!!!
Thank you for visiting
Subscribe to:
Comments
(Atom)


