Monday, September 30, 2013
I Mix You
Hi everyone! Indah here again with a new card to share with you! This is a special card for me because it's inspired by one of my fave movies, Julie & Julia. I love the colors here and that image is so perfect!

I used Ops Tilda, then colored her in with Copic markers. Isn't she just the cutest?
Hope you like it and thank you for visiting!

I used Ops Tilda, then colored her in with Copic markers. Isn't she just the cutest?
Hope you like it and thank you for visiting!
Wednesday, September 25, 2013
For you.......
Good morning, everyone, Steph here today with another look at the Prima Doll Stamps by Julie Nutting. I absolutely adore them and am having so much fun using them in a variety of projects.
Today I used Mix'd Media Doll #4 to use as the focal element of this elongated card. I stamped her on white cardstock, then restamped her on the navy paper which is included in the Bo Bunny Anthem paper pad.
The background papers were also from the Bo Bunny Anthem paper pad, and I cut them apart, inked them and layered them to fit the front of the card.

Using the same papers, I decorated the interior of the card, adding a die cut oval to use for the sentiment, which I left blank since I'm not sure yet to whom I'll be sending this card!

Thank you for visiting.
Cupcake pin cushion
Hi everyone and welcome to another Thursday with Kelly. It's a fun project day and to help me out I used the NEW Bo Bunny collection called The Avenues that I got from The Rubber Buggy store . The papers were the perfect color to go with the color scheme I wanted for this special little cupcake treat. If you haven't yet guessed it's a CUPCAKE PIN CUSHION!

I had so much fun making this I should've done a tutorial but the products I used were:
Plastic cup cut in half
Styrofoam ball
Beans in the bottom for weight
I then adhered all those above together
Then I used the BO Bunny paper to score with my Martha Stewart scoreboard at every 1/4 inch and make a pleated cupcake liner bottom.
I then adhered all the flowers on top, took me a while but I love how it turned out.
Then I added the bow in front with mulberry rose flower from the Rubber Buggy.
I added the stick pin and the Wonderful word saying from the diecut collection BO Bunny The Avenues again from the Rubber Buggy store. I hope you like it as much as I loved creating it, it's the first one I have ever made and I was very pleased. Hope you had fun learning this new trick or if you've seen it before just coming over to visit The Rubber Buggy store. Have a great day! ~Kelly
Tuesday, September 24, 2013
Fall is here - let's make pies
Hi everyone!
Summer is turning in and fall is just around the corner. But I'm fond of fall, the air is crisp and everything changes colours. I'll even go so far that I'll admit that I like the rain... That will be when I can be on the inside snuggled up under a blanket with a hot cup of tea. Not when I'm about to get to work and I'll be soaked for hours...
However, I'm sure you're here for some inspiration not my rambling:)
Here is my DT-project for The Rubber Buggy!

Products used from the store:
12x12 paper pad, Graphic 45, place in time
Sticker sheet, Graphic 45, place in time
Chipboard 2, Graphic 45, place in time
Grossgrain/satin ribbon
Cling rubber stamp set #3, Graphic 45, French country
Thank you for visiting!
Summer is turning in and fall is just around the corner. But I'm fond of fall, the air is crisp and everything changes colours. I'll even go so far that I'll admit that I like the rain... That will be when I can be on the inside snuggled up under a blanket with a hot cup of tea. Not when I'm about to get to work and I'll be soaked for hours...
However, I'm sure you're here for some inspiration not my rambling:)
Here is my DT-project for The Rubber Buggy!
Products used from the store:
12x12 paper pad, Graphic 45, place in time
Sticker sheet, Graphic 45, place in time
Chipboard 2, Graphic 45, place in time
Grossgrain/satin ribbon
Cling rubber stamp set #3, Graphic 45, French country
Thank you for visiting!
Friday, September 20, 2013
Rose Red
Hi Everyone!!! Dawn here on this fabulous Friday with my post for The Rubber Buggy, to show you some more inspiration using some wonderful stamps and products from the Store.

I used "Rose Red" from the Saturated Canary Collection on my card today. I stamped her onto some cryogen CS and colored her in using copics. I added some lace, ribbon, WOC flowers and a couple corner pieces.
See you all back next Friday with some more inspiration. Check out the challenge blog for an awesome challenge, we'd love to see you participate.
HAPPY STAMPING!!!!
Wednesday, September 18, 2013
Beautiful banners & embellishments
Hi everyone it's Kelly and I'm happy to share another card for the Rubber Buggy team here today. I just got the new "The Avenues" paper from BO Bunny from the store and it's amazing! You will want to run out and get a hold of this because it has the most beautiful hues and the color I chose today to use is the peach and brown tones.

The card is inspired by my love for banners and then I added some accents at the side to just give it a touch of fun. The paper again is The Avenues and the top button is from Hello Pastel by Prima, the flower is Prima and the bottom metal brad is from Bo Bunny. You can find the new papers here ==>The Rubber Buggy store as well as the Hello Pastel buttons. Thank you for visiting and I will be seeing you next Thursday! ~Kelly

The card is inspired by my love for banners and then I added some accents at the side to just give it a touch of fun. The paper again is The Avenues and the top button is from Hello Pastel by Prima, the flower is Prima and the bottom metal brad is from Bo Bunny. You can find the new papers here ==>The Rubber Buggy store as well as the Hello Pastel buttons. Thank you for visiting and I will be seeing you next Thursday! ~Kelly
Steampunky gift bag
Good morning, Steph here today and I'm enjoying the Prima stamps so much I thought I'd pair this gal with some Graphic 45 - Steampunk Spells.
So here's what I created - a fun, steampunky gift bag.

The Graphic 45 Steampunk paper pad is full of wonderful colors that coordinate very well together. I used 2 sheets for the bag, inking the edges to highlight the design, then I tied some brown May Arts ribbon where the papers were joined.
Then I had fun with my paper doll. After stamping her on cardstock, I restamped her on the Steampunk paper - cutting her dress and wings from one sheet of paper and highlightling the flow of her dress with another. So much fun!!!

Isn't she just the cutest? Couldn't you see giving her to someone special?
Thank you for visiting.
Tuesday, September 17, 2013
Mythical ocean
Hi everyone!
Pi here with a LO from my latest vacation to Italy.
I really wanted to show the beautiful colours of the photos and Magnolia's sea breeze paper Mythical Ocean was so perfect as the colour is gorgeous and it has lots of tiny anchors all over the paper.

The letters are from Tim Holtz wordplay. I've taken water colour paper and sprayed it with starburst sprays. Some of the letters are also accented with ice stickles. To create some texture I've used stickles to try it look like sand. I then splattered some drops of Heidi Swapp's teal colour shine to look like water drops and in the midst I added a cluster of flat backs to emphasis the look.
Product used from The Rubber Buggy:
12x12 Magnolia, sea breeze, mythical ocean paper
6x6 Graphic 45, French country, solids & pattern paper pad
Ice stickles, artic blue
Ice stickles, crystal
Ice stickles, gold
Prima say it in crystals
Thank you all for visiting!
Pi here with a LO from my latest vacation to Italy.
I really wanted to show the beautiful colours of the photos and Magnolia's sea breeze paper Mythical Ocean was so perfect as the colour is gorgeous and it has lots of tiny anchors all over the paper.
The letters are from Tim Holtz wordplay. I've taken water colour paper and sprayed it with starburst sprays. Some of the letters are also accented with ice stickles. To create some texture I've used stickles to try it look like sand. I then splattered some drops of Heidi Swapp's teal colour shine to look like water drops and in the midst I added a cluster of flat backs to emphasis the look.
Product used from The Rubber Buggy:
12x12 Magnolia, sea breeze, mythical ocean paper
6x6 Graphic 45, French country, solids & pattern paper pad
Ice stickles, artic blue
Ice stickles, crystal
Ice stickles, gold
Prima say it in crystals
Thank you all for visiting!
Sunday, September 15, 2013
Sitting Tilda with Butterfly & Root Cellar Door card with mixed media techniques by Deb.x
Hi there Rubber Buggy fans! Today I have a shaped Magnolia card I made using some new mixed media techniques I've recently discovered! I used Sitting Tilda with Butterfly from the Once Upon a Tim '13 collection and Root Cellar Door from the Sweet Rainbow '11 collection and masked the image to create this scene.

The shaped blank is made with Go Kreate Frilly Frame #5 and the image is Spellbinders Nestabilities labels 1 die, also used Tim Holtz on the edge Butterflight die. Papers are the Soferio collection by Maja Design.

Distress Inks:
Skin - Tattered Rose, Vintage Photo
Cheeks - Tattered Rose mixed with Aged Mahogony
Hair - Antique Linen, Walnut Stain
Dress - Victorian Velvet with Pumice Stone shading
Tights - Pumice Stone
Flowers - Shaded Lilac
Butterfly - Victorian Velvet, Pumice Stone, Shaded Lilac
Greenery - Bundled Sage
Wall - Pumice Stone
Bricks & Stone - Soot Black
Highlighted with Sakura Pen-Touch, white

The mixed media techniques I used are The Crafters Workshop Reversed Chicken Wire template and applied texture paste to achieve the chicken wire effect. I also used Shabby Pink Frantage embossing powder, set around the image with a heat gun, then applied Mod-poge and added Frantage colour Fragments. The Butterflight die has been coated with Snow Tex textured paint, and the stunning chipboard butterflies by Dusty Attic and 'hold my hand' Maja strip has been shaped and coated in Gesso. The large flower below is Prima.

Suggestions for Rubber Buggy Products:
Thank you for visiting
Friday, September 13, 2013
On The Road Tilda
Hi Everyone!!! Dawn here on this fabulous Friday with my post for The Rubber Buggy, to show you some more inspiration using some wonderful stamps and products from the Store.

I used "On the Road Tilda" from the Sea Breeze 2013 Collection on my card today. I stamped her onto some cryogen CS and colored her in using copics. My DP is from the Wild Rose Studio Bella paper pad. I added some lace and a few pearls.
See you all back next Friday with some more inspiration. Check out the challenge blog for an awesome challenge, we'd love to see you participate.
HAPPY STAMPING!!!!
Wednesday, September 11, 2013
Taking a drive with Princess Pea Tilda
Welcome friends to another Thursday project with Kelly. I wanted to share a scenery type card today and so I used quite a few different elements here for this fun imagery card.


Rubber Buggy products were:
Bo Bunny key lime papers
Matlida princess pea stamp
Bo Bunny key lime sticker sheet
Other products used:
Tim Holtz jalopy die
My minds Eye Miss Caroline diecut stickers
Prima De Soie 2011 flower
Lime grograin ribbon
Fiskars scallop edge punch
Thanks for looking and have a great day! ~Kelly
Rose Beauty
Hi everyone, Steph here today with another wonderful Prima stamp. This is Mixed Media Doll #1 created by Julie Nutting.
Today, I paired her with some awesome Bo Bunny papers. After stamping her on white cardstock, I stamped her again on a sheet of roses and cut out the dress. This takes me back to my childhood where I'd play with paper dolls for hours. Ahh, so much fun!!!

A beautiful brown satin/grosgrain ribbon was tied to the card then some paper roses and garland were added to the knot to finish to card.
Thank you for visiting.
Tuesday, September 10, 2013
Fluggy hanging in there
Hi everyone!
Pi here mixing Fluffy from wee stamps with Graphic 45 background.

Products from the store:
Fluggy hanging in there, wee stamps
Grossgrain ribbon
Lace with pearl center
Copic markers
Graphic 45 paper
Stamping supplies
Thank you for visiting!
Pi here mixing Fluffy from wee stamps with Graphic 45 background.
Products from the store:
Fluggy hanging in there, wee stamps
Grossgrain ribbon
Lace with pearl center
Copic markers
Graphic 45 paper
Stamping supplies
Thank you for visiting!
Monday, September 9, 2013
Blue Ballerina
Hello everyone! Indah here again. And today I have a card to share with you. I love the colors here because I am all for pinks, so blue is a great change of pace for me :)

Thank you for visiting!

I used Tilda With Ballet Shoes from Magnolia then colored her in using Copic markers. I also use Stickles to glitter parts of her skirt and all over the flowers.
Thank you for visiting!
Sunday, September 8, 2013
LOTV tag card mixed media project by Deb.x
Hi all it's Deb here & today I have a LOTV tag card to share. To make the tag shaped card blank first create a 4x6" tent fold card blank, then trim one of the corners off. Turn the corner over and use as a template to trim the other side in order to get even corners.

Lovely papers are by Pion Design coated in Gesso, edges have been inked with Antique Linen and Walnut Stain Distress Ink using a blending tool & then sewn around on the machine.
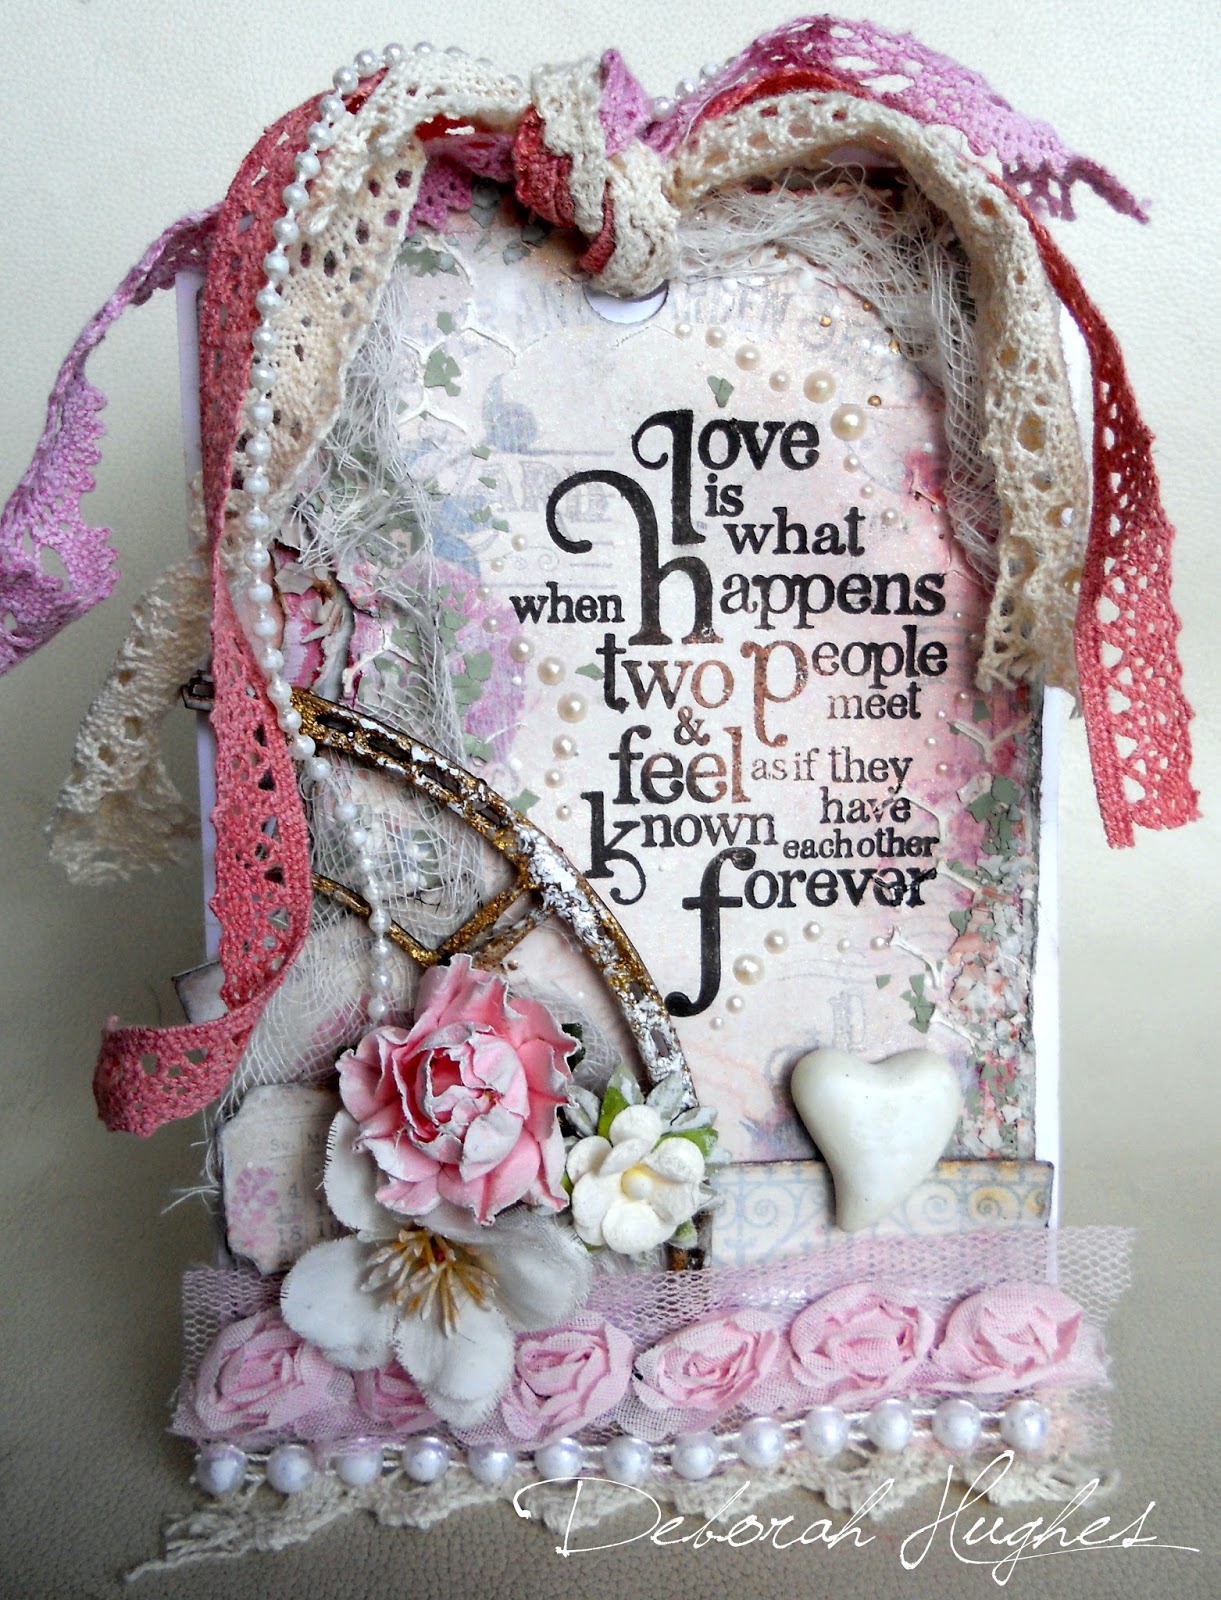
The chicken wire effect is made using The Crafters Workshop reversed Chicken Wire template & texture paste. I then added shabby white Frantage embossing powder & Frantage flakes in green and pink.

The LOTV sentiment is from the Quotable Love set, stamped in Sepia with Black added towards the outsides. Viva Declor Cream pearl pen faux pearl swirls added around sentiment to highlight. The skeliton clock chipboard has been embossed in That Special Touch of Gold, then set with UTEE sprinkled with white embossing powder. To finish I added flowers & lace trims.

Suggestions for Rubber Buggy Products:
Thank you for visiting
Friday, September 6, 2013
Silver Fairy
Hi Everyone!!! Dawn here on this fabulous Friday with my post for The Rubber Buggy, to show you some more inspiration using some wonderful stamps and products from the Store.

I used "Silver Fairy" by Wee Stamps by Whimsy on my card today. I stamped her onto some cryogen CS and colored her in using copics. My DP is from Graphic 45 Secret Garden .My Swirl and Flowers are made using dies from Cheery Lynn Designs.
See you all back next Friday with some more inspiration. Check out the challenge blog for an awesome challenge, we'd love to see you participate.
HAPPY STAMPING!!!!
Wednesday, September 4, 2013
Life is sweet at the beach Magnolia houses series
Good day friends, it's Kelly. I am here with a project to help bring this summer to it's fruition with a Magnolia mini houses stamp featuring a beach style print to leave summer with a warm goodbye and a love for the sweet life. I used the Bo Bunny key lime collection papers for the background from the Rubber Buggy and a Magnolia stamp mini houses and added a doily from my stash . I stamped it onto a note card die with navy blue ink and then distressed the edges with a sponge in the same color ink. I added the houses on 3-d dots, then a few flowers & mulberry leaves from the Rubber buggy store. I added a few fish tale diecuts I cut from the same paper collection and a wood veneer arrow from my stash. I topped it off with some little gems from Bo Bunny, same collection you can find them in the store as well and then a pretty matching bow at the top. I will be putting this layout in my project life album to go with our end of the summer photos from the beach house this summer. I'm sad to see it end but really excited to get to use these beautiful products to create something that I can enjoy and remember our summer of 2013. Thanks so much for watching and commenting have a great day! ~Kelly


Especially for you
Hey everyone, Steph here today using a fabulous Prima stamp. If you haven't yet had the chance to see them, you need to check out the store because they are all in stock.
I created a step card around Media Doll #1, knowing she's be the perfect size for this style of card. I stamped her in Memento Tuxedo Black Ink and then re-stamped her dress on Bo Bunny's Prairie Chic pattern paper.
The background uses papers from the Prima Almanac paper collection. A few die cuts, and some rhinestones finished off the card.

Thank you for visiting.
I created a step card around Media Doll #1, knowing she's be the perfect size for this style of card. I stamped her in Memento Tuxedo Black Ink and then re-stamped her dress on Bo Bunny's Prairie Chic pattern paper.
The background uses papers from the Prima Almanac paper collection. A few die cuts, and some rhinestones finished off the card.
Thank you for visiting.
Tuesday, September 3, 2013
Tilda on the Beach from new Sea Breeze collection by Deb.x
Hi there Rubber Buggy fans it's Deb here & today I'm posting a great Magnolia card I made for my Saturday spot (appologies for the lateness!) using this ever so cute 'Tilda on the beach' stamp fromt the new Sea Breeze collection. I teamed her with my new LOTV sentiment stamp which complimented the image perfectly.

The papers I used are 12x12 Blue Vintage Hydrangea (front & back) from the new Sea Breeze collection and New England Wood from Bon Voyage collection, both available here at The Rubber Buggy (direct links to products at bottom of post). All paper edges have been inked with Antique Linen & Walnut Stain Distress Ink pads using a blending tool then distressed with edge of scissors.

I stamped the Tilda image onto watercolour paper, then again on to a scrap piece of thin card, cut the Tilda out and placed her over the origional image as a 'mask', then stamped the LOTV greeting in Whethered Wood Distress Ink. I coloured the image & around the sentiment with Distress Inks using a normal watercolour brush.

Distress Inks:
Skin - Tattered Rose, Vintage Photo
Cheeks - Tattered Rise mixed with Aged Mahogony
Hair - Antique Linen, Walnut Stain
Skin - Tattered Rose, Vintage Photo
Cheeks - Tattered Rise mixed with Aged Mahogony
Hair - Antique Linen, Walnut Stain
Swin Suit - Whethered Wood shaded with Pumice Stone
Trim - Pumice Stone
Highlighted with White Sakura Pen-Touch
Trim - Pumice Stone
Highlighted with White Sakura Pen-Touch

And here's a quick look at the inside where I've also stamped the LOTV sentiment, this time onto the wood paper, circles are Spellbinders dies and the kraft die cuts have been cut with Feur de Lies Accents die.

Suggestions for Rubber Buggy Products:
Tilda on the beach
12x12 Blue Vintage Hydrangea
12x12 New England Wood
Tilda on the beach
12x12 Blue Vintage Hydrangea
12x12 New England Wood
Thank you for visiting
Hi everyone!
Pi here again :)
Remember I showed you earlier how to embrace the project life style without having to spend your money on journaling and filler cards. (HERE)
Well, today I'll show you how I used those cards. I just did a spread of my weekend in London last October. It was my first visit and as you see I took snap shots of some tourist attractions - LOL!

I've also cut the small alphas from the design paper and stuck the tiny pieces to doublesided scoretape - works like a sticker after that.
Products used from the store:
Prima 6x6pad, almanac
Prima washi tape, divine
Prima washi tape, engraver
Tim Holtz tissue tape
Sticker sheets
Score tape
I hope you liked it.
Thank you for visiting!
Pi here again :)
Remember I showed you earlier how to embrace the project life style without having to spend your money on journaling and filler cards. (HERE)
Well, today I'll show you how I used those cards. I just did a spread of my weekend in London last October. It was my first visit and as you see I took snap shots of some tourist attractions - LOL!
I've also cut the small alphas from the design paper and stuck the tiny pieces to doublesided scoretape - works like a sticker after that.
Products used from the store:
Prima 6x6pad, almanac
Prima washi tape, divine
Prima washi tape, engraver
Tim Holtz tissue tape
Sticker sheets
Score tape
I hope you liked it.
Thank you for visiting!
Subscribe to:
Posts
(Atom)


