Showing posts with label prima flowers. Show all posts
Showing posts with label prima flowers. Show all posts
Thursday, December 3, 2020
How to use Slimline Dies
Hi everyone, Steph Ackerman here today with lots of fun products from the store. Please visit the store for all the fun products I've used today.


Thank you for visiting

I've created 2 cards today using Tutti Designs Slimline dies - Stitched Scalloped Rectangle and Stitched Rectangle in 2 different ways.
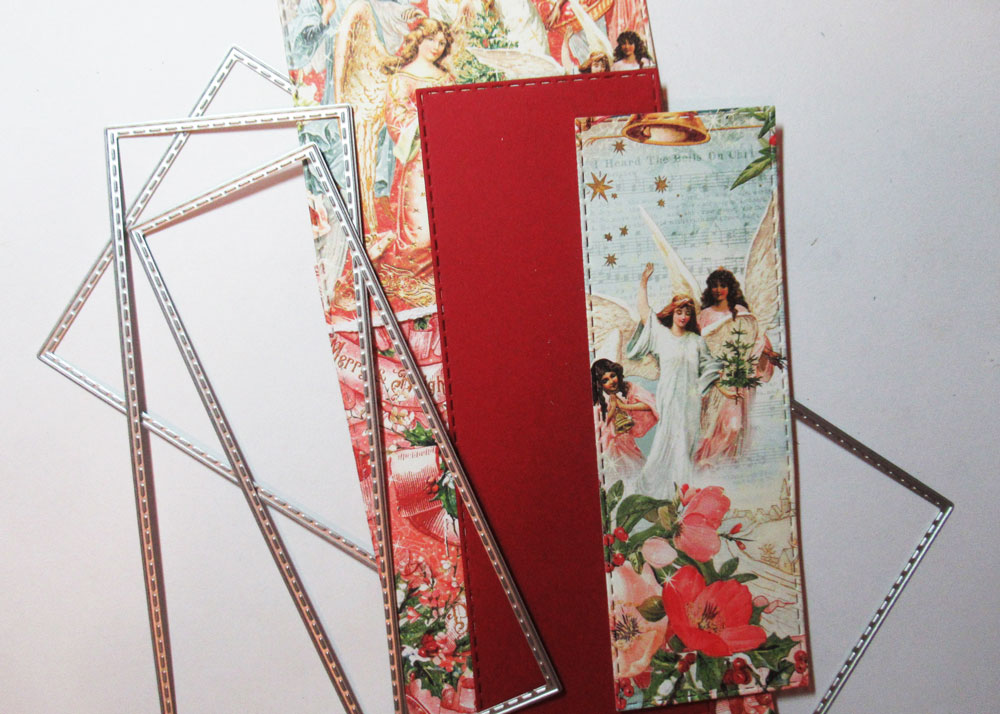
My first card was created from Bazzill Lollipop cardstock. Using papers from the Graphic 45 Joy to the World collection, along with Lollipop and green cardstock, I die cut the layers to create a true slimline card.

Prima poinsettias were added to to the layers with brads, along with a metal phrase from Tim Holtz Christmas Words collection. Glue Dots were used to provide dimension.

My next card is an A2 sized card and I used the same Tutti Designs Slimline dies to die cut the elements from Bazzill Lollipop cardstock and Graphic 45's Joy to the World papers.

I placed the scalloped layer on the card, cutting off the sections I did not need. Then I die cut the angel layer and cut off the sections I did not need. A poinsettia was added to the upper corner and a Tim Holtz Christmas Word was added along the edge. This is a great way to use slimline dies in another way with left over papers.

Monday, August 26, 2019
Brag Book with 3 Waterfalls with Bev

Hi... Bev here today at The Rubber Buggy. I am sharing this super fun brag book. I experimented with this style for days before ending up with my preferred 3 waterfalls with both horizontal and vertifcal waterfalls to be able to share lots of photos. It will be great for memories of all kinds... special occasions.... use them as photo gifts or even xmas gifts. The personal touch makes it an amazing creative brag gift... perfect for any coffee table for viewing often.
This collection ... Prima Apricot Honey – is soft, elegant and has amazing mix and match prints and subtle accents sheets and images to decorate your projects.
- Paper: Prima Marketing Apricot Honey Collection
- Flowers: Prima Marketing Apricot Honey - Honey Sweet, Prima Fruit Paridise Raspberry Kisses
- Glue: Beacon 3-in-1 Glue,
- Accents: Scrapbook 3D foam
- Machine/ tools: EK success cutter bee scissors, Fiskar Paper Trummer.
- Other: cardstock, accents, ribbon, glass floral

For this brag book as I mentioned I was after something that would be perfect for vertical and horizontal photos ... and also wanted a good size photo space.... and the many photos of both sizes.
(Instructions to follow when ready)

Side view of brag book.

So the outside and accents are mostly Prima Marketing Apricot Honey Collecton.

Super fun to decorate by theme.

This one is soft, elegant and displays amazing prints both light and dark and the touch of foil is a great touch in this collection.


Thanks for stopping by... hope to see you again soon

Monday, August 13, 2018
Treaure Layout using 49 and Market Sweet Reflections

Hi so how are you today. Well it's Bev here and I am sharing a page showcasing my mom with the youngest Grand Kids. I used 49 and Markets - Sweet Reflections Collection from The Rubber Buggy. The accents are the matching Laser Cut Sheet. Flowers are Prima and chipboards from Creative Embellishments.
For this page I used my sketch from Creative Inspirations Sunday Sketch Challenge. My favourite glue used is Beacon 3-in-1 and inking is done using Tim Holtz Vintage Photo. I finished it off with a small cute tied ribbon bow. Some of the accents are popped up using Scrapbook Adhesive 3D foam tape.


In the close ups you can view the details better. In this section I used naked natural coloured chipboards. I added fun layers and a great metal butterfly.
\

In this section you can see the layers along with the fussy cut sections where I slipped thing behind. I also inked edges to give depth and demension.

This section has a fun title and more smaller chipboard accents.

More overlaping layers with flowers and some of them popped up.

Central section with photo front and centre.


Thanks for stopping by.... be sure to visit the STORE to view these products and so many more that are available. There are many brands not carried at all the other stores ... I am sure you will love them all.

Thursday, April 24, 2014
Celebrate Spring Graphic 45 Sweet Sentiments
Hi everyone. Hope you are having a blessed spring, it's been beautiful here which has caused me to spend much more time outside and less time inside being able to craft but I did come up with this beautiful little spring bag that I am using to send a special gift out to a friend.
I used the Sweet Sentiments line from Graphic 45 available at The Rubber Buggy. I fussy cut the diecut cards and adhered them with foam adhesive for dimension. I used a bit of trims to accent and a doily to create a beautiful opening/closure for the top. The butterflies were also fussy cut from the paper, as well as the title. I also used Prima flowers from the store at the bottom they are from the Divine line. I hope you like it!

Thank you for visiting ~Kelly
I used the Sweet Sentiments line from Graphic 45 available at The Rubber Buggy. I fussy cut the diecut cards and adhered them with foam adhesive for dimension. I used a bit of trims to accent and a doily to create a beautiful opening/closure for the top. The butterflies were also fussy cut from the paper, as well as the title. I also used Prima flowers from the store at the bottom they are from the Divine line. I hope you like it!
Thank you for visiting ~Kelly
Thursday, March 13, 2014
Stinkin' Cute floral spring card
Hi friends it's Kelly. By today's weather it's feeling more and more like spring and I couldn't be more excited about a bit of warmer weather on its way. That inspired me to make this card for the monthly challenge over at the Rubber Buggy challenge blog here to enter for this months challenge Spring Flowers!
I have shown my card here below with the following Rubber Buggy products.
Carnation flowers
My Favorite things fence die
My Favorite things doily die
Mini rose flowers
Prima hello pastel flowers
Authentique traditions papers
...and here is my card....

Thank you for visiting ~Kelly
Thursday, October 24, 2013
Popcorn Treat Bag
Happy Thursday friends! It's Kelly here and I thought today I would share with you a little treat that I created for my little Halloween guests who might be arriving soon on my doorstep. This is the "Stache it for later" Popcorn treat bag. I found the adorable saying on pinterest, love that site, and then I created the template for the popcorn look-a-like container you see here.
Materials used:
Prima Hello pastel paper
Prima Hello pastel flowers
How to create this popcorn packet holder.
1. Take 2 pieces of 6x6 paper, use ruler measure bottom at approx. 4 inches to fit popcorn packet. Adhere bottom of each paper together to form a bottom.
2. Adhere ribbon to hold card together in middle then create bow.
3. Oval punch for the center, flower adhered with glue.
4. Draw popcorn pieces and adhere on the inside; one side only. Color if necessary.
5. Create saying on font - computer. "Stache some popcorn for later" I drew the mustache onto the cardstock. Just practice it's not hard to draw. Mat to black cardstock. Use circle punch to clip the corners to make it look like it's a ticket from the ticket booth at the movie theater, and adhere together.
6. Slip microwaveable popcorn packet down inside from the top, if the bottom is adhered together correctly it will hold it in as well as the ribbon on side.
7. Give as gift for trick or treaters!
Here is the finished product:


Thank you for visiting ~Kelly
Materials used:
Prima Hello pastel paper
Prima Hello pastel flowers
How to create this popcorn packet holder.
1. Take 2 pieces of 6x6 paper, use ruler measure bottom at approx. 4 inches to fit popcorn packet. Adhere bottom of each paper together to form a bottom.
2. Adhere ribbon to hold card together in middle then create bow.
3. Oval punch for the center, flower adhered with glue.
4. Draw popcorn pieces and adhere on the inside; one side only. Color if necessary.
5. Create saying on font - computer. "Stache some popcorn for later" I drew the mustache onto the cardstock. Just practice it's not hard to draw. Mat to black cardstock. Use circle punch to clip the corners to make it look like it's a ticket from the ticket booth at the movie theater, and adhere together.
6. Slip microwaveable popcorn packet down inside from the top, if the bottom is adhered together correctly it will hold it in as well as the ribbon on side.
7. Give as gift for trick or treaters!
Here is the finished product:

Thank you for visiting ~Kelly
Wednesday, September 11, 2013
Taking a drive with Princess Pea Tilda
Welcome friends to another Thursday project with Kelly. I wanted to share a scenery type card today and so I used quite a few different elements here for this fun imagery card.


Rubber Buggy products were:
Bo Bunny key lime papers
Matlida princess pea stamp
Bo Bunny key lime sticker sheet
Other products used:
Tim Holtz jalopy die
My minds Eye Miss Caroline diecut stickers
Prima De Soie 2011 flower
Lime grograin ribbon
Fiskars scallop edge punch
Thanks for looking and have a great day! ~Kelly
Subscribe to:
Posts
(Atom)


