Showing posts with label Copics. Show all posts
Showing posts with label Copics. Show all posts
Thursday, September 30, 2021
Happy Halloween with Magnolia WItch Tilda
Hi everyone, Steph Ackerman here today with lots of fun products from the store.


Happy Halloween with Magnolia Witch Tilda with Pumpkin. Isn't she a cutie? I colored her with Copic Markers.

The card is created from Simple Stories Vintage Farmhouse paper pack and Tim Holtz Kraft Cardstock. The contract of black and white against her red dress is amazing. She was fussy cut and added upon Lawn Fawn Stitched Circle dies, using the Small and Large dies. Cutting off the left side of the dies allowed Hello Friend from the Memory Box Bird Sanctuary stamp set to slip underneath.
Thank you for visiting
Thursday, September 9, 2021
Fall Themed Friendship Card
Hi everyone, Steph Ackerman here today with lots of fun products from the store.


Creating a slimline card from Bazzill Juicy Pear Cardstock, I cut a panel from Dress My Crafts to create my card.

For the top layer, I used the Tutti Designs Slimline Fence Die for a different effect. The die allows the underlying layer to show.

The image was stamped and colored with Copic Markers, then die cut using a Tutti Designs Oval die. The image was then matted with brown cardstock, then added to the card with 3D Foam Adhesives for dimension. Fussy cutting leaves from the pattern paper, they were placed around the image.

The sentiment, from a Penny Black stamp, was stamped with Lawn Fawn Black Licorice Ink.
Thank you for visiting.
Thursday, September 2, 2021
Thanks with Stamping Bella
Hi everyone, Steph Ackerman here today with lots of fun products from the store.


Ciao Bella has some beautiful stencil and I've used Ciao Bella Blossom stencil to create the background of my card. I first inked the stencil with Ranger Distress Oxide Ink in Abandoned Coral.

Since I was using the stencil on dark cardstock, I then used Ranger Clear Embossing Powder on top to give the design dimension.

Since I usually get embossing powder everyway, the Sizzix Anti-Static Funnel Tray by Tim Holtz is the perfect tray to keep the powder confined and then it easily poured back into its original jar.

I matted the panel with white cardstock.

Wrapping the panel with ribbon, I then added the panel to a card created with Bazzill Pale Rose Cardstock using 3D Foam Adhesives for dimension.

I stamped Stampingbella's Daisy Squidgy and colored her with Copic Markers. Thanks, which was included with the stamp set, was stamped and tied to the ribbon with Baker's Twine.

Thank you for visiting.
Thursday, May 27, 2021
Collect Beautiful Moments
Hi everyone, Steph Ackerman here today with lots of fun products from the store.


This beautiful floral stamp is a Magnolia Stamp - Meadow Daisy - and is a perfect size for a card front. I stamped it with Lawn Fawn Black Licorice Ink, then colored it with Copic Markers. I used Ranger Distress Ink in Speckled Egg to add color to the sky using Ranger Mini Domes Ink Blending Foams, and used Copic Markers to add the ground. The image was die cut with Lawn Fawn Stitched Rectangle Dies, then matted on Lawn Fawn Kraft cardstock.

Collect Beautiful Moments is from Stampers Anonymous Tiny Text stamp set and it was also stamped with Lawn Fawn Black Licorice Ink directly on the card.

Using Ranger Ice Stickles in Twinkle, I added dimension to the Daisy petals. Next, I added Ranger Liquid Pearls in Copper to the Daisy center.

What beautiful moments will you collect today?
Thank you for visiting.
Thursday, April 15, 2021
Swinging by....
Hi everyone, Steph Ackerman swinging by to say hi.


I stamped the image - Bundle Girl on a Swing from Stamping Bella - on white cardstock and colored her with Copic Markers. Next, I die cut her with Lawn Fawn Small Stitched Rectangle Dies. While still within the die, I added color with Distress Oxide Inks in Speckled Egg.

I then added some Distress Oxide Ink Stormy Sky.

Removing the die leaves a white edge around the image.

She was matted with Simple Stories Navy Cardstock, then Bazzill Gold Coins Cardstock that was die cut with Lawn Fawn Stitched Windy Backdrop Die.
The panel was placed on Bazzill Peppermint Cardstock, then added to the card.
The included sentiment was stamped, inked and matted with a scrap of the navy cardstock and added to the card with EK Success 3D Foam Dots.

Thank you for visiting.
Thursday, April 8, 2021
Stamping Bella Thanks Card
Hi everyone, Steph Ackerman here to share a sweet thank you card.
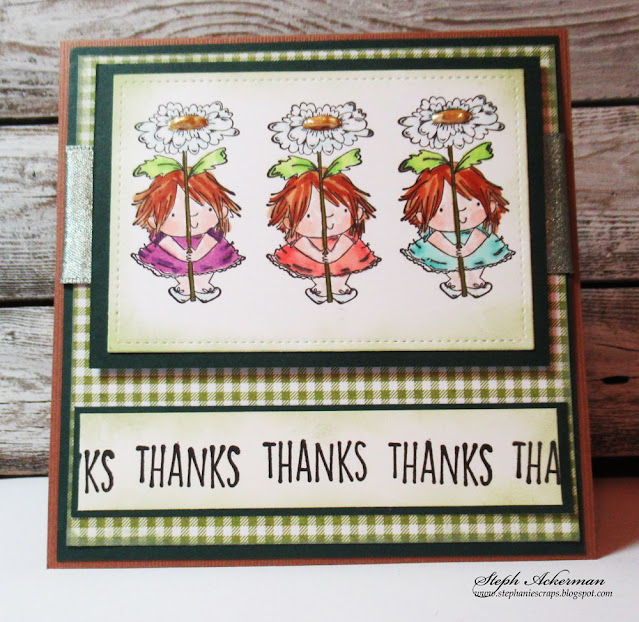


This Stamping Bella stamp set - Daisy Squidgy is so much fun to create with. The stamp set comes with 2 different sized images and a sentiment.

I stamped the smaller image three times on white cardstock, then die cut it with Lawn Fawn Small Stitched Rectangle Stackables. After coloring with Copic Markers, I added Liquid Pearls to the centers of the daisies. The panel was matted with Echo Park Dark Green Cardstock.

Creating a card from Echo Park Brown Cardstock, I wrapped a checked panel with ribbon and adhered the panel to the card.

Thanks was stamped repeatedly on a scrap of cardstock, then cut to fit the card.

Thank you for visiting
Thursday, March 25, 2021
Masculine Card with Tutti Designs Dies
Hi everyone, Steph Ackerman here today with a masculine card. Masculine cards are a bit more challenging to create as you don't want all the flowers and frills, but you still want a nice card.


Using Tutti Designs Dotted Rectangle slimline dies, I die cut one layer from Bazzill Jawbreaker Cardstock and the next size down from pattern paper.

I needed a masculine card and this older Prima Marketing stamp was perfect. I colored him with Copic Markers and then fussy cut him.

Before placing him atop the card with EK Success 3D Dots for dimension, I inked him with Distress Oxide Ink - Ground Espresso.

I used a stamp from Art Impressions Watercolor Cling stamp set using Lawn Fawn Licorice Ink. I wanted a smaller sized sentiment so I die cut black cardstock with the smaller Tutti die, then moved it 1/2" along the die and recut that end.

The sentiment was then placed along side of the image.

Thank you for visiting
Thursday, December 31, 2020
Happy New Year Cards
Hi everyone, Steph Ackerman here today with lots of fun products from the store. Please visit the store for all the fun products I've used today.
Wishing you all a Happy New Year and a much better 2021!!!!

I used several Tutti Designs dies to create these mini cards. I found the size of the Tutti Designs Stitched Scalloped Rectangle Dies, once die cut from Bazzill Licorice Twist Cardstock and scored in half created amazing mini cards For the sencond layer I use Tutti Designs Stitched Rectangle Dies with papers from Dress My Crafts Whispering Love collection. I just cut the die cut panels in half to create the 2nd layer.

The Magnolia Happy New Year stamp was perfect for these cards so I colored them with Copic Markers before fussy cutting them.

Using a Tutti Designs Stitched Nesting Oval, I added the next layer to the card. They were also die cut from Bazzill Licorice Twist Cardstock because I wanted the ladies to stand out.

Each lady was placed atop an oval using Glue Dots for dimension.

Thee are cute mini cards, but they'd also be great used as tags hanging from a bottle of wine for hte New Year don't you think?

Thank you for visiting
Thursday, December 17, 2020
Merry Christmas Tilda
Hi everyone, Steph Ackerman here today with lots of fun products from the store. Please visit the store for all the fun products I've used today.


I stamped an assortment of images from the Lawn Fawn Ho Ho Holidays stamp set using Lawn Fawn Licorice Ink.

Next, I colored the image with Copic Markers, then die cut them with the coordinating Lawn Fawn dies.

A Magnolia stamp, Pointing Tilda, was stamped with Lawn Fawn Licorice Ink, then also colored with Copic Markers. The panel was die cut with Lawn Fawn Stitched Rectangle dies and matted with Bazzill green cardstock, die cut with the next sized rectangle.

The background of the card is from Craft O'Clock Age of Technology collection. The panel was added to the card with Glue Dots for dimension. Merry Christmas, also from the Lawn Fawn Ho Ho Holiday stamp set, was stamped and added to the card. And I thought I'd use just one reindeer from the set as Tilda appears to be pointing toward it. I'm leaving the rest of he images for upcoming projects.
Thank you for visiting
Thursday, December 10, 2020
Merry Christmas - Be Jolly
Hi everyone, Steph Ackerman here today with lots of fun products from the store. Please visit the store for all the fun products I've used today.

I created an easel card to showcase the Stamping Bella Woodsies Christmas Morning Chicks stamp set. The easel card was created from Bazzill cardstock and an older paper from a Graphic 45 Christmas collection was added to both layers. The image was stamped with Lawn Fawn Black Licorice Ink, then colored with Copic Markers. It was then die cut with Lawn Fawn Rectangle Die then edged with Heartfelt Creations Fleur Borders and Pockets Dies to give it a lacey edge. The panel was added to Bazzill Lollipop Cardstock.


Using a Lawn Fawn Line Border Die - Merry Christmas - I also die cut it from Lollipop cardstock.

The image was added to the card with Glue Dots for dimension. Merry Christmas was added across the front of the card using Art Institute Glue. Using Tutti Designs Oval Dies, I created the stopper for the card base adhering it with Glue Dots for dimension.

Folded up, the card slips into a square envelope for easy mailing.

Thank you for visiting
Thursday, November 19, 2020
North Pole Love
Hi everyone, Steph Ackerman here today with lots of fun products from the store. Please visit the store for all the fun products I've used today.


I've used Lawn Fawn Large Slimline Dies with Sliders to create my card bases. The first base was die cut from Bazzill Jawbreaker Cardstock and a smaller piece was die cut from Bazzill Marshmallow Cardstock.

The snowflakes, from Poppy Stamp Die - Crystal Ornaments Craft Die, was also die cut from Bazzill Marshmallow Cardstock.

Rudi, a Prima Marketing - Julie Nutting stamp, is a perfect sized stamp for slimline cards. I stamped the elements with Lawn Fawn Black Licorice Ink, heat set, colored each with Copic Markers and then die cut with the included dies.

I inked the edges of each stamped piece before adding them to the card.

I spritzed the panel of the second card with one of the colors from Lindy's Stamp Gange - Neon Graffiti - Sidewalk Chalk - to simulate snow, then also die cut it with Lawn Fawn Large Slimline Die with Sliders.

The snowflake die was added to the cards, then Rudi and the North Pole sign were added to the cards with foam adhesives for dimension.


Thank you for visiting.
Subscribe to:
Posts
(Atom)


