Showing posts with label kraft cardstock. Show all posts
Showing posts with label kraft cardstock. Show all posts
Thursday, September 30, 2021
Happy Halloween with Magnolia WItch Tilda
Hi everyone, Steph Ackerman here today with lots of fun products from the store.


Happy Halloween with Magnolia Witch Tilda with Pumpkin. Isn't she a cutie? I colored her with Copic Markers.

The card is created from Simple Stories Vintage Farmhouse paper pack and Tim Holtz Kraft Cardstock. The contract of black and white against her red dress is amazing. She was fussy cut and added upon Lawn Fawn Stitched Circle dies, using the Small and Large dies. Cutting off the left side of the dies allowed Hello Friend from the Memory Box Bird Sanctuary stamp set to slip underneath.
Thank you for visiting
Thursday, August 26, 2021
Thinking of You with Lawn Fawn
Hi everyone, Steph Ackerman here today with lots of fun products from the store.


This sweet card uses the Lawn Fawn Tropical Laves Backdrop.

I die cut the backdrop from white cardstock, then used assorted colors of Ranger Distress Oxide Inks in Marigold, Mowed Lawn and Tea Dye to add color to the backdrop. I matted it on white cardstock then added the panel to a card.

The die set came with some small elements which you can easily clip apart. I chose to keep them intact as I tend to misplace little pieces. I die cut them from Ranger Kraft-Stock - Cool.

I stamped the bird from Memory Box Bird Sanctuary Stamp set, colored with Copic Markers and then fussy cut. Thinking of You was stamped with Lawn Fawn Black Licorice Ink directly on the white panel.

Thank you for visiting
Thursday, June 17, 2021
Graphic 45 Bird Watcher Card
Hi everyone, Steph Ackerman here today with lots of fun products from the store.


Cutting cardstock 6" x 10", I scored it at 5" and 7 1/2" along the long edge using the Scor-Pal. Then I cut the card on an angle from the 5" score line to 3" from the bottom edge. Fold on the score lines to create the card.

I used assorted papers from the Graphic 45 Bird Watcher collection: Feather Your Nest, Flock Together and Beautiful Morning, cutting each to fit the card's shape.

Since the papers are double sided, I was able to use both sides of the papers.

The paper are beautiful and coordinate so well together. On the back panel, I matted the bird paper with a sheet of cardstock from Tim Holtz Idea-ology Kraft Cardstock - Cool.

To finish, I cut the tags from Graphic 45 - Bird Watcher Learn to Fly paper. Matting each with a sheet of cardstock from Tim Holtz Idea-ology Kraft Cardstock - Cool, I placed the tag inside, then aligned the exterior one so it covered the inside tag. You only see the inside tag once the card is opened.

Thank you for visiting
Thursday, June 4, 2020
Summer Travel Treats
Hi everyone, Steph Ackerman here today with lots of fun products from the store. Please visit the store for all the fun products I've used today.


Thank you for visiting

Using Scor-Pal, I created a set of cards from Bazzill Jawbreaker Cardstock and Lawn Fawn Kraft Cardstock. I used papers from the Maja Design Life by the Sea and Sommartider collections to complete the cards. The top layers of the cards were die cut using Lawn Fawn Stitched Rectangle Dies.

I also created a coordinating set of gift bags which I'll fill with little odds and ends for the traveler. The top layers were die cut using Lawn Fawn Stitched Rectangle Dies.

I used Sizzix Thinlit Dies by Tim Holtz, die cutting the words from scraps of the pattern papers I used for the cards and gift bags. The mats were die cut from Bazzill Jawbreaker Cardstock.

Tattered Lace Detail Glue with it's fine tip was used to adhere the word layers together.
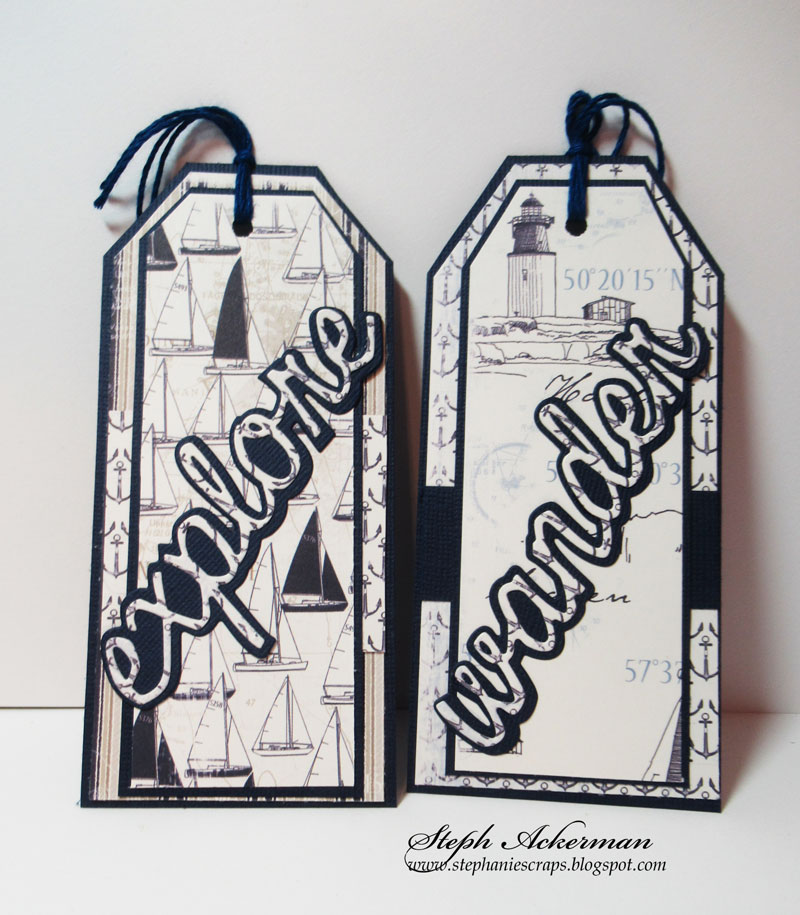
Creating tags from Bazzill Jawbreaker Cardstock, I added assorted layers and placed words on top. Twine was added to each tag.

Happy Summer from Lawn Fawn was die cut from Jawbreaker Cardstock and adhered across each card using the Tattered Lace Detail Glue.

This would be a nice set to give to someone planning on traveling this summer.

Fill the gift bags with little treats, or perhaps a pad and paper for doodling.
Friday, December 16, 2016
False embossing Christmas Card
Hi everyone!!
Christmas is coming,the coundown has been activated and we hardly have time to finish sending the outstanding christmas cards ... So here is, one suggestion to easy and fast for make... Hope you like!!

To make the card I used the false embossing tecnique, which consists of diying our figures on a card in the same color as the one we use for the base... Simple, look:

The rest of the card is very simple, color a beautiful stamp and dye the number 25 on doble adhesive foam tape to be able to sprinkle glitter over it.

Supply list:

Thank you for visiting
Christmas is coming,the coundown has been activated and we hardly have time to finish sending the outstanding christmas cards ... So here is, one suggestion to easy and fast for make... Hope you like!!

To make the card I used the false embossing tecnique, which consists of diying our figures on a card in the same color as the one we use for the base... Simple, look:

The rest of the card is very simple, color a beautiful stamp and dye the number 25 on doble adhesive foam tape to be able to sprinkle glitter over it.

Supply list:
- Winter Unicorn Lawn Fawn.
- Winter Big scripty Words Stamps.
- Winter Big Scripty Words Dies.
- Cross Stitched Rectangles Frames.
- Gold Glitter.
- Gold Super fine embossing powders.
- Copics Markers.
- Kraft Paper.
- Bazzil Card Wax Lips.

Thank you for visiting
Wednesday, July 17, 2013
Layering and fussy cutting
Hi scrappy friends it's Kelly. Today I have a card that is very simple but a perfect example of layering and fussy cutting. Sometimes you are in a hurry and aren't sure if you have time to color an image. It's in those times I like to get out the most vibrant and intricate paper pads that I own such as the bohemian bazaar from Graphic 45 sold at The Rubber Buggy and fussy cut the most interesting images. I then decide where to place them on a card and if I can adhere any flowers to add a little pizazz I will do that because I am the epitome of flowers anonymous.
Here is the card I created after fussy cutting the beautiful designs and the memories sign, I added a little ribbon, some flowers and presto....super simple but very lovely card for a friend or loved one. Thanks for looking have a great Thursday! ~Kelly

Here is the card I created after fussy cutting the beautiful designs and the memories sign, I added a little ribbon, some flowers and presto....super simple but very lovely card for a friend or loved one. Thanks for looking have a great Thursday! ~Kelly

Wednesday, June 12, 2013
Tilda Princess Pea on vintage swedish bench dt project
Hi everyone it's Kelly here again for project Thursday. I got the new Tilda Princess Pea stamp and the Vintage swedish bench from TheRubberBuggy and I am so excited to show you what I created. It's a super simple card which I am pretty familiar with I like easy cards that can go together in under 30 minutes. I used a kraft cardstock base for this and then I used the Prima notecards from the meadowlark collection. I then stamped my Tilda on xpress it cardstock from Rubber Buggy and copic colored her as well then paper pieced her outfit. I popped up the bench and popped her up on it. Then I added some Prima pearls in the corners and a beautiful red tinted bow to match her bow in her hair.

Thank you for visiting ~Kelly Walkelmol

Thank you for visiting ~Kelly Walkelmol
Subscribe to:
Posts
(Atom)


