Showing posts with label bazzill. Show all posts
Showing posts with label bazzill. Show all posts
Thursday, May 30, 2019
Tulip Cards
Hi everyone, Steph Ackerman here today with lots of fun products from the store. Please visit the store for all the fun products I've used today.

Lawn Fawn Small Stitched Rectangle Dies are at the center of my first card using Bazzill Sour Lemon and Gummy Bear Cardstocks. Once added to the card, I die cut the MemoryBox Tulip Bouquet from both Lawn Fawn White Cardstock and Bazzil Sour Lemon Cardstock. Remember to save all the little pieces!

I adhered the white tulips to the corner using a Nuvo Fine Tip Glue Pen. Then I placed the yellow die cuts inside.

The card was created from Lawn Fawn Kraft Cardstock and scored using the Scor-Pal Score Board. The panel was then added on top and a phrase added across the top.


Thank you for visiting

Lawn Fawn Small Stitched Rectangle Dies are at the center of my first card using Bazzill Sour Lemon and Gummy Bear Cardstocks. Once added to the card, I die cut the MemoryBox Tulip Bouquet from both Lawn Fawn White Cardstock and Bazzil Sour Lemon Cardstock. Remember to save all the little pieces!

I adhered the white tulips to the corner using a Nuvo Fine Tip Glue Pen. Then I placed the yellow die cuts inside.


The remaining die cut yellow tulips were added atop Lawn Fawn Outside In Stitched Circle Dies, die cut from Lawn Fawn White Cardstock, Bazzill Sour Lemon and Gummy Bear Cardstocks then added to a brown panel die cut from Lawn Fawn Reverse Stitched Scalloped Rectangle Dies and added to a Lawn Fawn Kraft Cardstock. Phrase added to the corner.

Thank you for visiting
Thursday, September 14, 2017
Glittered Background with Tutti Designs
Hi everyone, Steph Ackerman here today working with a bunch of products from the Rubber Buggy Store. Have you checked out the store lately? It has so many wonderful new products.
I love Tutti Designs dies and wanted to do something a little different with the Oriental Screen Craft Die.

I die cut a white panel using the Oriental Screen Craft Die. Due to the delicate nature of this die, I placed it on a sheet of Scor-Tape, cutting the adhesive sheet to fit the die cut panel.

Because of the exposed adhesive, I knew glitter would stick. I poured an assortment of Blue Fern Studio Glitter on the panel then gently rubbed the glitter into the adhesive.


Using a journaling card from the Rossi Belle Journaling pack, I die cut it with a Spellbinders oval die and matted it with a larger die. I adhered it over the ribbon using Scrapbook Adhesives 3D foam squares for dimension.
Doesn't it look pretty?
Thank you for visiting.
I love Tutti Designs dies and wanted to do something a little different with the Oriental Screen Craft Die.


Because of the exposed adhesive, I knew glitter would stick. I poured an assortment of Blue Fern Studio Glitter on the panel then gently rubbed the glitter into the adhesive.

I tapped off the excess glitter and then added the panel to a card created from Bazzill Taffy cardstock.

I wrapped May Arts ribbon around the panel.

Doesn't it look pretty?
Thank you for visiting.
Thursday, August 10, 2017
Butterflies and Poppies
Hi everyone, Steph Ackerman here today working with a bunch of products from the Rubber Buggy Store. Be sure you stop by the store to see all the products available.

Today, I've created 2 cards using Bazzill Circus Peanuts cardstock.
I cut cardstock 4 1/4" x 11" and used my Scor-Pal to score it at 5 1/2".
Using a left over sheet of pattern paper from the Prima Marketing's Vintage Emporium, I tore the left side and added it to the card.

Memory Box has some amazing dies that are perfect for creating cards. This Silver Springs Butterfly die was die cut from Vintage Emporium and placed along the left side of the card. The sentiment is WPlus 9 - Guiding Light Sentiments. This was die cut, matted with a larger die and added to the card.

Thank you for visiting

Today, I've created 2 cards using Bazzill Circus Peanuts cardstock.
I cut cardstock 4 1/4" x 11" and used my Scor-Pal to score it at 5 1/2".
Using a left over sheet of pattern paper from the Prima Marketing's Vintage Emporium, I tore the left side and added it to the card.

Memory Box has some amazing dies that are perfect for creating cards. This Silver Springs Butterfly die was die cut from Vintage Emporium and placed along the left side of the card. The sentiment is WPlus 9 - Guiding Light Sentiments. This was die cut, matted with a larger die and added to the card.

For my next card I created a background using assorted colors of ink, spritzed with water. Then I used the Poppystamps Die - Arched Poppies with white cardstock. I die cut another set from green cardstock and another from the orange cardstock. Then, I reassembled the poppies on the background. Finally, I matted the panel with the orange cardstock and wrapped the panel with May Arts Sheer Ribbon. The sentiment is WPlus 9 - Guiding Light Sentiments.
Thursday, May 25, 2017
Prima Gal Cards
Hi everyone, Steph Ackerman here today working with a bunch of products from the Rubber Buggy Store. Have you checked out the store lately? It has so many wonderful new products.
I created 3 different Prima Gal cards using the Photoplay Julie Nutting French Flea Market collection.


My next card uses another print from the Photoplay pack and the left over scrap from my first card. All were matted with Bazzill Candy Bar cardstock. The phrase is also from one the sheets in the paper pack and I simply die cut the oval shape. The Prima girl was colored with Copic Markers, then fussy. She was placed on the oval with foam adhesives.

And my final card incorporates two papers from the Photoplay paper pack, each matted with Bazzill Candy Bar cardstock. The phrases are also from one the sheets in the paper pack. I placed them on top of a die cut oval. The Prima girl was colored with Copic Markers, then fussy. She was placed on the oval with foam adhesives.

Thank you for visiting
I created 3 different Prima Gal cards using the Photoplay Julie Nutting French Flea Market collection.

The colors in this paper pack are amazing and coordinate so well together. I began by inking the word paper with brown ink, matting it with Bazzill Candy Bar cardstock, then added a Spellbinders die cut oval in the center. I stamped and colored the Prima girl with Copic Markers, then fussy cut her. The phrase is from one the sheets in the paper pack and the girl was added on top with foam adhesives.

My next card uses another print from the Photoplay pack and the left over scrap from my first card. All were matted with Bazzill Candy Bar cardstock. The phrase is also from one the sheets in the paper pack and I simply die cut the oval shape. The Prima girl was colored with Copic Markers, then fussy. She was placed on the oval with foam adhesives.

And my final card incorporates two papers from the Photoplay paper pack, each matted with Bazzill Candy Bar cardstock. The phrases are also from one the sheets in the paper pack. I placed them on top of a die cut oval. The Prima girl was colored with Copic Markers, then fussy. She was placed on the oval with foam adhesives.

Three different cards from one paper pack and there is plenty of paper left to create some more cards.
Thank you for visiting
Thursday, March 16, 2017
Wedding Card and Tag
Hi everyone, Steph Ackerman here with a wedding card and coordinating tag.

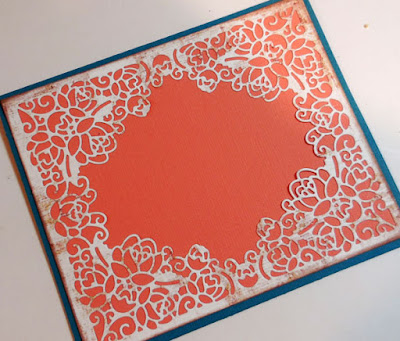
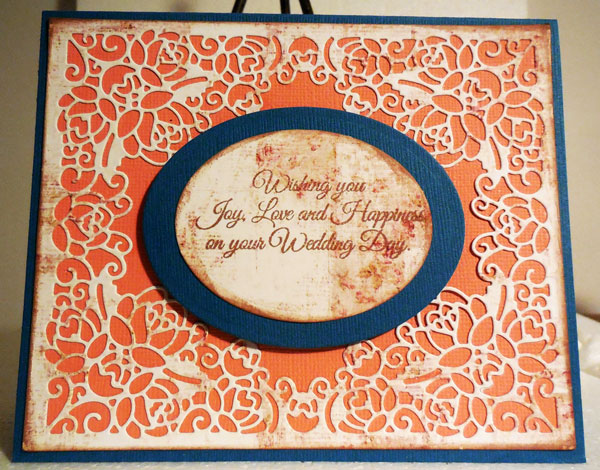
Using the delicate Rose Frame from Tutti Designs, I die cut pattern paper from Prima's Debutante 6" x 6" paper pad. Due to the delicate nature of the die, I used Spellbinders Tool n One to help remove the die cuts and all the little bits.

I mounted the die on a panel of peach cardstock. Then mounted the panel on a card created from Gummy Bear Bazzill cardstock. Be sure to save the center piece for another project.
Using Spellbinders dies, I die cut ovals which were added to the center of the card and added a wedding sentiment.


To create the tag, I used a Memory Box stencil - Distressed Grid - on a tag inking it with Ranger Walnut Stain Distress Ink.


What do you think?

Thank you for visiting.

Using the delicate Rose Frame from Tutti Designs, I die cut pattern paper from Prima's Debutante 6" x 6" paper pad. Due to the delicate nature of the die, I used Spellbinders Tool n One to help remove the die cuts and all the little bits.

I mounted the die on a panel of peach cardstock. Then mounted the panel on a card created from Gummy Bear Bazzill cardstock. Be sure to save the center piece for another project.

Using Spellbinders dies, I die cut ovals which were added to the center of the card and added a wedding sentiment.


Next, I cut peach cardstock 5 1/2" x 2 1/2". Using the Scor Pal Mini, I scored three lines at the bottom and top of the tag.

I placed the peach cardstock on the tag, then placed the left over middle portion of the die from the card on top. Since the Prima paper pad is double sided, I used the other side. Then I die cut ovals for the center and stamped a sentiment on top.

May Arts sheer ribbon finished off the tag.

What do you think?

Thank you for visiting.
Thursday, March 9, 2017
Flower Cart card with Tutti Designs
Hi everyone, Steph Ackerman here today wishing you a happy day. If you haven't seen the number of new dies in the store you need to check them out. The Tutti Designs dies are awesome and I've used the Tutti Designs Flower Cart Die.


Stop by the store and see all the amazing Tutti Designs dies in stock.
Thank you for visiting

I die cut 2 pieces from green and brown cardstock. This die is extremely delicate but cuts so well. For those little pieces that got stuck, I used the Spellbinders Tool n' One and easily removed them.

I added color to the green layer with Dried Marigold, and Squeezed Lemonade using a Ranger Ink Blending Tool. I fussy cut the brown layer, placing it atop the green layer. So the flower cart would stand out, I die cut a large oval from Prima Debutante pattern paper and matted with Bazzill cardstock.

Finally I placed it on a brown card.

Stop by the store and see all the amazing Tutti Designs dies in stock.
Thank you for visiting
Thursday, March 2, 2017
Bloom Where You're Planted
Hi everyone, Steph Ackerman here today wishing you a happy day. If you haven't seen the number of new dies in the store you need to check them out. The Tutti Designs dies are awesome.


I added color to one of the white layers with Shabby Shutters, Dried Marigold, and Squeezed Lemonade using a Ranger Ink Blending Tool. I placed this inked layer on the black layer, slightly offsetting the layers. I fussy cut the butterflies from the 3rd layer, inked them with Dried Marigold and placed them on top.


I love how this turned out. The die is very delicate and adding layers really emphasizes that.
Thank you for visiting

I've used Tutti Designs Butterfly Oval Die cutting 2 pieces from white cardstock and 1 from black cardstock. This die is extremely delicate but cuts so well. For those little pieces that got stuck, I used the Spellbinders Tool n' One and easily removed them.


The pattern paper I used is from the Prima Debutante 6"x6" paper pack.

A sentiment was added to die cut ovals and the panel was then matted with Bazzill cardstock before adding it to the card.

I love how this turned out. The die is very delicate and adding layers really emphasizes that.
Thank you for visiting
Tuesday, February 14, 2017
Eggstra Special Easter Gift Cards

Hi it's Jennifer here with some cute and quick
gift cards ready for Easter.
So today I have used papers from Lemon Craft - Tiny Miracles
and White Bazzill for the bases.
I also used the new Lawn Fawn Fancy Scalloped Circles with
Lawn Fawn Small Stitched Circles layered on using 3D Foam Tape
The stamp set I coloured up with Copics is Lawn Fawn Eggstra Special Easter
I also used the new Lawn Fawn Fancy Scalloped Circles with
Lawn Fawn Small Stitched Circles layered on using 3D Foam Tape
The stamp set I coloured up with Copics is Lawn Fawn Eggstra Special Easter

So here's the first one. I also coloured little pearls to match
on all there bows.
Copics used
Bunny - C0, C01, C03
Nose and ears - R81
Bow - BG11, BG13, BG49
Egg - Y11, Y15, Y18, R81, R83, BG11, BG13

Flower - R81, R83, R85, R69
Leaves - G21, G24
Bow - BG000, BG01, BG02

Basket - E30, E31, E33, YR23
Bow - Y11, Y15, Y18
Eggs - Y11, Y15, BG000, BG01, V00, V12, R81, R83, BG11, BG13
All these products and more are avaliable at the
The Rubber Buggy Shop and don't forget to visit us on Facebook look for the Videos
down the side too, Instragram and the Rubber Buggy Design Team Blog
where there's a post nearly everyday from one of the team.
Happy Crafting
Happy Crafting
Jennifer
Tuesday, February 7, 2017
Daffodil Tilda Finished Card

Hi Everyone it's Jennifer here with my finished
card from last week when we did the face tutorial.
The link for the face Tutorial is Here.
So I was going to make her into an Easle Card with lots of
layers and lace but then decided to take a step back and just
do a CAS card and give her centre stage.
So I have cut a card base 23cmx15.5cm
lavered it in a piece of Bazzill to match my paper
11cmx15cm. Then the same Bazzill 14.5cmx7cm.
I then used Pion Sent Of Lavender
to highlight her 14cmx6.5cm. I then layered them
all up as in the picture. Now to do the frame I used the
I am just in love with these. The holes around the edges
are just so delicate I'm sure its going to get a good
working out I can see. I used the second biggest and I then
cut 1cm in all around the inside with my paper trimmer.
I then cut my Image to 7cmx10cm and ran 3D Foam Tape
cut to fit around the bottom of the frame and then my Tilda.
I then used the 3D Foam Tape to layer her framed on the card.
I was going to do more but kept looking at her thinking
she is just perfect all by herself.
Copics I used are
Face - E0000, E000, E00, E01, E11, E13, R21
Hair - E25, E30, E31, E33, Y21
Flowers Base - C0, C01
Outfit, Flower Tops - RV00, RV91, RV93, RV95, RV99

All these products and more are avaliable at the
The Rubber Buggy Shop and don't forget to visit us on Facebook look for the Videos
down the side too, Instragram and the Rubber Buggy Design Team Blog
where there's a post nearly everyday from one of the team.
Happy Crafting
Happy Crafting
Jennifer
Thursday, January 26, 2017
Valentine's Day Projects
Hi everyone, Steph Ackerman here to share some Valentine's Day projects with you.

Using the Scor-Pal, I created a gate fold card from Bazzill Licorice cardstock. The pattern paper layers are from Wild Rose Studios - Vintage Rose.


Finally, I created some goodie bags using the same cardstock and pattern papers. I used one of the other stamps included with the Wild Rose Studios - Romantic Greetings stamp set, die cutting it with Spellbinders dies.
After filling the bags with candy, I stapled the toppers in place.

These are quick and easy candy bags for the Valentine's in your life.
Thank you for visiting.

Using the Scor-Pal, I created a gate fold card from Bazzill Licorice cardstock. The pattern paper layers are from Wild Rose Studios - Vintage Rose.

I added Bazzill Butter Mint cardstock between the layers and inked each layer with Ranger Tea Dye Distress Ink.

Stamp an image from Wild Rose Studios - Romantic Greetings. This set of 6 stamps is comprised of wedding and love themes in a variety of shapes.

Spellbinders dies were used to die cut all the layers which were then adhered together and the sentiment placed on top. I adhered the circle to the left side of the card.

Finally, I created some goodie bags using the same cardstock and pattern papers. I used one of the other stamps included with the Wild Rose Studios - Romantic Greetings stamp set, die cutting it with Spellbinders dies.
After filling the bags with candy, I stapled the toppers in place.

These are quick and easy candy bags for the Valentine's in your life.
Thank you for visiting.
Thursday, January 5, 2017
Winter Themed Cards with Riddersholm Design
Hi everyone, Steph Ackerman here today with some winter themed cards.


How sweet is that bird in the snow covered branches? I simply tore it on a slight angle and added Bazzill Jelly Bean Cardstock between the layers. Since the paper is double sided, both sides can be used and they coordinate perfectly. I then matted the panel on additional Bazzill Jelly Bean Cardstock. A sweet sentiment was added with 3D Foam Squares from Scrapbook Adhesives for dimension.

These deer are just as sweet at the bird. I chose to tear across the top and add Bazzill Jelly Bean Cardstock between the layers. The sentiment is actually the UPC coded label which I thought would be a fun way to use it. I also added it to the card with 3D Foam Adhesives from Scrapbook Adhesives.
Thank you for visiting.
Steph

Have you seen the newest paper collections in the store? I've used papers from the Christmas Cosy collection from Riddersholm Design.

How sweet is that bird in the snow covered branches? I simply tore it on a slight angle and added Bazzill Jelly Bean Cardstock between the layers. Since the paper is double sided, both sides can be used and they coordinate perfectly. I then matted the panel on additional Bazzill Jelly Bean Cardstock. A sweet sentiment was added with 3D Foam Squares from Scrapbook Adhesives for dimension.

These deer are just as sweet at the bird. I chose to tear across the top and add Bazzill Jelly Bean Cardstock between the layers. The sentiment is actually the UPC coded label which I thought would be a fun way to use it. I also added it to the card with 3D Foam Adhesives from Scrapbook Adhesives.
Thank you for visiting.
Steph
Subscribe to:
Posts
(Atom)


