Showing posts with label Tutti Designs. Show all posts
Showing posts with label Tutti Designs. Show all posts
Thursday, August 6, 2020
Stamping Bella Cards
Hi everyone, Steph Ackerman here today with lots of fun products from the store. Please visit the store for all the fun products I've used today.


.

I love the 7 Gypsies Boots & Brollas on Ivory cardstock. This is a sturdy cardstock with assorted boots and umbrellas. Creating 5 1/2" square cards from Bazzill Licorice Twist Cardstock, the pattern paper was cut 5" square and inked with Tim Holtz Gathered Twigs Ink.
Using the reverse side, I cut it 5 1/4" square and adhered the papers together.
After wrapping the panels with May Arts Sheer Black Ribbon, the panels were added to the cards.

I love the Stamping Bella stamps and used both Sunny is Stylish and Lolly with her Brollie. Both were colored with Copic Markers. Sunny was fussy cut and added atop a Tutti Designs oval die, with Scrapbook 3D Foam Adhesives for dimension, while Lolly was stamped on a Tutti Designs oval die. The ovals were then adhered to larger black ovals.

The right side of Lollie's oval was cut off to align with the edge of the card.
The ovals were then added to each of the cards with foam adhesives for dimension.
Thank you for visiting
Thursday, July 23, 2020
Rose Birthday Card
Hi everyone, Steph Ackerman here today with lots of fun products from the store. Please visit the store for all the fun products I've used today.


Thank you for visiting

Using Prima Watercolor Paper, spritz it with water and sprinkle Lindy's Stamp Gang Magicals in Urban Amethyst on the paper. Add more water as necessary until the paper is covered.
Once dry, die cut to fit a card created from Pion Design - Purple V. Next, use Bazzill Licorice Twist cardstock with Tutti Designs Background die.

Nuvo Crystal Drops in Sweet Lilac was used to add additional color to the roses. Using a Tutti Designs Stitched Oval die, I die cut Bazzill Marshmallow cardstock. A birthday stamp from Penny Black Transparent stamp set, was stamped on the oval using Lawn Fawn Soot ink. Inking the edges with Lawn Fawn Fresh Lavender ink, I then placed it in the center of the card using Glue Dots Mini Dots for a little dimension.

What do you think?
Thank you for visiting
Thursday, July 16, 2020
Thanks Shaker Card
Hi everyone, Steph Ackerman here today with lots of fun products from the store. Please visit the store for all the fun products I've used today.


Thank you for visiting

Using Tutti Designs Butterfly Dance die, I die cut it from white and pink cardstock from the Lawn Fawn Schoolyard paper pack. I then die cut larger ovals from acetate, yellow cardstock and a newsprint panel from Dress My Craft'sWhispering Love collection.
Adhere the white die cut butterfly panel to the acetate using Tattered Lace Detail Glue, then place the yellow oval on top. Adhere foam adhesives along the edge of the pattern panel creating the shaker. Fill the channel with Dress My Crafts Shaker Elements - Dessert, then place the acetate butterfly panel on top, creating the shaker.

Fussy cut the butterflies from the pink die cut oval and place them atop the white panel, letting the wings free. The butterflies appear to be in flight.

Create a card from white cardstock. Mat pattern paper (from the Whispering Love collection) with pink cardstock and wrap with May Arts Sheer Black ribbon. Adhere the panel to the card.
Adhere the butterfly shaker to the card. Using the Lawn Fawn Thanks Line die to die cut Thanks from black cardstock. Adhere it across the bottom of the oval., cutting off the excess portion as necessary.
Thank you for visiting
Thursday, June 25, 2020
Floral Fantasy Cards
Hi everyone, Steph Ackerman here today with lots of fun products from the store. Please visit the store for all the fun products I've used today.


Use the same products to create 2 coordinating cards. Start by creating cards from Bazzill Rock Candy and Gumdrop cardstocks.

Cut 2 pieces of Maja Designs Vintage Summer pattern paper to 4" x 5 1/4". Ink the edges with Tim Holtz Mahogany Distress Ink. Use a Tutti Designs Oval die to cut an oval from the center of one of the panels. Stamp the cross pattern from Gabi's Daisies stamp set on Neenah white cardstock with Memento Tuxedo Black Ink. Adhere behind the die cut panel. Add drops of Liquid Pearls Merlot and Raspberry to the flower pieces.

Place 2 Tutti Oval dies on Simple Stories Brick cardstock and die cut. Pull apart the ovals. Use the outer piece to create the frame around the opening and place the center piece aside for the 2nd card. Use Sizzix Funky Foliage dies to die cut mushrooms, leaves and flowers from left over papers. Ink the mushrooms with Tim Holtz Old Paper Distress Ink before assembling. Adhere the flowers, leaves and mushrooms around the oval.
Add the panel to Brick cardstock then to the Gumdrop card. Stamp a phrase from the Tim Holtz Tiny Text stamp set on a scrap of the pattern paper, die cut with a small Tutti Designs oval and mat with a larger die. Add to the card with Scrapbook Adhesives.

For my 2nd card, I used the same Gabi's Daisies stamp, and stamped it on the left over oval from above using VersaMark Watermark stamp pad and Lawn Fawn White embossing powder. Heat set and adhere to a larger oval die cut from gray cardstock and place in the center of the panel.

Using the same papers, die cut additional flowers and leaves and place around the oval. Stamp another phrase from the Tiny Text stamp set. Die cut and mat with 2 additional larger layers.
Add the panel to the Rock Candy card with Scrapbook Adhesives for dimension. Add Merlot Liquid Pearls to the flower centers.
Thank you for visiting
Monday, July 9, 2018
The Rubber Buggy products used along with sketches to share with you

The Rubber Buggy project was made using my very own sketch from Creative Inspirations for the month of July. Using the sketch below I followed the sketch background and worked my way forward to the amazing fall family photos from my youngest son's family.
I used Blue Fern Studios Remnants Paper Collection, some cardstock, Prima Flowers and some brads. The title is a copic marked chipboard. I use Beacon 3-in-1 for most of my projects.


This super fun but easy card is also made using The Rubber Buggy products and my very own card sketch. I used the sketch for the background moving forward creating the fun may layered border with Heartfelt Creations paper floral flower band. I fussy cut the print butterfly for an accent, die cut the gold butterfly using only part of the Tutti #267 Fluttering butterflies die, Tutti #229 Word Set Birthday, Tutti #228 Word Set Happy and also did the gold Happy Birthday.

Thanks for stopping by. Be sure to visit THE RUBBER BUGGY STORE and also

Monday, February 26, 2018
"OWL" always love you card and a Tag
'Owl' always love you


Ink: Tim Holtz
Other: cardstock, ribbons, thread, buttons stamp


Products Used
Sugar Hollow Paper Collection HCDP1-262
Flowering Dogwood HCD1 - 7129
Sugar Hollow Hangout HCD1 -784
Botanic Orchid Wishes HCPC -3744
Markers: Copic,
Glue: Beacon 3-in-1
Ink: Tim Holtz
Tools: Misti
Other: cardstock, beads puffy stickers,foam pop ups,
 Instructions: Using a cardstock card base cut your background paper panel to fit. Cut a 2nd image section as we will be using foam to pop it up and add depth and dimension. Cut the sentiment from the paper collection and mat it to pop up also. Add foam pop ups and add the bead trim around the circle image. Now we will die cut foamiran to start the flower and leaf accents.
 When all the pieces are cut lightly heat them .... shrink a bit, shape and glue together. Add to the card. Add the few additional sticker accents and the front is done. Now for the inside I chose a great print image from the 6x6 options and cut it to fit the inside of my card. I used the Botanic Orchid Wishes verse for inside. I stamped it and then copic coloured it. The print image had a cage in the upper right side so I die cut a white one for more depth and texture using the Sugar Hollow Hangout. Ink the edges and glue to the inside. I mixed some products together but they look great together.
Sugar Hollow Paper Collection HCDP1-262
Flowering Dogwood HCD1 - 7129
Sugar Hollow Hangout HCD1 -784
Botanic Orchid Wishes HCPC -3744
Markers: Copic,
Glue: Beacon 3-in-1
Ink: Tim Holtz
Tools: Misti
Other: cardstock, beads puffy stickers,foam pop ups,

 When all the pieces are cut lightly heat them .... shrink a bit, shape and glue together. Add to the card. Add the few additional sticker accents and the front is done. Now for the inside I chose a great print image from the 6x6 options and cut it to fit the inside of my card. I used the Botanic Orchid Wishes verse for inside. I stamped it and then copic coloured it. The print image had a cage in the upper right side so I die cut a white one for more depth and texture using the Sugar Hollow Hangout. Ink the edges and glue to the inside. I mixed some products together but they look great together.


**************************************************

I did this project for another post but was using The Rubber Buggy tutti 213 dies so thought I'd add it in here as an extra to give you an idea about using the amazing nested stitched tags of many sizes .
Die cut many tags in different colours for layers. Stamp the background. Using digi printed stamps from Vectoria Designs and matted them to pop.
I added some circle chipboards plain and then played with some buttons and thread for cute fun accents. Tie off the tags with mix of thin ribbons and they are done.
Supply List:
The Rubber Buggy products
Glue: Beacon 3-in-1Ink: Tim Holtz
Other: cardstock, ribbons, thread, buttons stamp

Each one is just laid out a bit different using all the same elements and basic design.


This is the close up of the tags.

Be sure to stop by often when I get to share even more projects using products from The Rubber Buggy STORE.....see you soon.

Thursday, January 25, 2018
Especially For You
Hi everyone, Steph Ackerman here today with a sweet something especially for you. Please visit the store for all the fun products I've used today.

This little gal is from Stamping Bella and looks sweet no matter what you do with her. She was colored with assorted Copic Markers then fussy cut. Using a Gel Press, I added assorted Prima Marketing Acrylic Paints - Art Alchemy Metallic in Green-Gold, Rose-Gold and Light Patina. Placing Strathmore Water Color paper on the Gel Press. Once the paper dried, I die cut it with Tutti Designs Rose Frame Branch die. Since this is an intricate die, I found the Spellbinders Tool N One was really helpful in getting the little bits out.


I wrapped the panel with May Arts White Grossgrain ribbon, then added the panel to a card with foam adhesives for dimension. The girl was added on top with foam adhesives and the phrase was added to the background.

Isn't she sweet?
Thank you for visiting

This little gal is from Stamping Bella and looks sweet no matter what you do with her. She was colored with assorted Copic Markers then fussy cut. Using a Gel Press, I added assorted Prima Marketing Acrylic Paints - Art Alchemy Metallic in Green-Gold, Rose-Gold and Light Patina. Placing Strathmore Water Color paper on the Gel Press. Once the paper dried, I die cut it with Tutti Designs Rose Frame Branch die. Since this is an intricate die, I found the Spellbinders Tool N One was really helpful in getting the little bits out.
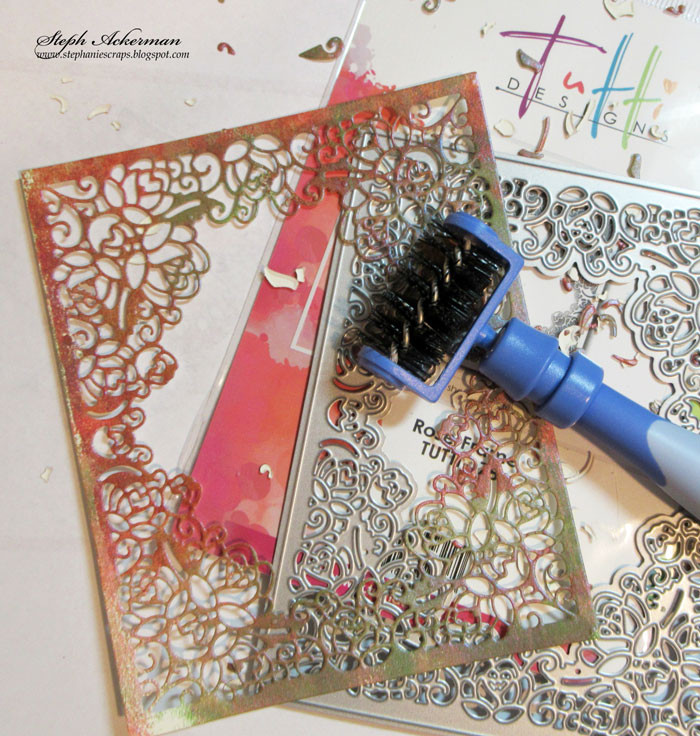
I then matted this die cut panel on black cardstock. Love that it shows off the intricate die.


Isn't she sweet?
Thank you for visiting
Monday, November 20, 2017
Super fun Best Wishes Gift Card Holder

Hi... it's Bev here today. So how are you enjoying fall or for some the start of winter with snow staying on the ground already? Today at The Rubber Buggy I am using Blue Fern Studios Amber and Apricot Collection along with some fun stamping and die cuts. This card has a simple but easy fold flap inside to hold a gift card.
Supply List:
The Rubber Buggy Products
Paper: Blue Fern Studio Amber & Apricot
Dies: tutti word set Best Wishes, Memory Box Distressed Baptisia Collage
Ink: Tim Holtz Distress Vintage Photo, Ranger Die Ink Black Tie
Glue: Beacon 3-in-1
Other: cardstock, brads, stamp

To make this gift card holding card I used white cardstock paper ... cut to fit your envelope ... but add about a 1.5" band extra to the back panel for the gift card holder section.

Here is the base ready to work on.

On the inside of card I added the decorated papers... I trimmed the flip fold panel and added some cute brads to the outer edges to help hold the pocket for the gift card in tack.

Using brads like this... leave the metal showing... but just cover the back section with paper also.

I stamped inside the card with a fun verse.

To make the front I used the print section of the paper that I loved and sized it first. I die cut the words Best Wishes and also the fun side panel using black cardstock ... a colour that popped off the print and added depth and dimension to the card front.


Thanks for stopping by... see you again soon.

Subscribe to:
Posts
(Atom)


