Showing posts with label Bazzil. Show all posts
Showing posts with label Bazzil. Show all posts
Thursday, March 4, 2021
Special Card and Matching Gift Bag
Hi everyone, Steph Ackerman here using the Memory Box Die - Woodgrain Heart.


The die creates the perfect heart shape with a wood grain effect so it can be used on all types of papers. I die cut Bazzill Lollipop Cardstock and Bazzill Sour Lemon Cardstock.

The card was created from Dress My Crafts Whispering Love Collection and Bazzill Licorice Twist Cardstock. Before adding the panel to the card, I placed the 2 hearts on the panel, punched holes through the layers and slipped ribbon through the holes, tying it atop the hearts.

A phrase from an Art Impressions stamp set was stamped with Lawn Fawn Black Licorice Ink and added to the corner of the card.

As I was giving this to a sweet friend with a small gift, I created a coordinating gift bag.

Thank you for visiting
Thursday, November 5, 2020
Thank you for being my Rainbow
Hi everyone, Steph Ackerman here today with lots of fun products from the store. Please visit the store for all the fun products I've used today.


Now that we've entered the cold, dreary days of fall, I wanted to share a bright, sunny card.

Don't you just love these Magnolia cuties? I think Little Tilda is totally precious. I wasn't sure what I was going to create with her till after I colored her.

I colored her with Copic Markers, then set her atop a set of oval dies, which I die cut using Tutti Designs Stitched Oval Dies and Bazzill cardstock in Marshmallow and Whirlypop. The phrase, also a Magnolia stamp, was stamped with black ink and matted with Whirlypop cardstock and slipped under her.

The ovals were added to a panel of Bazzill Sour Lemon cardstock which was matted with Whirlypop cardstock. Using assorted flowers from my stash (similar to these), I added them around the oval with Simple Stories brads. Bazzill Candy Corn cardstock was cut to fit the card, then the panel was added on a slight angle with foam adhesives for dimension.

Once the card was completed, I used Nuvo Crystal Drops in Ivory Seashell to add crystal dots in two opposite corners. I also added them atop the brads. I also added drops to her dress and wings. They dry as clear drops and add some nice dimension to your projects.

Thank you for visiting
Thursday, June 25, 2020
Floral Fantasy Cards
Hi everyone, Steph Ackerman here today with lots of fun products from the store. Please visit the store for all the fun products I've used today.


Use the same products to create 2 coordinating cards. Start by creating cards from Bazzill Rock Candy and Gumdrop cardstocks.

Cut 2 pieces of Maja Designs Vintage Summer pattern paper to 4" x 5 1/4". Ink the edges with Tim Holtz Mahogany Distress Ink. Use a Tutti Designs Oval die to cut an oval from the center of one of the panels. Stamp the cross pattern from Gabi's Daisies stamp set on Neenah white cardstock with Memento Tuxedo Black Ink. Adhere behind the die cut panel. Add drops of Liquid Pearls Merlot and Raspberry to the flower pieces.

Place 2 Tutti Oval dies on Simple Stories Brick cardstock and die cut. Pull apart the ovals. Use the outer piece to create the frame around the opening and place the center piece aside for the 2nd card. Use Sizzix Funky Foliage dies to die cut mushrooms, leaves and flowers from left over papers. Ink the mushrooms with Tim Holtz Old Paper Distress Ink before assembling. Adhere the flowers, leaves and mushrooms around the oval.
Add the panel to Brick cardstock then to the Gumdrop card. Stamp a phrase from the Tim Holtz Tiny Text stamp set on a scrap of the pattern paper, die cut with a small Tutti Designs oval and mat with a larger die. Add to the card with Scrapbook Adhesives.

For my 2nd card, I used the same Gabi's Daisies stamp, and stamped it on the left over oval from above using VersaMark Watermark stamp pad and Lawn Fawn White embossing powder. Heat set and adhere to a larger oval die cut from gray cardstock and place in the center of the panel.

Using the same papers, die cut additional flowers and leaves and place around the oval. Stamp another phrase from the Tiny Text stamp set. Die cut and mat with 2 additional larger layers.
Add the panel to the Rock Candy card with Scrapbook Adhesives for dimension. Add Merlot Liquid Pearls to the flower centers.
Thank you for visiting
Thursday, June 18, 2020
Tropical Thank You Cards
Hi everyone, Steph Ackerman here today with lots of fun products from the store. Please visit the store for all the fun products I've used today.


Thank you for visiting

Using Heartfelt Creations Tropical Hibiscus stamps and coordinating dies, create the flowers using Bazzill Cardstock and Lawn Fawn Peach Fuzz Ink.

Use the Heartfelt Creations Deluxe Flower Shaping Tool to shape the flowers.

Create a square card from Lawn Fawn Kraft cardstock. Cut Bazzill Marshmallow Cardstock slightly smaller and die cut the center using a Tutti Designs Oval die. Add the die cut panel to the card. Die cut the white oval using the next size down die and die cut the peach frame using 2 dies to create the frame.

Using Memento Tuxedo Black Ink, stamp thank you on the white oval and place in the opening. Adhere the leaves to opposite sides of the card using Tattered Lace Detail Glue. Adhere the flowers on top.

Create a second card from Bazzill cardstock. Cut 7Gypsies Garden Words to size and mat with Bazzill Marshmallow cardstock before adhering to the card.

Using 2 sizes of the Tutti Designs Nesting Ovals, die cut both colors of cardstock and adhere to the card. Stamp thank you slightly off center. Adhere 2 sets of leaves and the flowers to the corner of the card.
Finish by adding Nuvo Drops to the flower centers.
Thank you for visiting
Thursday, June 11, 2020
Pretty in Purple Cards
Hi everyone, Steph Ackerman here today with lots of fun products from the store. Please visit the store for all the fun products I've used today.

Starting with the Prima Marketing Open Flower die, I decided to build 2 cards around it. Since it is an open flower, there is no backing, so to achieve the look I wanted, I die cut the flower from 3 layers of Pion Design's Purple cardstock in one pass and 3 layers of Pion Design's Lavender cardstock in one pass. Pulling off the top 2 layers, the third layer shows the impression of the die and remains intact.

Using the intact layer for the flower bases, I reassembled the flowers using Tattered Lace Detail Glue, adding the purple insets to the lavender layer and the lavender insets to the purple layer. Then I adhered the top layer, gluing just the center of the flower, leaving the edges free.


Thank you for visiting

Starting with the Prima Marketing Open Flower die, I decided to build 2 cards around it. Since it is an open flower, there is no backing, so to achieve the look I wanted, I die cut the flower from 3 layers of Pion Design's Purple cardstock in one pass and 3 layers of Pion Design's Lavender cardstock in one pass. Pulling off the top 2 layers, the third layer shows the impression of the die and remains intact.

Using the intact layer for the flower bases, I reassembled the flowers using Tattered Lace Detail Glue, adding the purple insets to the lavender layer and the lavender insets to the purple layer. Then I adhered the top layer, gluing just the center of the flower, leaving the edges free.

Create a card from purple cardstock. Using Lawn Fawn Stitched Rectangle dies, die cut Bazzill Marshmallow Cardstock. Assemble the card by adding a lavender layer behind the rectangle.

Using Heartfelt Creations Classic Rose dies and coordinating stamps, create 4 sets of leaves on Bazzill Gumdrop Cardstock using Lawn Fawn Walnut Ink. Place 2 sets of leaves along the bottom of the card.

Add a brad to the flower center and place the flower on top of the leaves.

Finish the card by stamping a stamp from Stamperia's Enjoy stamp set, stamp it on Marshallow Cardstock and die cut with a Tutti Designs Nesting Oval die. Die cut a larger purple oval and slip it behind the leaves. Add to the card with Scrapbook Adhesives.

Alternate the colors for the 2nd card and adhere 2 sets of leaves in the upper corner. Again, add a brad to the flower center and place it on top of the leaves.

Stamp and die cut the same sentiment, adding it to the card with Scrapbook Adhesives.
Thank you for visiting
Thursday, May 28, 2020
Dress My Craft Cards
Hi everyone, Steph Ackerman here today with lots of fun products from the store. Please visit the store for all the fun products I've used today.

Dress My Crafts has some wonderful paper collections and I've used Whispering Love for my cards today. This paper pad has 24 sheets of single sided papers.


Dress My Crafts has some wonderful paper collections and I've used Whispering Love for my cards today. This paper pad has 24 sheets of single sided papers.

For my birthday card, I used Lawn Fawn Stitched Circle Dies, Lawn Fawn Zig Zag dies and Happy Birthday Line Die which were die cut from Bazzill Licorice Twist and Marshmallow cardstocks.

The background is a combination of different papers in this collection which have been torn and a strip of Licorice Twist placed between the layers.

A Penny Black birthday stamp was inked with Memento Tuxedo Black Ink and stamped on the white circle. She was then colored with Copic Markers, matted with the Zig Zag die and added to the card with Scrapbook 3D Foam Adhesives. Ranger Liquid Pearls in Merlot were added to the cupcake. To finish, the Happy Birthday phrase was added to the top of the card.

My 2nd card is a 5 1/2" square card from Bazzill Licorice Twist Cardstock. A sheet from the same collection was added to the card and the roses were fussy cut from another sheet. For emphasis, the roses were matted with pink cardstock and again fussy cut creating a pocket.
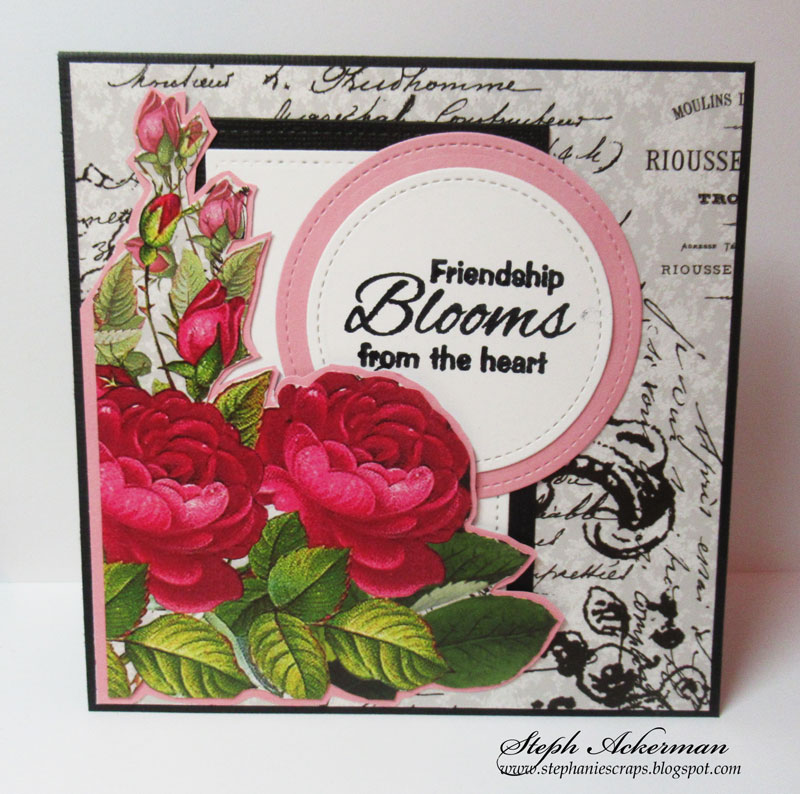
Using Lawn Fawn Stitched Rectangle Dies, Bazzill Licorce Twist and Marshmallow cardstocks were die cut and then slipped behind the roses. The phrase from Art Impressions Watercolor Stamp set was stamped on Marshmallow cardstock with Memento Tuxedo Black Ink, then die cut with Lawn Fawn Stitched Circle dies. It was also slipped behind the roses.

Thank you for visiting
Thursday, April 16, 2020
Need a Hug? Card
Hi everyone, Steph Ackerman here today with lots of fun products from the store. Please visit the store for all the fun products I've used today.




Thank you for visiting

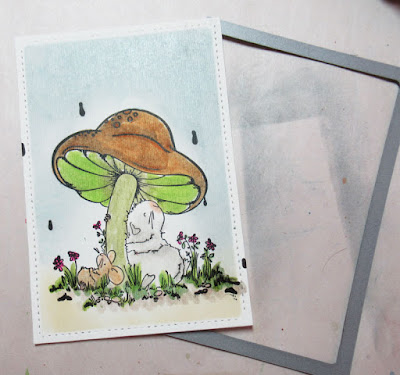
I stamped Stamping Bella's Gilbert and Maisy Under the Toadstool with Memento Tuxedo Black Ink, then colored the image with Copic Markers. Using Lawn Fawn Stitched Rectangle Dies, the image was die cut. Leaving the image in place, I added Ranger Distress Inks around the image using a Ranger Ink Blending Tool.

Removing the die, you can see a nice white edge around the image.

Creating a card from Bazzill Gumdrop cardstock, I added a panel from Lawn Fawn's Knock on Wood paper pad, then wrapped the card with Cotton Ribbon.

Matting the image with Bazzill Gumdrop cardstock, I added it to the card with Scrapbook Adhesives 3D Foam Squares for dimension. The sentiment was added to the corner.

To finish, Ranger Liquid Pearls in Merlot were added to the flower centers and the sentiment.
Thank you for visiting
Thursday, April 2, 2020
Welcome Burlap Panel
Hi everyone, Steph Ackerman here today with lots of fun products from the store. Please visit the store for all the fun products I've used today.
What are you doing while you are waiting out the current pandemic? I've been going through my stash and organizing everything and pulling out products I want to use. This burlap panel is the result of just gathering supplies.

Using a burlap panel, I inked it with Ranger Distress Ink in Walnut Stain using a Ranger Ink Blending Tool. I cut Graphic 45 papers to fit, tearing the top layer and adding strips of Bazzill Licorice Twist Cardstock to help the panel pop. With so many different Graphic 45 papers available, any of them would be perfect for the center of this panel. I used US Art Quest Perfect Paper Adhesive to adhere the papers to the burlap panel.


Then I assembled the panel with burlap tags, paper tags (similar to the 7 Dots Studio tags), assorted flowers and clothes pins.


Thank you for visiting
What are you doing while you are waiting out the current pandemic? I've been going through my stash and organizing everything and pulling out products I want to use. This burlap panel is the result of just gathering supplies.

Using a burlap panel, I inked it with Ranger Distress Ink in Walnut Stain using a Ranger Ink Blending Tool. I cut Graphic 45 papers to fit, tearing the top layer and adding strips of Bazzill Licorice Twist Cardstock to help the panel pop. With so many different Graphic 45 papers available, any of them would be perfect for the center of this panel. I used US Art Quest Perfect Paper Adhesive to adhere the papers to the burlap panel.

I found some metal words at the Dollar Store, so I inked welcome with Ranger Embossing Ink and added color with Ranger Perfect Pearls in Forever Green and Perfect Copper. The embossing ink was a great foundation for adhering the perfect pearls. Allow to set for a few minutes, then brush away the excess.

Then I assembled the panel with burlap tags, paper tags (similar to the 7 Dots Studio tags), assorted flowers and clothes pins.
Welcome was added to the panel with US Art Quest Perfect Paper Adhesive as well as Scrapbook Adhesives 3D Foam Adhesives to pop it up in the center.

Think about using whatever you have handy and see what you can create.
Thank you for visiting
Thursday, October 17, 2019
Happy Holidays with Wild Rose Studio
Hi everyone, Steph Ackerman here today with lots of fun products from the store. Please visit the store for all the fun products I've used today.

Christmas is only 11 weeks away so it's time to start creating Christmas cards. I've used the Mia with Candy from Wild Rose Studio - a sweet stamp, perfect for your Christmas cards or even general holiday cards. I stamped her twice on Lawn Fawn white cardstock with Memento Tuxedo Black Ink then colored the images with Copic Markers.

I die cut the images using Lawn Fawn Small Stitched Circle Dies, then added them to green cardstock which was die cut with Lawn Fawn Large Stitched Circle Dies.

The cards were created using Bazzill Wax Lips cardstock, cut to 5 1/2" x 11" and scored in half with Scor-Pal Scoring Board. The papers are from Graphic 45's Joy To The World collection which I mixed and matched to create my cards.
May Arts Sheer Ribbon was wrapped around the panels before adding the images with Scrapbook Adhesives 3D Foam Adhesives for dimension. Baker'sTwine was then tied around the ribbon to add some color.
The included phrase was stamped with Memento Tuxedo Black Ink on Lawn Fawn white cardstock, matted with green and red cardstock and then added to the card with Scrapbook Adhesives 3D Foam Adhesives for dimension.
Thank you for visiting

Christmas is only 11 weeks away so it's time to start creating Christmas cards. I've used the Mia with Candy from Wild Rose Studio - a sweet stamp, perfect for your Christmas cards or even general holiday cards. I stamped her twice on Lawn Fawn white cardstock with Memento Tuxedo Black Ink then colored the images with Copic Markers.

I die cut the images using Lawn Fawn Small Stitched Circle Dies, then added them to green cardstock which was die cut with Lawn Fawn Large Stitched Circle Dies.

The cards were created using Bazzill Wax Lips cardstock, cut to 5 1/2" x 11" and scored in half with Scor-Pal Scoring Board. The papers are from Graphic 45's Joy To The World collection which I mixed and matched to create my cards.
May Arts Sheer Ribbon was wrapped around the panels before adding the images with Scrapbook Adhesives 3D Foam Adhesives for dimension. Baker'sTwine was then tied around the ribbon to add some color.
The included phrase was stamped with Memento Tuxedo Black Ink on Lawn Fawn white cardstock, matted with green and red cardstock and then added to the card with Scrapbook Adhesives 3D Foam Adhesives for dimension.
Thank you for visiting
Subscribe to:
Posts
(Atom)


