Showing posts with label Scrapbook Adhesives. Show all posts
Showing posts with label Scrapbook Adhesives. Show all posts
Thursday, September 17, 2020
Happy Fall with Penny Black's Gathering Stamp
Hi everyone, Steph Ackerman here today with lots of fun products from the store. Please visit the store for all the fun products I've used today.
As we head into our next season, I want to wish everyone Happy Fall.

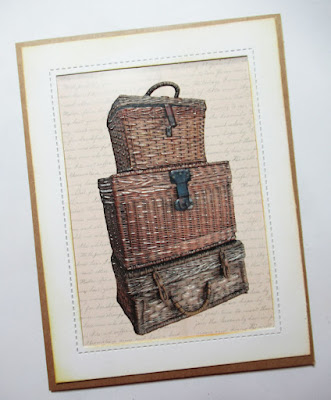
I stamped the Gathering Stamp from Penny Black with Lawn Fawn Licorice Black Ink. Next, I colored her with Copic Markers. In order to die cut the image, I first cut around the basket, fitting the Lawn Fawn Small Stitched Rectangle Die so the basket would remain intact.


I stamped the Gathering Stamp from Penny Black with Lawn Fawn Licorice Black Ink. Next, I colored her with Copic Markers. In order to die cut the image, I first cut around the basket, fitting the Lawn Fawn Small Stitched Rectangle Die so the basket would remain intact.

While still in the die, I lightly inked around the image with Tim Holtz Distress Oxide Ink in Faded Jeans using a Ranger Ink Blending Tool.

The card was created using Bazzill cardstock and the new Photo Play Gnome for Thanksgiving 6x6 paper pad. This double sided paper pad has 24 papers with 2 of each design. This leaves you lots of options to work with. The wordy paper was matted with cardstock then wrapped with May Arts Sheer Ribbon before being added to the card on a slight angle.

The image was edged with Tim Holtz Distress Oxide Ink in Bundled Sage, matted with a Lawn Fawn Large Stitched Rectangle Die, then placed on the card with Scrapbook Adhesives.

Finally, I used the reverse side of the wordy paper to die cut Lawn Fawn's Happy Fall Line Border Die, placing it above the image with Tattered Lace Detail Glue, which is perfect for these smaller die cuts.

Thank you for visiting
Thursday, July 2, 2020
Framed Dimensional Cards
Hi everyone, Steph Ackerman here today with lots of fun products from the store. Please visit the store for all the fun products I've used today.


Thank you for visiting

I used some fun 7Gypsies Adhesive Embellishments. I die cut a frame using Bazzill Marshmallow Cardstock with Lawn Fawn Stitched Rectangle dies. The edges were inked with Ranger Brushed Corduroy Distress Ink, and placed atop a scrap of pattern paper. Several stamps from Tim Holtz Tiny Text cling stamps were inked with Memento Tuxedo Black Ink and stamp around the panel. Add the panel to a Lawn Fawn Kraft card.

I used the Old Paint Brush for my first card, adding it to the card on an angle. Using Tutti Designs Nesting Ovals, I die cut white and kraft cardstock. Another phrase was stamped on the white layer and the ovals were then added to the card with Scrapbook Adhesives 3D foam squares for dimension, overlapping the paint brush.

For my second card, I used the 3 Wicker Woven Trunks. I really liked the packaging so I used it for the background, and placed another die cut panel on top.

Again, I stamped several stamps from Tim Holtz Tiny Text cling stamps with Memento Tuxedo Black Ink around the die cut panel. A third stamp was stamped on a strip of white cardstock, matted with kraft cardstock and added to the card with foam adhesives. The panel was then added to a Lawn Fawn Kraft card. Makes me want to pack my trunks and do some traveling.

Thank you for visiting
Thursday, June 11, 2020
Pretty in Purple Cards
Hi everyone, Steph Ackerman here today with lots of fun products from the store. Please visit the store for all the fun products I've used today.

Starting with the Prima Marketing Open Flower die, I decided to build 2 cards around it. Since it is an open flower, there is no backing, so to achieve the look I wanted, I die cut the flower from 3 layers of Pion Design's Purple cardstock in one pass and 3 layers of Pion Design's Lavender cardstock in one pass. Pulling off the top 2 layers, the third layer shows the impression of the die and remains intact.

Using the intact layer for the flower bases, I reassembled the flowers using Tattered Lace Detail Glue, adding the purple insets to the lavender layer and the lavender insets to the purple layer. Then I adhered the top layer, gluing just the center of the flower, leaving the edges free.


Thank you for visiting

Starting with the Prima Marketing Open Flower die, I decided to build 2 cards around it. Since it is an open flower, there is no backing, so to achieve the look I wanted, I die cut the flower from 3 layers of Pion Design's Purple cardstock in one pass and 3 layers of Pion Design's Lavender cardstock in one pass. Pulling off the top 2 layers, the third layer shows the impression of the die and remains intact.

Using the intact layer for the flower bases, I reassembled the flowers using Tattered Lace Detail Glue, adding the purple insets to the lavender layer and the lavender insets to the purple layer. Then I adhered the top layer, gluing just the center of the flower, leaving the edges free.

Create a card from purple cardstock. Using Lawn Fawn Stitched Rectangle dies, die cut Bazzill Marshmallow Cardstock. Assemble the card by adding a lavender layer behind the rectangle.

Using Heartfelt Creations Classic Rose dies and coordinating stamps, create 4 sets of leaves on Bazzill Gumdrop Cardstock using Lawn Fawn Walnut Ink. Place 2 sets of leaves along the bottom of the card.

Add a brad to the flower center and place the flower on top of the leaves.

Finish the card by stamping a stamp from Stamperia's Enjoy stamp set, stamp it on Marshallow Cardstock and die cut with a Tutti Designs Nesting Oval die. Die cut a larger purple oval and slip it behind the leaves. Add to the card with Scrapbook Adhesives.

Alternate the colors for the 2nd card and adhere 2 sets of leaves in the upper corner. Again, add a brad to the flower center and place it on top of the leaves.

Stamp and die cut the same sentiment, adding it to the card with Scrapbook Adhesives.
Thank you for visiting
Thursday, April 2, 2020
Welcome Burlap Panel
Hi everyone, Steph Ackerman here today with lots of fun products from the store. Please visit the store for all the fun products I've used today.
What are you doing while you are waiting out the current pandemic? I've been going through my stash and organizing everything and pulling out products I want to use. This burlap panel is the result of just gathering supplies.

Using a burlap panel, I inked it with Ranger Distress Ink in Walnut Stain using a Ranger Ink Blending Tool. I cut Graphic 45 papers to fit, tearing the top layer and adding strips of Bazzill Licorice Twist Cardstock to help the panel pop. With so many different Graphic 45 papers available, any of them would be perfect for the center of this panel. I used US Art Quest Perfect Paper Adhesive to adhere the papers to the burlap panel.


Then I assembled the panel with burlap tags, paper tags (similar to the 7 Dots Studio tags), assorted flowers and clothes pins.


Thank you for visiting
What are you doing while you are waiting out the current pandemic? I've been going through my stash and organizing everything and pulling out products I want to use. This burlap panel is the result of just gathering supplies.

Using a burlap panel, I inked it with Ranger Distress Ink in Walnut Stain using a Ranger Ink Blending Tool. I cut Graphic 45 papers to fit, tearing the top layer and adding strips of Bazzill Licorice Twist Cardstock to help the panel pop. With so many different Graphic 45 papers available, any of them would be perfect for the center of this panel. I used US Art Quest Perfect Paper Adhesive to adhere the papers to the burlap panel.

I found some metal words at the Dollar Store, so I inked welcome with Ranger Embossing Ink and added color with Ranger Perfect Pearls in Forever Green and Perfect Copper. The embossing ink was a great foundation for adhering the perfect pearls. Allow to set for a few minutes, then brush away the excess.

Then I assembled the panel with burlap tags, paper tags (similar to the 7 Dots Studio tags), assorted flowers and clothes pins.
Welcome was added to the panel with US Art Quest Perfect Paper Adhesive as well as Scrapbook Adhesives 3D Foam Adhesives to pop it up in the center.

Think about using whatever you have handy and see what you can create.
Thank you for visiting
Thursday, February 6, 2020
Bird Sanctuary Cards
Hi everyone, Steph Ackerman here today with lots of fun products from the store. Please visit the store for all the fun products I've used today.


Thank you for visiting


Using Memento Tuxedo Black Ink, stamp a 5 1/2" x 11" panel of Bazzill Alpaca Cardstock with the 3 birds included with the Memory Box Bird Sanctuary stamp set. This stamp set includes 3 birds, 4 phrases and 4 geometric designs for lots of card making ideas.

Stamp the dots with Ranger Distress Ink in Iced Blue randomly around the birds.

Cut the panel to create 2 cards and mat each panel with Bazzill Jelly Bean Cardstock. Stamp 2 phrases on Bazzill Marshmallow Cardstock and die cut with Lawn Fawn Stitched Circle Dies.

Place white ribbon on the Ranger Distress Ink in Iced Blue and pull it across the pad picking up the color.

Wrap ribbon around the panels.

Add the phrases to the cards using Scrapbook Adhesives 3D Foam Squares for dimension.

Thank you for visiting
Thursday, September 26, 2019
Enjoy Every Moment
Hi everyone, Steph Ackerman here today with lots of fun products from the store. Please visit the store for all the fun products I've used today.

I'm using Stamping Bella's Gilbert and Maisy under the Toadstool, stamping the image with Memento Tuxedo Black Ink on Lawn Fawn White cardstock, then coloring it with Copic Markers.

The image was die cut with Lawn Fawn Small Stitched Rectangle Stackable dies then matted on Bazzill Wax Lips cardstock.

A plaid background was also matted with Bazzill Wax Lips cardstock, then wrapped with Sheer White Stitched Ribbon. The stamped panel was added to the card with Scrapbook Adhesives 3D Foam Adhesives.

The phrase is from 49th and Market - Valerie's Enjoy Every Moment Stamp Set. It was also stamped with Memento Tuxedo Black Ink on Lawn Fawn White cardstock, matted with Bazzill Wax Lips cardstock and placed on the card.

Thank you for visiting
Thursday, June 27, 2019
Hoping you are doing great cards
Hi everyone, Steph Ackerman here today with lots of fun products from the store. Please visit the store for all the fun products I've used today.

Using a Ranger stencil, placed it on Lawn Fawn White cardstock and inked it with Tim Holtz Distress Ink in Weathered Wood, Victorian Velvet, and Chipped Sapphire. To blend the inks, I used a Ranger Ink Blending Tool. The panels were matted with Lawn Fawn Peacock cardstock and Lawn Fawn Kraft cardstock.

Using Lawn Fawn Soot Ink and Memory Box stamps, I stamped the words directly on the stencilled background. Metal labels were adhered around hoping. Twine was wrapped around each panel.

Cut Lawn Fawn Ground Coffee cardstock to fit card fronts. Die cut cardstock with Lawn Fawn Large Stitched Circle Dies and adhere to the background panels and cut off the edges. Add the stencilled panels to the cards with Scrapbook Adhesives 3D Foam Squares.

Thank you for visiting.
Thursday, April 11, 2019
Happy Easter Card
i everyone, Steph Ackerman here today with lots of fun products from the store. Please visit the store for all the fun products I've used today.


Happy Easter was stamped, inked and matted, then adhered to the card with 3D foam adhesives for dimension.
Thank you for visiting

I've used a Stamping Bella stamp - Bunny and Her Daffodil - which is perfect for Easter don't you think? She was stamped with Memento Tuxedo Black Ink, then colored with Copic Markers. The panel was inked with Thistle Ink before being matted with Bazzill Gummy Bear cardstock.
Bazzill Banana Split was cut to size and scored with ScorPal to create the card.

Happy Easter was stamped, inked and matted, then adhered to the card with 3D foam adhesives for dimension.
Thank you for visiting
Wednesday, December 19, 2018
Merry Christmas ornaments
Hi everyone, Steph Ackerman here today with lots of fun products from the store. Please visit the store for all the fun products I've used today.


Bazzill Wax Lips cardstock was added to a card and a scrap from Graphic 45's Twelve Days of Christmas was placed in the corner. The ornaments were then added on top.

Merry Christmas is from the Lawn Fawn Winter Sentiments stamp set, stamped with Lawn Fawn Black Licorice Ink.
Thank you for visiting

I used the Memory Box dies - Crystal Ornaments with Lawn Fawn white cardstock and the Crystal Ornament Background die with paper from Prima Marketing's Misty Rose paper pad. Such a pretty delicate set of ornaments appears once you've assembled the layers together.


Merry Christmas is from the Lawn Fawn Winter Sentiments stamp set, stamped with Lawn Fawn Black Licorice Ink.
Thursday, October 4, 2018
Happy Fall Cards
Hi everyone, Steph Ackerman here today with lots of fun products from the store. Please visit the store for all the fun products I've used today.

Fall is a wonderful time of year full of beautiful colors. Check out these fun cards I've created using papers from the Authentique Pastime 6" x 6" paper pad and a Lawn Fawn die.

This Authentique paper pad has some amazing papers that can be used for any occasion. I chose the wood grain paper to use as the card base, then added a torn strip across the center. Happy fall is a Lawn Fawn die, which die cut cardstock beautifully.

I selected another paper from this paper pad and die cut it with the Lawn Fawn Quilted Backdrop die. It gives a really nice texture to the background. A strip of cardstock was added across the card and a torn strip of striped paper added on top. The Happy fall Lawn Fawn die was used again atop the striped panel.


The tags are from the 49 and Market Cottage Life Cottage Cuts which I felt worked well with my fall cards. 2 of them were matted with cardstock and wrapped with twine before being added to the card with Scrapbook Adhesives 3D Foam Squares.
Thank you for visiting

Fall is a wonderful time of year full of beautiful colors. Check out these fun cards I've created using papers from the Authentique Pastime 6" x 6" paper pad and a Lawn Fawn die.

This Authentique paper pad has some amazing papers that can be used for any occasion. I chose the wood grain paper to use as the card base, then added a torn strip across the center. Happy fall is a Lawn Fawn die, which die cut cardstock beautifully.

I selected another paper from this paper pad and die cut it with the Lawn Fawn Quilted Backdrop die. It gives a really nice texture to the background. A strip of cardstock was added across the card and a torn strip of striped paper added on top. The Happy fall Lawn Fawn die was used again atop the striped panel.

The pumpkin was created from another Authentique paper in this paper pack and a Spellbinders oval die.

The tags are from the 49 and Market Cottage Life Cottage Cuts which I felt worked well with my fall cards. 2 of them were matted with cardstock and wrapped with twine before being added to the card with Scrapbook Adhesives 3D Foam Squares.
Subscribe to:
Posts
(Atom)