Saturday, June 29, 2019
Encouragement Cards Featuring Prima Apricot Honey
Hello Friends! Debbie with you today sharing a couple of cards featuring Prima Marketing Apricot Honey. You can purchase this 12x12 paper pad and it's coordinating embellishments in the Rubber Buggy Store. Today's cards are encouragement/friendship cards.


To start these cards I cut out a background and mounted it to coordinating card stock, rounded all the corners and then mounted it to my card base.
I used the cutouts that came with in the pad. I rounded all the corners and mounted them on coordinating card stock and then added some foam tape to the back and adhered it to the card as shown. This will be your focal point.
I used the cutouts that came with in the pad. I rounded all the corners and mounted them on coordinating card stock and then added some foam tape to the back and adhered it to the card as shown. This will be your focal point.
I die cut a doily from white card stock using one of my older Prima dies from my stash. I cut that in half and adhered it under the popped up sentiment cut out.
Once this is done you can embellish your card. I added some flowers from my stash however the Apricot Honey coordinating flowers are available in the Rubber Buggy Store.
Once this is done you can embellish your card. I added some flowers from my stash however the Apricot Honey coordinating flowers are available in the Rubber Buggy Store.
To finish up these cards I added some ribbon and a bow as well as some Butterflies I cut from a sheet of Apricot Honey patterned paper that came in the 12 x 12 paper pad.
The final touch was to give the butterflies some sparkle I outlined them with Stickles.
Thanks for stopping by the Rubber Buggy Blog today!
Debbie
Bridge Card and Shabby Chic Flowers Tutorial
Welcome back crafter friends and happy weekend to you. I am sharing today how to create a bridge card and shabby chic flowers used for my sample bridge cards. This is a really impressive looking card and how simple it actually is compared to how beautiful you can make your bridge card look! The whole card collapses flat to easily fit in a regular medium envelope. Love it! Ok, now, this is just too much fun! Turn off your computer, go get in the craft room and try this one right away.
The Rubber Buggy on-line store has all of the wonderful name-brand products with fast delivery and wonderful customer service to make your gorgeous projects and cards have that WOW look. Check out daily the new arrivals of these wonderful products.
I have two bridge card samples using the gorgeous Prima Marketing Havana paper, Havana chipboard and Prima Marketing Havana Rose Words and Stickers. The Brigide card will fold down to fit in an envelope.


Tutorial for Making a Bridge Card

- Sturdy plain and patterned cardstock
- Embellishments
- Score board
- Adhesive such as the Beacon 3 n 1 Advance glue and/or Scor Tape
 |
Step 1  |

Step 4

Step 5: Depending on what you want in the center of the card, I cut out a 3" x 4 3/4" patterned paper and glued on the inside of the card. If you want a sentiment, I cut out one 2 1/2" x 4 1/4" white cardstock paper, stamp the sentiment and glued in the center. Then glue the last strip to the front of the card as shown below or add a sentiment to the strip and then glue to front of the card. Embellish the card and have fun finishing it with ribbons, charms, stickers, etc.


Thank you for coming to see what my tutorials were about today!
I hope I have inspired you try out these products available at The Rubber Buggy on-line store. My cards and projects are always posted on Saturday. Keep watching and thank you so much for those wonderful comments as well as suggestions.
Enjoy and Happy Crafting!
 |
Thursday, June 27, 2019
Hoping you are doing great cards
Hi everyone, Steph Ackerman here today with lots of fun products from the store. Please visit the store for all the fun products I've used today.

Using a Ranger stencil, placed it on Lawn Fawn White cardstock and inked it with Tim Holtz Distress Ink in Weathered Wood, Victorian Velvet, and Chipped Sapphire. To blend the inks, I used a Ranger Ink Blending Tool. The panels were matted with Lawn Fawn Peacock cardstock and Lawn Fawn Kraft cardstock.

Using Lawn Fawn Soot Ink and Memory Box stamps, I stamped the words directly on the stencilled background. Metal labels were adhered around hoping. Twine was wrapped around each panel.

Cut Lawn Fawn Ground Coffee cardstock to fit card fronts. Die cut cardstock with Lawn Fawn Large Stitched Circle Dies and adhere to the background panels and cut off the edges. Add the stencilled panels to the cards with Scrapbook Adhesives 3D Foam Squares.

Thank you for visiting.
Tuesday, June 25, 2019
Butterfly Gift Cards

Hi Everyone it's Jennifer here with a few gift cards I
created using the Beautiful Lawn Fawn Butterfly Dies
The first on here I turned in to a shaker card. I used
the Lawn Fawn Papers Spring Fling and
Spiffy Speckles for them all.

This one I just layered the papers using 3D Tape.

So then I thought I would try using square layers
instead of circles.

Then for this one I created another Shaker.


Bazzill


I hope you all have a Great Crafting Week
Jennifer
Monday, June 24, 2019
Easel Card using Mintay Berrylicious Collection

Hi... Bev here today at The Rubber Buggy. I am sharing this super card today using Mintay Berrylicious Collection. What amazing fun, bright and bold colours to mix and match. My card uses the red colouring with added white and beads.
- Paper: Mintay Berrylicious Collection
- Flowers: 49 and Market Blood Orange
- Glue: Beacon 3-in-1 Glue,
- Accents: Scrapbook 3D foam
- Machine/ tools: EK success cutter bee scissors, Fiskar Paper Trummer
- Other: die, cardstock, bling,
Instruction Sheet (printable on 8.5x11 so you can make your own card)
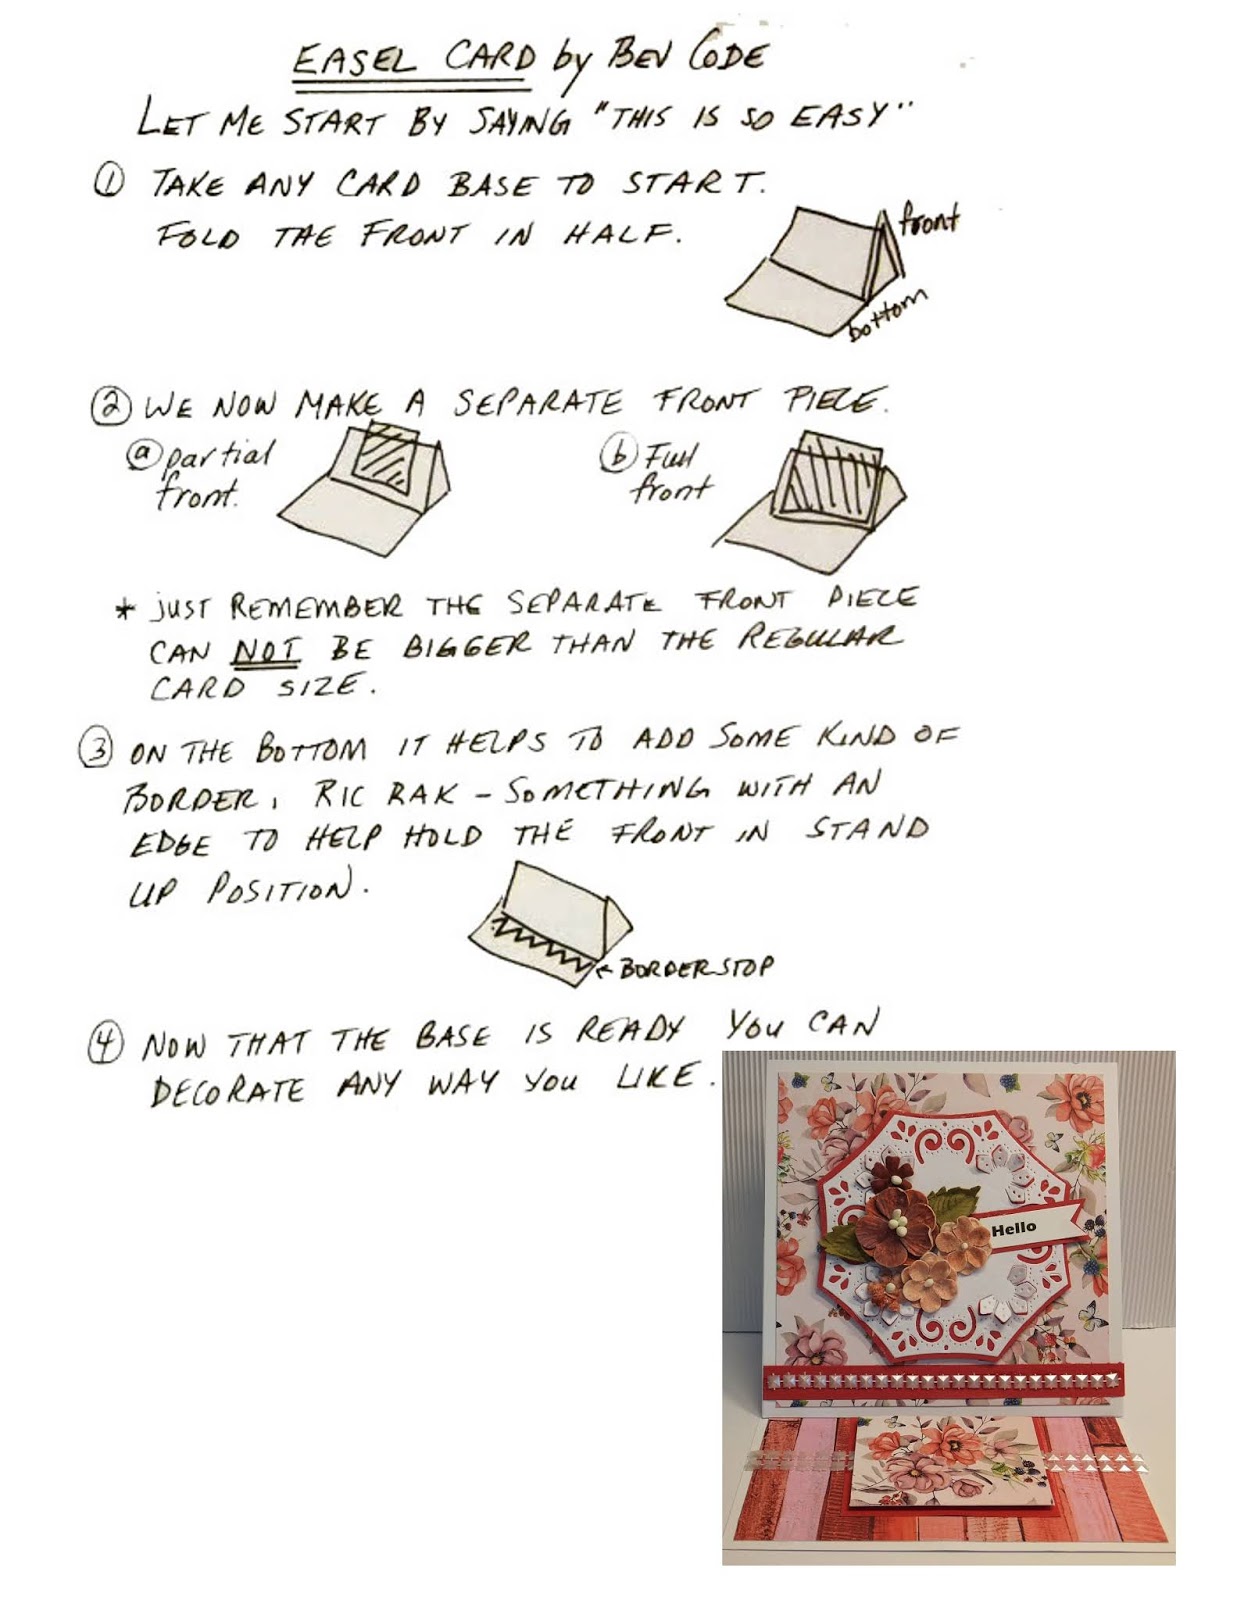
Just remember to use the base instructions and then you can decorate any way using any products to your liking..... and any theme to meet your required card sentiments.
I have been teaching a card class and this is one of them from the class and 2 participants offered photos of their cards to share with you also.

Roberta used the blue coloured papers from the same Berrylicious collection and added extra fussy cut accents to her card... she also changed the sentiment to Happy Birthday from Hello like mine.
This colouring is just stunning also.

Here is Judy's card using the same papers and Roberta... slight changes to placement of accents but absolutely stunning cards. The same colour accents and trims suited both colour combos.


Thanks for stopping by... hope to see you again soon

Saturday, June 22, 2019
My Fairy Friends
Welcome back and Nancy, here, to share another card made with the adorable Lawn Fawn dies and stamp set. The Rubber Buggy has all of the name-brand supplies and products to create your beautiful cards and projects.

Isn't it fun to create to play with these Lawn Fawn stamp and die set like this Lawn Fawn Fairy Stamp Set and Lawn Fawn Fairy Die Set .
 |
| Lawn Fawn Fairy Stamp Set and Lawn Fawn Fairy Die Set |
I viewed a few tutorials on how others colored these little fairies from the Lawn Fawn Fairy Stamp set and used a few of their techniques as well as added my own techniques.
I added the white dots on the fairies and their house with the wonderful Uni-Ball White pen which I highly recommend after coloring them with Copic Markers. The Uni-Ball White pen has been the only white pen that has lasted me for a few years without jelling or drying out. All of the other brands of white pens were thrown in the trash after using them for a few weeks or month.
 |
 |
I fussy cut the fairies and their house and colored with Copic Markers. The Lawn Fawn Flower Hill Pop Up Die Set comes in the background, tulips and flowers. I cut out the background in a blue green cardstock and cut out the tulips in yellow and flowers in two different tones of pink. I stamped the sentiment in the banner in a lavender ink.
 |
| Lawn Fawn Flower Hill Pop Up Die Set |
I used a rectangle die set that fits well with the Lawn Fawn Scalloped Rectangle die set.

I sponged the center using the Lawn Fawn Sun Flower Ink Pad to appear as a sunset and sponged on blue ink around the yellow sunset. I glued the Lawn Fawn Stitched Mountain Border with the Lawn Fawn Flower Hill Pop Up Die Set die this rectangle and then cut out the over handing edges around this rectangle before gluing on the Lawn Fawn Stitched Scalloped Rectangle Frame.
I embossed the fairy dust stars with a clear glitter embossing powder.
 |
| Lawn Fawn Stitched Scalloped Rectangle Frame |
 | |

I hope I have inspired you try out these products available at The Rubber Buggy on-line store. My cards and projects are always posted on Saturday. Keep watching and thank you so much for those wonderful comments as well as suggestions.
Enjoy and Happy Crafting!
|
Subscribe to:
Posts
(Atom)


