Showing posts with label tim Holtz Oxide Inks. Show all posts
Showing posts with label tim Holtz Oxide Inks. Show all posts
Thursday, September 16, 2021
Happy Moments
Hi everyone, Steph Ackerman here today with lots of fun products from the store.


I've used the Folk Flowers - SizzixThinlits Dies by Tim Holtz to create this card. I die cut it from white cardstock and used assorted Distress Oxide Inks - Weathered Wood, Dried Marigold, to add color to the panel.

I matted the panel with Simple Stories Cardstock, then wrapped it with sheer ribbon.

The panel was added to a yellow card with 3D Foam Adhesives for dimension. The sentiment was stamped with Lawn Fawn Black Licorice Ink, die cut with Lawn Fawn Small Stitched Circle Die, then matted with Lawn Fawn Large Stitched Circle Die.
Finally, baker's twine was tie to the ribbon.
Thank you for visiting
Thursday, August 5, 2021
Simply Sweet Daisy Cards
Hi everyone, Steph Ackerman here today with lots of fun products from the store.


Start by die cutting the Daisy base from green and yellow cardstock and the top layer from white cardstock.

Assemble the layers. You can either use the yellow base for the daisy topper or inlay the yellow petals once the white layer has been placed.

Cut Memory Box Woodgrain White Cardstock 4" x 5 1/4". Die cut thanks from Lawn Fawn Thanks Line Border Die and place across each panel. Add the daisies placing the top one with 3D Foam Adhesives for dimension.

Using Lawn Fawn Gemstone Cardstock, create the cards, then adhere the panels.
Thank you for visiting
Thursday, April 15, 2021
Swinging by....
Hi everyone, Steph Ackerman swinging by to say hi.


I stamped the image - Bundle Girl on a Swing from Stamping Bella - on white cardstock and colored her with Copic Markers. Next, I die cut her with Lawn Fawn Small Stitched Rectangle Dies. While still within the die, I added color with Distress Oxide Inks in Speckled Egg.

I then added some Distress Oxide Ink Stormy Sky.

Removing the die leaves a white edge around the image.

She was matted with Simple Stories Navy Cardstock, then Bazzill Gold Coins Cardstock that was die cut with Lawn Fawn Stitched Windy Backdrop Die.
The panel was placed on Bazzill Peppermint Cardstock, then added to the card.
The included sentiment was stamped, inked and matted with a scrap of the navy cardstock and added to the card with EK Success 3D Foam Dots.

Thank you for visiting.
Thursday, October 29, 2020
Happy Holidays Slimline Cards
Hi everyone, Steph Ackerman here today with lots of fun products from the store. Please visit the store for all the fun products I've used today.


The cards were created from Bazzill Gumdrop Cardstock and Bazzill Jawbreaker Cardstock. The pattern papers are from Laserowe Love - Winter Song Collection - and were die cut using Lawn Fawn Slim Line Dies. I love the stitched edges.

I used the Memory Box Bird Sanctuary Clear Stamp set for my cards, stamping 2 different birds with Lawn Fawn Black Licorice Ink. Each was then die cut with Lawn Fawn Stitched Circle Dies Small and matted with Lawn Fawn Stitched Circle Dies Large. To coordinate with the blue background, the first bird was edged with Ranger Distress Ink in Speckled Egg. Happy Holidays, a Lawn Fawn Die, was die cut from Jawbreaker cardstock and adhere across the card with .

To coordinate with the green background, the second bird was edged with Ranger Distress Ink in Shabby Shutters. A panel of Lawn Fawn Kraft Cardstock was added across the card and happy holidays was die cut from brown cardstock. .

Finally, I fussy cut flowers from one of the pattern papers and adhered them across the card.
Thank you for visiting
Thursday, September 17, 2020
Happy Fall with Penny Black's Gathering Stamp
Hi everyone, Steph Ackerman here today with lots of fun products from the store. Please visit the store for all the fun products I've used today.
As we head into our next season, I want to wish everyone Happy Fall.

I stamped the Gathering Stamp from Penny Black with Lawn Fawn Licorice Black Ink. Next, I colored her with Copic Markers. In order to die cut the image, I first cut around the basket, fitting the Lawn Fawn Small Stitched Rectangle Die so the basket would remain intact.


I stamped the Gathering Stamp from Penny Black with Lawn Fawn Licorice Black Ink. Next, I colored her with Copic Markers. In order to die cut the image, I first cut around the basket, fitting the Lawn Fawn Small Stitched Rectangle Die so the basket would remain intact.

While still in the die, I lightly inked around the image with Tim Holtz Distress Oxide Ink in Faded Jeans using a Ranger Ink Blending Tool.

The card was created using Bazzill cardstock and the new Photo Play Gnome for Thanksgiving 6x6 paper pad. This double sided paper pad has 24 papers with 2 of each design. This leaves you lots of options to work with. The wordy paper was matted with cardstock then wrapped with May Arts Sheer Ribbon before being added to the card on a slight angle.

The image was edged with Tim Holtz Distress Oxide Ink in Bundled Sage, matted with a Lawn Fawn Large Stitched Rectangle Die, then placed on the card with Scrapbook Adhesives.

Finally, I used the reverse side of the wordy paper to die cut Lawn Fawn's Happy Fall Line Border Die, placing it above the image with Tattered Lace Detail Glue, which is perfect for these smaller die cuts.

Thank you for visiting
Thursday, September 10, 2020
Stamperia Designed Cards
Hi everyone, Steph Ackerman here today with lots of fun products from the store. Please visit the store for all the fun products I've used today.


Thank you for visiting
Stamperia has a line of decorative chips that can be used for assorted projects. I've used the Rose and Butterfly chips to create my cards today.

Start by inking the leaves and flowers with Copic Markers. Then lightly ink the lattice panel with Tim Holtz Squeezed Lemonade Ink. Use Tattered Lace Detail Glue to adhere the panel to the card base.

Using Liquid Pearls in Dazzle and Garnet, fill in the roses. Use Liquid Pearls in Electric to fill in the leaves. Place aside to dry. Once dry, I added some more liquid pearls to fill in the cavities.

Along the right side of the card, add a strip of Bazzill Gumdrop Cardstock. Ink the Stamperia Butterflies with Tim Holtz Tattered Rose Ink and adhere just the bodies to the cards, leaving the wings free. Hello Friend, from the Memory Box Bird Sanctuary Clear Stamp set was stamped on Marshmallow Cardstock with Lawn Fawn Black Licorice Ink, die cut and matted with Gumdrop Cardstock. It was added to the card with Scrapbook Adhesives for dimension.

For my second card, I chose to ink the roses with Tim Holtz Tattered Rose and Fired Brick Inks. The leaves were inked with Bundled Sage Ink.

Using Maja Designs Shades of Sweet Coral, Tear the panel and ink with Fired Brick before adhering to the card. Stamp the dots in Black Licorice Ink using a stamp from the Bird Sanctuary collection. Also stamp Hello friend on a scrap of the Coral paper. Assemble the card and adhere the roses and leaves. Place the sentiment across the bottom edge and place one of the left over leaves on the strip.

Thursday, August 13, 2020
Happy Fall Card
Hi everyone, Steph Ackerman here today with lots of fun products from the store. Please visit the store for all the fun products I've used today.

Fall will be here before we know it so I'm starting on fall cards for family and friends. Using a stamp from my stash I stamped it with Lawn Fawn Soot Ink. Then I colored the image with Copic Markers. Then, I used the Lawn Fawn Stitched Rectangle dies to die cut the image.


Fall will be here before we know it so I'm starting on fall cards for family and friends. Using a stamp from my stash I stamped it with Lawn Fawn Soot Ink. Then I colored the image with Copic Markers. Then, I used the Lawn Fawn Stitched Rectangle dies to die cut the image.

Before removing the die, I added color around the stamped image with Distress Oxide Inks in Speckled Egg and Dried Marigold using a Ranger Ink Blending Tool. This gives a nice line of color and a white band around the edge of the image.

I wanted to highlight the design so I adhered it to an orange burlap panel and frayed the edges.

The panel was matted to a wood background panel from Lawn Fawn Knock on Wood Paper Pad. This was then adhered to a white card.

Happy Fall is a Lawn Fawn Border Die, which was die cut from 7Gypsies Paper and adhered to the lower corner of the card using Tattered Lace Detail Glue.

To finish, I added Ranger Liquid Pearls and Nuvo Crystal Drops about the pumpkins.
Thank you for visiting
Tuesday, September 3, 2019
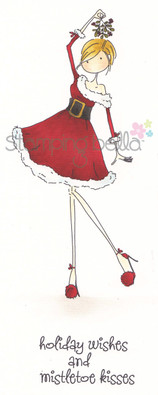
Christmas Inspiration - Stamping Bella Eve under the Mistletoe

Hi it's Jennifer here with a Chrismas card with a bit of a different background.
I have firstly inked the background using 3 Oxide Inks, Broken China,
Blueprint, Chipped Saphire. Sprinkle with water and mop it up with
paper towel then spritz with Perfect Pearls to make it glitter.

I then Die Cut it using the Stripy Background Backdrop from
Lawn Fawn. I then used 3D tape on the back after taking out all
the pop out pieces. I then stuck it to a fraction smaller piece
of Card Stock.

I then Glued in the strips flat giving it great dimension.

I them taped it to a card base coloured my gorgeous image
with copics
Skin - E0000, E000, E00, E01, E04, E11
Hair - E30, E31, E33, E5, E37
Dress - R24, R27, R29, R37, R39
Dress Trims - C0, C01, C03
Belt - C05, C07, C09, C10
Buckle - Y06, Y16, Y17, E33



Bazzill


I hope you all have a Great Crafting Week
Jennifer
Jennifer
Monday, March 26, 2018
Amazing Stamperia Roses and Lace "Smile" layout

Hi it's Bev here today. I am excited to be sharing my first finished project using Stamperia Roses and Laces one of the newest Stamperia collection from The Rubber Buggy.
This super page is my youngest Grand Daughter who loves to craft with me. She also likes fun colourful clothing and when she grows her nails she love a manicure. She puts a smile on my face.
Supply List
The Rubber Buggy
Ink: Tim Holtz distress and distress Oxide bundle
Glue: Beacon 3-in-1
Chipboards: Creative Embellishments
Button: Creative Embellishments Flair
Other: cardstock, gel dots, ribbon, lace

To start this page I wanted soft elegant for my girl.... and the mix and match of this paper is fabulous.
I chose a woodgrain combo .. some amazing pink grey images, a tag, a clock and some accent pop of colour florals.

The strip is through the centre. The forals are the ripped outer edges of centre after gluing it all down I decided to soften the edges.


Using Ink Oxides from Tim Holtz I used a finger dauber and blended from the centre out with white and then added some soft pink. It was perfect.

I used chipboards left naked on this page.

I inked and matted the clock and slit cut it in behind the bird cage.

I matted the one photo.... then arranged the 2 of them on the upper section.

I added the cute flair button and the upper edge gel dots.

I matted and popped up the feet photo off to the side over lapping the other photo and added more gel dots around the photo.

Below in this section I added the title "Smile"

Here is a few close ups for your viewing.


Thanks for stopping by..... be sure to visit the store to view these products and so many more that are available.... and the best service ever.

Subscribe to:
Posts
(Atom)


