Showing posts with label simple stories. Show all posts
Showing posts with label simple stories. Show all posts
Thursday, March 17, 2022
Creative Use of Diecuts

Welcome to the Rubber Buggy blog. Today I am sharing a creative use of your diecuts and florals with a touch of white gesso to live up your embellishments.

I used the newly released Sime Stories Indigo Garden along with a Prima Butterfly Borders chipboard piece. I used Dina Wakley white gesso to cover the chipboard piece so it blended with all the color’s

I added some pink flowers and applied some gesso sparingly which gives it a nice shabby look.

I hope everyone enjoyed my post and thanks for stopping by
Thank you for visiting
Thursday, September 30, 2021
Happy Halloween with Magnolia WItch Tilda
Hi everyone, Steph Ackerman here today with lots of fun products from the store.


Happy Halloween with Magnolia Witch Tilda with Pumpkin. Isn't she a cutie? I colored her with Copic Markers.

The card is created from Simple Stories Vintage Farmhouse paper pack and Tim Holtz Kraft Cardstock. The contract of black and white against her red dress is amazing. She was fussy cut and added upon Lawn Fawn Stitched Circle dies, using the Small and Large dies. Cutting off the left side of the dies allowed Hello Friend from the Memory Box Bird Sanctuary stamp set to slip underneath.
Thank you for visiting
Thursday, September 16, 2021
Happy Moments
Hi everyone, Steph Ackerman here today with lots of fun products from the store.


I've used the Folk Flowers - SizzixThinlits Dies by Tim Holtz to create this card. I die cut it from white cardstock and used assorted Distress Oxide Inks - Weathered Wood, Dried Marigold, to add color to the panel.

I matted the panel with Simple Stories Cardstock, then wrapped it with sheer ribbon.

The panel was added to a yellow card with 3D Foam Adhesives for dimension. The sentiment was stamped with Lawn Fawn Black Licorice Ink, die cut with Lawn Fawn Small Stitched Circle Die, then matted with Lawn Fawn Large Stitched Circle Die.
Finally, baker's twine was tie to the ribbon.
Thank you for visiting
Thursday, August 12, 2021
Mixed Media Tags with Simple Stories
Hi everyone, Steph Ackerman here today with lots of fun products from the store.

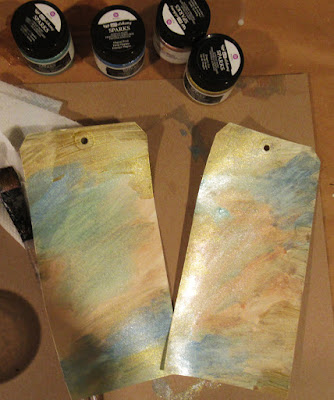


Wanting something a little different, I used Prima Marketing Art Alchemy Acrylic Paints on large tags from Dylusions Journal Tags #10. The colors are gorgeous so I mixed up an assortment of colors including Ice Queen, Gold Amber, Frozen Berries and Soft Satin and painted them randomly on the tags.

Next I used one of the Ciao Bella Stencils with Lawn Fawn's Freshly Cut Grass Ink, randomly adding a pattern around the tag.

Net I cut apart Simple Stories Simple Vintage Farmhouse papers to decorate the tags.

I also fussy cut the words to fit the tags. This is a little time consuming as the words are delicate, but the results were worth it.

Next, I used a script stamp (similar to this Ciao Bella Stamp) and randomly stamped it about the tags. Then I added May Arts Celery Green Sheer Ribbon to finish off the tags.

Thank you for visiting
Thursday, June 24, 2021
Simple Stories Greeting Cards
Hi everyone, Steph Ackerman here today with lots of fun products from the store.


Have you seen the Simple Stories Simple Vintage Farmhouse Garden?

This collection has 24 double sided sheets of beautifully designed papers as well as 2 sheets of greeting card elements. I've created different sized cards using Pion Designs Pion Black cardstock.

I then mixed and matched the papers to create each card. The papers work extremely well together. All the layers were matted with Pion Black cardstock then placed on each card.

Finally, the greeting card elements were added to each card with EK Success 3D Dots for dimension. This collection has everything you need to create an assortment of cards.
Thank you for visiting.
Thursday, June 10, 2021
You Brighten My Day with Simple Stories
Hi everyone, Steph Ackerman here today with lots of fun products from the store.


I wanted to create a bright and colorful card using one of the frames from the Simple Stories - Simple Vintage Farmhouse Garden Chipboard Frames set.

I wanted the frame to stand out but wanted some background dimension on the card so I used the Ciao Bella Blossom Stencil.

I used Ranger Distress Oxide Ink in Abandoned Coral, repeatedly moving the stencil around the card.

I poured Ranger Clear Embossing Powder over the stenciled design and used the Sizzix Making Essentials Anti Static Funnel Tray to catch the embossing powder. I usually get embossing powders and glitters everywhere, but this tray made it so easy to keep the embossing powder from exploding.

I think it made a wonderful background for the card.

I cut a panel of Simple Stories Vintage Farmhouse Garden to fit behind one of the frames, then adhered the panel to the card. Inside the card, I added another sheet of paper from this collection to finish.

The phrase was stamped with Lawn Fawn Black Licorice Ink, die cut with Lawn Fawn Small Stitched Circle Die and matted with a larger die.
Thank you for visiting
Thursday, April 15, 2021
Swinging by....
Hi everyone, Steph Ackerman swinging by to say hi.


I stamped the image - Bundle Girl on a Swing from Stamping Bella - on white cardstock and colored her with Copic Markers. Next, I die cut her with Lawn Fawn Small Stitched Rectangle Dies. While still within the die, I added color with Distress Oxide Inks in Speckled Egg.

I then added some Distress Oxide Ink Stormy Sky.

Removing the die leaves a white edge around the image.

She was matted with Simple Stories Navy Cardstock, then Bazzill Gold Coins Cardstock that was die cut with Lawn Fawn Stitched Windy Backdrop Die.
The panel was placed on Bazzill Peppermint Cardstock, then added to the card.
The included sentiment was stamped, inked and matted with a scrap of the navy cardstock and added to the card with EK Success 3D Foam Dots.

Thank you for visiting.
Thursday, February 25, 2021
Friendship Blooms with Memory Box Dies
Hi everyone, Steph Ackerman here using the Memory Box Sprinkle Heart Collage in 2 different ways. This is a wonderful die that has endless possibilities.


My first card uses Lindy's Stamp Gang Shimmer Sprays on cardstock. Using different colors creates different effects. You can heat set between the colors for one effect or you can spray color upon color for another effect. Any of the color combinations in the sets work extremely well together.

Cut Simple Stories Cream Cardstock to card size then place the die at the right side and die cut. Save the die cut hearts as they can be used on the finished card.

Place the spritzed panel behind the die cut panel, moving it until the colors show through the hearts. Mat the panel with Simple Stories Black Cardstock, then adhere to a card base.

Stamp a phrase on cardstock using Lawn Fawn Black Licorice Ink, mat with black cardstock and add to the card. Also place some of the die cut hearts on the card.

For the 2nd card, die cut Simple Stories Red Cardstock and place a solid piece of cream cardstock behind the panel. Using paper from Dress My Craft Whispering Love collection, cut it so that it fits snuggly against the die cut edge.

Stamp the same and add it to the card with EK Success Foam Adhesives for dimension.
How many different style cards can you create with this die?
Thank you for visiting
Monday, January 28, 2019
More Christmas Memories to share at The Rubber Buggy

Hi... it's Bev back again . I am still working on 2018 Chritmas memories using more of the photos I just got printed and I still uisng more of the amazing Christmas papers and accents.
I am mixing up products from The Rubber Buggy with lots of fun challenges for these from
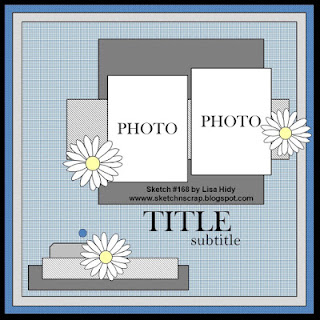
Sketch n Scrap . Using sketch #168 (below) I created the Christmas layout above. This is our 2018 photos taken Christmas Eve at my mom's house.... and Mickey, Melissa and Samantha were there too. Always happy for these family celebrations with photos.
I am using Simple Stories Simple Vintage Christmas Collection with lots of the matching accents all from The Rubber Buggy.
*************


I am mixing up products from The Rubber Buggy with lots of fun challenges for these from
Sketch n Scrap . Using sketch #168 (below) I created the Christmas layout above. This is our 2018 photos taken Christmas Eve at my mom's house.... and Mickey, Melissa and Samantha were there too. Always happy for these family celebrations with photos.
I am using Simple Stories Simple Vintage Christmas Collection with lots of the matching accents all from The Rubber Buggy.

*************

For Sketch n Scrap sketch #169 (below) I created the layout above celebrating both Alex's Birthday and Christmas Eve at my son's house. . I used Simple Stories Simple Vintage Christmas collection and great accent sheets. Hope I inspire you to use lots of beautiful prints on your pages as backgrounds.... they do work fabulously with the proper mix and match of lights and darks.

The Rubber Buggy Products
Paper: Simple Stories Simple Vintage Christmas
Accents: Simple Stories Simple Vintage Christmas: clear Accents, Trees and Star Die cuts, 12x12 banner stickers,
Glue: Beacon 3-in-1,
Other: cardstock,
Sketches: Sketch n Scrap


Thanks for visiting. Hope your having a great day.

Subscribe to:
Posts
(Atom)