Monday, March 20, 2017
Heartfelt Creations Watering Can with tutorial from Bev
12:00 AM
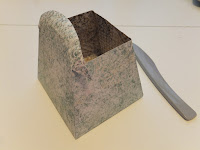
Hi... it's Bev here today and I am super excited to share. I had a chance to create with amazing products from The Rubber Buggy. Here is a watering can project I made using Heartfelt Creations products from the store. Below you will find a template and instructions for making this cute project.
Supply List:
Heartfelt Creations Products
Glue: Art Glitter Dries Clear Adhesive
Other: Spellbinders Labels 46 die, accents, beads, stickles, lace, ribbons, string
Template: see photo attached and original link:
Instructions:
Watering Can Project
Template can be printed and cut
on 8.5x11” or enlarged to fit 12x12 paper for larger size. I enlarged the main
base to fit 12x12 and estimated size of the handle and spout with adjustments
to close in the pieces.
This template originates
from: http://www.splitcoaststampers.com/resources/tutorials/wateringcan/
1. Using the templates trace and cut the pieces to your
watering can.
Fold your watering can, spout and handle pieces.

TIP: to make the curvature on the upper lid edge of
watering can I using the flower shaping kit to bevel the outer edge instead of
adding the extra strip of paper. It worked perfectly especially with the high
quality of Heartfelt Creations paper.
2. Using the Ornate
Borders & Pockets die cut in coordinating paper and apply to the
upper lid section fitting into the rounded concave grove. If your making the
smaller size watering can you’ll have decorate this section to fit the size
your working on.
3.Using the Spellbinders Label 46 smallest die cut 2 of
them to fit on the front and back panels under where you placing the sprout and
handle section… for added décor.
4. The upper lid section on the outer sides need to be
bend and glued into the outer edges.
5. Form your spout and handle ready to apply to the front
and back panels. On the handle section I used a large stapler to add extra
strength to it. Otherwise just glue it firmly. The spout was glued only.

6. Using the Border Essentials die I cut 4 of them and
glued and cut them to fit the 4 bottom sides.
7. On top of this border I glued some thinner lace all
the way around.
8. Next using the Wildwood Floral Dies I cut and layers
some flower and added some accents to the centres. I also took print flowers
off the Sun Kissed paper Collection and fussy cut both small and larger flowers
to add to the shaped floral cluster for
the main section of the watering can.
I die cut both the bird and the butterfly from the
Garden Romance die collection. I cut 2 of each so I could pop them up giving 3D
look for dimension.
9. Now taking all the flowers, 3D accents and adding some
beaded accents I started gluing on and clustering the main section.
10. I die cut a few more flowers and also a leafy piece to
accent the side of the spout.
11. I now went back into my stash to find a few more
beads, stones, hearts etc to decorate the upper lid, the spout and a few more
accents added to the main floral cluster.
12. Last but not least was the cute small clustered
ribbons and bead accents is added to the back handle. Tie them off and glue the
beads and your done.
Subscribe to:
Post Comments
(Atom)
Total Pageviews

Powered by Blogger.


-
▼
2017
(282)
-
▼
March
(26)
- Birthday Love with Graphic 45
- Tim Holtz Folio with Netra
- Edwin with Teo the Dragon
- Simple Stories Carpe Diem collection at The Rubber...
- "About a Little Boy" Photoplay Mini Album
- Warmest Wishes Birthday Card
- Beautiful Rose Cards
- Rose Quartz Planner Page with Netra
- Lawn Fawn Shaker Box Card
- Heartfelt Creations Watering Can with tutorial fro...
- Peacock Card
- Boarding Pass Mini Album
- Wedding Card and Tag
- Wild and Free with Netra
- Lawn Fawn Scallop Box Card with Mermaids
- Using Misti for stamping projects
- Courage
- Flower Cart card with Tutti Designs
- "Let Your Light Shine" a Card with Netra
- Goodnight Teddy
- Christmas Celebrations in March at The Rubber Buggy
- Genie Sent of Lavender
- Heartfelt Creations Woodsy Wonderland
- Unicorn Star!
- Bloom Where You're Planted
- Gift Tags with Netra
-
▼
March
(26)


A person will be excited to get this gorgeous tea pot with this gorgeous paper and wonderful work put into this. So well done. Hugs
ReplyDelete