Showing posts with label Hearfelt Creations. Show all posts
Showing posts with label Hearfelt Creations. Show all posts
Monday, March 20, 2017
Heartfelt Creations Watering Can with tutorial from Bev

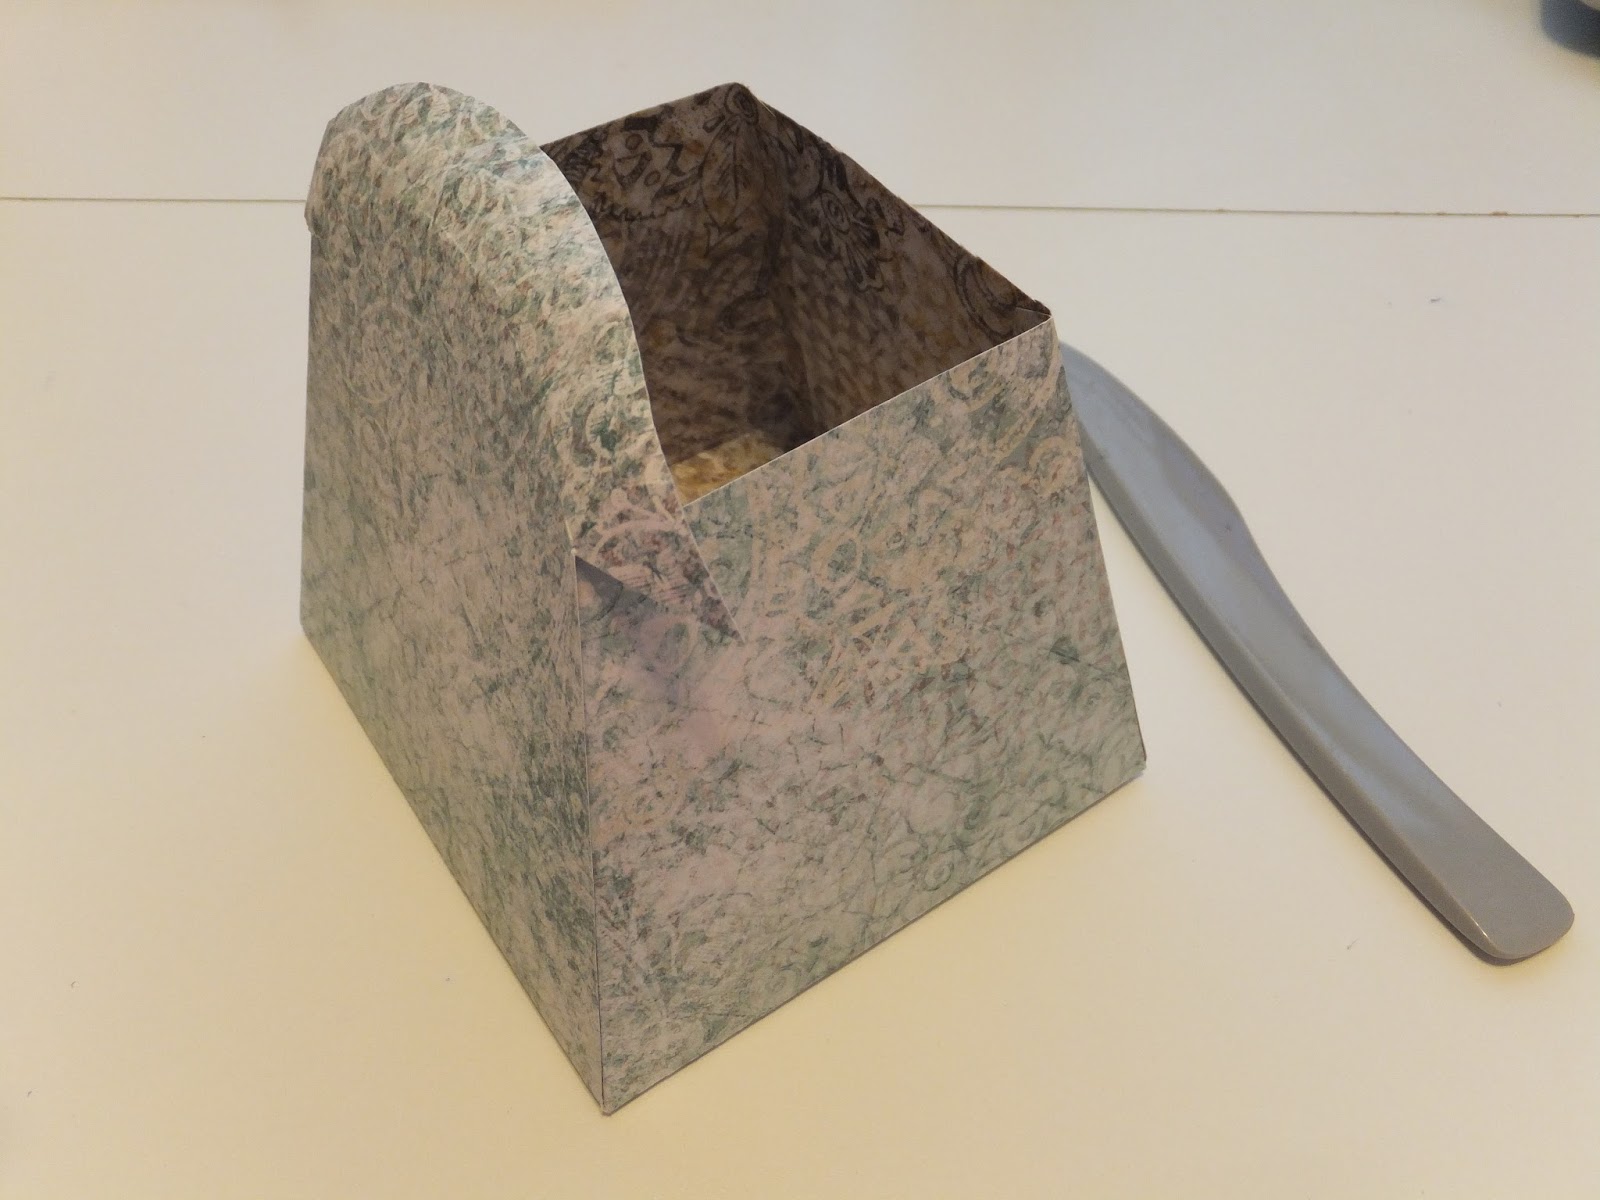
Hi... it's Bev here today and I am super excited to share. I had a chance to create with amazing products from The Rubber Buggy. Here is a watering can project I made using Heartfelt Creations products from the store. Below you will find a template and instructions for making this cute project.
Supply List:
Heartfelt Creations Products
Glue: Art Glitter Dries Clear Adhesive
Other: Spellbinders Labels 46 die, accents, beads, stickles, lace, ribbons, string
Template: see photo attached and original link:
Instructions:
Watering Can Project
Template can be printed and cut
on 8.5x11” or enlarged to fit 12x12 paper for larger size. I enlarged the main
base to fit 12x12 and estimated size of the handle and spout with adjustments
to close in the pieces.
This template originates
from: http://www.splitcoaststampers.com/resources/tutorials/wateringcan/
1. Using the templates trace and cut the pieces to your
watering can.

Fold your watering can, spout and handle pieces.


TIP: to make the curvature on the upper lid edge of
watering can I using the flower shaping kit to bevel the outer edge instead of
adding the extra strip of paper. It worked perfectly especially with the high
quality of Heartfelt Creations paper.

2. Using the Ornate
Borders & Pockets die cut in coordinating paper and apply to the
upper lid section fitting into the rounded concave grove. If your making the
smaller size watering can you’ll have decorate this section to fit the size
your working on.

3.Using the Spellbinders Label 46 smallest die cut 2 of
them to fit on the front and back panels under where you placing the sprout and
handle section… for added décor.
4. The upper lid section on the outer sides need to be
bend and glued into the outer edges.
5. Form your spout and handle ready to apply to the front
and back panels. On the handle section I used a large stapler to add extra
strength to it. Otherwise just glue it firmly. The spout was glued only.


6. Using the Border Essentials die I cut 4 of them and
glued and cut them to fit the 4 bottom sides.

7. On top of this border I glued some thinner lace all
the way around.

8. Next using the Wildwood Floral Dies I cut and layers
some flower and added some accents to the centres. I also took print flowers
off the Sun Kissed paper Collection and fussy cut both small and larger flowers
to add to the shaped floral cluster for
the main section of the watering can.
I die cut both the bird and the butterfly from the
Garden Romance die collection. I cut 2 of each so I could pop them up giving 3D
look for dimension.

9. Now taking all the flowers, 3D accents and adding some
beaded accents I started gluing on and clustering the main section.

10. I die cut a few more flowers and also a leafy piece to
accent the side of the spout.
11. I now went back into my stash to find a few more
beads, stones, hearts etc to decorate the upper lid, the spout and a few more
accents added to the main floral cluster.

12. Last but not least was the cute small clustered
ribbons and bead accents is added to the back handle. Tie them off and glue the
beads and your done.


Monday, February 20, 2017
Stunning cards using Heartfelt Creations Products

Hi.. OMG it's already past mid way through February. Where does the time go? Today I am sharing at The Rubber Buggy where I get such fabulous, rich and elegant paper selections.
I am excited to share a few cards to day all made using the same Heartfelt Creations All Glammed Up Collection.... but I still had so many options with design, layers and accents. I also used some the Sentiment stamps to my cards.... Heartfelt Sentiments and Heartfelt Wishes.
The flowers are die cut using Heartfelt Creations Delightful Daisy die, shaped and layered.
The one above is many layers cut from the papers....some foam dotted to pop them up while others are flat. This card has added beads, pearls, ribbon and flair button.

For each card I will share a close up side angle shot to detail the amazing 3D shaped and sculpted flowers made using paper, the Deluxe Flower Shaping Kit and adding some accents to finish off each card.

This card using more fabulous prints and some journal/ tag pieces cut from the different pages in the collection. The stamp type image pieces are showcased on this card along with the sentiment. Homemade flowers and for accents their are some beads, pearls and ribbon.

From this side view you can see that a few things are pop dotted to add layers and the flowers are 3D and beautiful.

This card showcases some of the fun and beautiful ticket accents and a great frame which has more fabulous flowers clustered.

This card is accented with beads and tied ribbon. Also lots of great layers and 3D flowers.


Thanks for joining me today.... I enjoyed making all these cards to share with you. The more you make the easier they become.

Subscribe to:
Posts
(Atom)


