Showing posts with label w9design. Show all posts
Showing posts with label w9design. Show all posts
Thursday, January 12, 2017
I Miss you a lot
Hi everyone, Steph Ackerman here today using an amazing die from Tutti Designs. Tutti Designs is a new company with some fresh and fabulous dies. Be sure to stop by the store to see all the amazing designs.

The design I'm using today is the Birdhouse Collection which is extremely sweet. I die cut it from Bazzill Marshmallow cardstock, then added color using assorted Copic Markers. I added brads to the flower centers as well as to the middle birdhouse.

I inked around the panel with Brush Corduroy Distress Ink, then matted the panel with Bazzill Candy Bar cardstock. The sentiment is fromWPlus9 Designs - Miss You Lots. The panel was then added to the card with 3D Foam Adhesives.
Thank you for visiting.
Steph
Thursday, May 26, 2016
Tomorrow is a new day
Hi everyone, Steph Ackerman here with a card celebrating spring.
The card is 5 1/2" square and was created from Bazzill Gummy Bear cardstock. Graphic 45 creates amazing papers so I've used both sides of the paper. Each was matted on Bazzill Marshmallow cardstock.
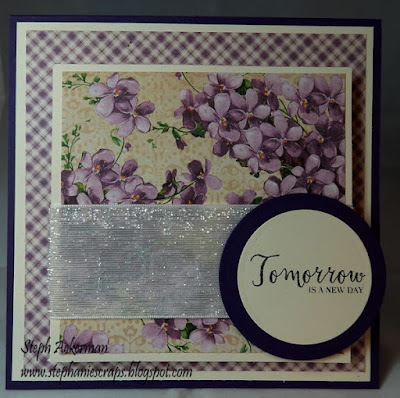
The top panel was wrapped with May Arts ribbon and added to the card with Scrapbook Adhesives 3D Foam Squares.

The sentiment is from A New Day from WPlus9. Spellbinders dies were used to die cut the sentiment..
Thank you for visiting
The card is 5 1/2" square and was created from Bazzill Gummy Bear cardstock. Graphic 45 creates amazing papers so I've used both sides of the paper. Each was matted on Bazzill Marshmallow cardstock.

The top panel was wrapped with May Arts ribbon and added to the card with Scrapbook Adhesives 3D Foam Squares.

The sentiment is from A New Day from WPlus9. Spellbinders dies were used to die cut the sentiment..
Thank you for visiting
Friday, December 4, 2015
Lingonberry Light Tilda Card
Hi everyone!!
Here Noe with quick visit to show my newest card with a novelty that Magnolia Stamps brings us this Christmas !! This week I introduce you "Lingonberry Light Tilda"... It´s adorable!!

Products used in this Card:


Hope you like this Card!!

Thank you for visiting
Here Noe with quick visit to show my newest card with a novelty that Magnolia Stamps brings us this Christmas !! This week I introduce you "Lingonberry Light Tilda"... It´s adorable!!

- Lingonberry Light Tilda Card
- Spectrum Noir Markers
- Ultra Smooth Premium White Cardstock for Alcohol Markers
- Poppystamps Decor Celebrate Die
- Ranger Archival Jet Black
- W9Plus Design Love Mom Layers Die
- Stamping Supplies
- Let´s Bokeh in the Snow Petite Paper Pad


Hope you like this Card!!
Thank you for visiting
Friday, August 14, 2015
Happy Birthday Celebrate!!
Hi everyone!!
Noe here to give you some crafting inspiration with "The Rubber Buggy" products!!
Today, one card to congratulate a birthday... A Celebrate Card, to give someone special!!

If you read me weekly you know that I love playing with my Distress inks and make my own backgrounds for my cards... so this time wouldn´t be different!!

I tryed new tecnique for me... different dies cuts are embedded in the cardstock, and I like the result! Look!!


It requires patience go placing small pieces of cardstock, but worth it!
Products used in this card:
- Abandoned Coral Distress Paint.
- Tangerine Dream Dylusion Spray.
- Happy Birthday Lawn Fawn Border Die
- Strictly Sentiment1 Stamps Wplus9
- Decor Celebrate Poppystamps Cratf Die
- Jet Black Archival ink
- Stamping Supplies
Have a great day!!
Thank you for visiting
Thursday, July 23, 2015
Love to help weather the storm
Hi everyone, Steph Ackerman on this lovely Thursday.
Using a premade card, I cut Bazzill cardstock to fit. Graphic 45 pattern paper was then cut to slightly smaller. May Arts ribbon was wrapped around the panel and LOVE was stamped on the ribbon.

Using a premade card, I cut Bazzill cardstock to fit. Graphic 45 pattern paper was then cut to slightly smaller. May Arts ribbon was wrapped around the panel and LOVE was stamped on the ribbon.

I used the Layers Label 2 die to die cut a white panel. Then I used the Love Showers Rubber Stamp set. I stamped the umbrella in the center of the panel then repeatedly stamped hearts all around the umbrella.

A die cut circle was added to the card and the die cut panel was placed slightly off center. The sentiment was stamped and edges with black cardstock, then added to the card with foam adhesives for dimension.
Thank you for visiting.
Steph
Thursday, July 9, 2015
Showering you with Love
Hi everyone, Steph Ackerman on this lovely Thursday. It's been raining quite a bit here and since I've been wanting to use this stamp set for awhile, I chose to work with it today.
 I used the Layers Label 2 die to die cut the center of a white panel. Then I used the Love Showers Rubber Stamp set. I repeatedly stamped hearts all around the opening of the die cut panel. After inking the edges, I adhered the panel to the card. The umbrella was stamped with blue ink in the opening.

Thank you for visiting


I stamped the sentiments in blue, edging with red ink and matting with brown cardstock then adhered them to opposite sides of the card.
Steph
Friday, May 22, 2015
Sparkle Shaker Card
Hi everyone!!
Here Noe and like every Friday I bring you a inspiration post for The Rubber Buggy!!
Today it´s time for a Shaker Card... Sparkle Shaker Card!! Love these cards... they are funny!! Look!

Products from the store:
- Wplus 9 Sparkle & Shine Rubber Stamp
- Sprinkle Dots Memory Box Stencil
- Stazon Ink
- Stamping Supplies
- Spectrum Noir Brights
- Sour Lemon Bazzil Basic
To make the background I used Sparkle Medium with Sprinkle Dots. Then, I stamped sentiment and gems and coloured them with Spectrum Noir Brights.
Finally I put some sequins inside the card to make it shaker.
More detail photos:


Thanks for stopping by.. hope to see you again soon.
Thank you for visiting
Friday, May 15, 2015
Let´s Party Mini Album
Hi everyone!!
Here Noe with a new project
for The Rubby Buggy Blog... Today is the turn for a Mini Álbum... for a Funny Party Mini Álbum!!
Here is!

Supply List:
- Distress Ink Pad Mini #2
- Distress Ink Pad Mini #4
- Distress Ink Pad Mini #1
- Xyron Mega Runner Permanent Adhesive Dispenser
- Banner Love Rubber Stamp
- 10mm Mulberry Open Roses Tone Yellow
- Lawn Fawn Acrylic Stampin Block
More photos in detail:


Do you like it?? I hope this project inspires you!!
Thanks for stopping by today.. be sure to visit daily when all DT hope to inspire you to create.
Friday, May 8, 2015
Mother´s Day Card
Happy Friday!
Here Noe with a new project
for The Rubby Buggy Blog.
First Sunday in May is
Mother's Day in Spain ... so here is the card that I made for that special day
(dedicated to my mom :)

To make this card I used this Rubby Buggy godies:
- Bazzil Card Licorice Twist
- Distress Ink Pad Mini 1
- Lily Wild Orchid Crafts
- Green Mulberry Paper Leaves 35mm
- Chrysanthemums Mixed
- Banner Love Rubber Stamps
- Stamping Supplies
- Holographic Embossing Powder
- Edwins Rectangle Lace 3 Die Set
I created my own background paper using distress inks and
holographic embossing powder and the embossing resist technique.

Love Wild Orchid Crafts Flowers!!! They are very easy to use and are so pretty...


Finally, banner
is a Wplus9
stamp that I cut and placed in the top corners of the card.

I hope you like my project and I hope it inspires you to play.
Happy Crafting!!

Thank you for visiting
Subscribe to:
Posts
(Atom)


