Saturday, September 18, 2021
Shabby Chic Baby Girl Easel Card
Welcome back and Nancy, here to share a fun shabby chic little girlie card for our special great daughter's 1st birthday. As grandparents, we can't have enough grand kiddos and so excited to celebrate this big birthday with her.
Let me guide you through how to make your very first easel card with my step by step photo and written guide that walks you through the process. Once you learn how to make easel cards, you won't want to stop and the easel frame adds some pizzazz and dimension to your finished handmade card!
Easel cards stand up and look fabulous on display and offer something very different from the normal greeting card and can be folded flat for mailing. One thing to note with easel cards is when they are on display, part of the inside of the card is visible.


Supplies:
- 5mm flat back pearls
- Oval doily or doily die
- Wild Rose baby girl Printed Panel
- Prima Marketing Butterfly Spell and Prima Marketing Mermaid Sparkle and Prima Marketing White Pearl acrylic paints
- Prima Marketing Rose Gold Wax
- Beacon 3-n-1 Advanced glue
- Purple cardstock
- Heavy weight white cardstock
- NUVO Crystal Winter Blizzard Glitter Drops
- Metal corner and metal butterfly embellishments

Step 1: Creating the Front of the Card
My top and bottom card measures 6" wide and 6 1/2" length. Therefore, I will be adding an extra length to the bottom of my easel base when I am ready to cover the bottom with pattern paper and attaching it to the easel.
I am using the Lemon Craft paper collection for this card. There are so many gorgeous Lemon Craft paper with roses eventhough this one isn't in stock at this time. I cut out the doily and We stamp and adhered together and added 5mm flat back pearl around the oval. I made the Zuri Design Flower Festival rose mold using epoxy resin since it is very light weight and bends for mailing. I colored the roses with Prima Marketing Butterfly Pink and Prima Marketing Mint Green acrylic paints. I used Prima Marketing Rose Gold wax on the metal corner embellishments and used glue to adhere. I added a purple cardstock to frame the patterned paper.
I added some NUVO White Blizzard Glitter drops to the cake and the bubbles for some added dimension and shine.
Step 2: Easel Frame and Marking Where to Fold Your Easel Card
Score the center of the 6" x 12" which would be at 6" and then score again at the 3" line. (NOTE: Modify the width of the easel to the width of the front of your card.) This will create the easel frame. In the past when creating larger cards, I cut out a larger bottom and adhered to the easel card to match the size of the front of the card.) If you don't have a scoring tool or scoreboard, you can just fold the card by hand. You won't get such a good crease but it works. Use a scoring tool and ruler or don't press too hard in case you rip the card. Score 2 or 3 times with less pressure to make a good crease line.
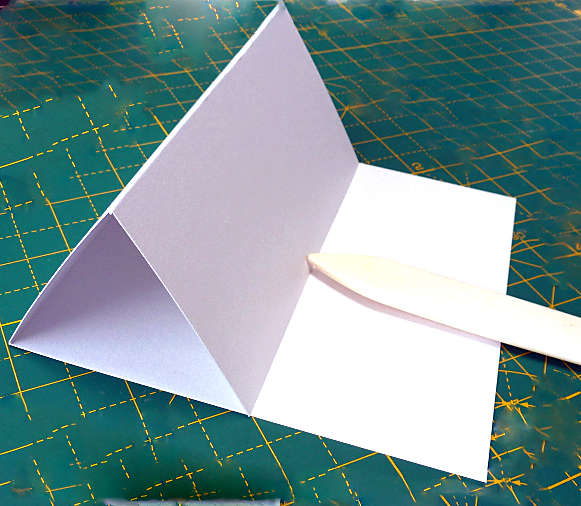
Line up the bottom almost half of your card front with front of the easel fold and glue. This will now face toward you and will fit on the lower part of the easel base. Below, you can see the shape of the fold in the photo. I have taken a sideways shot to emphasize the fold more.

Step 3: Inside Card With Decorative Paper
I cut out a 6" x 6 1/2" purple cardstock for the inside of the card and will cover about 2/3 rds since only 1/2 of the inside part will be showing when the easel card is standing.
Your easel card needs something that helps it to stay propped open when on display. Decorate the inside with decorative paper but also include an embellishment with 3D foam dots, 3D tape or mold for the front of the card to hold it in place for when the easel card is open and prevent it from sliding forward.
To make the easel card stand up by itself, I added the Prima Marketing corner mold on each side the inside of your card. It is best to have that embellishment or mold at least 1/3" to 1/2" into the card from the bottom up. In the past, I have even added flowers, a frame or label with 3D popups on the back for this height. In the past, I didn't have it high enough and the front of my card would slip out of the easel base so I added extra weight of an embellishment on the bottom of the front of my card to hold it in place.


I made some handmade flowers using the Lemon Craft paper that was used for this card.
I created this molded frame with epoxy resin from the Prima Marketing Grungy frame mold and colored it with Prima Marketing White Pearl and then used my fingers to highlight parts of the frame and corner mold with Prima Marketing Rose Gold Metallique wax.
- You've seen the tutorial and photo and now you need to try it! Please share you experience and a photo of your easel card on The Rubber Buggy Brigade Group Facebook. Enjoy making some wonderful cards.
- So get crafting and have a fabulous day and thanks for visiting.The Rubber Buggy has the crafting supplies for your next project. So have fun crafting this weekend with these products. My cards and projects are always posted on Saturday. Keep watching and thank you so much for those wonderful comments as well as suggestions.Enjoy and Happy Crafting!


Subscribe to:
Post Comments
(Atom)


0 comments:
Post a Comment