Tuesday, April 19, 2016
Travel album: The process continues
Hi everyone!
Pi back again and continuing with my travel album.
You can find the set up plan HERE and the first process video HERE.
This week I found I was more true to my own style.
In short, I have learned that I don't have the time to overthink or put to much effort in finding the perfect balance or even a straight line. Thus I have been forced to embrace the imperfection.
I have learned that in the end I'm glad that I have the story told, rather than focus on everything that could have been better layout-wise.
My goal is to fill the pockets and I do that by starting with the largest photos and continuing with the smaller. Then I add my jounaling, then I add my filler cards and last I embellish.
However, I do only manage to print a couple of photos at the time, otherwise I will forget how I intended to put them together. Thus, pending back and fourth between the steps I just told you about.
Products from The Rubber Buggy:
Simple stories snap green 6x8 fuax leather album
Simple stories you are here snap pages
Simple stories you are here snap pack
Simple stories you are here bradz
Simple stories you are here enamel dots
Simple stories you are here expression cardstock stickers
Thank you for visiting!
Pi back again and continuing with my travel album.
You can find the set up plan HERE and the first process video HERE.
This week I found I was more true to my own style.
In short, I have learned that I don't have the time to overthink or put to much effort in finding the perfect balance or even a straight line. Thus I have been forced to embrace the imperfection.
I have learned that in the end I'm glad that I have the story told, rather than focus on everything that could have been better layout-wise.
My goal is to fill the pockets and I do that by starting with the largest photos and continuing with the smaller. Then I add my jounaling, then I add my filler cards and last I embellish.
However, I do only manage to print a couple of photos at the time, otherwise I will forget how I intended to put them together. Thus, pending back and fourth between the steps I just told you about.
Products from The Rubber Buggy:
Simple stories snap green 6x8 fuax leather album
Simple stories you are here snap pages
Simple stories you are here snap pack
Simple stories you are here bradz
Simple stories you are here enamel dots
Simple stories you are here expression cardstock stickers
Thank you for visiting!
Monday, April 18, 2016
Love and a special page using Wild Rose Studio Always and Forever Pack

Hi... it's Bev here today to share this page for The Rubber Buggy which is special. It has my eldest Grand Daughter with her other Gramma before she pasted away. It will be a page that will saved to share with her kids and grandkids to tell them about this fabulous lady.
Supply List:
The Rubber Buggy Products
Paper: Wild Rose Studio Always and Forever Pack
Chipboard: Blue Fern Studio Circle LInks
Markers: copics
Stamp: Blue Fern Studios Halftone
Ink: Tim Holtz ranger
Doily: Unique
Flowers: Wild Craft Open Roses
Leaf: Wild Craft mulberry paper leaves
Other: paint, stencil, corner round punch, Cricut cut titles, cardstock
The Rubber Buggy Products
Paper: Wild Rose Studio Always and Forever Pack
Chipboard: Blue Fern Studio Circle LInks
Markers: copics
Stamp: Blue Fern Studios Halftone
Ink: Tim Holtz ranger
Doily: Unique
Flowers: Wild Craft Open Roses
Leaf: Wild Craft mulberry paper leaves
Other: paint, stencil, corner round punch, Cricut cut titles, cardstock

This page started with lots of fun background work. Paint splatter, stamping and stencil work.

The close ups share in more details the paint splatter, the stamping and also the stenciling. after the base layers of paper are applied. Then the doily and the matted photo are added. along with copic coloured chipboard accents and cut file titles.

The small cluster of flowers is a perfect accent for the page.


Thanks for visiting.. looking forward to seeing you again soon.

Friday, April 15, 2016
Mixed Media Time!
Hi everyone!!
Noe here as every Friday but today I come with a different project... A Mixed Media Project... Mixed Media is one of my passions but I don´t have enough time to dedicate it... I really love play with inks, gesso, papers, canvas, paints... and let my mind flies!!
So, this is my weekly project:

Products used:

Hope you like!! Happy crafting weekend!!

Thank you for visiting
Noe here as every Friday but today I come with a different project... A Mixed Media Project... Mixed Media is one of my passions but I don´t have enough time to dedicate it... I really love play with inks, gesso, papers, canvas, paints... and let my mind flies!!
So, this is my weekly project:

Products used:
- Candie .- Julie Nutting Doll (or another Prima Doll).
- Dina Wakley White Gesso
- Open Roses 15 mm Vintage Colors
- Crushed Grape Dylusion Paint.
- London Blue Dylusion Paint.
- Mixed Media Border Stamp by Julie Nutting
- Honeycomb splatter Stencil
- Life in Color Simple Stories (for paper piercing tecnique in Prima Doll).
- Wink of Stella Brush Marker - Clear

Hope you like!! Happy crafting weekend!!

Thank you for visiting
Thursday, April 14, 2016
Spring Daisies
Hi everyone, Steph Ackerman here on this lovely Spring Thursday. And finally the sun is shining and there is a hint of the flowers that are yet to come.
Thinking about spring has lead me to creating cards using Heartfelt Creations Delightful Daisies Cling Stamp set and the coordinating Delightful Daisy Die.

The flowers and leaves were stamped and die cut using the coordinating dies - makes perfect cuts every time. The flowers and leaves were painted with Prima Marketing Acrylic Paints and allowed to dry. They easily formed into shape once dry using the Heartfelt Creations Deluxe Flower Shaping Kit.

The background of the card is a sheet of Bazzill Gumdrop cardstock. Pattern papers were cut into triangles and placed on the cardstock, then May Arts Sheer Ribbon was wrapped around the panel before adhering to the card. Using a brad I adhered the flower to the ribbon and placed the leaves underneath.
Thank you for visiting
Thinking about spring has lead me to creating cards using Heartfelt Creations Delightful Daisies Cling Stamp set and the coordinating Delightful Daisy Die.
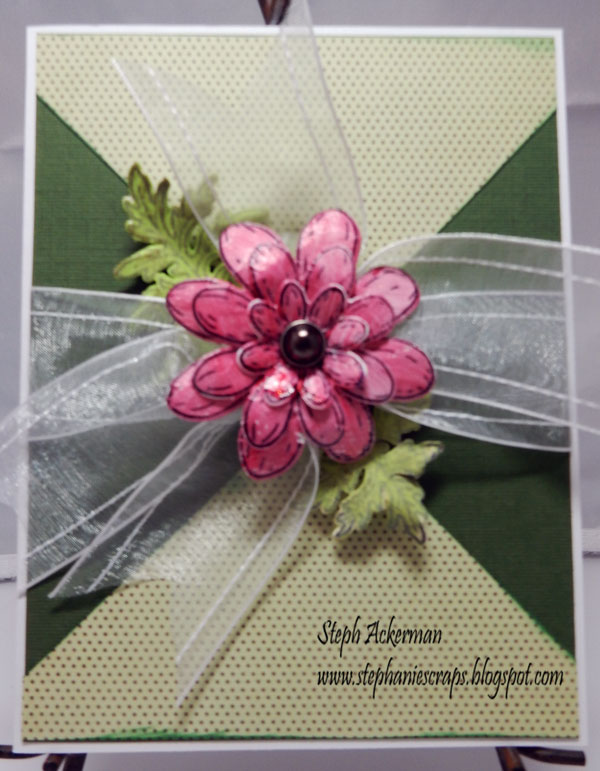
The flowers and leaves were stamped and die cut using the coordinating dies - makes perfect cuts every time. The flowers and leaves were painted with Prima Marketing Acrylic Paints and allowed to dry. They easily formed into shape once dry using the Heartfelt Creations Deluxe Flower Shaping Kit.

The background of the card is a sheet of Bazzill Gumdrop cardstock. Pattern papers were cut into triangles and placed on the cardstock, then May Arts Sheer Ribbon was wrapped around the panel before adhering to the card. Using a brad I adhered the flower to the ribbon and placed the leaves underneath.
Thank you for visiting
Wednesday, April 13, 2016
"Lets Do This" Tag with Netra
Hey guys !!
I made a super stacked tag ! Using lots of layers. I thought I'd share it here.
I hope you like it !


Thank you for visiting
Tuesday, April 12, 2016
Travel album: The documenting begins
Hi everyone!
I'm here with a process video of the first pages of my travel album.
You can find the set up plan HERE.
For the first page you'll see me quickly pimp some of the snap cards.
Then the second page is mainly photos and I change the card I put there in the set up part.
I have some trouble placing the letters "CINQUE TERRE" and that takes me forever, I almost gave up. I have printed a map to the snap page which I want to highlight, so I added a geotag where we started. I also used some die cuts from the snap pack and enamel dots.
I hope you enjoyed the process and will come back for more next week.
I'm having a bit of stage fright, when the camera is recording, so I'll see how I proceed :)
Products from The Rubber Buggy:
Simple stories snap green 6x8 fuax leather album
Simple stories you are here snap pages
Simple stories you are here snap pack
Simple stories you are here bradz
Simple stories you are here enamel dots
Simple stories you are here expression cardstock stickers
Thank you for visiting!
I'm here with a process video of the first pages of my travel album.
You can find the set up plan HERE.
For the first page you'll see me quickly pimp some of the snap cards.
Then the second page is mainly photos and I change the card I put there in the set up part.
I have some trouble placing the letters "CINQUE TERRE" and that takes me forever, I almost gave up. I have printed a map to the snap page which I want to highlight, so I added a geotag where we started. I also used some die cuts from the snap pack and enamel dots.
I hope you enjoyed the process and will come back for more next week.
I'm having a bit of stage fright, when the camera is recording, so I'll see how I proceed :)
Products from The Rubber Buggy:
Simple stories snap green 6x8 fuax leather album
Simple stories you are here snap pages
Simple stories you are here snap pack
Simple stories you are here bradz
Simple stories you are here enamel dots
Simple stories you are here expression cardstock stickers
Thank you for visiting!
Monday, April 11, 2016
Imagine using Pion Design, TCW Stencils and a sketch from Bev

Hi Bev here today with some multi tasking. I share my imagine Florida boat ride page from our visit with the eldest son and family. This is the eldest Grand Daughter of four. We had a great visit, did lots of swimming and some great exploring excursions. I used Pion Design Shoreline Treasures along with some great TCW stencils and Tim Holtz ranger mini pads and a sketch of mine from the Turtle Soup Forum.
Supply List:
The Rubber Buggy Products:
Paper: Pion Design Shoreline Treasures
Stencils: The Crafters Workshop
Sketch: Bev Code Turtle Soup
Other: Paper House Cork'd sticker, burlap ribbon


In the close ups you can view the many layers, the stenciling and extra strips and accents.

I love the touch of burlap ribbon for a rustic touch and depth to page.


Lots of stenciling and a great cork'd accents from Paper House.
Thanks for stopping by... see you again soon....have a great day.

Subscribe to:
Posts
(Atom)


